
User Manual
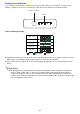


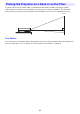
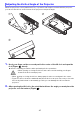
Table Of Contents
- Contents
- Safety Precautions
- Operating Precautions
- About the Light Source Unit
- Do not block light output or look directly into the lens!
- Laser Precautions (See the label on the projector)
- AC Adapter Precautions
- Battery (Optional YA-B10) Precautions
- Soft Inner Case (Optional YB-3) Precautions
- Other Precautions
- Precautions when Handling the Projector after Use
- Getting Ready
- Operating the Projector
- Cleaning the Projector
- Troubleshooting
- Appendix
- Specifications

37
When the projection screen (whiteboard, etc.) is positioned at a higher elevation than the projector,
you can use the tilt foot on the bottom of the projector to adjust its angle.
1.
Hook your finger on the recessed part in the center of the tilt foot and open the
foot (Figure
, above).
Note the following precautions when performing tilt foot operations.
– When opening or closing the tilt foot, always grasp it at the recessed part in the center.
–Figure
, above, shows the maximum amount the tilt foot can open. Do not try to force the
tilt foot any further than it can naturally go. Doing so can damage the tilt foot and the
projector.
2.
After opening the tilt foot to the point that achieves the angle you want place the
projector on a flat surface (Figure
).
Adjusting the Vertical Angle of the Projector
– When opening or closing the tilt foot, take care to avoid catching your fingers
between the tilt foot and projector.
Tilt foot
.