
User Manual
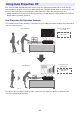
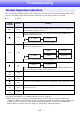
Table Of Contents
- Contents
- Safety Precautions
- Operating Precautions
- About the Light Source Unit
- Do not block light output or look directly into the lens!
- Laser Precautions (See the label on the projector)
- AC Adapter Precautions
- Battery (Optional YA-B10) Precautions
- Soft Inner Case (Optional YB-3) Precautions
- Other Precautions
- Precautions when Handling the Projector after Use
- Getting Ready
- Operating the Projector
- Cleaning the Projector
- Troubleshooting
- Appendix
- Specifications

69
Troubleshooting
The color and on/off/flashing status of the indicators let you know the current operational status of the
projector. The table below shows what the indicators look like when operation is normal.
Normal Operation Indicators
■ : Lit ★ : Flashing
POWER/
STANDBY
STATUS Meaning
■■
Indicators light for a few seconds immediately after the projector is connected to a
power source (AC adapter or battery). Wait until the projector enters the standby state
(see below) before trying to turn it on.
Amber Amber
■
Red
(Unlit)
Indicates standby when the projector is being powered by the AC adapter in the
configuration illustrated below.*
1
You can turn on the projector by pressing the [P] key.
(Unlit) (Unlit)
Indicates standby when the battery is connected to the projector in one of the
configurations illustrated below.*
1
*
2
You can turn on the projector by pressing the [P] key.
■
Amber
★
Red
When the projector is being powered by the battery only,*
2
indicates a battery level of
10% or less. The projector will not turn on in this case.
★
(Unlit)
Projector is warming up after being turned on.
Green
■■
Projector is on and standing by for use. The “Bright Mode” setting (page 49) is “Off”.
Green Green
■
(Unlit)
Projector is on and standing by for use. The “Bright Mode” setting (page 49) is “On”.
Green
■■
Projector is performing an internal process to prepare for network system startup
(network model only).
Green Amber
★
(Unlit)
Projector is performing internal power down processes.
Red
*1 For more information, see “Preparing a Power Source” page 28.
*2 When the projector is being powered by the battery only, be sure to check the battery level,
referring to “Battery Level Indicator” (page 31). The projector will not turn on while the battery level
is 10% or lower. Use the procedure under “Charging the Battery” (page 29) or “Charging the
Battery While it is Connected to the Projector” (page 30) to charge the battery.
AC adapter Projector
*
2
Battery
AC adapter Battery
Projector
Projector
Battery Projector