
User Manual

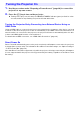

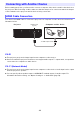
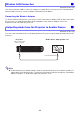
Table Of Contents
- Contents
- Safety Precautions
- Operating Precautions
- About the Light Source Unit
- Do not block light output or look directly into the lens!
- Laser Precautions (See the label on the projector)
- AC Adapter Precautions
- Battery (Optional YA-B10) Precautions
- Soft Inner Case (Optional YB-3) Precautions
- Other Precautions
- Precautions when Handling the Projector after Use
- Getting Ready
- Operating the Projector
- Cleaning the Projector
- Troubleshooting
- Appendix
- Specifications

39
Before starting projection, you first need to connect a computer, video device, and/or other devices to
the projector. When selecting a cable, make sure that the shapes of its connectors match the shapes
of the terminals on the projector and the devices being connected.
You can use an HDMI cable to connect the projector to a computer or video device as shown in the
illustration below.
CX-E1
This projector projects the image input from a computer or video device.
Connection with this projector model does not support audio output. To output audio, use speakers
connected to the computer or audio device.
CX- F1 (Network Model)
This projector projects the image input from a computer or video device. Audio input is also output
from the projector’s speaker.
You can specify either speaker output or AUDIO OUT terminal output, for audio output. For
information about this setting, see “Option Settings 2 3 Audio Out” (page 59).
Connecting with Another Device
HDMI Cable Connection
Projector
Computer or video device
HDMI terminal
(Type A)
To HDMI output terminal