
User Manual
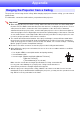
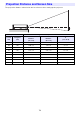
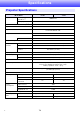
Table Of Contents
- Contents
- Safety Precautions
- Operating Precautions
- About the Light Source Unit
- Do not block light output or look directly into the lens!
- Laser Precautions (See the label on the projector)
- AC Adapter Precautions
- Battery (Optional YA-B10) Precautions
- Soft Inner Case (Optional YB-3) Precautions
- Other Precautions
- Precautions when Handling the Projector after Use
- Getting Ready
- Operating the Projector
- Cleaning the Projector
- Troubleshooting
- Appendix
- Specifications

72
Check the following items whenever you experience any problem with the projector.
Projector Troubleshooting
Problem Cause and Recommended Action
Power does not turn on. The AC adapter or battery may not be connected correctly to the projector. Refer
to “Preparing a Power Source” (page 28) and check the connection.
When the projector is being powered by the battery only, press the battery’s check
button to check the battery level (page 31). If none of the indicator lights are lit,
power the projector with the AC adapter or charge the battery before using it.
If the STATUS indicator remains flashing or lit, it means some type of error has
occurred. See “Indicator Status When an Error Occurs” (page 71).
No image is projected or
the projected image is
abnormal.
The computer or video device connected to the projector is not turned on or it is
not outputting a video signal. Make sure the connected computer or video device
is turned on, and perform the required operation on it to output a video signal.
The HDMI input signal may be incompatible with the projector’s setup. Try
changing the “Input Settings 3 HDMI Equalizer” (page 58) and “Input Settings 3
HDMI Input Range” (page 58) settings.
I can’t understand
messages or menus
because they are the
wrong language.
Perform the following operation to select the language you want.
1. Press the [MENU] key.
2. On the Frequent Functions Menu that appears, press the [] key.
3. The bottom item (“Setup Menu”) will be selected on the menu, so press the
[ENTER] key.
4. If you have the network model, press the [] key five times and then press the
[ENTER] key.
If you have the non-network model, press the [] key four times and then press the
[ENTER] key.
5. Press [] twice and then press the [ENTER] key to display the language selection
menu.
6. Use the [] and [] keys to move the highlighting to the language you want to
select and then press the [ENTER] key.
7. Press the [MENU] key to exit the setup menu.
No sound (Network Model
Only)
The projector’s volume level setting may be too low. Adjust the volume level.
The volume level setting of the device connected to the projector is too low or the
other device is not outputting audio. Adjust the volume level of the connected
device.
“Line” may be selected for the “Option Settings 2 3 Audio Out” setting on the
setup menu. Change the “Audio Out” setting to “Speaker”.
Strange color The input signal may not match projector settings. Try doing the following.
– Use “Image Adjustment 1 3 Brightness” on the Setup Menu to adjust brightness.
– Use “Image Adjustment 1 3 Color Mode” on the Setup Menu to change the color
mode.
– On the setup menu, use “Image Adjustment 1 3 Color Balance” to adjust the
projection image color balance.
Text is blurry. The image may be out of focus. Adjust image focus.
The image is coarse, text is
difficult to read, and there
is a moire effect in the
image.
This can occur when the input signal from the computer does not match the
projection resolution of the projector (1280 × 800). If this happens, try performing the
operations below.
Change your computer’s output resolution to 1280 × 800.
See the user documentation that comes with your computer for details about
changing its settings.
Change the projector’s aspect ratio setting to “True”.
The “True” setting causes the input signal to be projected at actual size (one input
source dot matched to one dot of the projector output pixel dot). For information
about how to change the aspect ratio setting, see “Changing the Aspect Ratio of
the Projected Image” (page 51).