
User Manual
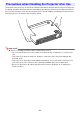


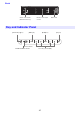
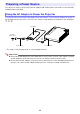
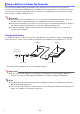
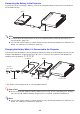
Table Of Contents
- Contents
- Safety Precautions
- Operating Precautions
- About the Light Source Unit
- Do not block light output or look directly into the lens!
- Laser Precautions (See the label on the projector)
- AC Adapter Precautions
- Battery (Optional YA-B10) Precautions
- Soft Inner Case (Optional YB-3) Precautions
- Other Precautions
- Precautions when Handling the Projector after Use
- Getting Ready
- Operating the Projector
- Cleaning the Projector
- Troubleshooting
- Appendix
- Specifications

24
Getting Ready
As you unpack the projector, check to make sure that all of the items listed below are present.
Projector
AC Power Cord
AC Adapter
Wireless adapter YW-41 (CX-F1 only)
“Attaching the Wireless Adapter” sheet (CX-F1 only)
“Where to find the User’s Guide” sheet
Warranty
As an example, this section explains the operational flow up to the point that projection is started
when there is an HDMI connection between the projector and a computer.
1.
Place the projector onto a table, desk, or stand that is level and firm, making
sure you allow enough room around it.
“Safety Precautions” (page 6), “Operating Precautions” (page 16)
“Placing the Projector on a Desk or on the Floor” (page 36), “Setup Precautions” (page 38)
2.
Connect the projector to a power source.
“Preparing a Power Source” (page 28)
3.
Start up the computer and then use an HDMI cable to connect it to the projector.
“HDMI Cable Connection” (page 39)
This will automatically cause the projector to turn on and project the computer screen
contents.
The first time you turn on the projector, a “Language” window will appear in the center of the
projection image. Select the language you want.
4.
Adjust the vertical angle of the projector.
“Adjusting the Vertical Angle of the Projector” (page 37)
5.
Rotate the zoom ring (page 26) to adjust the size of the projection.
6.
Rotate the focus ring (page 26) to adjust focus.
7.
Adjust keystone correction and brightness.
“Correcting Vertical and Horizontal Keystoning Manually” (page 47)
“Adjusting Projection Brightness (Light Control)” (page 48)
8.
Perform the required operations on the computer to sequentially display
presentation materials or other images.
9.
To stop projection, press the [P] key to turn off the projector.
Unpacking
Operation Flow to Projection