
User Manual
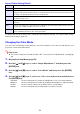
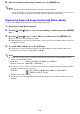
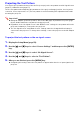
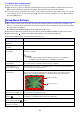

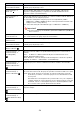
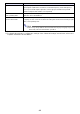
Table Of Contents
- Contents
- Safety Precautions
- Operating Precautions
- About the Light Source Unit
- Do not block light output or look directly into the lens!
- Laser Precautions (See the label on the projector)
- AC Adapter Precautions
- Battery (Optional YA-B10) Precautions
- Soft Inner Case (Optional YB-3) Precautions
- Other Precautions
- Precautions when Handling the Projector after Use
- Getting Ready
- Operating the Projector
- Cleaning the Projector
- Troubleshooting
- Appendix
- Specifications

56
To unlock the control panel
Perform one of the operations below.
While there is no menu or dialog box displayed in the projection image, hold down the projector’s
[] key. Release the key when the message “Control panel was unlocked.” appears.
To use the remote controller to unlock the control panel, perform the procedure under “To lock the
control panel” above. In step 4, press the [] key of the remote controller to select “Off” and then
press the [MENU] key.
One or more letters (such as D) after the menu item name indicates an item that is available only
when one or more particular input source is selected. The letters indicate the input source(s) where
the menu item is available.
H: HDMI(PC), D: HDMI(DTV), N: Network (Network model only)
A menu item that does not have any letter after it will be available regardless of the input source.
Menu items with indicate information that applies to the network model only.
The initial default setting is indicated by an asterisk (*).
Setup Menu Settings
Use this menu item: To do this:
Image Adjustment 1 3
Brightness
Adjust projected image brightness.
Image Adjustment 1 3
Contrast
Adjust projected image contrast.
Image Adjustment 1 3
Color Mode
Select one of the following projected image color modes: “Standard”*, “Graphics”,
“Theater”*, “Natural”.
Note
Initial default setting: “Theater” when the input source is HDMI(DTV).
“Standard” when the input source is HDMI(PC) or Network.
Image Adjustment 1 3
Color Balance
Select one of the following color balance presets: “Warm”, “Normal”*, “Cold”.
Also can be used to separately adjust red, green, and blue.
Image Adjustment 1 3
Restore Menu Defaults
Return all of the items in the “Image Adjustment 1” menu to their initial defaults for
the currently projecting image source.
Image Adjustment 2 3
Overscan (D)
Adjust the overscan amount for an input video signal within the range of 0%* to 5%.
The size of the border area displayed on the projection screen depends on the
setting value. A smaller value results in a wider border area as shown below.
Image Adjustment 2 3
Restore Menu Defaults (D)
Return all of the items in the “Image Adjustment 2” menu to their initial defaults for
the currently projecting image source.
Volume Adjustment 3
Volume
Adjust the volume level.
For details, see “Adjusting the Volume Level” (page 49).
Volume Adjustment 3
Restore Menu Defaults
Return the Volume setting to its initial default for the currently projecting image
source.
Screen Settings 3 Vertical
Keystone Correction
Correct vertical keystoning of the projected image.
N
Display range at 5%
Display range at 0%
N
N