Mobile Picture & Video Player with Camera (Version 1.0 US) User's Guide Important The contents of this User's Guide are subject to change without notice. This software is intended for viewing still images and movie format files and for listening to audio and music files only for your own personal enjoyment. Such files are normally protected by copyright law and by international treaties.
Contents 4...Introduction 4... Features and Functions 4...Supported File Formats 5...To start up Mobile Picture & Video Player with Camera 6...Recording 6...Getting Ready 6...Precautions 7...Selecting a Camera 8...Recording Snapshots 10...Stop Action Images 10...Using Timer Recording 11...Recording a Movie 13...Interpreting Status Bar Information 13...File Names 14...Making Record Settings 16...Adjusting Camera Screen Brightness 17... Playing Back Images 17...Playing Back Images from a Camera Screen 17...
41...Making Slideshow Settings 41...Changing to a Different Screen 42...Using the Movie Screen 42...Basic Movie File Playback Operations 43...Controlling Movie Playback 44...Movie Screen Operations using CASSIOPEIA Buttons 44...Capturing a Still Image of Movie Screen Contents 45...Movie Screen Setup 46...Displaying the File Properties of a Movie 46...Changing to a Different Screen 47...Selecting Screen Backgrounds 48...Adjusting Slideshow and Movie Screen Brightness 49...Albums 49...Creating an Album 50...
Introduction Mobile Picture & Video Player with Camera is a program that lets you record and playback snapshots and movies with a digital camera card installed in the card slot of your CASSIOPEIA. It also includes a thumbnail viewer and other functions for easy management of your movies and snapshots. Features and Functions Image recording (Page 6) Record snapshots, stop action images, and movies. Snapshots are stored as JPEG files, while movies are stored using CASIO's original CMF file format.
To start up Mobile Picture & Video Player with Camera 1. Install the Digital Camera Card into the card slot of your CASSIOPEIA. See the separate documentation that comes with the Digital Camera Card for details about installation. • 2. Turn on your CASSIOPEIA. , Programs, and then Picture & Video Player. 3. Tap The movie camera screen appears the first time you start up Mobile Picture & Video Player with Camera.
Recording Mobile Picture & Video Player with Camera lets you record both snapshots and movies. You can also record a series of stop action snapshots over a specific period. Getting Ready Check the following points before trying to record. Make sure the Digital Camera Card is correctly installed into the card slot of your CASSIOPEIA. See the separate documentation that comes with the Digital Camera Card for details about installation.
Selecting a Camera Use the following procedures to select either for recording movies. for recording snapshots or To select a camera 1. On the command bar, tap to display the camera screen. 2. Tap one of the camera buttons in the upper left corner of the screen to select the one you want. • is for recording snapshots and Snapshot camera screen • is for recording movies. Movie camera screen You can also toggle between cameras by pressing the CASSIOPEIA's ACTION control.
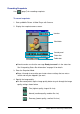
Recording Snapshots Use (page 7) for recording snapshots. To record snapshots 1. Start up Mobile Picture & Video Player with Camera. 2. Display the snapshot camera screen. Icon bar Viewfinder Control panel Status bar Folder box • Check to make sure that the message Ready to record is in the status bar. See "Interpreting Status Bar Information" on page 13 for details. 3. Enter the Snapshot Mode.
5. Specify the image size. On the control panel, tap the image size button to cycle through the image size settings shown below. • ... VGA (640 x 480) ... 1/4 VGA (320 x 240) ... 1/9 VGA (212 x 160) : This setting can be used for stop action only. ... 1/16 VGA (160 x 120) : This setting can be used for stop action only. 6. Make white balance and other settings as required. Tap the button. This causes icons showing the current record settings to appear in the icon bar.
Stop Action Images Stop action recording lets you record a series of images that effectively break action into a series of segments. The number of images recorded when you press the button depends on the image size, as shown in the table below.
Recording a Movie Use (page 7) for recording movies. To record movies 1. Start up Mobile Picture & Video Player with Camera. 2. Display the movie camera screen. Icon bar Viewfinder Control panel Status bar Folder box • • Check to make sure that the message "Ready to record" is in the status bar. See "Interpreting Status Bar Information" on page 13 for details. Steps 3 through 7 cover other settings that are not essential and may be skipped if you want. 3. Specify the image size.
5. Make white balance and other settings as required. • • On the control panel, tap the button. This causes icons showing the current record settings to appear in the icon bar. See "Making Record Settings" on page 14 for details about the meaning of each icon and how to make these settings. 6. Specify the storage location of the image, if you want. Tap the folder box to display the Add/Delete Folders screen, and then tap the folder where you want the image to be stored.
Interpreting Status Bar Information The status bar shows the status of Mobile Picture & Video Player with Camera, and the number of snapshots you can store or how many minutes of movie recording you can perform under current settings. "Ready to record" Press the SHUTTER button to record. "Recoding" Image or movie record operation is in progress. "Saving the recording image" Recorded images are being stored in memory.
Making Record Settings On the Movie camera screen or snapshot camera screen, tap the icon bar area (page 11) to display the Record Settings dialog box. The format of the Record Settings dialog box depends on whether you started from the movie camera screen or snapshot camera screen. ///// Note ///// The icons shown in parentheses in the following explanation are the icons that appear in the icon bar.
Movie Record Settings Approximate Record Time This value shows the maximum number of seconds you can record, based on free space available in main memory. Approximate Save Time This value shows how many seconds it will take to store recorded data if all of the recording time is used. White Balance Outdoor daylight ( ) ............ For recording under sunlight Incandescent lighting ( Fluorescent lighting ( ) .... For recording under illumination from light bulbs ) .......
Adjusting Camera Screen Brightness Use the following procedure to make separate camera screen settings during battery-powered operation and external AC power operation. To adjust the camera screen brightness 1. On the View menu, tap Brightness. 2. Drag the sliders left or right to adjust screen brightness during battery powered operation and external AC power operation.
Playing Back Images Mobile Picture & Video Player with Camera provides you with a number of different ways to view JPEG and CMF format files. To view: Use the: All snapshots in a folder All movies in a folder A specific snapshot A series of snapshots A specific movie Snapshot index Movie index Snapshot screen Slideshow screen Movie screen Playing Back Images from a Camera Screen From a camera screen screen, tap • • If you tap . on the snapshot camera screen, the snapshot index appears first.
You can perform the following operations from the thumbnail index.
Selecting the Thumbnail Index Folder The thumbnail index shows all of the snapshots or movies in the currently selected folder. To change to another folder, follow the steps below. 1. Tap the folder box. • This displays the Add/Delete Folders screen. 2. Tap the folder you want to select. 3. Tap OK to display the contents of the folder on the Thumbnail Index screen. ///// Note ///// • The thumbnail index automatically generates thumbnail files for the images it displays.
3. Tap the New button. 4. Input the name you want to assign to the folder and then tap OK. • This creates the new folder and makes it the currently selected folder. 5. Tap OK to return to the Thumbnail Index screen (or Camera screen). To rename a folder 1. Tap the folder box to displays the Add/Delete Folders screen. 2. On the Add/Delete Folders screen, tap the folder whose name you want to change. 3. Tap the Rename button to display the Rename Folder screen. 4. Type the new name and then tap OK.
Displaying a Specific Snapshot You can select one of the thumbnails in the snapshot index and then display a large-size image in the snapshot screen. Snapshot Index Snapshot Screen You can display the large-size image of a thumbnail using any of the following methods. • • Tap the thumbnail of the image you want to display. Select the thumbnail of the image you want to display so its file name is highlighted, and then press the CASSIOPEIA's ACTION control.
Displaying the Slideshow Screen The slideshow screen lets you automatically scroll through images one-by-one. Note that you can display the slide show screen only from the snapshot index. Snapshot Index Slideshow Screen To display the slideshow screen, tap the snapshot index View menu and then tap Slideshow. • • • • The image that is selected on the snapshot index is the one that appears first on the slideshow screen. To start the slideshow, tap the button.
Displaying the Movie Screen You can select one of the thumbnails in the movie index and then display its movie screen. Movie Index Movie Screen You can display the movie screen using any of the following methods. • • Tap the thumbnail of the movie. Select the thumbnail of the movie so its file name is highlighted, and then press the CASSIOPEIA's ACTION control. To return to the movie index from the snapshot screen, tap the button.
Deleting Files Use the following procedure to delete files on a thumbnail index screen. To delete files 1. On a thumbnail index screen, tap and hold the thumbnail for the file you want to delete, and then tap Delete on the shortcut menu that appears. 2. On the confirmation dialog box that appears, tap YES to delete the file. • You can also delete folders. See "Deleting All the Files in a Folder" on page 27 for details.
To move a file 1. On a thumbnail index, tap and hold the thumbnail of the file you want to move, and then tap Rename/Move on the shortcut menu that appears. • This displays the Rename/Move screen. 2. Tap the Folder box to displays the Select Folder screen. 3. On the Select Folder screen, tap the folder to which you want to move the file. 4. Tap OK to go back to the Rename/Move screen. 5. Tap OK to move the file.
Moving All the Files in a Folder Use the following procedure to move all the files in one folder to another. To move all the files in a folder 1. On a thumbnail index, use the folder box to select the folder that contains the files you want to move. 2. On the View menu, tap Snapshot Screen or Movie Screen. • Note that this procedure moves all the snapshot files or all the movie files in the folder in accordance with the selection you make here. 3. On the Tools menu, tap Batch Move.
Deleting All the Files in a Folder Use the following procedure to delete all the files in a folder. To delete all the files in a folder 1. On a thumbnail index, use the folder box to select the folder that contains the files you want to delete. 2. On the View menu, tap Snapshot Screen or Movie Screen. • Note that this procedure deletes all the snapshot files or all the movie files in the folder in accordance with the selection you make here. 3. On the Tools menu, tap Batch Delete.
Refreshing a Thumbnail Index Any time you select a folder on the Index screen Mobile Picture & Video Player with Camera automatically displays thumbnails of all the image files (snapshots and movies) contained in that folder. However, the contents of the Index screen are not updated automatically when you add or delete image files (using File Explorer or standard computer operations) in the currently selected folder.
Attaching a Snapshot or Movie File to E-mail Use the following procedure to attach a snapshot or movie file to an e-mail message. To attach a snapshot or movie file to e-mail 1. Display the snapshot screen or movie screen of the file you want to attach. 2. Tap (Send As Attachment). Input the subject of the message here. Attached image file name Mail text Message tab 3. Tap the "Message" tab and input the subject of the messages into the "Subject" box.
5. Tap the "To:" tab and input the mail address to which you want to send the message. You can use any of the three following methods to input the mail address. • • • Direct input Input from Contacts Inputting a pre-assigned nickname Direct e-mail input Type the e-mail address into the box at the bottom of the tab. You can input up to 200 characters for the address. Input the e-mail address here. Input from Contacts With this method, you use e-mail data from the Contacts application.
Inputting a pre-assigned nickname After you assign e-mail addresses to nicknames, you can specify an address by specifying its nickname. See "To assign a nickname to an e-mail address" on page 33 for information about assigning nicknames. Tap here to display a list of nicknames. Tap the nickname whose e-mail address you want to use. 6. Tap the "Services" tab and select the service you want to use. Select the Internet service provider (ISP) you want to use to send the mail.
7. After making all the necessary settings on the "Message", "To:", and "Services" tab, put the queue the message in the Outbox. (To Outbox). On the "Message", "To:", or "Services" tab, tap If you did not specify the addressee of the mail, the message "The To: field must have at least one addressee." appears. Input the addressee and then perform this step again. 8. After all the messages have been stored in the Outbox, run the Inbox application to send all the queued mail.
To assign a nickname to an e-mail address 1. On the "To:" tab, input the mail address. 2. On the Edit menu, tap Assign name To Address. • This causes the dialog box shown below to appear. Input the nickname here 3. In the "Name" box, input up to 50 characters for the nickname. 4. After inputting the nickname, tap OK to store it. This stores the nickname and address combination, which you can now use when sending e-mail messages.
Editing and deleting nicknames 1. On the Edit menu, tap Assign name To Address. • This causes the dialog box shown below to appear. Nickname list 2. On the nickname list, tap and hold the nickname you want to edit or delete. • • To edit the nickname, tap "Rename", make the changes you want, and then store the new nickname. To delete the nickname, tap "Delete". ///// Note ///// • • A nickname cannot include the colon (:) character. You can edit the nickname only. You cannot edit the e-mail address.
Playing Back Snapshots or Movie Files Attached to E-mail Use the procedure below to play back snapshots and movie files you receive as e-mail attachments. Note that an attached file is first imported into main memory or the storage card before it can be played back. To playback e-mail attachments 1. On a thumbnail index, the snapshot screen, or the movie screen, use the folder box to select the folder to which you want to import the attached file. 2. Tap Tools, and then Copy Attachment.
To display E-mail Message Information Use the following procedure to toggle display of e-mail information (subject, sender, date and part of the body text contents) on and off. 1. On the View menu, tap Display Mail Contents. • This toggles e-mail message information display on (Display Mail Contents checked) and off (Display Mail Contents not checked).
Using the Snapshot Screen There are three different snapshot screen views: compressed, uncompressed, full-screen. Compressed View Uncompressed View Full-screen View Compressed View ......... This view displays the entire image so it appears like a photograph. Uncompressed View ..... This view displays the image in actual-size. In this view, you have to scroll the image to view the parts that do not fit on the screen. Full-screen View. ...........
Changing the Snapshot Screen View Use either of the following procedures to select compressed, uncompressed, or full-screen as the snapshot screen view. To change the snapshot screen view • • On the View menu, tap Compressed, Uncompressed, or Full Screen. Press the CASSIOPEIA ACTION control to cycle through the three views in the sequence: compressed - uncompressed - full screen.
Displaying the File Properties of a Snapshot The file properties dialog provides you with a wealth of information about the file whose image is currently displayed on the snapshot screen. To display the file properties of a snapshot 1. On the View menu, tap Properties. 2. To close the file properties dialog box, tap OK. Changing to a Different Screen Use the following procedures when you want to change to another screen from the snapshot screen.
Using the Slideshow Screen The slideshow screen lets you sequentially play back snapshots in the condensed view. Control panel Status bar Slideshow Screen Controlling Image Playback Use the control panel to control the playback of images on the slideshow screen. ... Tap this button to start the slideshow. Images appear in the same sequence they are arranged on the snapshot index, for the amount of time you set using the slideshow settings dialog described on page 41. ...
Making Slideshow Settings Tapping Slideshow Settings on the View menu displays a dialog box for controlling the playback interval and the repeat setting. Playback Interval . Use this setting to specify how long each image should remain displayed before changing to the next one. You can set a value form 1 to 10 seconds, and the initial default setting is 3 seconds. Auto Repeat .........
Using the Movie Screen The movie screen provides you control over a wide variety of movie playback features and functions. Basic Movie File Playback Operations 1. Use the procedure under "Displaying the Movie Screen" on page 23 to display the movie screen for the movie file you want to play. Movie image Control panel Name of currently open file • Play time To start playback of the movie file, press 2. To stop movie playback, press or the ACTION control. or press the ACTION control.
Controlling Movie Playback Use the control panel to control the playback of movie files on the movie screen. Audio volume slider: Slide right to increase audio output volume, or left to decrease volume. Playback position slider: Drag the slider left and right to jump to a specific playback position. ......................... Tap this button to jump to the beginning (in the case of forward play) or end (in case of reverse play) of the movie. .........................
Movie Screen Operations using CASSIOPEIA Buttons You can use the CASSIOPEIA's ACTION control and cursor buttons to perform a variety of different movie screen operations. During Playback Stop playback ... Press ACTION control When Stopped Start normal speed playback ... Press ACTION control Switch to reverse playback... Rotate ACTION control up or press the up cursor button Switch to forward playback...
3. Press . 4. In the dialog box that appears, input the name you want to assign to the still image file. 5. Tap OK. Movie Screen Setup Use the following procedure to display the movie screen setup dialog box for controlling playback speed and auto repeat play, and to make other settings. To display the movie screen setup dialog 1. On the View menu, tap Movie Playback Settings. Playback Speed .................. Use this box to specify the playback speed of the currently open movie file.
Displaying the File Properties of a Movie The file properties dialog provides you with a wealth of information about the file whose image is currently displayed on the movie screen. To display the file properties of a movie 1. On the View menu, tap Properties. 2. To close the file properties dialog box, tap OK. Changing to a Different Screen Use the following procedures when you want to change to another screen from the movie screen.
Selecting Screen Backgrounds You can select from among four different backgrounds for the snapshot, slideshow, and movie screens. To select a background 1. On the View menu, tap Backgrounds to display the dialog box shown below. 2. Tap the option button of the background you want to select. 3. When the settings are the way you want, tap OK to apply them and close the dialog box.
Adjusting Slideshow and Movie Screen Brightness You can adjust the screen brightness level of the slideshow and movie screens. Separate settings can be made for operation under battery power and operation under AC adapter power. To adjust slideshow and movie screen brightness 1. On the View menu, tap Brightness to display the dialog box shown below. 2. Drag the sliders left to reduce brightness and right to increase brightness.
Albums The album function of the Mobile Picture & Video Player with Camera lets you instantly generate an album with snapshots and movie images pasted inside it. Album Index Album Page The following are some of the main features of the album function. • • • • • • You can instantly generate an album for each folder. Album titles (names) are identical to folder names, so you can group images by theme and manage folders using the album index screen shown above.
Creating a New Album Use the following procedure to create a new album of images contained in a specific folder. To create a new album 1. On a thumbnail index, use the folder box to select the folder for which you want to create a new album. 2. On the Tools menu, tap Make Album. • This displays new album dialog box. 3. Select a format by tapping an option button and then tap Next.
4. Use the “Number of Images” box to specify how many images you want on each page. 5. After double-checking to make sure the settings are the way you want, tap Finish. • This creates the album and displays its front cover. ///// Note ///// The images of files added to a folder are not automatically added to the folder's existing album. The images of new files must be pasted into an existing album using the procedure described on page 61.
Album Index Screen The album index shows thumbnails of the covers of all albums currently stored in the selected folder. Album cover thumbnail Album title (folder name) Number of album pages Number of images (files) in the album A blue frame indicates the currently selected album. Its album title is also highlighted. Use the cursor keys or rotate ACTION control to select another album.
Displaying the Pages of an Album You can use album page screen to browse through the pages of an album and view its contents. Album pages consist of a front cover, inside pages, and back cover. Front Cover • • Inside Page Back Cover The title on the front cover is the album title (folder name). The following shows the layout of the inside pages of the album. Thumbnail images of album files You can input comment text here (page 63). Tap here to turn the page.
Displaying the Album Page Screen You can use any of the following methods to display the album page screen. The front cover of the album you select appears first. To display the album page screen • • On the album index, tap the thumbnail image of the album whose page screen you want to display. Select the thumbnail image of the album whose page screen you want to display (so its album title is highlighted), and then press the CASSIOPEIA's ACTION control to open it.
Displaying the Movie Screen or Snapshot Screen from the Album Page Screen You can use either of the following procedures to display the movie screen or snapshot screen of a particular image displayed on the album page screen. To display the movie screen or snapshot screen from the album page screen • • Tap the thumbnail of the image whose movie screen or snapshot screen you want to display.
Editing the Album Index You can use the album index to perform the following editing operations. • • • Delete the album Change the album title (folder name) Move the album between main memory and the storage card Deleting an Album You can delete an album without deleting its image files, or you can delete an album along with all the image files it contains.
Renaming and Moving an Album You can use the Rename/Move Album screen to change the name of an album and the album’s storage folder. Rename/Move Album screen To change an album title 1. On the album index screen, tap and hold the album whose title you want to change, and then tap Rename/Move on the shortcut menu that appears. • This causes the Rename/Move Album screen to appear. 2. In the Name box, input the new title you want to assign to the album.
To move the storage folder of an album 1. On the album index screen, tap and hold the album whose storage folder you want to move, and then tap Rename/Move on the shortcut menu that appears. • This causes the Rename/Move Album screen to appear. 2. Tap the Destination Folder box to displays the Select Folder screen. 3. On the Select Folder screen, tap the folder to which you want to move the album. 4. Tap OK to go back to the Rename/Move Album screen. 5. Tap OK to move the album.
Editing Album Pages You can use the album page screen to add, move, and delete pages, and to add and edit text comments on the page. This section describes how to perform each of these operations. Adding an Album Page Adding an album page inserts a new blank page in front of the page that is currently displayed on the album page screen. You can then use the procedure under "Pasting Snapshot and Movie Images onto an Album Page" on page 61 to paste snapshot and movie file images into the blank page.
3. Use the screen to specify the location to which you want to move the page. 4. After the setting is the way you want, tap OK to apply it. Deleting an Album Page When deleting an album page, you get a choice between deleting the page only without deleting the files of the images on the page, or deleting the page and the files of the images on the page as well. Note that deleting image files cannot be undone, so make sure you really do not need image files before you delete them.
Pasting Snapshot and Movie Images onto an Album Page You can use the following procedure to paste a snapshot or movie image at any location on the album page. To paste an image onto an album page 1. On the album page screen, display the page onto which you want to paste an image. 2. Tap and hold the location on the album page where you want to paste the image, and then tap Paste on the shortcut menu that appears. • You can select a location that already contains a snapshot or movie image if you want.
Deleting an Image from an Album Page When deleting an image from an album page, you get a choice between deleting the image only without deleting its file, or deleting the image and its file as well. Note that deleting an image cannot be undone, so make sure you really do not need an image before you delete it. To delete an image from an album page 1. On the album page screen, display the page that contains the image you want to delete. 2.
Inserting and Editing Album Page Comment Text You can use the album page Comments dialog box to add comment text to an album page and to edit existing comment text. To insert or edit album page comment text 1. Display the 1-image or 3-image album page whose comment text you want to input or edit. • You cannot insert text into a 6-image album page. 2. On the Tools menu, tap Comments to display the album page Comments dialog box.
Comment Text Input Dialog Formats 3-image Album Page Image 1 Image 2 Image 3 Each of the comment boxes corresponds to an image on the album page. 1-image Album Page Input the text you want into the comment box.
Command Bar Items (Menus and Buttons) Camera Screen Menus and Buttons View Menu Command Description About Recording When a check mark is next to this menu item, the "About Recording" dialog box appears whenever you display a Camera Screen from another screen (Index Screen, etc.) The "About Recording" dialog box provides brief explanations of Camera Screen button operations. Brightness Displays a dialog box for adjusting the brightness of the screen during record standby.
Index Screen Menus and Buttons View Menu Command Description Snapshot Screen Displays snapshot index screen. Movie Screen Displays movie index screen. Slideshow Displays slideshow screen. This command is enabled only when a snapshot index is displayed. About This Screen Displays a dialog box copyright and version information about Mobile Picture & Video Player with Camera. The dialog box also shows a list of CASSIOPEIA key operations that can be used with this screen.
Buttons Command Button Description Record Displays the camera screen. Album Displays the album index screen. Playback Menus and Buttons (Snapshot / Movie / Slide Show Screens) View Menu Command Description Movie Screen Displays Movie Index screen. Snapshot Screen Displays Snapshot Index screen. Compressed Uncompressed Full Screen Selects snapshot screen view among “compressed”, “uncompressed” and “full screen.
Tools Menu Command Copy Attachment Description Plays an image (snapshot or movie) received as an e-mail attachment. Buttons Command Button Description Record Displays the camera screen. Album Displays the album index screen. Index Displays the index screen. Slideshow Displays the slideshow screen. Snapshot Displays the snapshot screen. Send As Attachment Displays the “send as attachment” screen.
Send as Attachment Menus and Buttons Edit Menu Command Description Assign Name To Address Assigns a nickname to a mail address. This command is available only while the “Addressee” tab is displayed. About This Screen Displays a dialog box copyright and version information about Mobile Picture & Video Player with Camera. The dialog box also shows a list of CASSIOPEIA key operations that can be used with this screen.
Buttons Command Button Description Record Displays the camera screen. Playback Displays the image index screen. Album Page Screen Menus and Buttons View Menu Command Description Go To Page Displays a dialog for jumping to a specific album page. About This Screen Displays a dialog box copyright and version information about Mobile Picture & Video Player with Camera. The dialog box also shows a list of CASSIOPEIA key operations that can be used with this screen.
Command Description Delete Page Displays the currently displayed album page. This command is enabled only when an album page screen is on the display. Refresh Thumbnails Generates index thumbnails for all files of the current index that do not have thumbnails. Buttons Command Button Description Record Displays the camera screen. Playback Displays the image index screen. Index Displays the album index screen. Page Displays the album page screen.