
User`s guide


20031201
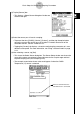
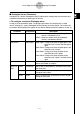
(4) Select the sensors you will use for sampling.
• Depending on the sensors you have connected to each channel, select the [CASIO],
[Vernier], or [Custom] tab and then tap the option button for the applicable sensor
name. For details about the sensors that can be selected for each channel, see the
“10 Sensor List”.
• Tapping the [Custom] tab displays a sheet for configuring the parameters of a user-
defined custom probe. For more information, see “Using a Custom Probe” on page
3-12.
• If you do not want to use a particular channel for sampling, select the [None] option
on the Select Sensor dialog box.
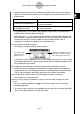
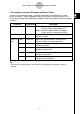
(5) After selecting a sensor, tap [Set].
• This closes the Select Sensor dialog box and displays the [Multiple] tab again (step
(2)), with the name of the sensor you selected next to the channel name.
(6) Repeat steps (3) through (5) for all of the channels you want to use for sampling.
• You can select sensors for up to three channels at one time.
• If you select sensors for four channels, an error occurs when you start sampling. To
correct the problem, display the Select Sensor dialog box for one of the channels,
and then select the [None] option button to deselect it.
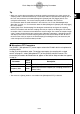
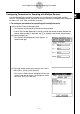
(7) On the menu bar, tap [Setup].
• This displays the [Sample] tab of the Setup dialog
box.
2-8
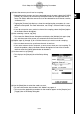
Basic Steps for Configuring Sampling Parameters
(8) Use the [Mode] box to select the mode you want.
• For more information about modes, see “Modes” on page 3-3.
• This causes the applicable parameters for the mode to appear on the [Sample] and
[Trigger] tabs of the Setup dialog box.
20040201