E Digital Camera User’s Guide Thank you for purchasing this CASIO product. • Before using it, be sure to read the precautions contained in this User’s Guide. • Keep the User’s Guide in a safe place for future reference. • For the most up-to-date information about this product, visit the official EXILIM Website at http://www.exilim.com/ To go to “Getting the Most Out of Dynamic Photo” click here! Downloaded From camera-usermanual.
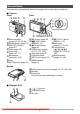
Unpacking As you unpack your camera, check to make sure that all items shown below are included. If anything is missing, contact your original retailer. Digital camera Rechargeable lithium ion battery (NP-110) Charger unit (BC-110L) To attach the strap to the camera Attach strap here. 1 * The shape of the power cord plug varies according to country or geographic area. 2 Power cord USB cable Strap AV cable CD-ROM Downloaded From camera-usermanual.
Read this first! • The contents of this manual and the bundled Basic Reference are subject to change without notice. • The contents of this manual have been checked at each step of the production process. Feel free to contact us if you notice anything that is questionable, erroneous, etc. • Any copying of the contents of this User’s Guide, either in part or its entirety, is forbidden. Except for your own personal use, any other use of the contents of this manual without the permission of CASIO COMPUTER CO.
Contents Unpacking . . . . . . . . . . . . . . . . . . . . . . . . . . . . . . . . . . . . . . . . . . . . . . . . . Read this first! . . . . . . . . . . . . . . . . . . . . . . . . . . . . . . . . . . . . . . . . . . . . . . General Guide . . . . . . . . . . . . . . . . . . . . . . . . . . . . . . . . . . . . . . . . . . . . . . Monitor Screen Contents . . . . . . . . . . . . . . . . . . . . . . . . . . . . . . . . . . . . . . ... 2 ... 3 ... 9 . .
❚❙ Recording Movie Images and Audio To record a movie . . . . . . . . . . . . . . . . . . . . . . . . . . . . . . . . . . . . . . . . . . . Using Prerecord Movie . . . . . . . . . . . . . . . . . . . . . . . . . . . . . . . . . . . . . . . Shooting a Snapshot while Shooting a Movie . . . . . . . . . . . . . . . . . . . . . . Recording Audio Only . . . . . . . . . . . . . . . . . . . . . . . . . . (Voice Recording) 49 .. .. .. .. 49 51 52 52 ❚ To play back an audio recording . . . . . . . . . . . . . . .
❚ Adjusting Image Contrast . . . . . . . . . . . . . . . . . . . . . . . . . . . . . . . (Contrast) . . . 83 ❚ Specifying Flash Intensity . . . . . . . . . . . . . . . . . . . . . . . . . (Flash Intensity) . . . 83 ❚❙ Viewing Snapshots and Movies 84 Viewing Snapshots . . . . . . . . . . . . . . . . . . . . . . . . . . . . . . . . . . . . . . . . . . . . 84 Viewing a Movie. . . . . . . . . . . . . . . . . . . . . . . . . . . . . . . . . . . . . . . . . . . . . . . 84 Viewing Continuous Shutter Images . .
❚❙ Printing 114 Printing Snapshots. . . . . . . . . . . . . . . . . . . . . . . . . . . . . . . . . . . . . . . . . . . . 114 Connecting Directly to a PictBridge Compatible Printer . . . . . . . . . . . . . . . 115 Using DPOF to Specify Images to be Printed and the Number of Copies. . 117 ❚❙ Using the Camera with a Computer 120 Things you can do using a computer... . . . . . . . . . . . . . . . . . . . . . . . . . . . . 120 Using the Camera with a Windows Computer . . . . . . . . . . . . . . . . . . .
Resetting the Camera to Factory Defaults . . . . . . . . . . . . . . . . . . (Reset) . 148 ❚❙ Configuring Monitor Screen Settings 149 Using the On-screen Histogram to Check Exposure . . . . . . . . . . . . . . . . . . 149 ❚ How to Use the Histogram . . . . . . . . . . . . . . . . . . . . . . . . . . . . . . . . . . . . . . . . 150 ❚❙ Appendix 151 Precautions during Use . . . . . . . . . . . . . . . . . . . . . . . . . . . . . . . . . . . . . . . . 151 Power Supply. . . . . . . . . . . . . . . . . . .
General Guide The numbers in parentheses indicate the pages where each item is explained. .
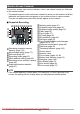
Monitor Screen Contents The monitor screen uses various indicators, icons, and values to keep you informed of the camera’s status. • The sample screens in this section are intended to show you the locations of all the indicators and figures that can appear on the monitor screen in various modes. They do not represent screens that actually appear on the camera. .
. Movie Recording 1 23 4 5 8 7 1Flash (page 35) 2Recording mode (page 49) 3White balance setting (page 80) 4Remaining movie memory capacity (page 49) 5Movie recording time (page 49) 6Exposure compensation (page 45) 7Battery level indicator (page 16) 8Histogram (page 149) 6 .
Quick Start Basics What is a digital camera? A digital camera stores images on a memory card, so you can record and delete images a countless number of times. Record Delete Play You can use the images you record in a variety of different ways. Store images on your computer. Print images. Downloaded From camera-usermanual.com Casio Manuals 12 Attach images to e-mail.
What you can do with your CASIO camera Your CASIO camera is packed with a powerful selection of features and functions to make recording of digital images easier, including the following three main functions. Premium Auto Select Premium Auto recording and the camera automatically determines whether you are shooting a subject or scenery, and other conditions. Premium Auto delivers higher image quality than standard Auto. See page 23 for more information.
First, charge the battery prior to use. Note that the battery of a newly purchased camera is not charged. Perform the steps under “To charge the battery” to bring the battery to a full charge. • Your camera requires a special CASIO rechargeable lithium ion battery (NP-110) for power. Never try to use any other type of battery. To charge the battery 1. Positioning the positive + and negative - terminals of the battery with those of the charger unit, load the battery into the charger unit. 2.
Other Charging Precautions • Use the special charger (BC-110L) to charge the special lithium ion battery (NP-110). Never use any other type of charger device. Attempting to use a different charger can result in an unexpected accident. • A battery that is still warm due to normal use may not charge fully. Give the battery time to cool before charging it. • A battery discharges slightly even when it is not loaded in the camera.
3. Close the battery cover. Close the battery cover and then shift the slider towards LOCK. • For information about how to replace the battery, see page 159. Checking Remaining Battery Power As battery power is consumed, a battery indicator on the monitor screen indicates remaining power as shown below. Remaining Power High Battery Indicator Indicator Color Cyan Low * * * Amber * * Red * Red indicates battery power is low. Charge the battery as soon as possible.
Configuring Basic Settings the First Time You Turn On the Camera The first time you load a battery into the camera, a screen appears for configuring the display language, date, and time settings. Failure to set the date and time correctly will cause the wrong date and time data to be recorded with images. IMPORTANT! • A screen for language selection will not appear in step 2 of the procedure below if you purchased a camera intended for the Japanese market.
6. Use [8] and [2] to select “Auto” or “Premium Auto” as the auto recording mode (page 23) and then press [SET]. • After configuring the auto recording mode setting you want here, you can toggle between “Auto” and “Premium Auto” by pressing [AUTO]. If you make a mistake configuring display language, date, or time settings with the above procedure, refer to the following pages for information about how to correct the settings.
To load a memory card 1. Press [ON/OFF] to turn off the camera and then open the battery cover. Slide the battery cover slider towards OPEN and then open it as indicated by the arrows in the illustration. 2. Load a memory card. Positioning the memory card so its front is facing upwards (towards the monitor screen side of the camera), slide it into the card slot all the way in until you hear it click securely into place. Front Front 3. Back Close the battery cover.
To format (initialize) a new memory card You need to format a new memory card before using it for the first time. 1. Turn on the camera and press [MENU]. 2. Select the “Set Up” tab, select “Format” and then press [6]. 3. Use [8] and [2] to select “Format” and then press [SET]. IMPORTANT! • Formatting a memory card that already has snapshots or other files on it, will delete its contents. Normally you do not need to format a memory card again.
Turning the Camera On and Off To turn power on To enter the REC mode, press [ON/OFF] (Power) or [r] (REC). To enter the PLAY mode, press [p] (PLAY). The back lamp will light (green) momentarily and the camera will turn on. If you are entering the REC mode, the lens will extend from the camera at this time. • Take care to ensure that nothing is restricting or coming into contact with the lens as it extends. Holding the lens with your hand so it cannot extend creates the risk of malfunction.
Holding the Camera Correctly Your images will not come out clearly if you move the camera when you press the shutter button. When pressing the shutter button, be sure to hold the camera as shown in the illustration below, and keep it still by pressing your arms firmly against your sides as you shoot. Holding the camera still, carefully press the shutter button and take care to avoid all movement as the shutter releases and for a few moments after it releases.
To shoot a snapshot Selecting an Auto Recording Mode You can select one of two auto recording modes (Auto or Premium Auto) according to your digital imaging needs. R Auto This is the standard Auto recording mode. • It provides faster operation than Premium Auto recording. With Premium Auto recording, the camera automatically determines whether you are shooting a subject or scenery, and other conditions. Premium Auto recording delivers higher Ÿ Premium Auto image quality than standard Auto recording.
To shoot a snapshot 1. Point the camera at the subject. If you are using Premium Auto, text will appear in the lower right corner of the monitor screen describing the type of shot the camera has detected. • You can zoom the image, if you want. w Wide Angle z Telephoto Appears when the camera detects it is stationary on a tripod. Zoom controller 2. Half-press the shutter button to focus the image.
3. Continuing to keep the camera still, press the shutter button the rest of the way down. This records the snapshot. Full-press Recording a Movie [0] (Movie) Press [0] (Movie) to start movie recording. Press [0] (Movie) again to stop movie recording. See page 49 for details. Snap (Image is recorded.) . If the image does not focus... If the focus frame stays red and the back lamp is flashing green, it means that the image is not in focus (because the subject is too close, etc.).
. Shooting with Premium Auto • In addition to shutter speed, aperture, and ISO sensitivity, the camera automatically executes the following operation as required when shooting with Premium Auto. – Auto Focus is normally performed until you half-press the shutter button. – Intelligent AF (Page 40) – Face Detection (Page 44) – Make-up/Landscape (Pages 78, 79) • Shooting with Premium Auto can cause vibration and noise to occur due to lens operation. This does not indicate malfunction.
Viewing Snapshots Use the following procedure to view snapshots on the camera’s monitor screen. • For information about how to play back movies, see page 84. 1. Press [p] (PLAY) to enter the PLAY mode. • This will display one of the snapshots currently stored in memory. • Information about the displayed snapshot also is included (page 174). • You also can clear the information to [p] (PLAY) view only the snapshot (page 149).
Deleting Images If memory becomes full, you can delete images you no longer need to free up storage and record more images. IMPORTANT! • Remember that a file (image) delete operation cannot be undone. • Deleting an audio snapshot (page 105) deletes both the snapshot and the audio file. To delete a single file 1. Press [p] (PLAY) to enter the PLAY mode and then press [2] ( ). 2. Use [4] and [6] to scroll through the files until the one you want to delete is displayed. 3.
To delete all files 1. Press [p] (PLAY) to enter the PLAY mode and then press [2] ( 2. Use [8] and [2] to select “Delete All Files” and then press [SET]. 3. Use [8] and [2] to select “Yes” and then press [SET] to delete all files. ). This will cause the message “There are no files” to appear. Snapshot Shooting Precautions Operation • Never open the battery cover while the back lamp is flashing green.
Auto Focus Restrictions • Any of the following can make proper focus impossible.
Snapshot Tutorial Using the Control Panel The Control Panel can be used to configure camera settings. 1. In the REC mode, press [SET]. This will select one of the Control Panel icons and display its settings. [8] [2] [4] [6] Available settings Control Panel [SET] 2. 1 2 3 4 5 6 7 8 9 Use [8] and [2] to select the setting you want to change.
Specifying Control Panel Items You can use the following procedure to specify the eight items you want on the Control Panel. 1. In the REC mode, press [SET]. 2. Press [MENU]. • This will display a menu of Control Panel items, with the items currently selected for display shown in green. 3. Use [8], [2], [4], and [6] to select an item you want on the Control Panel and then press [SET]. This will cause the lamp next to the item to light. 4.
. About image sizes The size of an image indicates how many pixels it contains, and is expressed as horizontal pixelsxvertical pixels. 10M (3648x2736) size image = Approximately 10 million pixels 3648* 2736* VGA (640x480) size image = Approximately 300,000 pixels 640* 480* * Unit: pixels Image Size Selection Tips Note that larger images have more pixels, so they take up more memory space. Large Number of Pixels More detail, but takes up more memory.
. To select the image size 1. In the REC mode, press [SET]. 2. Use [8] and [2] to select the top Control Panel option (Image Size). 3. Use [4] and [6] to select an image size and then press [SET]. Image Size (Pixels) Suggested Print Size and Application 14M (4320x3240) Poster Print 3:2 (4320x2880) Poster Print 16:9 (4320x2432) HDTV 10M (3648x2736) Poster Print 6M (2816x2112) A3 Print 3M (2048x1536) 3.
Using Flash (Flash) 1. In the REC mode, press [2] ( 2. Use [4] and [6] to select the flash setting you want and then press [SET]. ) once. Flash • You can select the flash mode by pressing [2] ( ) in either of the following cases. [2] ( ) – When “Flash” is not shown on the control panel (page 32) – After [8] (DISP) is pressed to clear the information from the monitor screen (page 149) 3. > Auto Flash Flash fires automatically in accordance with exposure (amount of light and brightness) conditions.
NOTE • Take care so your fingers and the strap do not block the flash. • The desired effect may not be obtained when the subject is too far away or too close. • Flash charging time (page 177) depends on operating conditions (battery condition, ambient temperature, etc.) • Shooting with flash turned off when lighting is dim results in a slow shutter speed, which can cause image blur due to camera movement. Under such conditions, secure the camera with a tripod, etc.
Selecting a Focus Mode (Focus) You can select a focus mode setting. 1. In the REC mode, press [SET]. 2. Use [8] and [2] to select the third Control Panel option from the top (Focus). 3. Use [4] and [6] to select the setting you want and then press [SET].
Super Macro Super Macro fixes optical zoom at a position that allows you to shoot from the closest distance to the subject. The result is closer and larger subject images. NOTE • Zoom is fixed while Super Macro is selected, so no zoom operation is performed when you slide the zoom controller. To focus with manual focus 1. On the monitor screen, compose the image so the subject you want to focus on is within the yellow boundary. 2.
Using Focus Lock “Focus lock” is a technique you can use when you want to compose an image in which the subject you want to focus on is not within the focus frame in the center of the screen. • To use focus lock, select “Û Spot” for the Auto Focus area (page 40). 1. Align the monitor screen’s focus frame with the subject you want to focus on and then halfpress the shutter button. 2. Keeping the shutter button half-pressed (which maintains the focus setting), move the camera to compose the image. 3.
Specifying the Auto Focus Area (AF Area) Ò Intelligent The camera automatically determines the focus point on the screen and focuses there (intelligent AF). Û Spot This mode takes readings of a small area in the center of the image. This setting works well with focus lock (page 39). È Multi When you half-press the shutter button while this setting selected, the camera will select the optimum Auto Focus area from among nine possible areas.
5. Press the shutter button the rest of the way down. “Ò Intelligent” “Û Spot” or “Ë Tracking” Focus frame Focus frame “È Multi” Focus frame IMPORTANT! • “È Multi” cannot be selected for the Auto Focus area while you are using Face Detection (page 44). • “Ë Tracking” cannot be selected for the Auto Focus area while you are using Auto Shutter (page 66). • Selecting “Ë Tracking” can cause vibration and noise to occur due to lens operation while tracking a subject. This does not indicate malfunction.
Specifying ISO Sensitivity (ISO) ISO sensitivity is a measure of sensitivity to light. 1. In the REC mode, press [SET]. 2. Use [8] and [2] to select the fifth Control Panel option from the top (ISO Sensitivity). 3. Use [4] and [6] to select the setting you want and then press [SET]. AUTO Adjusts sensitivity automatically according to conditions ISO 64 Lower sensitivity Slow shutter speed Less noise ISO 3200 Higher sensitivity Fast shutter speed (Set for shooting in dimly lit areas.
Using the Self-timer (Self-timer) With the Self-timer, pressing the shutter button starts a timer. The shutter is released and the image is shot after a fixed amount of time. 1. In the REC mode, press [SET]. 2. Use [8] and [2] to select the sixth Control Panel option from the top (Self-timer). 3. Use [4] and [6] to select the setting you want and then press [SET].
Using Face Detection (Face Detection) When shooting people, the face detection feature detects the faces of up to ten individuals and adjusts focus and brightness accordingly. 1. In the REC mode, press [SET]. 2. Use [8] and [2] to select the seventh Control Panel option from the top (Face Detection). 3. Use [4] and [6] to select “G Face Detection: On” and then press [SET]. 4. Point the camera at the subject(s). The camera will detect human faces and display a frame around each one. 5.
IMPORTANT! • Face detection cannot be used in combination with any of the following features. – Some BEST SHOT scenes – Movie Recording • The following function is disabled when shooting with face detection. – Multi AF Correcting Image Brightness (EV Shift) You can manually adjust an image’s exposure value (EV value) before shooting it. • Exposure Compensation Range: –2.0EV to +2.0EV • Unit: 1/3EV 1. In the REC mode, press [SET]. 2.
Changing the Control Panel Date/Time Style 1. In the REC mode, press [SET]. 2. Use [8] and [2] to select the bottom Control Panel option (Date/Time). Use [4] and [6] to select the date or time. NOTE • You can select either of two display style (page 144) for the date: Month/Day or Day/Month. • The time is displayed using 24-hour format.
NOTE • The higher the digital zoom factor, the coarser the recorded image. Note that the camera also has a function that lets you record using digital zoom without image deterioration (page 48). • Use of a tripod is recommended to protect against image blur due to camera movement when shooting with telephoto. • Performing a zoom operation changes the lens aperture. • Digital zoom only is available during movie recording.
• The image deterioration point depends on the image size (page 32). The smaller the image size, the higher the zoom factor you can use before reaching the image deterioration point. • Though digital zoom generally causes a deterioration of image quality, some digital zoom without image deterioration is possible with image sizes of “10M” and smaller. The range in which you can use digital zoom without image deterioration is indicated on the display. The deterioration point depends on the image size.
Recording Movie Images and Audio To record a movie 1. Configure the quality setting for the movie (page 77). The length of the movie you can record will depend on the quality setting you select. 2. In the REC mode, point the camera at the subject and then press [0] (Movie). Remaining recording time (page 175) [0] (Movie) This will start recording and display Y on the monitor screen. Movie recording includes monaural audio.
NOTE • Spending a long time using movie recording will cause the camera to become slightly warm to the touch. This is normal and does not indicate malfunction. • The camera also records audio. Note the following points when Microphone shooting a movie. – Take care that the microphone is not blocked by your fingers, etc. – Good recording results are not possible when the camera is too far away from what you are trying to record.
Using Prerecord Movie With this feature, the camera prerecords up to four seconds of whatever is happening in front of the lens in a buffer that is continually updated. Pressing [0] saves the prerecorded action (buffer contents) followed by real-time recording. Real-time recording continues until you stop it. [0] [0] Movie Recording start 4-second prerecorded part (from the buffer) Recording end . To set up the camera to shoot with Prerecord Movie 1. In the REC mode, press [BS]. 2.
Shooting a Snapshot while Shooting a Movie 1. While a movie is being recorded, press the shutter button. Movie recording continues after the snapshot is recorded. NOTE • You can use [2] ( ) while shooting a movie to change the flash mode setting. • Movie recording is interrupted for a few seconds at the point where a snapshot is recorded. • Shooting a snapshot during movie recording is not possible when shooting with any of the following.
NOTE • You can use [8] (DISP) during audio recording to toggle the monitor screen on and off. • When monitor screen contents are turned off, selecting the “Voice Recording” scene will cause the monitor screen to turn off immediately (page 149). About audio data • Audio files can be played back on a computer with Windows Media Player or QuickTime. – Audio Data: WAVE/IMA-ADPCM (WAV extension) To play back an audio recording 1.
Using BEST SHOT What is BEST SHOT? BEST SHOT provides you with a collection of sample “scenes” that show a variety of different types of shooting conditions. When you need to change the setup of the camera, simply find the scene that matches what you are trying to achieve, and the camera sets up for it automatically. This helps to minimize the chance of ruined images due to poor exposure and shutter speed settings.
3. Press [SET] to configure the camera with the settings for the currently selected scene. This returns to the REC mode. • The settings of the scene you selected remain in effect until you select a different scene. • To select a different BEST SHOT scene, repeat the above procedure from step 1. 4. Press the shutter button (if you are shooting a snapshot) or [0] (if you are shooting a movie).
. BEST SHOT Precautions • Some BEST SHOT scenes cannot be used while recording a movie. • The following BEST SHOT scenes cannot be used while shooting a snapshot. Prerecord (Movie), For YouTube • The Voice Recording scene cannot be used while shooting a snapshot or recording a movie. • Some scenes like Night Scene and Fireworks results in a slow shutter speed setting.
Creating Your Own BEST SHOT Setups You can save up to 999 camera setups as user BEST SHOT scenes for instant recall whenever you need them. 1. On the BEST SHOT scene menu, select the scene named BEST SHOT (Register User Scene). 2. Use [4] and [6] to select the snapshot or movie whose setup you want to save. 3. Use [8] and [2] to select “Save”, and then press [SET]. Your BEST SHOT scene will be assigned the name “Recall User Scene”, along with a scene number.
Shooting ID Photographs You can use this procedure to shoot a portrait and then print it out in the following standard ID photo sizes: 30x24mm, 40x30mm, 45x35mm, 50x40mm, 55x45mm. 1. Press [BS] and then select the “ID Photo” scene. 2. Press the shutter button to shoot a portrait of the person for whom you want to create an ID photo. 3. Adjust the position of the face in the image. [8] [2] [4] [6] : Moves the portrait up, down, left, and right. Zoom controller : Zooms the portrait in and out.
Shooting Images of Business Cards and Documents A process called “keystone correction” makes lines straight and natural, even if rectangular subjects are shot from an angle. Before keystone correction After keystone correction Business cards and documents White board, etc. BEST SHOT has two scenes. 1. Press [BS] and then select the “Business cards and documents” or “White board, etc.” scene. 2. Press the shutter button to shoot the image.
NOTE • When composing an image like the ones shown above, make sure that the entire outline of the object you are trying to shoot is enclosed within the monitor screen. • Make sure the object is against a background that allows its outline to stand out. • VGA size images are stored as VGA size images. All other size images are stored as 2M (1600x1200 pixels) images. • Digital zoom is disabled while shooting with the “White board, etc.” and “Business cards and documents” scenes.
Advanced Settings The following are menu operations you can use to configure various camera settings. • You also can use the Control Panel (page 31) to configure some of the settings that appear on the menu screen. Refer to the page references provided in this section for information about configuring settings using the Control Panel. Using On-screen Menus . Example Menu Screen Operation 1. [8] [2] [4] [6] In the REC mode, press [MENU]. This will display the menu screen.
. Menu Operations in This Manual Menu operations are represented in this manual as shown below. The following operation is the same one described under “Example Menu Screen Operation” on page 61. Use [4] and [6] to select the “REC” tab. Procedure [r] (REC) * [MENU] * REC Tab * Focus Press [r] (REC). Press [MENU]. Use [8] and [2] to select the “Focus” and then press [6]. Downloaded From camera-usermanual.
REC Mode Settings (REC) Selecting a Focus Mode (Focus) Procedure [r] (REC) * [MENU] * REC Tab * Focus For details, see the Control Panel procedure on page 37. Using Continuous Shutter (CS) Procedure [r] (REC) * [MENU] * REC Tab * CS Your camera has four continuous shutter modes.
. Specifying the Method for Saving Continuous Shutter Images Specify the method to use for saving images recorded with the following continuous shutter (CS) modes. CS: 4 fps/10 fps 1. After continuous shutter shooting is finished, use [8] and [2] to select the save method you want and then press [SET]. Save Selected The shot images are played back at slow speed so you can select the images you want to save.
IMPORTANT! • If there is not enough available capacity on the memory card, you may not be able to record the number of CS images indicated on the monitor screen. Make sure your memory card has sufficient remaining capacity before shooting with using continuous shutter. • With continuous shutter, exposure and focus for the first image are applied for successive images as well. • When using a continuous shutter mode, keep the camera still until shooting is finished.
Using Auto Shutter (Auto Shutter) Procedure [r] (REC) * [MENU] * REC Tab * Auto Shutter With Auto Shutter, the camera releases the shutter automatically when it detects that certain conditions are present. ¸ Detect Blur Camera releases the shutter automatically when it detects image blur to camera and subject movement are minimized. ¯ Detect Panning When panning, the camera releases the shutter automatically when it determines there is no blur in the subject being followed.
. To use Detect Panning to minimize image blur (Detect Panning) 1. Point the camera at location where the subject will pass and then halfpress the shutter button to adjust exposure and focus. 2. Press the shutter button the rest of the way down. This will put the camera into Auto Shutter standby. Move the camera to follow the movement of the subject. The camera will release the shutter automatically the moment it determines there is no blur in the subject you are following.
. To change Auto Shutter trigger sensitivity (Sensitivity) 1. Use [8] and [2] to select “Sensitivity” and then press [6]. 2. Use [4] and [6] to select the sensitivity setting you want, and then press [SET]. • You can select any one of three sensitivity levels, from ø (Lowest) to œ (Highest). • With the œ (Highest) setting, the auto shutter release is triggered relatively easily. Auto shutter release triggering becomes more difficult with the ø (Lowest) setting, but recorded images have the least blur.
IMPORTANT! • If the camera remains in Auto Shutter standby without releasing the shutter, you can record an image by pressing the shutter button all the way down again. • Detect Blur and Detect Panning may not produce the desired effect when shooting in an area where dim lighting requires a slow shutter speed, or when the subject is moving extremely quickly.
Reducing the Effects of Camera and Subject Movement (Anti Shake) Procedure [r] (REC) * [MENU] * REC Tab * Anti Shake You can turn on the camera’s Anti Shake feature to reduce image blur due to subject movement or camera movement when shooting a moving subject using telephoto, when shooting a fast-moving subject, or when shooting under dim lighting conditions. Your digital camera is equipped with a CCD shift type camera shake correction feature and a high-sensitivity anti image blur feature.
Specifying the Auto Focus Area (AF Area) Procedure [r] (REC) * [MENU] * REC Tab * AF Area For details, see the Control Panel procedure on page 40. Using the Auto Focus Assist Light (AF Assist Light) Procedure [r] (REC) * [MENU] * REC Tab * AF Assist Light Half-pressing the shutter button while this setting is selected causes the front lamp to light, which provides illumination for focusing in areas where lighting is dim.
Changing the Focus Frame Shape (Focus Frame) Procedure [r] (REC) * [MENU] * REC Tab * Focus Frame You can use this procedure to select from among five different shapes, including a heart shape, for the focus frame. Settings ¹ ™ ß ¬ μ Random NOTE • Half-pressing the shutter button will cause the focus frame to change one of the shapes shown below. Focus successful Focus not successful • While “Random” is selected, one of the four focus frames is selected randomly whenever the camera is turned on.
Shooting with Quick Shutter (Quick Shutter) Procedure [r] (REC) * [MENU] * REC Tab * Quick Shutter When Quick Shutter is turned on, you can press the shutter button all the way without waiting for Auto Focus. This will record the image using a high-speed focus operation that is much faster than Auto Focus. On Turns on Quick Shutter • Some images may be out of focus when Quick Shutter is used. Off Turns off Quick Shutter so focus is performed using normal Auto Focus before the image is recorded.
Displaying the On-screen Grid (Grid) Procedure [r] (REC) * [MENU] * REC Tab * Grid The on-screen grid can be displayed on the REC mode monitor screen for easy vertical and horizontal alignment when composing images. Turning on Image Review (Review) Procedure [r] (REC) * [MENU] * REC Tab * Review While Review is turned on, the camera will display a image for about one second immediately after you press the shutter button to record it.
Configuring Power On Default Settings (Memory) Procedure [r] (REC) * [MENU] * REC Tab * Memory When you turn off the camera, it remembers the current settings of all enabled memory items and restores them when you turn it back on. Any memory item that is disabled will be returned to its initial default setting whenever you turn off the camera.
Image Quality Settings (Quality) Specifying Snapshot Size (Size) Procedure [r] (REC) * [MENU] * Quality Tab * Size For details, see the Control Panel procedure on page 34. Specifying Snapshot Image Quality (Quality (Snapshot)) Procedure [r] (REC) * [MENU] * Quality Tab * T Quality (Snapshot) Fine Gives image quality priority. Normal Normal Economy Gives number of images priority.
Specifying Movie Image Quality (Quality (Movie)) Procedure [r] (REC) * [MENU] * Quality Tab * » Quality (Movie) Movie image quality is a standard that determines the detail, smoothness, and clarity of a movie during playback. Shooting with the high-quality (HD) setting will result in better image quality, but it also shortens the amount of time you can shoot. Image Quality (Pixels) Approximate Data Rate Frame Rate HD 1280x720 30.2 Megabits/second 30 frames/second STD 640x480 12.
. Shooting with the Make-up Mode (Make-up) 1. Enter the Make-up Mode • Entering the Make-up Mode causes the ± to appear on the Control Panel. 2. Press [SET]. Make-up icon 3. Use [4] and [6] to select “Make-up Level” (seventh Control Panel icon from the top), and then press [SET]. • You can set one of 13 levels in the range of “0 (Off)” (no correction) to “+12 (Max.)” (maximum correction). The larger the value, the greater the processing that is performed. 4. Point the camera at the subject(s).
. Shooting Beautiful Scenery Images (Landscape) 1. Enter the Landscape Mode • Entering the Landscape Mode causes the Ö to appear on the Control Panel. 2. Press [SET]. Landscape icon 3. Use [4] and [6] to select the Landscape Mode setting (seventh Control Panel icon from the top), and then press [SET]. Vivid Landscape Enhances colors to produce a clearer, more vivid landscape image.
Controlling White Balance (White Balance) Procedure [r] (REC) * [MENU] * Quality Tab * White Balance You can adjust white balance to match the source of light available where you are shooting and avoid the blue cast that results when shooting outdoors when it is cloudy, and the green cast that results when shooting under fluorescent lighting.
Specifying ISO Sensitivity (ISO) Procedure [r] (REC) * [MENU] * Quality Tab * ISO For details, see the Control Panel procedure on page 42. Specifying the Metering Mode (Metering) Procedure [r] (REC) * [MENU] * Quality Tab * Metering The metering mode determines what part of the subject is metered for exposure. B Multi Multi-pattern metering divides the image into sections and measures the light in each section for a balanced exposure reading.
Optimizing Image Brightness (Lighting) Procedure [r] (REC) * [MENU] * Quality Tab * Lighting You can use this setting to optimize the balance between bright areas and dark areas when shooting images. Extra Performs a higher level of brightness correction than the “On” setting. When this option is selected, it takes longer for the image to be stored after the shutter button is pressed. On Performs brightness correction. Off Does not perform brightness correction.
Controlling Color Saturation (Saturation) Procedure [r] (REC) * [MENU] * Quality Tab * Saturation You can specify one of five saturation settings from +2 (most saturated) to –2 (least saturated). Adjusting Image Contrast (Contrast) Procedure [r] (REC) * [MENU] * Quality Tab * Contrast You can specify one of five contrast settings from +2 (most contrast between light and dark) to –2 (least contrast between light and dark).
Viewing Snapshots and Movies Viewing Snapshots See page 27 for the procedure for viewing snapshots. Viewing a Movie 1. Press [p] (PLAY) and then use [4] and [6] to display the movie you want to view. 2. Press [SET] to start playback. Movie icon: » Recording time Image quality Movie Playback Controls Fast forward/ fast reverse [4] [6] • Each press of either button increases the speed of the fast forward or fast reverse operation. • To return to normal playback speed, press [SET].
Viewing Continuous Shutter Images Each time you perform a continuous shutter (CS) operation, the camera creates a CS group that includes all of the images for that particular CS session. You can use the following procedure to play back the images in a particular CS group. 1. Press [p] (PLAY) and then use [4] and [6] to display the CS group whose images you want to view. CS group icon Number of image files in the CS group First image in the CS group 2.
NOTE • Multiple images shot using “CS: Normal Speed CS” are stored individually and are not grouped. This means they can be displayed individually (page 27) but not as a CS group. Deleting Continuous Shutter Images You can delete CS images (1 image in CS group, selected images in CS group, 1 CS group) while playback is in progress or paused. 1. While CS image playback is in progress or paused, press [2]. 2. Next, perform the same operations you would perform to delete normal (non-CS) images (page 28).
. Dividing Up All CS Groups 1. While a CS group is displayed, press [MENU]. 2. Use [4] and [6] to select the “PLAY” tab. 3. Use [8] and [2] to select “Divide Group” and then press [6]. 4. Use [8] and [2] to select “Divide All Groups” and then press [SET]. 5. Use [8] and [2] to select “Yes”, and then press [SET]. • Once a CS group is divided, it cannot be regrouped. Zooming an On-screen Image 1. In the PLAY mode, use [4] and [6] to scroll through the images until the one you want is displayed.
Displaying the Image Menu 1. In the PLAY mode, slide the zoom controller towards w (]). Boundary Use [8], [2], [4] and [6] to move the selection boundary around the image menu. To view a particular image, use [8], [2], [4], or [6] to move the selection boundary to the image you want and then press [SET]. Displaying Images in the Calendar Screen 1. In the PLAY mode, slide the zoom controller towards w (]) twice. This will display the calendar screen that shows the first image recorded on each day.
Viewing Snapshots and Movies on a TV Screen 1. Use the AV cable that comes with the camera to connect it to the TV. Yellow TV White Video AV cable (bundled) Audio AUDIO IN jacks (white) USB/AV port VIDEO IN jack (yellow) Making sure that the 6 mark on the camera is aligned with the 4 mark of the AV cable connector, connect the cable to the camera. • Make sure that you insert the cable connector into the USB/AV port until you feel it click securely into place.
4. Now you can display images and play back movies as you normally do. IMPORTANT! • Before connecting to a TV to display images, be sure to configure the camera’s [r] (REC) and [p] (PLAY) buttons for “Power On” or “Power On/Off” (page 146). • Audio is initially output by the camera at maximum volume. When you first start displaying images, set the TV volume control at a relatively low level and then adjust it as required. NOTE • Audio is monaural. • Certain TVs may cut off part of the images.
Other Playback Functions (PLAY) This section explains menu items that you can use to configure settings and perform other playback operations. For information about menu operations, see page 61. Playing a Slideshow on the Camera (Slideshow) Procedure [p] (PLAY) * [MENU] * PLAY Tab * Slideshow Start Starts the slideshow.
Effect Select the effect you want. Pattern 1 to 5: Plays background music and applies an image change effect. • Patterns 1 through 4 have different background music, but they all use the same image change effect. • Pattern 5 can be used for playback of snapshots only, and the “Interval” setting is ignored. • The currently selected image change effect setting is disabled automatically in following cases.
1. Connect the camera to your computer (pages 122, 131). If you plan to save the music files to the camera’s memory card, make sure the card is loaded in the camera. 2. Perform one of the following operations to open the memory card or built-in memory. This will cause the camera to be recognized by your computer as a Removable Disk (Drive). • Windows 1 Windows 7 / Windows Vista: Start * Computer Windows XP: Start * My Computer Windows 2000: Double-click “My Computer”. 2 Double-click “Removable Disk”.
Laying Out Snapshots with Layout Print (Layout Print) Procedure [p] (PLAY) * Spnapshot Screen * [MENU] * PLAY Tab * Layout Print You can use the following procedure to insert existing snapshots into the frames of a layout and produce a new image that contains multiple snapshots. 1. Use [4] and [6] to select the layout pattern you want and then press [SET]. 2. Use [4] and [6] to select the background color and then press [SET]. 3.
Creating a Snapshot of Movie Frames (MOTION PRINT) Procedure [p] (PLAY) * Movie Screen to be Used * [MENU] * PLAY Tab * MOTION PRINT 1. Use [4] and [6] to scroll through the movie frames and display the one you want to use as the image of the MOTION PRINT image. Holding down [4] or [6] scrolls at high speed. 2. 9 frames 1 frame Use [8] and [2] to select either “9 frames” or “1 frame” and then press [SET].
Editing a Movie on the Camera (Movie Editing) Procedure [p] (PLAY) * Movie Screen of Movie to be Edited * [MENU] * PLAY Tab * Movie Editing The Movie Editing feature lets you use one of the following procedures to edit out a specific part of a movie. } Cut (To-Point Cut) Cuts everything from the beginning of the movie up to the current location. ~ Cut (Point-To-Point Cut) Cuts everything between two points. ¡ Cut (From-Point Cut) Cuts everything from the current location to the end of the movie. 1.
3. When the frame where you want the cut point to be is displayed, press [2]. } Cut (To-Point Cut) ~ Cut (Point-To-Point Cut) While the frame you want the cut to be up to is displayed, press [2]. 1While the frame you want the first (From) cut to be is displayed, press [2]. 2While the frame you want the second (To) cut to be is displayed, press [2]. ¡ Cut (From-Point Cut) 4. While the frame you want the cut to be from is displayed, press [2]. Use [8] and [2] to select “Yes” and then press [SET].
Optimizing Image Brightness (Lighting) Procedure [p] (PLAY) * Snapshot Screen * [MENU] * PLAY Tab * Lighting You can use this setting to optimize the balance between bright areas and dark areas in existing images. +2 Performs a higher level of brightness correction than the “+1” setting. +1 Performs brightness correction. Cancel Does not perform brightness correction. NOTE • Correcting the lighting when shooting produces better results (page 82).
Adjusting White Balance (White Balance) Procedure [p] (PLAY) * Snapshot Screen * [MENU] * PLAY Tab * White Balance You can use the white balance setting to select a light source type for a recorded image, which will affect the colors of the image. ¤ Daylight Outdoors, fair weather ' Overcast Outdoors, cloudy to rain, in tree shade, etc. “ Shade Very high temperature light, such as building shade, etc.
Adjusting the Brightness of an Existing Snapshot (Brightness) Procedure [p] (PLAY) * Snapshot Screen * [MENU] * PLAY Tab * Brightness You can select one of five brightness levels, from +2 (brightest) to –2 (least bright). NOTE • The original snapshot is retained in memory and not deleted. • When you display an altered image on the camera’s monitor screen, the date and time indicates when the image was originally recorded, not when the image was altered.
Using Color Correction to Correct the Color of an Old Photograph (Color Correction) Procedure [p] (PLAY) * Snapshot Screen * [MENU] * PLAY Tab * Color Correction Color Correction lets you correct the color of an old photograph. The corrected image is saved as 2M (1600x1200 pixels) size. 1. Perform the above operation. • An image of the photograph you are restoring will appear on the monitor screen with a red boundary around it.
Selecting Images for Printing (DPOF Printing) Procedure [p] (PLAY) * Snapshot Screen * [MENU] * PLAY Tab * DPOF Printing See page 117 for details. Protecting a File Against Deletion (Protect) Procedure [p] (PLAY) * [MENU] * PLAY Tab * Protect Protects specific files. 1Use [4] and [6] to scroll through the files until the one you want to protect is displayed. 2Use [8] and [2] to select “On” and then press [SET]. An image that is protected is indicated by the › icon.
Editing the Date and Time of an Image (Date/Time) Procedure [p] (PLAY) * Snapshot Screen * [MENU] * PLAY Tab * Date/Time [8] [2] Changes the setting at the cursor location [4] [6] Moves the cursor between settings [BS] Toggles between 12-hour and 24-hour format When the date and time settings are what you want, press [SET] to apply them. NOTE • The date and time stamped into an image using the Time Stamp (page 143) cannot be edited. • You cannot edit the date and time of an image that is protected.
Resizing a Snapshot (Resize) Procedure [p] (PLAY) * Snapshot Screen * [MENU] * PLAY Tab * Resize You can reduce the size of a snapshot and save the result as a separate snapshot. The original snapshot is also retained. You can select resize an image to one of three image sizes: 10M, 6M, VGA. • Resizing a 3:2 or 16:9 size snapshot will create an image with an aspect ratio of 4:3, with both sides cut off.
Adding Audio to a Snapshot (Dubbing) Procedure [p] (PLAY) * Snapshot Screen * [MENU] * PLAY Tab * Dubbing You can add audio to a snapshot after you shoot it. You can re-record a snapshot’s audio whenever you want. You can record up to about 30 seconds of audio for a single snapshot. 1. Press [SET] to start audio recording. Remaining recording time 2. Press [SET] again to stop audio recording. Microphone • Take care that you do not block the camera’s microphone with your fingers while recording.
Voice Recording Playback Controls Fast forward/fast reverse [4] [6] Play/pause [SET] Volume adjustment Press [2] and then press [8] [2]. Display content switching [8] (DISP) Stop playback [MENU] • Audio of an Audio Snapshot also can be played back on a computer with Windows Media Player or QuickTime. Copying Files (Copy) Procedure [p] (PLAY) * Snapshot Screen * [MENU] * PLAY Tab * Copy Files can be copied from the camera’s built-in memory to a memory card or from a memory card to built-in memory.
Dynamic Photo You can use the procedures in this section to crop either a moving subject or a still subject out of a snapshot and then insert it into another snapshot or movie. Moving Subject Another Image Dynamic Photo Image To create a subject image to be inserted (Dynamic Photo) 1. Press [BS] and then select the “Dynamic Photo” scene. 2. Press [SET], use [8] and [2] to select “Subject Type”, and then press [SET]. 3. Use [8] and [2] to specify the subject type, and then press [SET].
4. Press [SET], use [8] and [2] to select “Number of Shots”, and then press [SET]. 5. Use [8] and [2] to select either “1” or “2” and then press [SET]. To shoot under these conditions: Select this option: 2 The subject against a complex background You need to shoot twice to extract the subject. 1 The subject against a plain (no pattern) background You need to shoot only once to extract the subject. If you select this option, you will not need to perform steps 7 and 8 of the procedure below. 6.
7. Next, compose the image again, this time without the subject you want to extract. Take care so the image composition here is as close as possible to the image composition in step 6. This second image will let the camera know what part of the image in step 3 needs to be cropped. • A semi-transparent view of the image you shot in step 3 (which includes the subject) will be visible on the monitor screen to help you compose the background image properly. 8.
Extracting Text from an Image You can write text on a blank sheet of paper, shoot an image of it, and then extract the text for insertion into an image. 1. Press [BS] and then select the “Dynamic Photo” scene. 2. Press [SET], use [8] and [2] to select “Number of Shots”, and then press [SET]. 3. Use [8] and [2] to select “Text” and then press [SET]. 4. Press the shutter button to shoot what is written on the paper.
Inserting a Subject into a Snapshot or Movie (Dynamic Photo) Use the following procedure to insert a subject image into a snapshot or movie. Procedure [p] (PLAY) * [MENU] * PLAY Tab * Dynamic Photo 1. Use [4] and [6] to select the background image you want and then press [SET]. • Only an image that satisfies the following conditions can be used as a background image.
IMPORTANT! • Playing back a Dynamic Photo created with a movie background causes it to repeat three times in succession. NOTE • The camera comes with a number of extracted sample subjects in its built-in memory, which you can use to create Dynamic Photos, if you like. • Performing a delete or format operation will delete the sample subjects in built-in memory. If you delete the sample subjects, you can download them from the Dynamic Photo Special Site (http://dp.exilim.
To view a Dynamic Photo (Dynamic Photo File) 1. Press [p] (PLAY) and then use [4] and [6] to display the Dynamic Photo you want to view. 2. If you want to see the subject in the Dynamic Photo move, press [SET]. The Dynamic Photo is repeated as a continuous loop. Converting a Dynamic Photo Still Image to a Movie (Movie Converter) A Dynamic Photo with a still image background and a moving subject is stored as a series of 20 still images.
Printing Printing Snapshots Professional Print Service You can take a memory card that contains the images you want to print to a professional print service and have them printed. Printing on a Home Printer Printing Images on a Printer with Memory Card Slot You can use a printer equipped with a memory card slot to print images directly from a memory card. For details, see the user documentation that comes with your printer.
Connecting Directly to a PictBridge Compatible Printer You can connect the camera directly to a printer that supports PictBridge and print images without going through a computer. . To set up the camera before connecting to a printer 1. Turn on the camera and press [MENU]. 2. On the “Set Up” tab, select “USB” and then press [6]. 3. Use [8] and [2] to select “PTP (PictBridge)”, and then press [SET]. .
. To print 1. Turn on the printer and load paper. 2. Turn on the camera. This will display the print menu screen. 3. Use [8] and [2] to select “Paper Size”, and then press [6]. 4. Use [8] and [2] to select a paper size and then press [SET]. • The following are the available paper sizes. 3.5"x5", 5"x7", 4"x6", A4, 8.5"x11", By Printer • Selecting “By Printer” prints using a paper size selected on the printer. • See the documentation that comes with your printer for information about paper settings.
Using DPOF to Specify Images to be Printed and the Number of Copies . Digital Print Order Format (DPOF) DPOF is a standard that allows you to include image type, number of copy, and time stamp on/off information on the memory card with the images. After configuring settings, you can use the memory card to print on a home printer that supports DPOF or take the memory card to a professional print service. • Whether or not you will be able to use DPOF settings for printing depends on the printer you are using.
. Configuring the Same DPOF Settings for All the Images Procedure [p] (PLAY) * Snapshot Screen * [MENU] * PLAY Tab * DPOF Printing * All images 1. Use [8] and [2] to specify the number of copies. You can specify a value up to 99. Specify 00 if you do not want to print the image. • If you want to include the date in the images, press [BS] so “On” is shown for date stamping. 2. Press [SET]. DPOF settings are not cleared automatically after printing is complete.
. Date Stamping You can use one of the following three methods to include the recording date in the printout of an image. Configuring camera settings Configure DPOF settings (page 117). You can turn date stamping on and off each time you print. You can configure settings so some images include the date stamp and some don’t. Configure the Camera’s Time Stamp setting (page 143).
Using the Camera with a Computer Things you can do using a computer... You can perform the operations described below while the camera is connected to a computer. Save images to a computer and view them there • Save images and view them manually (USB connection) (pages 122, 131). • Transfer images to a computer automatically over a wireless LAN for viewing (Eye-Fi) (page 135).
Using the Camera with a Windows Computer Install the required software in accordance with the version of Windows you are running and what you want to do. When you want to do this: Operating System Version Save images to a computer and view them there manually Windows 7 / Windows Vista / Windows XP / Installation not required. Windows 2000 122 Play movies Installation not required. • Windows Media Player, which is already installed on most computers, can be used for playback.
. Computer System Requirements for Bundled Software Computer system requirements are different for each of the applications. See the “Read me” file that comes with each application for details. Information about computer system requirements also can be found under “Computer System Requirements for Bundled Software (Bundled CD-ROM)” on page 162 of this manual. . Precautions for Windows Users • Except for Adobe Reader, the bundled software requires Administrator privileges to run.
4. Turn off the camera and then use the USB cable that comes with the camera to connect it to your computer. USB port USB cable Large connector • The camera does not draw power over the USB cable. Make sure the camera’s battery is sufficiently charged Small connector before connecting.
8. Right-click the “DCIM” folder. 9. On the shortcut menu that appears, click “Copy”. 10. Windows 7 / Windows Vista users: Click “Start” and then “Documents”. Windows XP users: Click “Start” and then “My Documents”. Windows 2000 users: Doubleclick “My Documents” to open it. • If you already have a “DCIM” folder in “Documents” (Windows 7 / Windows Vista) or “My Documents” (Windows XP / Windows 2000), the next step will overwrite it.
3. Double-click the image file you want to view. • For information about file names, see “Memory Folder Structure” on page 138. • An image that was rotated on the camera will be displayed on your computer screen in its original (unrotated) orientation. Never use your computer to modify, delete, move, or rename any image files that are in the camera’s built-in memory or on its memory card.
. Movie Playback Precautions • Be sure to move the movie data to the hard disk of your computer before trying to play it. Proper movie playback may not be possible for data accessed over a network, from a memory card, etc. • Proper movie playback may not be possible on some computers. If you experience problems, try the following. – Try recording movies with a quality setting of “STD” or “LP”. – Try upgrading Windows Media Player to the latest version.
. To upload a movie file to YouTube • Before you can use YouTube Uploader for CASIO, you need to go to the YouTube website (http://www.youtube.com/) and register as a user there. • Do not upload any video that is copyrighted (including neighboring copyrights) unless you yourself own the copyright or you have obtained the permission of the applicable copyright holder(s). • The maximum file size for each upload is 1024 MB. 1. Record the movie you want to upload using the “For YouTube” BEST SHOT movie scene.
Transferring Images from Your Computer to Camera Memory If you want to transfer images from your computer to the camera, install Photo Transport on your computer from the CD-ROM that comes with the camera. . To install Photo Transport 1. On the CD-ROM menu screen, select “Photo Transport”. 2. After reading the information about installation conditions and system requirements for installation in the “Read me” file, install Photo Transport. . To transfer images to the camera 1.
. To transfer computer screen captures to the camera 1. Connect the camera to your computer (page 122). 2. On your computer, click the following: Start * All Programs * CASIO * Photo Transport. This starts up Photo Transport. 3. Display the screen whose screen capture you want to transfer. 4. Click the [Capture] button. 5. Draw a boundary around the area you want to capture. Move your mouse pointer to the upper left corner of the area you want to capture and then hold down the mouse button.
Play back Dynamic Photo images on your EXILIM, a computer, or on a mobile phone You can copy moving subjects (animated characters) from your computer to the EXILIM. You also can convert Dynamic Photo images to movies and send them to a mobile phone for playback. To perform such functions, you need to install Dynamic Photo Manager on your computer from the CD-ROM that comes with your EXILIM. For details, see the Dynamic Photo Manager user’s guide that comes with your EXILIM.
Using the Camera with a Macintosh Install the required software in accordance with what version of the Macintosh OS you are running and what you want to do. When you want to do this: Operating System Version Save images to your OS 9 Macintosh and view them there manually OS X Save images to your OS 9 Macintosh automatically/ OS X Manage images Play movies See page: Install this software: Installation not required. 131 Use commercially available software.
4. Turn off the camera and then use the USB cable that comes with the camera to connect it to your Macintosh. USB port USB cable Large connector • The camera does not draw power over the USB cable. Make sure the camera’s battery is sufficiently charged Small connector before connecting.
8. After the copy operation is complete, drag the drive icon to Trash. 9. On the camera, press [ON/OFF] (Power) to turn off the camera. After making sure that the green back lamp is unlit, disconnect the camera from the computer. . To view copied images 1. Double-click the camera’s drive icon. 2. Double-click the “DCIM” folder to open it. 3. Double-click the folder that contains the images you want to view. 4. Double-click the image file you want to view.
Transferring Images Automatically and Managing Them on Your Macintosh If you are running Mac OS X, you can manage snapshots using iPhoto, which comes bundled with some Macintosh products. If you are running Mac OS 9, you will need to use commercially available software. Playing a Movie You can use QuickTime, which comes bundled with your operating system, to play back movies on a Macintosh. To play back a movie, first copy it to your Macintosh and then double-click the movie file. .
Viewing User Documentation (PDF Files) You must have Adobe Reader or Adobe Acrobat Reader installed on your computer in order to view the contents of a PDF file. If you don’t, go to the Adobe Systems Incorporated website and install Acrobat Reader. 1. On the CD-ROM, open the “Manual” folder. 2. Open the “Digital Camera” folder and then open the folder for the language whose user’s guide you want to view. 3. Open the file named “camera_xx.pdf”. • “xx” is the language code (Example: camera_e.
IMPORTANT! • Recorded images are transferred over wireless LAN. Do not use the Eye-Fi card or turn off Eye-Fi card communication (page 140) when on an aircraft or in any other location where use of wireless communication is limited or prohibited. • Loading an Eye-Fi card will cause the Eye-Fi indicator to appear on the monitor screen. Its transparent or not transparent appearance indicates the communication status as shown below.
Files and Folders The camera creates a file and saves it each time you shoot a snapshot, record a movie, or perform any other operation that stores data. Files are grouped by storing them in folders. Each file and folder has its own unique name. • For details about how folders are organized in memory, see “Memory Folder Structure” (page 138). Name and Maximum Number Allowed Example Each folder can contain up to 9999 files named CIMG0001 through CIMG9999.
Memory Card Data The camera stores images you shoot in accordance with the Design Rule for Camera File System (DCF). . About DCF DCF is a standard that makes it possible to view and print images recorded on one manufacturer’s camera on DCF-compliant devices produced by other manufacturers. You can transfer DCF-compliant images recorded with another camera to this camera and view them on this camera’s monitor screen. . Memory Folder Structure 100CASIO *1 CIMG0001.JPG CIMG0002.AVI CIMG0003.WAV CIMG0004.
. Supported Image Files • Image files shot with this camera • DCF-compliant image files This camera may not be able to display an image, even if it is DCF-compliant. When displaying an image recorded on another camera, it may take a long time for the image to appear on this camera’s monitor screen. . Built-in Memory and Memory Card Data Handling Precautions • Whenever copying memory contents to your computer, you should copy the DCIM folder and all of its contents.
Other Settings (Set Up) This section explains menu items that you can use to configure settings and perform other operations in both the REC mode and PLAY mode. For information about menu operations, see page 61. Adjusting Monitor Screen Brightness (Screen) Procedure [MENU] * Set Up Tab * Screen You can change the brightness of the monitor screen. Auto 1 or Auto 2 With this setting, the camera detects available light levels and automatically adjusts the brightness of the monitor screen accordingly.
Configuring Camera Sound Settings (Sounds) Procedure [MENU] * Set Up Tab * Sounds Startup Half Shutter Shutter Specifies the startup sound. Sound 1 - 5: Built-in sounds (1 through 5) Off: Sound off Operation = Operation Specifies the sound volume. This setting is also used as the audio level during video output (page 89). = Play Specifies the volume of movie and Audio Snapshot audio output. This volume setting is not used during video output (from the USB/AV port).
Specifying the File Name Serial Number Generation Rule (File No.) Procedure [MENU] * Set Up Tab * File No. Use the following procedure to specify the rule that governs generation of the serial number used in file names (page 137). Continue Tells the camera to remember the last used file number. A new file will be named using the next sequential number, even if files are deleted or if a blank memory card is loaded.
3. Use [8], [2], [4], and [6] to select the geographic area you want and then press [SET]. 4. Use [8] and [2] to select the city you want and then press [SET]. 5. Press [SET]. IMPORTANT! • Before configuring World Time settings, make sure that the Home City setting is the place where you live or normally use the camera. If it isn’t, select “Home” on the screen in step 1 and configure the Home City, date, and time settings as required (page 144).
Setting the Camera’s Clock (Adjust) Procedure [MENU] * Set Up Tab * Adjust [8] [2] Change the setting at the cursor location [4] [6] Move the cursor between settings [BS] Toggles between 12-hour and 24-hour format When the date and time settings are what you want, press [SET] to apply them. • You can specify a date from 2001 to 2049. • Be sure to select your Home City (page 142) before setting the time and date.
Specifying the Display Language (Language) Procedure [MENU] * Set Up Tab * Language . Specify the display language you want. 1 Select the tab on the right. 2 Select “Language”. 3 Select the language you want. • Camera models sold in certain geographic areas may not support display language selection. 1 23 Configuring Sleep State Settings (Sleep) Procedure [MENU] * Set Up Tab * Sleep This feature turns off the monitor screen whenever no camera operation is performed for a preset amount of time.
Configuring Auto Power Settings (Auto Power Off) Procedure [MENU] * Set Up Tab * Auto Power Off Auto Power Off turns off the camera whenever no camera operation is performed for a preset amount of time. Trigger Time Settings: 1 min, 2 min, 5 min (The trigger time is always 5 minutes in the PLAY mode.) • Auto Power Off is disabled under any of the following conditions.
Configuring USB Protocol Settings (USB) Procedure [MENU] * Set Up Tab * USB You can use the procedure below to select the USB communication protocol, which is used when exchanging data with a computer, printer, or other external device. Mass Storage Select this setting when connecting to a computer (pages 122, 131). With this setting, the computer sees the camera as an external storage device. Use this setting for normal transfer of images from the camera to a computer.
Formatting Built-in Memory or a Memory Card (Format) Procedure [MENU] * Set Up Tab * Format If a memory card is loaded in the camera, this operation will format the memory card. It will format built-in memory if no memory card is loaded. • The format operation will delete all contents on the memory card or in built-in memory. It cannot be undone. Make sure you do not need any data currently on the card or in built-in memory before you format it. • Formatting built-in memory will delete the following data.
Configuring Monitor Screen Settings You can turn display information on and off by pressing [8] (DISP). You can configure separate settings for the REC mode and PLAY mode. Information display on Displays information about image settings, etc. Information display + Histogram on Turns on display of camera setting and other indicators, along with a histogram (page 150).
How to Use the Histogram A histogram is a graph that represents the lightness of an image in terms of the number of pixels. The vertical axis indicates the number of pixels, while the horizontal axis indicates lightness. If the histogram appears too lopsided for some reason, you can use EV shift to move it left or right in order to achieve better balance. Optimum exposure can be achieved by EV shifting so the graph is as close to the center as possible.
Appendix Precautions during Use . Avoid Use While In Motion • Never use the camera to record or play back images while operating an automobile or other vehicle, or while walking. Looking at the monitor while in motion creates the risk of serious accident. . Directly Viewing the Sun or Bright Light • Never look at the sun or any other bright light through the cameras viewfinder. Doing so can damage your eyesight. . Flash • Never use the flash unit in areas where flammable or explosive gas may be present.
. Smoke, abnormal odor, overheating, and other abnormalities • Continued use of the camera while it is emitting smoke or strange odor, or while it is overheating creates the risk of fire and electric shock. Immediately perform the following steps whenever any of the above symptoms are present. 1. Turn off the camera. 2. Remove the battery from the camera, taking care to protect yourself against burn injury. 3. Contact your dealer or nearest CASIO authorized service center. .
. Locations To Be Avoided • Never leave the camera in any of the following types of locations. Doing so creates the risk of fire and electric shock. – Areas subject to large amounts of humidity or dust – Food preparation areas or other locations where oil smoke is present – Near heaters, on a heated carpet, in areas exposed to direct sunlight, in a closed vehicle parked in the sun, or other areas subject to very high temperatures • Never place the camera on an unstable surface, on a high shelf, etc.
• Should you ever notice leakage, strange odor, heat generation, discoloration, deformation, or any other abnormal condition while using, charging, or storing a battery, immediately remove it from the camera or charger unit and keep it away from open flame. • Do not use or leave the battery under direct sunlight, in an automobile parked in the sun, or in any other area subject to high temperatures. Doing so can damage the battery, and cause deterioration of its performance and loss of service life.
. Data Error Precautions Your digital camera is manufactured using precision digital components. Any of the following creates the risk of corruption of data in camera memory.
. Caring for your camera • Never touch the lens or flash window with your fingers. Finger smudges, dirt, and other foreign matter on the lens or flash window can interfere with proper operation of the camera. Use a blower or other means to keep the lens and flash window free of dirt and dust, and wipe gently with a soft, dry cloth. • To clean the camera, wipe it with a soft, dry cloth. . Old Rechargeable Battery Handling Precautions • Insulate the positive and negative terminals with tape, etc.
. Other Precautions The camera becomes slightly warm during use. This is normal and does not indicate malfunction. . Copyrights Except for your own personal enjoyment, unauthorized use of use of snapshots or movies of images whose rights belong to others, without the permission of the right holder, is forbidden by copyright laws. In some cases, shooting of public performances, shows, exhibitions, etc. may be restricted entirely, even if it is for your own personal enjoyment.
Any and all unauthorized commercial copying, distribution, and copying of the bundled software over a network are prohibited. This product contains PrKERNELv4 Real-time OS of eSOL Co., Ltd. Copyright © 2007 eSOL Co., Ltd. PrKERNELv4 is a registered trademark of eSOL Co., Ltd. in Japan. This product contains the software of FotoNation, Inc. FotoNation is a registered trademark of FotoNation, Inc. FaceTracker is a trademarks of FotoNation, Inc.
To replace the battery 1. Open the battery cover and remove the current battery. Stopper With the monitor screen side of the camera facing upwards, slide the stopper in the direction indicated by the arrow in the illustration. After the battery pops out, pull it the rest of the way out of the camera. 2. Load a new battery. Battery Precautions . Precautions during Use • Operation provided by a battery under cold conditions is always less than operation under normal temperatures.
Using the Camera in another Country . Precautions during Use • The bundled charger is designed for operation with any power supply in the range of 100V to 240V AC, 50/60Hz. Note, however, that the shape of the power cord plug depends on each country or geographic area. Before taking the camera and charger along on a trip, check with travel agent about the power supply requirements in your destination(s). • Do not connect the charger to a power supply through a voltage converter or similar device.
. Using a Memory Card • SD memory cards and SDHC memory cards have a write protect switch. Use the switch when you need to Write enabled guard against accidentally deleting data. Note, however, if you write protect an SD memory card you must then turn write protection off whenever you want Write disabled to record to it, format it, or delete any of its images. • If a memory card starts to behave abnormally during image playback, you can restore normal operation by reformatting it (page 148).
Computer System Requirements for Bundled Software (Bundled CD-ROM) Computer system requirements are different for each of the applications. Be sure to check the requirements for the particular application you are trying to use. Note that the values provided here are minimum requirements for running each application. Actual requirements are greater, depending on the number of images and the sizes of the images being handled.
Reset Initial Default Settings The tables in this section show the initial default settings that are configured for menu items (displayed when you press [MENU]) after you reset the camera (page 148). Menu items depend on whether the camera is in the REC mode or PLAY mode. • A dash (–) indicates an item whose setting is not reset or an item for which there is no reset setting. IMPORTANT! • Switching from “Auto” to “Premium Auto” (page 23) will make some menu items unavailable. .
“Quality” Tab Size 14M (4320x3240) T Quality (Snapshots) Normal » Quality (Movies) STD Effect Off EV Shift 0.0 B Multi Lighting Off Color Filter Off Sharpness 0 Saturation 0 Contrast 0 Flash Intensity 0 White Balance Auto ISO Metering Auto “Set Up” Tab Screen Auto 2 Adjust – Eye-Fi On Date Style – Language – Sleep 1 min Sounds Startup: Sound 1 / Half Shutter: Sound 1 / Shutter: Sound 1 / Operation: Sound 1 / = Operation: ...//// / = Play: ...
. PLAY Mode “PLAY” Tab Images: All images / Time: 30 min / Interval: 3 sec / Effect: Pattern 1 Keystone – Color Correction – DPOF Printing – Protect – Date/Time – Rotation – MOTION PRINT 9 frames Resize – Movie Editing – Trimming – Lighting – Dubbing – Red Eye – Copy – White Balance – Divide Group – Brightness 0 Slideshow Dynamic Photo – Movie Converter Layout Print – – “Set Up” Tab • The contents of the “Set Up” tab are the same in the REC mode and PLAY mode.
When things don’t go right... Troubleshooting Problem Possible Cause and Recommended Action Power Supply Power does not turn on. 1)The battery may not be loaded correctly (page 15). 2)The battery may be dead. Charge the battery (page 14). If the battery goes dead soon after being charged, it means the battery has reached the end of its life and needs to be replaced. Purchase a separately available CASIO NP-110 rechargeable lithium ion battery. The camera suddenly powers down.
Problem Possible Cause and Recommended Action The subject is out of focus in the recorded image. The image may not be focused properly. When composing the image, make sure the subject is located inside the focus frame. The flash does not fire. 1)If ? (Flash Off) is selected as the flash mode, change to another mode (page 35). 2)If the battery is dead, charge it (page 14).
Problem Possible Cause and Recommended Action A recorded image was not saved. 1)Camera power may have been turned off before the save operation was complete, which will result in the image not being saved. If the battery indicator shows , charge the battery as soon as possible (page 16). 2)You may have removed the memory card from the camera before the save operation was complete, which will result in the image not being saved. Do not remove the memory card before the save operation is complete.
Problem Possible Cause and Recommended Action When shooting with Auto Shutter, the shutter does not trigger. Auto Shutter may not trigger when shooting under very bright or very dark conditions, or when shooting a fast moving subject, etc. If this happens, try changing the Auto Shutter Trigger Sensitivity setting (page 68), or press the shutter button all the way down to release the shutter and shoot the image. The image is out of focus during movie recording.
Problem Possible Cause and Recommended Action Other The wrong date and time are displayed, or the wrong date and time are being stored along with image data. The date and time setting is off. Set the correct date and time (page 144). The messages on the display are in the wrong language. The wrong display language is selected. Change the display language setting (page 145). Images cannot be transferred over a USB connection. 1)The USB cable may not be connected securely. Check all connections.
Problem Possible Cause and Recommended Action The time and date settings configured the first time after purchasing the camera are reset to their factory defaults when remove the camera’s battery. Load the camera’s battery and reconfigure the time and date settings (page 17). Do not remove the battery from the camera for at least 24 hours after configuring time and date settings. After that, the settings will not be reset if you remove the battery.
Check connections! You are attempting to connect the camera to a printer while the camera’s USB settings are not compatible with the USB system of the printer (page 115). Files could not be saved because battery is low. Battery power is low, so an image file could not be saved. Folder cannot be created. You are trying to record a file while there are already 9999 files stored in the 999th folder. If you want to record more, delete files you no longer need (page 28). Images are being transferred.
RETRY POWER ON The lens came into contact with an obstruction while moving. The camera will turn off automatically when this message appears. Remove the obstruction and turn power back on again. SYSTEM ERROR Your camera system is corrupted. Contact your retailer or a CASIO authorized service center. The LOCK switch of the SD or SDHC memory card loaded in the camera is in the The card is locked. locked position. You cannot store images to or delete images from a memory card that is locked.
Number of Snapshots/Movie Recording Time/ Voice Recording Time Snapshot Image Size (Pixels) 14M (4320x3240) 3:2 (4320x2880) 16:9 (4320x2432) 10M (3648x2736) 6M (2816x2112) 3M (2048x1536) VGA (640x480) Image Quality Approximate Image File Size Built-in Memory (Approx. 73.8MB*1) Snapshot Recording Capacity SD Memory Card (1GB*2) Snapshot Recording Capacity Fine 9.31 MB 8 103 199 Normal 4.86 MB 15 Economy 3.24 MB 23 298 Fine 8.19 MB 9 118 225 Normal 4.29 MB 17 Economy 2.
Movies Image Quality (Pixels) Approximate Data Rate (Frame Rate) Built-in Memory (Approx. 73.8MB*1) Movie Recording Capacity SD Memory Card (1GB*2) Movie Recording Capacity File Size of 1-minute Movie HD 1280x720 30.2 Megabits/second (30 frames/second) 20 seconds 4 minutes 22 seconds 226.3 MB STD 640x480 12.2 Megabits/second (30 frames/second) 48 seconds 10 minutes 47 seconds 91.3 MB LP 320x240 2.7 Megabits/second (15 frames/second) 3 minutes 39 seconds 49 minutes 33 seconds 19.
Specifications File Format Snapshots: JPEG (Exif Version 2.2); DCF 1.0 standard; DPOF compliant Movies: Motion JPEG AVI, IMA-ADPCM audio (monaural) Audio (Voice Recording): WAV (monaural) Recording Media Built-in Memory (Image Storage Area: 73.
Exposure Compensation –2.0 EV to +2.0 EV (in 1/3EV steps) Shutter CCD shutter, mechanical shutter Shutter Speed Snapshot (Auto): 1/2 to 1/1000 second Snapshot (Night Scene): 4 to 1/1000 second * May differ due to the camera setup. Aperture Value F2.8 (W) to F7.9 (W) (When used with ND filter) * Using optical zoom changes the aperture value.
Input/Output Terminals USB/AV port, Hi-Speed USB compatible Microphone Monaural Speaker Monaural Power Requirements Rechargeable lithium ion battery (NP-110) x1 Downloaded From camera-usermanual.
Approximate Battery Life All of the values provided below represent the approximate amount of time under normal temperature (23°C (73°F)) before the camera turns off. These values are not guaranteed. Low temperatures shorten battery life.
. Rechargeable lithium ion battery (NP-110) Rated Voltage 3.7 V Rated Capacitance 1200 mAh Operating Temperature Requirements 0 to 40°C (32 to 104°F) Dimensions 37.5 (W) x 44.9 (H) x 7.0 (D) mm (1.48" (W) x 1.77" (H) x 0.28" (D)) (excluding projections) Weight Approximately 25 g (0.9 oz) . Charger unit (BC-110L) Input Power 100 to 240 V AC, 80 mA, 50/60 Hz Output Power 4.
CASIO COMPUTER CO.,LTD. 6-2, Hon-machi 1-chome Shibuya-ku, Tokyo 151-8543, Japan M29 Downloaded From camera-usermanual.
Getting the Most Out of Dynamic Photo For a wealth of information about Dynamic Photo including explanations about how to use Dynamic Photo images, the Dynamic Studio image conversion service, sample images, and more, visit the special Dynamic Photo website at: http://dp.exilim.com/ This manual provides an introduction to Dynamic Photo, which creates a whole new way to enjoy digital imaging. • All screen shots shown in this manual are in English.
Dynamic Photo! A totally new way to enjoy digital photography! Dynamic Photo makes it easy to crop a moving subject out of a series of images and insert it into other images! A simple operation on the camera extracts a moving subject automatically by cropping up to 20 Continuous Shutter images.
Using the Dynamic Photo Extracted Sample Subjects Your digital camera comes with a number of extracted sample subjects in its built-in memory. You can use these sample subjects to practice creating Dynamic Photo images by inserting them into your original snapshots or movies. Step 1: Shoot the image into which you want to insert an extracted sample subject. 1. Remove the memory card from the camera (if one is loaded).
6. After creation of the Dynamic Photo image is complete, the finished image with the inserted moving subject will appear on the monitor screen. After you master the above procedure using extracted sample subjects, you will be ready to create your own extracted subjects and insert them into snapshots or movies for totally original Dynamic Photo images. Important! • You will not be able to access the extracted sample subjects in built-in camera memory while a memory card is loaded in the camera.
Creating a Dynamic Photo Image Step 1: Shoot the subject. Dynamic Photo images are created by extracting the subject out of one image, and inserting it into another image (snapshot or movie). The term “subject” as used here refers to what you extract or crop out of the first image. Perform the following steps to shoot and extract the subject. To extract the subject, you shoot once with the subject against a background. Then you shoot the same background again, this time without the subject. (Shoot twice.
3. First, shoot the subject. Best results can be obtained with the camera secured on a tripod. With the camera pointed at the moving subject, press the shutter button to record. If you selected “Moving Subject”, the camera will record a series of Continuous Shutter (CS) images over a few seconds. First, let’s just have the subject wave or perform • To help ensure good cropping results... some other simple * See “Four Tips for Good Subject Cropping”. movement as we shoot.
Complete! The camera compares the images you shot in steps 3 and 4 and extracts the subject. The extracted subject image will appear on the monitor screen. If you selected “Moving Subject”, the 20 subject images that were recorded will scroll on the screen, creating the illusion of movement. • The background you shoot is not saved. Only the 20 cropped subject images are saved. • You can interrupt an ongoing image extraction process at any time by pressing [MENU] or [BS].
4. Use [4] and [6] to select the subject you want to insert and then press [SET]. * Only subjects that can be inserted into other images will appear at this time. 5. If you are inserting a subject into a movie an image will appear on the monitor screen showing the approximate location of the subject in the movie. Use [4] and [6] to shift the location to the position you want. After you are finished, press [SET].
Four Tips for Good Subject Cropping • When shooting the subject image, shoot against a white wall or some other surface whose color is different from that of the subject. The camera will not be able to crop the subject image properly if its color is the same as or similar to the background color. • Select a blank wall for the subject background, not one with a complex pattern or shapes. Find a blank wall whose color is different from that of the subject.
Move the subject away from the wall to avoid shadows! The camera may mistake shadows on the wall or floor caused by strong sunlight, illumination, or other light sources as part of the subject. Shadows tend to form when the subject is too close to a wall. Have the subject move as far away as possible from the wall. Do not use a moving background! Good cropping is not possible if anything besides the subject is moving in the images. For example, avoid breaking waves, trees blowing in the wind, etc.
CS speed Number of images Moving Subject 1sec (20fps) 20 frames per second 20 images Moving Subject 2sec (10fps) 10 frames per second 20 images Moving Subject 4sec (5fps) 5 frames per second 20 images Still Subject – 1 image Subject type Creates a moving subject from the CS images. • The subject is cropped out of each of the CS images. • “Moving Subject 1sec (20fps)” provides smooth subject movement, but recording time is limited to one second.
Extracting Text from an Image You can write text on a blank sheet of paper, shoot an image of it, and then use the following procedure to extract the text for insertion into an image. 1. Before shooting the subject in step 3 under “Step 1: Shoot the subject.” (page 6), press [SET]. 2. Select “Number of Shots” and then press [SET]. 3. Use [8] and [2] to select “Text” and then press [SET]. 4. Press the shutter button to shoot what is written on the paper.
Step 3: Have fun with Dynamic Photo. You can use the Dynamic Photo image you created in Step 2 in a variety of fun ways. On the camera Dynamic Photo images play back automatically as soon as you display them on the EXILIM monitor screen. On a TV Connect your EXILIM to a TV with the AV cable and you can enjoy watching Dynamic Photo images on your TV screen. Step 4: Converting a Dynamic Photo Still Image to a Movie (Movie Converter).
Step 5: Use Dynamic Studio to expand use of Dynamic Photo images to other applications. http://dynamicstudio.jp/ Dynamic Studio is a free online service that can be used to convert the moving subject extracted from Continuous Shutter images created during a Dynamic Photo operation to a movie file quickly and easily.