
User Guide


Table Of Contents
- UNPACKING
- CONTENTS
- QUICK START BASICS
- INTRODUCTION
- GETTING READY
- SHOOTING A SNAPSHOT
- SHOOTING A MOVIE
- USING BEST SHOT
- ADVANCED SETTINGS
- Changing the Focus Mode
- Correcting Image Brightness (EV Shift)
- Controlling White Balance
- Specifying ISO Sensitivity
- Specifying the Metering Mode
- Using the Camera’s Filter Effects
- Controlling Image Sharpness
- Controlling Color Saturation
- Adjusting Image Contrast
- Date Stamping Snapshots
- Using the On-screen Histogram to Check Exposure
- Other Useful Recording Functions
- VIEWING SNAPSHOTS AND MOVIES
- EDITING IMAGES
- USING AUDIO
- MANAGING YOUR FILES
- DELETING FILES
- OTHER SETTINGS
- Configuring Camera Sound Settings
- Turning the Startup Screen On or Off
- Specifying the File Name Serial Number Generation Rule
- Changing the Camera Date and Time Setting
- Using World Time
- Changing the Display Language
- Changing the USB Port Protocol
- [_] (REC) and [>] (PLAY) Button Settings
- Formatting Built-in Memory
- PRINTING
- USING THE CAMERA WITH A COMPUTER
- APPENDIX
175
PRINTING
■ Printing on a Printer that Supports
PictBridge or USB DIRECT-PRINT
You can connect the camera directly to a PictBridge or USB
DIRECT-PRINT compliant printer and print images without going
through a computer.
• The camera also allows easy connection to a printer. Before
connecting to a printer, be sure to perform the following
procedure first.
1. Press [MENU].
2. On the “Set Up” tab, select “USB” and then
press [X].
3. Use [S] and [T] to select the setting that suits
your printer and then press [SET].
4. Check the battery level indicator to make sure
that the battery is fully charged, and then turn
off the camera.
• If battery power is low, replace the battery.
• The camera does not draw power over the USB cable.
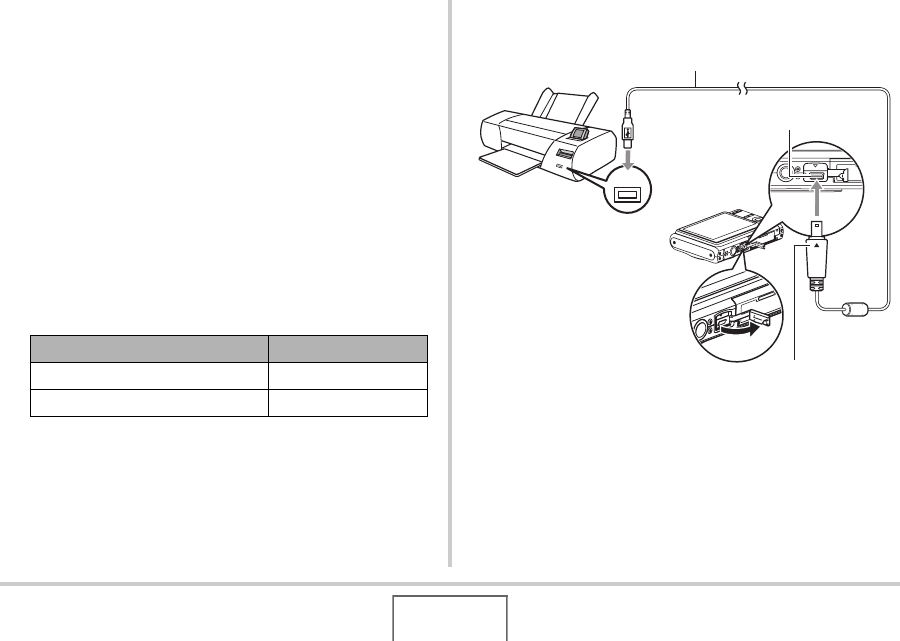
5. Use the USB cable that comes with the camera
to connect the camera to a printer.
• When connecting the bundled USB cable to the camera’s
USB/AV port, insert the plug into the port until you feel it
click securely into place. Failure to insert the plug fully
can result in poor communication or malfunction of the
connected components.
For this type of printer: Select this setting:
USB DIRECT-PRINT compatible Mass Storage
PictBridge compatible PTP
USB
USB Port
USB Cable
USB/AV connector
Making sure that the T mark on the camera is aligned with
the S mark of the USB cable plug, connect the cable to the
camera.
B