
Operation Manual


Table Of Contents
- Accessories
- Read this first!
- Contents
- General Guide
- Monitor Screen Contents and How to Change Them
- Quick Start Basics
- What you can do with your CASIO camera
- Tilting the Monitor Screen
- First, charge the battery prior to use.
- Configuring Basic Settings the First Time You Turn On the Camera
- Preparing a Memory Card
- Turning the Camera On and Off
- Holding the Camera Correctly
- To shoot a snapshot
- Viewing Snapshots
- Deleting Snapshots and Movies
- Snapshot Shooting Precautions
- Snapshot Tutorial
- Selecting the Recording Mode
- Using the Control Panel to Configure Camera Settings
- Shooting with Zoom
- Shooting a Burst of Images (CS)
- Triggering a Self-timer Operation with Motion (Motion Shutter)
- Shooting with Artistic Effects (Art Shot)
- Shooting Multiple Images Over a Specified Period (Interval Shot)
- Shooting with Triple Shot
- Recording Movies
- Using BEST SHOT
- To shoot with BEST SHOT
- Creating and Using Your Own Setups (Custom Shot)
- Recording Beautiful Portraits (Make-up)
- Shooting Three Versions of an Image with Different Skin Tone Settings (Make-up BKT)
- Digitally Correcting for Overexposure and Underexposure (HDR)
- Shooting with a Blurred Background (Blurred Background)
- Shooting a Panorama Image (Slide Panorama)
- Shooting with a Super Wide Angle of View (Wide Shot)
- Shooting RAW Images (Raw Image)
- Using a TV Screen to Shoot Snapshots (HDMI TV Output)
- Advanced Settings (REC MENU)
- Using the Menu Screen to Configure Recording Settings
- Shooting a Burst of Images (CS)
- Triggering a Self-timer Operation with Motion (Motion Shutter)
- Assigning a Recording Function to the Front Shutter Button (Front Shutter)
- Assigning Functions to the Function Ring and Control Dial (Key Customize)
- Using the Self-timer (Self-timer)
- Correcting Image Brightness (Exposure)
- Adjusting White Balance (White Balance)
- Specifying ISO Sensitivity (ISO)
- Specifying the ISO Sensitivity Upper Limit (ISO High Limit)
- Selecting a Focus Mode (Focus)
- Specifying the Auto Focus Area (AF Area)
- Shooting with Face Detection (Face Detection)
- Recording Beautiful Portraits (Make-up)
- Shooting with Continuous Auto Focus (Continuous AF)
- Specifying the Metering Mode (Metering)
- Reducing the Effects of Camera and Subject Movement (Anti-shake Functions)
- To select the snapshot image size (Image Size)
- Specifying Snapshot Image Quality (Image Quality)
- Movie Image Quality Settings (Movie Quality)
- Optimizing Image Brightness (Lighting)
- Controlling Image Sharpness (Sharpness)
- Controlling Color Saturation (Saturation)
- Adjusting Image Contrast (Contrast)
- Specifying Flash Intensity (Flash Intensity)
- Zooming with Super Resolution (Zoom (SR))
- Turning Digital Zoom On or Off (Digital Zoom)
- Using the Auto Focus Assist Light (AF Assist Light)
- Saving a Second Normal Image When Shooting With HDR Art (Double (HDR ART))
- Reducing Wind Noise during Movie Recording (Wind Noise Cut)
- Turning on Image Review (Review)
- Using Icon Help (Icon Help)
- Changing the Monitor Screen when Recording (Shooting Info)
- Configuring Power On Default Settings (Memory)
- Using the Menu Screen to Configure Recording Settings
- Viewing Snapshots and Movies
- Other Playback Functions (PLAY MENU)
- Using the Menu Screen to Select a Playback Operation and Configure Settings
- Assigning a Function to the Front Shutter Button (Front Shutter)
- Scrolling Images at High Speed or by Recording Date (Function Ring)
- Creating a Collage Image (Quick Collage)
- Playing a Slideshow on the Camera (Slideshow)
- Using Snapshots to Create a Movie (Make Movie)
- Editing a Movie on the Camera (Movie Editing)
- To merge two movies (Movie Merge)
- Creating a Snapshot of a Movie Frame (MOTION PRINT)
- Optimizing Image Brightness (Lighting)
- Adjusting White Balance (White Balance)
- Adjusting the Brightness of an Existing Snapshot (Brightness)
- Selecting Images for Printing (DPOF Printing)
- Protecting a File Against Deletion (Protect)
- Protecting an Image in a Group Against Deletion (Protect)
- Editing the Date and Time of an Image (Date/Time)
- Rotating an Image (Rotation)
- Resizing a Snapshot (Resize)
- Cropping a Snapshot (Trimming)
- Copying Files (Copy)
- Combining CS Images into a Single Still Image (CS Multi Print)
- Dividing Up a Group (Divide Group)
- Editing the Images in a Group (Edit Group)
- Using the Menu Screen to Select a Playback Operation and Configure Settings
- Connecting the Camera with a Smartphone (Wireless Connection)
- Controlling Your Camera with a Smartphone
- Using a Wireless Mode
- Getting Ready to Establish a Connection between a Smartphone and Your Camera
- Using a Smartphone as a Camera Remote Controller (Shoot with phone)
- Sending a Snapshot or Movie File from Camera Memory to a Smartphone (Send Selected Image)
- Configuring the Front Shutter Button to Send Images (Quick Send)
- Viewing Snapshots and Movies in Camera Memory on a Smartphone (View on phone)
- Configuring Wireless Connection Settings
- Entering the Camera’s Airplane Mode (Airplane Mode)
- Sending Images from the Camera to a Smartphone as They are Recorded (Auto Send)
- Specifying Images to be Sent by Auto Send (Auto Send File Settings)
- Resizing Snapshots before Sending Them to a Smartphone (Resize before send)
- Changing the Camera Password for Wireless LAN Connection (WLAN password)
- Unpairing the Camera from a Smartphone (Unpairing)
- Printing
- Using the Camera with a Computer
- Other Settings (SETTING)
- Using the Menu Screen to Configure Other Settings
- Enabling Power Saving (ECO Mode)
- Adjusting Monitor Screen Brightness (Screen)
- Configuring Camera Sound Settings (Sounds)
- Creating an Image Storage Folder (Create Folder)
- Time Stamping Snapshots (Timestamp)
- Auto Image Orientation Detection and Rotation (Auto Rotate)
- Specifying the File Name Serial Number Generation Rule (File No.)
- Configuring Sleep State Settings (Sleep)
- Configuring Auto Power Off Settings (Auto Power Off)
- Specifying the Operation when the Monitor Screen is Tilted (Screen Tilt)
- Configuring [>] Setting (PLAY)
- Disabling File Deletion (Delete Key)
- Configuring World Time Settings (World Time)
- Setting the Camera’s Clock (Adjust)
- Specifying the Date Style (Date Style)
- Specifying the Display Language (Language)
- Selecting the HDMI Terminal Output Method (HDMI Output)
- Formatting Built-in Memory or a Memory Card (Format)
- Resetting the Camera to Factory Defaults (Reset)
- Checking the Current Camera Firmware Version (Version)
- Using the Menu Screen to Configure Other Settings
- Appendix
111
Advanced Settings (REC MENU)
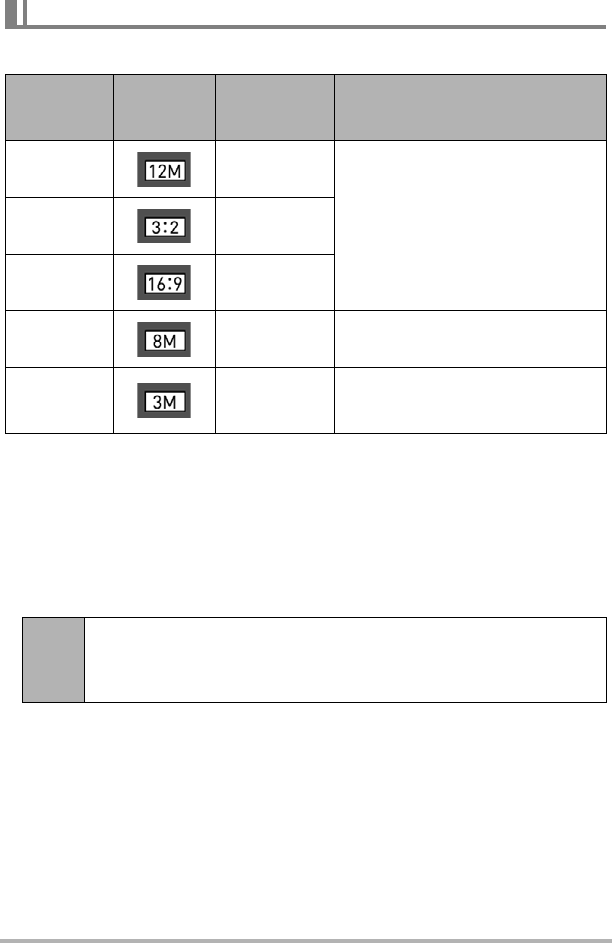
• The initial factory default image size setting is “12M”.
• Selecting “3:2” records images with an aspect ratio of 3:2, which matches the
standard aspect ratio of print paper.
• The letters “HDTV” stand for “High Definition Television”. An HDTV screen has an
aspect ratio of 16:9. Your camera can record images that are compatible with the
aspect ratio an HDTV screen.
• You should regard the print paper sizes suggested here as guidelines only (200 dpi
print resolution).
• Available image sizes are limited for some functions as noted below.
To select the snapshot image size (Image Size)
Menu item: Image Size
Image Size
(Pixels)
REC Screen
Icon Display
Suggested
Print Size and
Application
Description
12M
(4000
x
3000)
Poster
Good detail for better clarity even for
images cropped (page 140) from the
original
3:2
(4000
x
2656)
Poster
16:9
(4000
x
2240)
HDTV
8M
(3264
x
2448)
A4 Print Good detail
3M
(2048
x
1536)
3.5"×5" Print
Best when preserving memory
capacity is relatively more important
than image quality.
3:2,
16:9
These image sizes cannot be selected when using “High Speed CS” or
“HS Night Shot”. Selecting “3:2” or “16:9” in another mode and then
switching to “High Speed CS” or “HS Night Shot” will cause the image
size to change to “12M” automatically.