User Guide 5 .
Contents Getting Started with Your Phone ............................ 6 Phone Overview...........................................................................6 The Battery ................................................................................12 Charging the Battery .................................................................15 Battery Level ..............................................................................19 Turning the Phone On and Off .........................................
Contents Phone Numbers with Pauses.....................................................47 Searching Your Phone’s Memory ...............................................48 Making a Call from Your Phone’s Memory .................................49 Camera .................................................................... 52 Take Picture ...............................................................................54 Record Video .............................................................................
Voicemail .................................................................................110 Visual Voice Mail ......................................................................111 Mobile IM .................................................................................111 Email ........................................................................................111 Chat .........................................................................................112 Message Settings .................
Contents Bluetooth Menu........................................................................139 Power ..........................................................................140 Add New Devices .......................................................140 Options .......................................................................143 Sending and Receiving Name Cards .........................145 Sending and Receiving Images ................................147 Sounds Settings.............................
One Touch Dial ...........................................................168 Voice Privacy ..............................................................169 PC Connections ..........................................................169 DTMF Tones ................................................................169 Memory ....................................................................................170 Save Options ..............................................................170 Phone Memory ...........
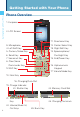
Getting Started with Your Phone Getting Started with Your Phone Phone Overview 1. Earpiece 2. LCD Screen 11. Directional Key 12. Center Select Key 13. Right Soft Key 14. Speakerphone/ Flashlight Key 15. End/Power Key 3. Microphone 4. Left Soft Key 5. Camera/Video Key 6. Send Key 7. Voicemail Key 8. Clear/Voice Commands Key 9. Shift Key 16. Alphanumeric Keypad 17. Vibrate Mode Key 10. Next Key 18. Charging/Data Port 19. Charge Indicator 20. Shutter Key 21. Side Select Key 22.
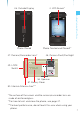
2. LCD Screen* Phone Closed Phone Twisted and Closed** Getting Started with Your Phone 26. Outside Display 27. Camera/Camcorder Lens* 28. Camera Flash/Flashlight 29. LOCK Switch 32. Speaker 31. Battery Cover 30. Internal Antenna Area*** *The surface of the screen and the camera/camcorder lens are made of reinforced glass. **For how to twist and close the phone, see page 27. ***For best performance, do not touch this area when using your phone.
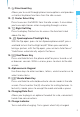
Getting Started with Your Phone 8 1. Earpiece 2. LCD Screen Displays messages and indicator icons. 3. Microphone 4. L Left Soft Key Press to display the Message menu or access the function listed above the key. 5. V Camera/Video Key With the flip open, press for quick access to the Take Picture mode or press and hold to access the Record Video mode. 6. D Send Key Press to place or answer calls. From the idle screen, press to access the All Calls list. 7.
Getting Started with Your Phone 11. a Directional Key Allows you to scroll through phone menu options and provides a shortcut to phone functions from the idle screen. 12. c Center Select Key Press to access the MENU from the idle screen. It also allows you to accept choices when navigating through a menu. 13. R Right Soft Key Press to display Contacts or to access the function listed above the key. 14.
Getting Started with Your Phone 10 20. S Shutter Key Press to capture an image. This key also functions as recording key in the Record Video mode. Press halfway to adjust and lock the focus without activating the shutter. 21. . Side Select Key With the flip open and music playing, press to skip to the next song. Press and hold to fast forward. When you Twist and Close the phone, press to select the Record Video mode or function. 22.
k Water Resistance NOTE To maintain water resistance: • Securely fasten the Charging/Data Port cover. • Completely close the battery cover and slide the Lock switch to LOCK. Getting Started with Your Phone The CASIO EXILIM Phone is water resistant. It provides reliable performance for outdoor life, in such conditions as driving rain or high humidity. The tested device meets the requirements of MIL-STD-810F (Rain & immersion 1m, 30 min) standard.
Getting Started with Your Phone NOTE The phone can be rinsed with clean water when dirty. To ensure water resistance, make sure that all covers are securely closed before rinsing. NOTE Periodically, clean the Charging Terminals with a dry cloth or cotton swab. Dust may cause some electrical connection problems. Avoid wiping with excessive force, which can disfigure the terminals.
k Installing the Battery Warning! Do not install the battery where water or liquid may fall directly on the phone or battery or in a humid place such as a bathroom. Otherwise, the electrical circuits may short or erode and cause the phone to malfunction. Getting Started with Your Phone Warning! Failure to follow the below directions for installing/removing the battery could result in product failure. 1. Slide the LOCK switch to FREE (direction of the arrow). 2.
7. Press the battery cover to the direction indicated 5 and 6 by Getting Started with Your Phone the arrows as shown in the figures. 8. Slide the Lock switch to LOCK. Warning! Do not press hard on the battery cover with the battery cover tab running over the phone because you may damage the battery cover tab. If you are using a wrist strap (included inbox), be careful not to get it caught between the battery cover and phone, in order to maintain waterproofing. k Removing the battery 1.
Charging the Battery To charge your battery: 1. Connect the Wall Charger to the Handset Charging Cradle (included inbox). 2. Plug the Wall Charger power plug into an electrical outlet. 3. Insert the CASIO EXILIM Phone into the Handset Charging Cradle in the order 2, 3 shown in the figure below. Getting Started with Your Phone Warning! Do not leave the removed battery where it can overheat such as near a flame, stove, or under direct sunlight. Otherwise, it can ignite, burst, malfunction, or cause a fire.
Getting Started with Your Phone Warning! Do not connect another Wall Charger to the Charging/Data Port (either directly or through the Headset Adapter), when charging the phone inserted in the Handset Charging Cradle. Damage or overheat may result. NOTE The phone can be inserted into the Handset Charging Cradle even if you Twist and Close it. For “Twist and Close the phone” see page 27.
3. Insert the CASIO EXILIM Phone into the Handset Charging Cradle to begin charging. Getting Started with Your Phone Warning! When connecting the USB cable to the Handset Charging Cradle, check that the tip of the USB cable connector matches the shape of the Handset Charging Cradle jack before inserting. Warning! • Do not use the Handset Charging Cradle where water or liquid may fall directly on it or in a humid place such as a bathroom.
Getting Started with Your Phone NOTE Charging by using the USB cable may take more time than using the Wall Charger. Charging time when using the USB cable may vary depending on the PC to be connected. k Charging the battery by directly connecting the Wall Charger You can also charge the battery by directly connecting the Wall Charger to the Charging/Data Port located at the right side of the handset and plugging the power plug into an electrical outlet.
NOTE The charge time varies depending upon the battery level. NOTE If you turn on Auto Start On/Off from the Settings & Tools menu > Display Settings > Slide Show, the phone automatically starts the Slide Show when the phone is twisted and closed and inserted into the Handset Charging Cradle for charging. It takes longer to fully charge the phone if the slide show is displayed while charging. For “Auto Start On/Off” see page 155.
Getting Started with Your Phone Turning the Phone On and Off k Turning the Phone On 1. Press and hold the End/Power Key until the LCD screen lights up. NOTE Avoid any unnecessary contact with the antenna while your phone is on. k Turning the Phone Off 1. Press and hold the End/Power Key until the LCD screen turns off. Making Calls 1. From the idle screen, enter the phone number (include the area code if needed). 2. Press the Send Key to place the call. 3. Press the End/Power Key to end the call.
Receiving Calls 1. When the phone rings or vibrates, press the Send Key to NOTE Since the answer option is set to Flip Open as default, you can directly answer an incoming call by simply opening the phone. For how to select an answer option, see page 167. 2. Press the End/Power Key to end the call. Getting Started with Your Phone answer the call. Screen Icons When the phone is turned on, the top line of the LCD screen displays icons indicating the status of the phone. Digital indicator.
Getting Started with Your Phone SSL (Secure Sockets Layer) is a protocol developed by Netscape Communications that uses encryption to secure data through the public Internet from client to server. TTY mode On Bluetooth® On Bluetooth® Device Connected Bluetooth® Discovery Mode Alarm Only Vibrate Only Sound Off Alarm On Calendar Missed Calls New Message New Voicemail Speakerphone mode Menu Access To display the Main Menu from the idle screen, press the Center Select Key [MENU].
NOTE For information about how to switch between Main Menu types, see page 154. k Grid Menu Getting Started with Your Phone NOTE All directions in this manual assume that Main Menu Settings is set to Grid and Multimedia, and Display Themes is set to Optical Black, which are the default settings. The Grid Menu has nine items. 1. From the idle screen, press the Center Select Key [MENU]. 2.
Getting Started with Your Phone Menu Overview CONTACTS 1. New Contact 2. Contact List 3. Groups 4. Speed Dials 5. In Case of Emergency 6. My Name Card MESSAGING 1. New Message 2. Inbox 3. Sent 4. Drafts 5. Voicemail 6. Visual Voice Mail 7. Mobile IM 8. Email 9. Chat RECENT CALLS 1. Missed 2. Received 3. Dialed 4. Blocked* 5. All 6. View Timers GAMES MEDIA CENTER 1. Music & Tones 1. V CAST Music | Rhapsody 2. Get New Ringtones 3. My Ringtones 4. My Music 5. My Sounds 6. Sync Music 2. Picture & Video 1.
5. Browse & Download 6. Extras VZ NAVIGATOR V CAST VIDEO SETTINGS & TOOLS 1. My Verizon 2. Tools 1. Voice Commands 2. Calculator 3. Calendar 4. Alarm Clock 5. Stop Watch 6. Countdown Timer 7. World Clock 8. Notepad 3. Bluetooth Menu 1. Add New Devices 4. Sounds Settings 1. Call Sounds 1. Call Ringtone 2. Call Vibrate 2. Alert Sounds 1. TXT Message 2. Media Message 3. Voicemail 4. Emergency Tone Getting Started with Your Phone MY VIDEOS 3. Keypad Volume 4. Service Alerts 1. ERI 2. Minute Beep 3.
Getting Started with Your Phone 26 6. Phone Settings 1. Airplane Mode 2. Set Shortcuts 1. Set My Shortcuts 2. Set Directional Keys 3. Voice Commands 4. Language 5. Location 6. Security 1. Edit Codes 2. Restrictions 3. Phone Lock Setting 4. Lock Phone Now 5. Restore Phone 7. System Select 8. NAM Selection 7. Call Settings 1. Answer Options 2. Auto Retry 3. TTY Mode 4. One Touch Dial 5. Voice Privacy 6. PC Connections 7. DTMF Tones 8. Memory 1. Save Options 2. Phone Memory 3. Card Memory 9. Phone Info 1.
Twist and Close the phone 2.-1 2.-2 2.-3 Getting Started with Your Phone When you Twist and Close the phone, you can take pictures or record videos in a manner similar to a digital camera. 1. Open the display in the direction shown in figure 2.-1. 2. Twist 180 degrees in the direction shown in figure 2.-2. 3. Close the display in the direction shown in figure 2.-3. Warning! • When rotating the display, rotate clockwise as shown in the figure 2.-2. • Do not rotate the display more than 180 degrees.
Getting Started with Your Phone NOTE This procedure described in this manual assumes the phone is opened with the display facing in unless noted otherwise. k Function Select Menu When you Twist and Close the phone with the idle screen displayed, the Function Select Menu displays automatically. From the Function Select Menu, you can turn on the camera and take pictures and videos, display pictures saved in My Pictures, or start a Slide Show. 1. Twist and Close the phone with the idle screen displayed. 2.
k Installing a Memory Card Warning! When installing or removing a memory card, avoid touching the memory card contacts and avoid damaging the memory card. Either can cause malfunction or loss of data. Warning! The front and back of the memory card look different. When inserting the memory card, make sure the correct side is facing up. If not, the card may become stuck or damaged.
Getting Started with Your Phone 3. Close the Memory Card Slot cover. Warning! Failure to fully close the Memory Card Slot cover after installing or removing a memory card can allow water to leak inside and create the risk of malfunction. k Removing a Memory Card Warning! Never remove a memory card from the phone while it is being accessed. Doing so can damage the memory card or the data stored on it. 1. Open the Memory Card Slot cover. 2. Gently press the memory card into the Memory Card Slot.
NOTE The memory card is very small. Make sure you do not drop it. Getting Started with Your Phone 4. Close the Memory Card Slot cover.
Quick Access to Convenient Features Quick Access to Convenient Features Using the Headset Adapter You can use the Headset Adapter included in the box to attach a standard 2.5mm headset to the phone. It also allows simultaneous connection of the Wall Charger. Wall Charger Headset Adapter Charging/ Data Port Headset Vibrate Mode Vibrate Mode mutes key tones and activates an alert for an incoming call or message. To activate Vibrate Mode from the idle screen, press and hold #.
NOTE For information about how to lock and unlock the phone, see page 163. If you press Mute during a call, the person you are speaking with cannot hear you or any sounds from your side of the conversation. However, you can still hear them. To activate Mute: 1. During a call, press the Left Soft Key [Mute]. 2. To unmute, press the Left Soft Key [Unmute]. Volume Quick Adjustment 1.
Quick Access to Convenient Features Call Waiting If you are on a call and you receive another incoming call, you will hear two beeps. With Call Waiting, you may put the active call on hold while you answer the incoming call. To use Call Waiting: 1. Press the Send Key to answer the waiting call. 2. Press the Send Key again to switch between calls. Caller ID Caller ID displays the number of the person calling when your phone rings.
Speed Dialing NOTE You will need to activate One-Touch Dialing to use Speed Dialing, see page 168. Quick Access to Convenient Features Speed Dialing is a convenient feature that allows you to make phone calls quickly and easily with a few keystrokes. Your phone recalls the number from your Contacts, displays it briefly, and then dials it. Speed Dial number 1 is automatically set for Voicemail. For detailed instructions on how to save a phone number to Speed Dial, see page 120.
Entering and Editing Information Text Input Entering and Editing Information You can input and edit your Banner, Schedule, Contacts, and Messages. k Key Functions L * 0 # C Left Soft Key: Press to select one of the following text input modes: T9 Word/Abc/ABC/123/Symbols/Add Quick Text Shift: Press to change case. T9 text: T9 Word → T9 WORD → T9 word Abc text: Abc → ABC → abc Next: In T9 Word mode, press to display other matching words.
NOTE Abc is the default text entry mode. k Using T9 Word Mode Text Input T9 Word mode incorporates a built-in-dictionary to determine a word based on the entered characters. A word can be entered more quickly by pressing each key once per character. To type the message “Call the office.” follow these steps from the text entry screen: 1. Press the Left Soft Key, select T9 Word, then press the Center Select Key [OK]. 2. Press 2 2 5 5. 3. Press # to complete the word and add a space. 4.
Entering and Editing Information k Adding Words to the T9 Database If a word is not in the T9 database, add it by using Abc (Multi-tap) mode text entry. To add a new word: 1. From the text entry screen, in Abc mode, press 5 5 6 6 6 7. “Kop” is displayed. 2. Press the Left Soft Key, select T9 Word, then press the Center Select Key [OK]. 3. Press and hold the Clear Key C to erase the existing word. 4. Press 5 6 7. “Kop” is displayed. 5. Press # to accept your choice and add a space.
Contacts in Your Phone’s Memory k Contacts Entries This provides easy access to your most frequently dialed phone numbers. You may store up to 500 entries. 1. From the idle screen, enter the phone number (up to 48 characters) you want to save. 2. Press the Left Soft Key [Save]. NOTE Press the Right Soft Key [Options] to access the following options: 2-Sec Pause Insert a 2-sec Pause in the number. Wait Insert a Wait pause in the number. New TXT Message Send a text message to the contact.
6. CONTACT SAVED appears on the display. The phone number Contacts in Your Phone’s Memory reappears on screen. Press the End/Power Key to exit, or press the Send Key to call the number. NOTE Use Update Existing to add another phone number to a contact already stored in memory, see page 43. Options to Customize Your Contacts Once the basic phone number and name information is stored in your Contacts, you can edit and/or customize the entries. 1.
4. Press the Directional Key j up or down to select the Group, NOTE You can change the name of the group, add groups, and delete groups, see page 118. k Changing the Call Ringtone To identify who is calling by setting different ringtones for different phone numbers in your Contacts: 1. From the idle screen, press the Right Soft Key [Contacts], then press the Directional Key j up or down to highlight an entry. 2. Press the Left Soft Key [Edit]. 3.
Contacts in Your Phone’s Memory k Adding or Changing the Pictures ID To select a picture or graphic to assign to a Caller ID: 1. From the idle screen, press the Right Soft Key [Contacts], then press the Directional Key j up or down to highlight an entry. 2. Press the Left Soft Key [Edit]. 3. Press the Directional Key j up or down to highlight Picture, then press the Left Soft Key [Set]. 4. Press the Directional Key a up, down, left or right to select a picture, then press the Center Select Key [OK]. 5.
5. Use the keypad to enter a Speed Dial digit. Press the Center Editing Contact Entries k Adding a Phone Number from the idle screen 1. From the idle screen, enter the phone number you want to save. 2. Press the Left Soft Key [Save]. 3. Press the Directional Key j up or down to highlight Update Contacts in Your Phone’s Memory Select Key [SET], or press the Directional Key j up or down to highlight the Speed Dial digit, then press the Center Select Key [SET]. 6.
k Adding a Phone Number from the Contact List Screen 1. From the idle screen, press the Right Soft Key [Contacts]. Your Contacts display alphabetically. Contacts in Your Phone’s Memory 2. Press the Directional Key j up or down to highlight the Contact entry you want to edit, then press the Left Soft Key [Edit]. 3. Press the Directional Key j up or down to highlight the phone number field you want to add, enter the number, then press the Center Select Key [SAVE] to save. A confirmation message appears.
3. Press the Directional Key j up or down to highlight the phone k Editing Stored Phone Numbers 1. From the idle screen, press the Right Soft Key [Contacts]. Your Contacts display alphabetically. 2. Press the Directional Key j up or down to highlight the Contacts in Your Phone’s Memory number you want to assign as the Default Number, then press the Right Soft Key [Options]. 4. Press the Directional Key j up or down to highlight Set As Default, then press the Center Select Key [OK]. 5.
Deleting k Deleting a Phone Number from a Contact 1. From the idle screen, press the Right Soft Key [Contacts]. 2. Press the Directional Key j up or down to highlight the Contact entry, then press the Left Soft Key [Edit]. Contacts in Your Phone’s Memory 3. Press the Directional Key j up or down to highlight the phone number to be deleted. 4. Press and hold the Clear Key C to delete the number. 5. Press the Center Select Key [SAVE]. A confirmation message appears. k Deleting a Contact Entry 1.
6. Press the Center Select Key [OK]. A confirmation message appears. Phone Numbers with Pauses k Wait (W) The phone stops dialing until you press the Left Soft Key [Release] to advance to the next number. Contacts in Your Phone’s Memory Pauses are used for automated systems (i.e. voicemail or calling cards). Insert a pause after a phone number then enter another group of numbers. The second set of numbers is dialed automatically after the pause.
8. Enter a name (up to 32 characters), then press the Center Contacts in Your Phone’s Memory Select Key [SAVE]. A confirmation message appears. k Adding a Pause to an Existing Number 1. From the idle screen, press the Right Soft Key [Contacts]. 2. Press the Directional Key j up or down to highlight the Contact entry to edit, then press the Left Soft Key [Edit]. 3. Press the Directional Key j up or down to highlight the number. 4. Press the Right Soft Key [Options]. 5.
k Scrolling Through Your Contacts 1. From the idle screen, press the Right Soft Key [Contacts]. Your CONTACT LIST is displayed alphabetically. 2. Press the Directional Key j up or down to scroll through the list. Your CONTACT LIST is displayed alphabetically. 2. Press (or press repeatedly) the key on the keypad that corresponds with the search letter. Making a Call from Your Phone’s Memory Once you have stored phone numbers into your Contacts, you can place calls to those numbers quickly and easily.
Contacts in Your Phone’s Memory NOTE Pressing the Directional Key j up or down to select the Contact entry and then pressing the Send Key will dial the Default Number of the Contact entry automatically. If multiple numbers are saved in the Contact entry, press the Directional Key j up or down to select the Contact entry and then press the Directional Key s left or right to select the number you want to dial, then press the Send Key. k From Recent Calls 1.
calling feature. For detailed instructions on how to save a phone number to Speed Dial, see page 120. NOTE You will need to activate One-Touch Dialing to use Speed Dialing, see page 168. displays it briefly, and then dials it. k For Double-Digit Speed Dials 1. Press the first Speed Dial digit, then press and hold the key of Contacts in Your Phone’s Memory k For Single-Digit Speed Dials 1. Press and hold the Speed Dial digit. 2.
Camera Camera Warning! The body of the phone may become warm when the monitor screen is displayed for a long time while taking photos or the camera is repeatedly zoomed in/out. In such case, do not keep your skin in contact with the phone too long because low temperature burn can occur. k How to hold your phone when shooting When shooting, hold the phone firmly with both hands while taking care not to cover the lens or flash with your finger or wrist strap.
• By using the self-timer, you can avoid blurred images due to camera movement because you do not press the shutter when shooting. • You can reduce image blurring due to camera movement by turning on the Image Stabilizer. • Be especially careful of image blurring when shooting in a dark area. Camera k Viewing direction of saved picture and video The top of any picture or video taken is always in the direction of the Camera/Camcorder Lens.
Warning! Fingerprint or oil adhered on the lens surface causes blurred vision. Wipe the lens surface with a soft cloth such as one for cleaning glasses, before taking a picture or recording a video. Do not wipe it strongly to avoid damaging the lens surface. Camera Take Picture In Take Picture mode, you can take pictures with resolution up to 2560 × 1920. k Options (Flip Open) You can change the camera options. 1. From the idle screen, press the Camera/Video Key V. 2.
Self Timer Macro Brightness White Balance Display Setting Video Camera Shutter Sound Memory To activate the camera’s timer function. (Off / 3 sec / 5 sec / 10 sec) Off/On To increase or decrease the brightness. (–5 to +5) Auto/Sunny/Shade/Tungsten/Fluorescent To select the icon display method. (Timeout/ Always) Shutter/Silent To select the picture storage location. (Phone/Card) To change to Record Video mode.
Camera NOTE You can turn on the camera’s Image Stabilizer to reduce image blur due to subject movement or camera movement when shooting a moving subject using telephoto, when shooting a fast-moving subject, or when shooting under dim lighting conditions. • If you set the Shot Mode to Multi Shot, Image Stabilizer is fixed to Off. NOTE The flash of the CASIO EXILIM Phone is provided only as an aid when shooting in a dark area and is not as bright as a normal camera flash.
4. Select the Option you want to change by pressing the Volume Keys <> left or right and then press the Side Select Key . [OK] to view your options. 5. Select the setting by pressing the Volume Keys <> left or right and then press the Side Select Key . [OK] to save the setting. Camera NOTE For “Options (Flip Open)” see page 54. k Normal Shot (Flip Open) 1. From the idle screen, press the Camera/Video Key V. 2.
Camera • 8: Changes the Best Shot setting. (Off/Person/Scenery/ Night View/Person & Scenery/Twilight/Food/Character/ Sports/Party/Monotone/Sepia/Reverse/High Sharpness/ High Contrast/Vivid) • *: Changes the Macro setting. (Off/On) • #: Changes the Flash setting. (Auto Flash/Off/On/Only This Shot) • 0: Displays the Key Guide. • Right Soft Key [Options]: Displays the Options menu • Left Soft Key [My Pics]: Displays My Pictures 3. To take the picture, press the Center Select Key [TAKE]. 4.
NOTE If you press the Shutter Key S all the way or press the Center Select Key [TAKE] without locking AF, focus is adjusted and the picture is taken after you press the key. Camera NOTE When the Auto Focus setting is set to 9 Point AF, nine focus rings appear. When the focus is locked, 3 focus rings change from white to green and the lock clicks. If the focus cannot be locked, the focus ring turns red. NOTE The LED next to the lens instantly blinks red when you activate the shutter.
Camera k Normal Shot (Twist and Close) When you twist and close the phone, you can take pictures in a manner similar to a digital camera. 1. Twist and close the phone with the idle screen displayed. 2. Press the Shutter Key S to select Take Picture. 3. Press the Volume Keys <> left or right to zoom in/out. 4. To take the picture, press the Shutter Key S [TAKE]. 5. Select from the following options: • Press the Shutter Key S [Save]. The picture is stored in My Pictures. • Press the Side Select Key . [SEND].
4. Select from the following options: • Press the Shutter Key S [Save]. The picture is stored in My Pictures. • Press the Side Select Key . [SEND]. The picture is stored in My Pictures, and then you can send a Picture Message. Camera NOTE Up to 16 blue frames and one red frame appear on the picture. The blue frames are the selectable outlines of the subject and the red frame is the currently selected outline. If there is no selectable outline around the subject, Perspective Adjustment cannot be performed.
Camera • Press the Center Select Key [Options] to access the following options: View Displays the selected picture in full screen mode. Save All Saves all pictures in My Pictures. Erase Erases the all pictures. • Press the Right Select Key [Erase] to erase the all pictures. NOTE When you set the Shot Mode to Multi Shot, Image Stabilizer is fixed to Off. When set to Best Shot, Night View, Twilight, and Party, Multi Shot cannot be selected.
3. Press the Side Select Key . [Options]. 4. Press the Volume Keys <> left or right to select Shot Mode, then press the Side Select Key . [OK]. 5. Press the Volume Keys <> left or right to select Multi Shot, then press the Side Select Key . [OK]. 6. To take the picture, press the Shutter Key S [TAKE]. 7. Press the Volume Keys <> left or right to select a Camera picture. You can select from the following options: • Press the Side Select Key .
k Take Picture mode Icon Reference The following icons are displayed in the Take Picture mode screen.
Resolution 2560×1920 2048×1536 1600×1200 1280×960 640×480 160×120 Quality Camera 320×240 Normal Fine Flash Auto Flash Off On Only This Shot Macro On Brightness (Value) White Balance Sunny Shade Tungsten Fluorescent Shutter Sound is set to silent.
Memory Phone Card Zoom (Step) Key Guide Camera Record Video In Record Video mode you can record video with sound at resolution up to 320 × 240. k Options (Flip Open) 1. From the idle screen, press and hold the Camera/Video Key V. 2.
White Balance Display Setting Start Sound Memory Camera Camera Auto/Sunny/Shade/Tungsten/ Fluorescent To select the icon display method. (Timeout/Always) Sound/Silent To select the video storage location. (Phone/Card) To change to Take Picture mode. NOTE From Record Video mode, you can change to Take Picture mode by pressing the Camera/Video Key V.
3. Press the Side Select Key . [OPTIONS]. Press the Volume Camera Keys <> left or right to select the option you want to change and then press the Side Select Key . [OK]. 4. Select the setting while pressing the Volume Keys <> left or right and then press the Side Select Key . [OK]. NOTE For “Options (Flip Open)” see page 66. k Record Video (Flip Open) 1. From the idle screen, press and hold the Camera/Video Key V. 2.
Camera • Right Soft Key [Options]: Displays the Options menu • Left Soft Key [My Videos]: Displays My Videos 3. To begin recording, press the Center Select Key [REC]. The following keys are available while recording: • #: Changes the Recording Light setting. (Auto/Off/On/Only This Shot) • Right Soft Key [Cancel]: Cancels recording • Left Soft Key [Pause]: Pauses recording 4. To stop recording, press the Center Select Key [STOP]. 5. Select from the following options: • Press the Left Soft Key [Save].
Camera 4. To begin recording, press the Shutter Key S [REC]. The following keys are available while recording: • Back Key , [Cancel]: Cancels recording • Side Select Key . [Pause]: Pauses recording 5. To stop recording, press the Shutter Key S [Stop]. 6. Select from the following options: • Press the Shutter Key S [Save]. The video is stored in My Videos. • Press the Side Select Key . [SEND]. The video is stored in My Videos, and then you can send a Video Message.
Color Effects Black & White Effect Negative Effect Sepia Effect Macro On Call Interruption is set to Block. White Balance Sunny Camera Brightness (Value) Shade Tungsten Fluorescent Start Sound is set to silent.
MEDIA CENTER Media Center gives you customizable service right on your wireless device that lets you get Ringtones, play games, surf the web, get up-to-the-minute information and more. MEDIA CENTER k Downloading Applications You can use MEDIA CENTER and download applications anywhere on the Verizon Wireless network, as long as you have a digital signal available for your handset. k Access and Options 1. From the idle screen, press the Center Select Key [MENU].
5. Browse & Download Everything you need to know while you are on the go. Look for a great restaurant, the nearest ATM, etc. 6. Extras Access additional applications. Music & Tones k Access and Options 1. From the idle screen, press the Center Select Key [MENU]. MEDIA CENTER You can personalize your phone’s ringtones and download music. You can select from a wide variety of genres. Select Media Center and press the Center Select Key [OK]. 2. Press 1 Music & Tones. 3. Select a submenu. 1.
MEDIA CENTER k Purchase songs on your V CAST Music with Rhapsody ® capable device* When you purchase music from your V CAST Music with Rhapsody® capable device, you also get a second copy that can be downloaded to your PC from the V CAST Music with Rhapsody ® software. * Per-song charges apply. 1. From the idle screen, press the Center Select Key [MENU]. Select Media Center and press the Center Select Key [OK]. 2. Press 1 Music & Tones, 1 V CAST Music | Rhapsody. 3.
Get New Ringtones To connect to MEDIA CENTER and download various ringtones: 1. From the idle screen, press the Center Select Key [MENU]. Select Media Center and press the Center Select Key [OK]. 2. Press 1 Music & Tones, 2 Get New Ringtones, 1 Get New Applications. 3. Follow the on screen prompts to download. To select a desired ringtone, or download a new ringtone: 1. From the idle screen, press the Center Select Key [MENU]. Select Media Center and press the Center Select Key [OK]. 2.
MEDIA CENTER • Press the Right Soft Key [Options] to access the following options: Erase* Erase the current ringtone from your phone. Rename* To edit the ringtone’s title. Lock/Unlock* Lock or unlock the current ringtone in your phone. Erase All* To erase all the ringtones in your phone. File Info Displays information on the selected ringtone. *These options only appear for a downloaded ringtone.
My Sounds MEDIA CENTER To select a desired sound: 1. From the idle screen, press the Center Select Key [MENU]. Select Media Center and press the Center Select Key [OK]. 2. Press 1 Music & Tones, 5 My Sounds. 3. Press the Directional Key j up or down to highlight a sound, then press the Center Select Key [PLAY] to hear the sound. Press the Center Select Key [STOP] to stop playing the sound. 4.
MEDIA CENTER 3. Press the Center Select Key [OK] to begin recording. When done, press the Center Select Key [STOP] to finish recording. The recording is automatically saved to your My Sounds list. 4. Your recording is saved with a number. To rename your recording, scroll to it with the Directional Key, then press the Right Soft Key [Options]. 5. Press 3 Rename. 6. Press and hold the Clear Key C to erase the number. 7. Enter the new name for your recording, then press the Center Select Key [OK].
NOTE Your phone comes with 5 preloaded sounds: clapping, crowd roar, happy birthday, rainforest, and train. These cannot be erased. Sync your music from your PC to your V CAST Music with Rhapsody® wireless device MEDIA CENTER This option allows you to transfer music files from your PC. In order to use this option, you must install V CAST Music with Rhapsody® on your PC. 1. Open V CAST Music with Rhapsody ®. Don’t have V CAST MUSIC with Rhapsody ®? Download it for free at www.verizonwireless.com/music. 2.
Picture & Video k Quick Access to Picture & Video Feature You can view, take and trade your digital pictures and video right from your wireless phone. k Access and Options 1. From the idle screen, press the Center Select Key [MENU]. MEDIA CENTER Select Media Center and press the Center Select Key [OK]. 2. Press 2 Picture & Video. 3. Select a submenu. 1. V CAST Videos 2. Get New Pictures 3. My Pictures 4. My Videos 5. Take Picture 6. Record Video 7.
k Browsing, Selecting, and Playing Video Clips 1. From the idle screen, press the Center Select Key [MENU]. Select Media Center and press the Center Select Key [OK]. 2. Press 2 Picture & Video. Press 1 V CAST Videos. 3. Press the Directional Key a up, down, left or right to select one of the video clip categories. 4. Select the content provider and then press the Center Select Key [OK] to open the selected category. then press the Center Select Key [OK]. 6.
3. Press 2 Save Video and then press the Center Select Key [OK]. MEDIA CENTER 4. To agree to the charge, press the Directional Key j up or down to select Yes and then press the Center Select Key [OK] to start downloading the video clip. 5. After download is complete, the message “Download Complete Play Video Now?” will appear on your phone’s display. 6. Press the Directional Key j up or down to select Yes to play the video clip. 7. The video clip is automatically saved in My Videos .
2. After reading the description of the video clip, press the Right Soft Key [Options]. 3. Select Alerts and then press the Center Select Key [OK]. 4. Select Configure alerts and then press the Center Select Key [OK]. 5. Select the type of alert you want and then press the Center Select Key [OK]. 6. Using the Directional Key, highlight Save and press the Center NOTE Alerts are billed as incoming TXT Messages. MEDIA CENTER Select Key [OK] to sign up for the selected alert.
MEDIA CENTER My Pictures 84 In My Pictures you can view all the pictures you have taken, store selected images in your phone, send pictures to the Online Album, delete images and access additional picture options. 1. From the idle screen, press the Center Select Key [MENU]. Select Media Center and press the Center Select Key [OK]. 2. Press 2 Picture & Video, 3 My Pictures. 3. Press the Directional Key a up, down, left or right to select your desired pictures, then press the Right Soft Key [Options]. 4.
k Browse My Pictures (Twist and Close) MEDIA CENTER You can display pictures saved in My Pictures with the phone twisted and closed. 1. Twist and close the phone with the idle screen displayed. 2. Press the Volume Key >. 3. Press the Volume Keys <> left or right to select the picture you want to view, then press the Side Select Key . [View]. The following keys can be used while a picture is displayed in full screen mode.
MEDIA CENTER k Zoom You can zoom pictures saved in My Pictures. 1. From the idle screen, press the Center Select Key [MENU]. Select Media Center and press the Center Select Key [OK]. 2. Press 2 Picture & Video, 3 My Pictures. 3. Press the Directional Key a up, down, left or right to select your desired picture, then press the Center Select Key [VIEW]. 4. Press the Right Soft Key [Options], then press 5 Zoom/ Pan. 5. Press the Right Soft Key [Zoom+] or the Left Soft Key [Zoom].
NOTE The resized picture is saved in My Pictures as a file separate from the original file. NOTE Only pictures taken with CASIO EXILIM Phone can be resized. k Crop MEDIA CENTER You can crop pictures saved in My Pictures. 1. From the idle screen, press the Center Select Key [MENU]. Select Media Center and press the Center Select Key [OK]. 2. Press 2 Picture & Video, 3 My Pictures. 3. Press the Directional Key a up, down, left or right to select your desired picture, then press the Center Select Key [VIEW].
NOTE Only pictures taken with CASIO EXILIM Phone can be cropped. MEDIA CENTER k Perspective Adjustment (Pers.Adj) If you need to adjust the perspective of a picture after shooting a timetable or poster, you can select and cut the outline of the picture and adjust it to appear as a rectangular image taken straight from the front. 1. From the idle screen, press the Center Select Key [MENU]. Select Media Center and press the Center Select Key [OK]. 2. Press 2 Picture & Video, 3 My Pictures. 3.
NOTE Only pictures taken with CASIO EXILIM Phone can be adjusted by Perspective Adjustment. Note that the perspective cannot be adjusted for the picture with the resolution of 2560 × 1920. k Slide Show (Flip Open) MEDIA CENTER You can display the pictures saved in My Pictures as a slide show. 1. From the idle screen, press the Center Select Key [MENU]. Select Media Center and press the Center Select Key [OK]. 2. Press 2 Picture & Video, 3 My Pictures. 3. Press the Right Soft Key [Options]. 4.
MEDIA CENTER k Slide Show (Twist and Close) You can start a slide show with the phone twisted and closed. 1. Twist and close the phone with the idle screen displayed. 2. Press the Volume Key <. The following keys can be used while playing a slide show: • Volume Keys <>: Displays the previous/next picture • Back Key , [Back]: Finishes the Slide Show. Takes you back to the menu. • Side Select Key . [Pause]: Pauses the Slide Show k Erase Picture 1. From the idle screen, press the Center Select Key [MENU].
5. Press the Center Select Key [OK] to select Yes. A confirmation message appears. My Videos MEDIA CENTER In My Videos, you can view all the videos you have taken, store selected video in your phone, send video to the Online Album, delete video, and access additional video options. 1. From the idle screen, press the Center Select Key [MENU], then use the Directional Key a to select My Videos and press the Center Select Key [OK]. 2.
MEDIA CENTER NOTE When you press the Right Soft Key [Options] after selecting a video in My Videos, you can select the following options: Send Send a Video message. Record Video Record a new video. To Online Album Access the Online Album. V CAST Videos Access V CAST Videos. Set As Wallpaper Set the selected video as wallpaper. Rename Rename the selected video. Move Move the selected video to the other save location.
3. Press the Center Select Key [OK] to select Yes. A confirmation message appears. k Erase All Videos 1. From the idle screen, press the Center Select Key [MENU], MEDIA CENTER then use the Directional Key a to select My Videos and press the Center Select Key [OK]. 2. Press the Right Soft Key [Options]. 3. Press the Directional Key j up or down to select Erase All, then press the Center Select Key [OK]. Highlight either erase From Card or From Phone and then press the Center Select Key [OK].
2. Press 1 Get new Applications. 3. Choose the software you want from the list displayed on the screen. Follow the on-screen prompts to download. k Playing Downloaded Games 1. From the idle screen, press the Center Select Key [MENU], MEDIA CENTER then use the Directional Key a to select Games and press the Center Select Key [OK]. 2. Press the Directional Key j up or down to select the application, then press the Center Select Key [OK]. 3. Follow the on-screen prompts.
2. Press 4 Mobile Web. The Dashboard screen launches. Select Mobile Web and press the Center Select Key [OK]. The browser launches. NOTE This feature is currently unavailable outside of the United States. It is only available within the Verizon Wireless Enhanced Services Area. End a Browser session by pressing the End/Power Key.
Anchor Link Info • The following additional options are available if Image is selected: Save Image/Save Selected Image/Anchor Link Info • The options in WML contents are also available when WML contents are displayed. MEDIA CENTER k Changing Display Mode The available Display Modes are Horizontal Scroll On and Horizontal Scroll Off. When switched to Horizontal Scroll On, the horizontal scroll bar appears and you can scroll horizontally.
k Settings MEDIA CENTER Allows you to set the Mobile Web settings. 1. Press the Right Soft Key [Menu] while browsing. 2. Press the Directional Key j up or down to select Settings, then press the Center Select Key [OK]. 3. Select one of the following options: SSL Info Current Certificate/Root Certificate. Cookie Setting Enable/Enable(Sending)/Enable(Receiving)/Enable(Both)/ Disable Referrer Setting Whether to send the link source URL information to the destination server.
MEDIA CENTER Browse & Download To download Tools that can help you navigate to entertainment spots, restaurants, and provide you with up-to-date weather information: 1. From the idle screen, press the Center Select Key [MENU]. Select Media Center and press the Center Select Key [OK]. 2. Press 5 Browse & Download. 3. Press the Center Select Key [OK] for Get New Applications. Follow the on-screen prompts. VZ NavigatorSM Now you can find the address of a great restaurant or the nearest ATM.
Extras To download Applications: 1. From the idle screen, press the Center Select Key [MENU]. Select Media Center and press the Center Select Key [OK]. 2. Press 6 Extras. 3. Press the Center Select Key [OK] for Get New Applications. Follow the on-screen prompts. To view App. Memory, Phone Memory, View Log, and Help information: 1. From the idle screen, press the Center Select Key [MENU]. Select Media Center and press the Center Select Key [OK]. 2. Press the Right Soft Key [Info]. 3.
MESSAGING MESSAGING k Access and Options 1. From the idle screen, press the Center Select Key [MENU], 100 then use the Directional Key a to select Messaging and press the Center Select Key [OK]. 2. Select a submenu. 1. New Message Sends a TXT Message/Picture Message/Video Message/Voice Message. 2. Inbox Displays the list of received messages. 3. Sent Displays the list of sent messages. 4. Drafts Displays the list of draft messages. 5. Voicemail Displays the number of messages in the voicemail box. 6.
Shortcut • From the idle screen, the Left Soft Key is a hot key to the Message menu. • You can make a call to the callback number by pressing the Send Key during a message check. k New Message Alert MESSAGING There are two ways your phone alerts you to new messages: 1. The phone displays a message on the screen. 2. The message icon ( / ) appears on the display screen. In the case of an urgent message, the icon will flash and NEW Message appears.
Search for a phone number which is stored in the contact list. Recent Calls Search the phone number which is stored in the recent calls list. Groups Search the groups stored in the contact list. To Online Album To send pictures by using online Address. (This option only appears for a Picture/ Video/Voice Message) To Contacts To store the phone number in contacts. 4. Press the Center Select Key [OK]. 5. Type your message. 6. Press the Center Select Key [SEND]. A sending screen appears.
8. Press the Directional Key j up or down to scroll to and make adjustments to any additional fields. 9. Press the Center Select Key [SEND]. A sending screen appears. k Sending a Video Message 1. From the idle screen, press the Left Soft Key [Message], press 1 New Message. MESSAGING 2. Press 3 Video Message. 3. Enter the phone number or e-mail address of the recipient. 4. Press the Center Select Key [OK]. 5. Type your message. 6.
6. Type your message. 7. Press the Directional Key j up or down to scroll to and make adjustments to any additional fields. 8. Press the Center Select Key [SEND]. A sending screen appears. MESSAGING k Customizing the Message Using Options You can customize a new Text Message, Picture Message, Video Message or Voice Message, by pressing the Right Soft Key [Options] to access the following features. NOTE These options vary depending on the type of message you are sending.
Allows you to create phrases for the Quick Text option. Quick Text can save up to 100 characters per phrase. Format Text Allows you to change the look of the text. Alignment/Font Size/Font Style/Text Color/Background (Text Message option) Save As Draft Saves the message into the Drafts folder. Add Quick Text Inserts Quick Text into a message. Add Slide Inserts multiple pictures into a message. (This option only appears for a Picture Message) Priority Level Assigns a priority to the message.
2. Press 1 TXT Message or 2 Picture Message or 3 Video Message or 4 Voice Message. 3. Press the Right Soft Key [Add]. 4. Press 1 From Contacts. 5. Press the Directional Key j up or down to highlight the MESSAGING Contact entry containing the destination, then press the Center Select Key [MARK]. 6. Press the Left Soft Key [Done] then press the Center Select Key [OK] to go to the Text field. NOTE You can send a message to up to ten people at a time. 7.
If memory is over 80% full, one of the following warning messages will appear. Text MEMORY FULL TEXT MSG xx% FULL Pictures/Videos MEMORY FULL PIX MSG xx% FULL Pictures/Videos Notification MEMORY FULL PIX NOTI xx% FULL 2 Inbox. 2. Press the Left Soft Key [Erase] to erase a selected message. MESSAGING k Viewing Your Inbox 1.
and unread) Messages or Only Read Messages. Extract Addresses Allows you to extract addresses from the message, and saves them to your Contacts. Message Info Allows you to check the received message information.
Allows you to resend the selected message. Lock Locks or unlocks the selected message. Locked messages cannot be deleted by the Erase Sent and Erase All functions. Add To Contacts Stores the callback number, e-mail address, and numbers from the address of the sent message into your Contacts. Erase Sent Deletes all the messages except locked messages. Message Info Allows you to check the sent message information.
Locks or unlocks the selected message. Locked messages cannot be deleted by the Erase Drafts and Erase All functions. Add To Contacts Stores the callback number, e-mail address, and numbers from the address included in the draft message into your Contacts. Erase Drafts Deletes all the messages except locked messages.
Visual Voice Mail MESSAGING Visual Voice Mail allows the management of voice mail directly from the device rather than accessing voice mail via traditional method(s). Visual Voice Mail displays a list of messages and allows the user to choose which message to listen to or erase, without having to dial into their mailbox, listen to voice instructions, or prior messages. To access Visual Voice Mail: 1. From the idle screen, press the Left Soft Key [Message]. 2.
2. Press the Directional Key j up or down to select your e-mail provider, and then press the Center Select Key [OK]. 3. To send an e-mail, follow the on-screen prompts and functions. MESSAGING Chat To chat with Internet Messenger users: 1. From the idle screen, press the Left Soft Key [Message], press 9 Chat. The browser launches. 2. Press the Directional Key j up or down to select one of the displayed chat rooms, and then press the Center Select Key [OK]. 3.
Signature None/Custom Messaging Font Size Small/Normal/Large NOTE When “T9 Word” is selected for Entry Mode, text can be input using the T9 Word mode. For details about the T9 Word mode, see page 37. k Message Settings Submenu Descriptions MESSAGING NOTE The entry mode you select is also applied to the Notepad and the Calendar. 1. Entry Mode Allows you to select the default input method including T9 Word, Abc, ABC, 123. 2.
MESSAGING 6. Quick Text Allows you to display, edit, and add text phrases. These text strings allow you to reduce manual text input into messages. A saved Quick Text can be up to 100 characters long. 7. Voicemail # Allows you to manually enter the access number for Voicemail Service (VMS). This number should be only used when a VMS access number is not provided by your network. 8. Callback # When activated, a designated callback number is sent automatically when you send a text message. 9.
• Press 4 Erase All to erase all messages stored in the Inbox, Sent, and Drafts folders. Press the Directional Key j up or down to select All Messages including Unread or All except Unread Messages, then press the Center Select Key [OK]. NOTE Locked, Unread or MMS notification messages cannot be erased. MESSAGING 2. A confirmation message appears.
CONTACTS The Contacts menu allows you to store names, phone numbers and other information in your phone’s memory. CONTACTS k Access and Options 1. From the idle screen, press the Center Select Key [MENU], then use the Directional Key a to select Contacts and press the Center Select Key [OK]. 2. Select a submenu: 1. New Contact 2. Contact List 3. Groups 4. Speed Dials 5. In Case of Emergency 6. My Name Card Shortcut In idle mode, pressing the Right Soft Key [Contacts] is a hot key to the Contact List.
1. From the idle screen, press the Center Select Key [MENU], CONTACTS then use the Directional Key a to select Contacts and press the Center Select Key [OK]. 2. Press 1 New Contact. 3. Enter the name, then press the Directional Key d down. To change the input mode, press the Left Soft Key [Abc]. 4. Press the Directional Key d down to enter information in other fields for the contact.
New Contact/Erase/New TXT Message/New Picture Message/New Video Message/New Voice Message/Set As ICE Contact (Unassigned ICE contact)/Call/Erase All Contacts/Send Name Card • Press the Left Soft Key [Edit] to edit the entry. • Press the Center Select Key [VIEW] to view the contact information. CONTACTS Groups 118 Groups allows you to classify phone entries into groups with up to 10 numbers in each group.
k Add a New Group 1. From the idle screen, press the Center Select Key [MENU], then use the Directional Key a to select Contacts and press the Center Select Key [OK]. 2. Press 3 Groups. 3. Press the Left Soft Key [New]. 4. Enter a new group name, then press the Center Select Key [SAVE]. then use the Directional Key a to select Contacts and press the Center Select Key [OK]. 2. Press 3 Groups. 3.
3. Press the Directional Key j up or down to select the existing group name that you want to change, and then press the Right Soft Key [Options]. 4. Press 5 Rename. 5. Enter the new group name, then press the Center Select Key [SAVE]. CONTACTS k Erase Group 1. From the idle screen, press the Center Select Key [MENU], then use the Directional Key a to select Contacts and press the Center Select Key [OK]. 2. Press 3 Groups. 3.
4. Press the Directional Key j up or down to highlight the Contact then press the Center Select Key [OK]. 5. Press the Directional Key j up or down to highlight the number you wish to select then press the Center Select Key [OK]. 6. Press the Directional Key j up or down to select Yes to set the speed dial to the contact. 7. Press the Center Select Key [OK]. A confirmation message appears.
4. When selecting from the Contact List, press 1 From Contacts, press the Directional Key j up or down to select the Contact entry, and then press the Center Select Key [OK]. When adding a new Contact, press 2 New Contact, enter the info, and then press the Center Select Key [SAVE]. CONTACTS NOTE The contact name assigned as the ICE contact is displayed in red font in the Contact List. NOTE For details about adding a new Contact, see page 39.
My Name Card NOTE My Name Card can be added to a message. See page 104. CONTACTS To register a name, telephone number, and e-mail address to My Name Card: 1. From the idle screen, press the Center Select Key [MENU], then use the Directional Key a to select Contacts and press the Center Select Key [OK]. 2. Press 6 My Name Card. 3. Enter the name and then press the Directional Key d down. 4.
RECENT CALLS The Recent Calls menu is a list of the last phone numbers or Contact entries for calls you placed, accepted, missed, or blocked. It is continually updated as new numbers are added to the beginning of the list and the oldest entries are removed from the bottom of the list. The following icons are displayed in the Recent Calls lists (Missed, Received, Dialed, and All): indicates a dialed call. RECENT CALLS indicates a received call. indicates a missed call. k Access and Options 1.
Missed RECENT CALLS To view a list of the 90 most recently missed calls: 1. From the idle screen, press the Center Select Key [MENU], then use the Directional Key a to select Recent Calls and press the Center Select Key [OK]. 2. Press 1 Missed. 3. Press the Directional Key j up or down to highlight an entry, then: • Press the Center Select Key [OPEN] to view the entry. • Press the Send Key to place a call to the number.
Save to Contacts/Erase/Lock (Unlock)/Erase All/View Timers • Press the Left Soft Key [Message] to select: New TXT Message/New Picture Message/New Video Message/New Voice Message RECENT CALLS Dialed To view a list of the 90 most recent outgoing calls: 1. From the idle screen, press the Center Select Key [MENU], then use the Directional Key a to select Recent Calls and press the Center Select Key [OK]. 2. Press 3 Dialed. 3.
1. From the idle screen, press the Center Select Key [MENU], then use the Directional Key a to select Recent Calls and press the Center Select Key [OK]. 2. Press 4 Blocked. 3. Enter the four-digit lock code, then press the Center Select Key [OK]. 4. Press the Directional Key j up or down to highlight an entry, and then: • Press the Center Select Key [OPEN] to view the entry. • Press the Send Key to place a call to the number.
• Press the Right Soft Key [Options] to select: Save to Contacts/Erase/Lock (Unlock)/Erase All/View Timers • Press the Left Soft Key [Message] to select: New TXT Message/New Picture Message/New Video Message/New Voice Message Shortcut To view a quick list of all your recent calls, press the Send Key from the idle screen. RECENT CALLS View Timers 128 To view the duration of selected calls: 1.
SETTINGS & TOOLS The Settings & Tools menu has options to customize your phone. k Access and Options 1. From the idle screen, press the Center Select Key [MENU], SETTINGS & TOOLS then use the Directional Key a to select Settings & Tools and press the Center Select Key [OK]. 2. Select a submenu: 1. My Verizon 2. Tools 3. Bluetooth Menu 4. Sounds Settings 5. Display Settings 6. Phone Settings 7. Call Settings 8. Memory 9. Phone Info My Verizon Allows you to access your account information. 1.
NOTE Airtime is free when accessing My Verizon. Once connected, the VZW My Verizon page will be displayed. To exit the browser at any time and return to the idle screen, press the End/Power Key. Tools SETTINGS & TOOLS k Access and Options 1. From the idle screen, press the Center Select Key [MENU], then use the Directional Key a to select Settings & Tools and press the Center Select Key [OK]. 2. Press 2 Tools. 3.
2. Press 2 Tools, 1 Voice Commands. 3. Follow the prompts to set up your voice command(s). Shortcut You can directly access the Voice Commands function by pressing the Voice Commands Key C. NOTE Pressing the Left Soft Key [Info] or saying the word “Information” displays and reads out a detailed explanation about the currently selected voice command (when Readout is selected as the Prompts mode). To make a call, say, “Call,” and the command system will prompt you for the name or number.
k Go To The “Go To” command allows you to access a menu within the phone (for example, “Go to Contact”).If no menu option is stated, a list of options will be provided. k Check - The “Check” command allows you to access device information including the battery level, signal strength, network status, volume, missed calls, voicemail, messages, and time (for example, “Check Battery”). If no menu option is stated, a list of options will be provided.
k Voice Commands Settings 1. From the idle screen, press the Center Select Key [MENU], SETTINGS & TOOLS then use the Directional Key a to select Settings & Tools and press the Center Select Key [OK]. 2. Press 2 Tools, 1 Voice Commands. 3. Press the Right Soft Key [Settings]. 4.
SETTINGS & TOOLS NOTE You can input arithmetic operators using the following keys. • Directional Key u up: + • Directional Key r right: × • Directional Key l left: ÷ • Directional Key d down: − • Center Select Key : = NOTE To insert a decimal, press *. To insert ±, press #. For example: 1. Press 1 0, press the Directional Key u up, 5, then press the Directional Key d down, 5, #. “10+5-(-5)” is displayed. 2. Press the Center Select Key [=], the answer “20” will be displayed.
3. Press the Directional Key a up, down, left or right to highlight the scheduled day. 4. Press the Left Soft Key [Add]. 5. Enter the Appointment Name. 6. Press the Directional Key j up or down to highlight the information field (Start Date & Time, End Date & Time, Time Zones, Recurrence, or Alert), then press the Left Soft Key [Set] to view your choices. 7. Press the Directional Key a up, down, left or right to highlight a setting and set information, then press the Center Select Key [OK]. 8.
Alarm Clock The Alarm Clock tool allows you to set up to three alarms. When you set an alarm, the current time is displayed. When the alarm goes off, Alarm 1 (or 2 or 3, as applicable) will be displayed on the screen and the alarm will sound. SETTINGS & TOOLS k Setting an Alarm 1. From the idle screen, press the Center Select Key [MENU], then use the Directional Key a to select Settings & Tools and press the Center Select Key [OK]. 2. Press 2 Tools, 4 Alarm Clock. 3.
2. Press 2 Tools, 4 Alarm Clock. 3. Press the Directional Key j up or down to highlight an alarm, then press the Right Soft Key [Options]. 4. Select one of the following options: Turn Off Turns off the highlighted alarm. Reset Alarm Resets the highlighted alarm. Reset All Resets all of the alarms. Stop Watch 1. From the idle screen, press the Center Select Key [MENU], SETTINGS & TOOLS then use the Directional Key a to select Settings & Tools and press the Center Select Key [OK]. 2.
World Clock To determine the current time in another time zone or country: 1. From the idle screen, press the Center Select Key [MENU], then use the Directional Key a to select Settings & Tools and press the Center Select Key [OK]. 2. Press 2 Tools, 7 World Clock. 3. Press the Directional Key s left or right to view the time in different cities. To view a list of the cities, press the Right Soft Key [Cities]. SETTINGS & TOOLS NOTE Press the Left Soft Key [Set DST], to apply Daylight Savings Time.
3. Press the Directional Key j up or down to highlight a note, then press the Center Select Key [VIEW]. 4. If you need to edit the note, press the Center Select Key [EDIT]. 5. Edit the note. When you are done, press the Center Select Key [SAVE]. NOTE You can erase the note by pressing the Left Soft Key [Erase] in step 4.
Power To toggle Bluetooth® power On/Off: 1. From the idle screen, press the Center Select Key [MENU], then use the Directional Key a to select Settings & Tools and press the Center Select Key [OK]. 2. Press 3 Bluetooth Menu. 3. Press the Left Soft Key [Turn On]. NOTE By default, your phone’s Bluetooth® functionality is turned off. SETTINGS & TOOLS Add New Devices “Pairing” is the process that allows the handset to locate, establish, and register a 1-to-1 connection with the target device.
5. The handset will prompt you with the following message on the LCD screen: PLACE DEVICE YOU ARE CONNECTING TO IN DISCOVERABLE MODE. Press the Center Select Key [OK]. 6. The device will appear in the ADD NEW DEVICE menu. Press the Directional Key j up or down to select the device you wish to pair to, then press the Center Select Key [PAIR]. 7. The handset may prompt you for the passkey. Consult the Bluetooth® accessory instructions for the appropriate passkey (typically “0000”—4 zeroes).
k Icon Reference When Adding New Device When the Bluetooth® wireless connection is active and paired devices are found, the following icons may appear: When an audio device is paired with your CASIO EXILIM Phone When a PC is paired with your CASIO EXILIM Phone When a PDA is paired with your CASIO EXILIM Phone When another phone is paired with your CASIO EXILIM Phone k Icon References When Searching for a Bluetooth ® Wireless Connection (neither connected nor SETTINGS & TOOLS paired) When your CASIO EXILIM
NOTE • In the Bluetooth Menu, you can disconnect the connected device with an icon by pressing the Center Select Key [DROP]. Conversely, you can reconnect by pressing the Center Select Key [OK] again. • When an audio device is connected, you can select another device and the connection is automatically transferred from the audio device to the other one. • If multiple devices are displayed, select the device you want to connect. Options 1.
k My Phone Name To edit the Bluetooth® name of your phone: 1. From the idle screen, press the Center Select Key [MENU], then use the Directional Key a to select Settings & Tools and press the Center Select Key [OK]. 2. Press 3 Bluetooth Menu. 3. Press the Right Soft Key [Options]. 4. Press 1 My Phone Name. 5. Use the numeric keypad to enter a new custom name. 6. Press the Center Select Key [OK] to save and exit.
4. Press 3 Supported Profiles. 5. Press the Directional Key j up or down to select one of the following profiles, and then press the Center Select Key [VIEW]. Headset/Handsfree/Dial Up Networking/Stereo/ Phonebook Access/Object Push Sending and Receiving Name Cards Use the following procedures to send and receive a Name Card via Bluetooth®. k Sending a Name Card SETTINGS & TOOLS To send to a contact entry via Bluetooth®: 1.
k Sending My Name Card SETTINGS & TOOLS To send My Name Card by Bluetooth®: 1. From the idle screen, press the Center Select Key [MENU], then use the Directional Key a to select Contacts and press the Center Select Key [OK]. 2. Press 6 My Name Card. 3. Press the Right Soft Key [Options] then 5 Exchange Name Card. 4. Press the Directional Key j up or down to select the receiving device and then press the Center Select Key [OK]. NOTE For information about how to register My Name Card, see page 123.
1. The message “Want to Receive files?” will appear on your phone’s display when another Bluetooth® device sends your phone a name card. 2. Press the Directional Key j up or down to select Yes, then press the Center Select Key [OK]. Sending and Receiving Images To send and receive an image via Bluetooth®: k Sending an Image SETTINGS & TOOLS To use Bluetooth® to send an image you have saved on your phone: 1. From the idle screen, press the Center Select Key [MENU].
Sounds Settings Provides options to customize the phone’s sounds. k Access and Options 1. From the idle screen, press the Center Select Key [MENU], then use the Directional Key a to select Settings & Tools and press the Center Select Key [OK]. 2. Press 4 Sounds Settings. 3. Select a submenu: Call Sounds / Alert Sounds / Keypad Volume / Service Alerts / Power On/Off SETTINGS & TOOLS Call Sounds To set ringtones for types of incoming calls: 1.
k Call Vibrate 1. From the idle screen, press the Center Select Key [MENU], then use the Directional Key a to select Settings & Tools and press the Center Select Key [OK]. 2. Press 4 Sounds Settings, 1 Call Sounds, 2 Call Vibrate. 3. Press the Directional Key j up or down to select On or Off, then press the Center Select Key [OK]. Alert Sounds SETTINGS & TOOLS To select the alert type for a new message: 1.
Keypad Volume To set the keypad volume: 1. From the idle screen, press the Center Select Key [MENU], then use the Directional Key a to select Settings & Tools and press the Center Select Key [OK]. 2. Press 4 Sounds Settings, 3 Keypad Volume. 3. Adjust the volume by pressing the Directional Key j up or down, then press the Center Select Key [OK] to save the setting. SETTINGS & TOOLS Service Alerts To set any of the three Alert options to either On or Off: 1.
1. From the idle screen, press the Center Select Key [MENU], then use the Directional Key a to select Settings & Tools and press the Center Select Key [OK]. 2. Press 4 Sounds Settings, 5 Power On/Off. 3. Press 1 Power On or 2 Power Off. 4. Press the Directional Key j up or down to select On/Off, then press the Center Select Key [OK]. Display Settings Provides options to customize the phone’s display screen. k Access and Options 1.
3. Enter your banner text (up to 18 characters) then press the Center Select Key [OK]. k ERI Banner If you use ERI Service, ERI Text is shown on the sub banner. 1. From the idle screen, press the Center Select Key [MENU], then use the Directional Key a to select Settings & Tools and press the Center Select Key [OK]. 2. Press 5 Display Settings, 1 Banner, 2 ERI Banner. 3. Press the Directional Key j up or down to select On/Off, then press the Center Select Key [OK].
Contrast To set the front LCD Contrast: 1. From the idle screen, press the Center Select Key [MENU], then use the Directional Key a to select Settings & Tools and press the Center Select Key [OK]. 2. Press 5 Display Settings, 3 Contrast. 3. Press the Directional Key s left or right to select 0% ~ 100%, then press the Center Select Key [OK]. Wallpaper SETTINGS & TOOLS To choose the kind of background to be displayed on the phone: 1.
3. Press the Directional Key j up or down to select one of the following settings, then press the Center Select Key [SET]. Classic/Optical Black/Positive Red/Composite Silver SETTINGS & TOOLS Main Menu Settings To change Main Menu layout and type: 1. From the idle screen, press the Center Select Key [MENU], then use the Directional Key a to select Settings & Tools and press the Center Select Key [OK]. 2. Press 5 Display Settings, 6 Main Menu Settings. 3.
3. Press the Directional Key j up or down to select one of the following settings, then press the Center Select Key [OK]. Normal/Large Only Clock Format Slide Show SETTINGS & TOOLS To choose the kind of clock to be displayed on the LCD screen: 1. From the idle screen, press the Center Select Key [MENU], then use the Directional Key a to select Settings & Tools and press the Center Select Key [OK]. 2. Press 5 Display Settings, 8 Clock Format. 3. Press 1 Main Clock or 2 Front Clock. 4.
1. From the idle screen, press the Center Select Key [MENU], SETTINGS & TOOLS then use the Directional Key a to select Settings & Tools and press the Center Select Key [OK]. 2. Press 5 Display Settings, 9 Slide Show, 1 Auto Start On/Off. 3. Press the Directional Key j up or down to select On/Off, then press the Center Select Key [OK].
k Repeat Setting whether to repeat a slide show: 1. From the idle screen, press the Center Select Key [MENU], then use the Directional Key a to select Settings & Tools and press the Center Select Key [OK]. 2. Press 5 Display Settings, 9 Slide Show, 3 Repeat. 3. Press the Directional Key j up or down to select On/Off, then press the Center Select Key [OK]. Phone Settings The Phone Settings menu allows you to set your phone’s system.
2. Press 6 Phone Settings, 1 Airplane Mode. 3. Press the Directional Key j up or down to select On/Off, then press the Center Select Key [OK]. SETTINGS & TOOLS Set Shortcuts k Set My Shortcuts Your phone offers you the option of assigning four shortcuts for favorite or often-used functions. 1. From the idle screen, press the Center Select Key [MENU], then use the Directional Key a to select Settings & Tools and press the Center Select Key [OK]. 2.
k Resetting My Shortcuts To return My Shortcuts to their original defaults: 1. From the idle screen, press the Center Select Key [MENU], then use the Directional Key a to select Settings & Tools and press the Center Select Key [OK]. 2. Press 6 Phone Settings, 2 Set Shortcuts, 1 Set My Shortcuts. 3. Press the Directional Key j up or down to select Shortcut k Set Directional Keys You can specify the function that is accessed when you press the Directional Key i up, down or left from the idle screen. 1.
k Resetting the Directional Key Settings Use the following procedure to specify the default directional key settings. 1. From the idle screen, press the Center Select Key [MENU], then use the Directional Key a to select Settings & Tools and press the Center Select Key [OK]. 2. Press 6 Phone Settings, 2 Set Shortcuts, 2 Set Directional Keys. SETTINGS & TOOLS 3.
2. Press 6 Phone Settings, 4 Language. 3. Press the Directional Key j up or down to select one of the following settings, then press the Center Select Key [OK]. English/Español Location 1. From the idle screen, press the Center Select Key [MENU], NOTE In Airplane Mode, services that support Location On functions are temporarily disabled. SETTINGS & TOOLS then use the Directional Key a to select Settings & Tools and press the Center Select Key [OK]. 2. Press 6 Phone Settings, 5 Location. 3.
1. From the idle screen, press the Center Select Key [MENU], then use the Directional Key a to select Settings & Tools and press the Center Select Key [OK]. 2. Press 6 Phone Settings, 6 Security. 3. Enter the four-digit Lock Code, then press the Center Select Key [OK]. SETTINGS & TOOLS 4. Press 1 Edit Codes. 5. Press the Directional Key j up or down to select one of the following settings, then press the Center Select Key [OK]. Phone Only Allows you to edit the Lock Code for the handset only.
3. Enter the four-digit Lock Code, then press the Center Select Key [OK]. The default Lock Code is the last 4 digits of your mobile telephone number. 4. Press 2 Restrictions. 5. Enter the four-digit Lock Code, then press the Center Select Key [OK]. 6. Select one of the following settings: SETTINGS & TOOLS Location Setting Unlock Setting/Lock Setting Calls Incoming Calls/Outgoing Calls For Incoming Calls, set Allow All/Contacts Only/Block All. For Outgoing Calls, set Allow All/Contacts Only/Block All.
1. From the idle screen, press the Center Select Key [MENU], then use the Directional Key a to select Settings & Tools and press the Center Select Key [OK]. 2. Press 6 Phone Settings, 6 Security. 3. Enter the four-digit Lock Code, then press the Center Select Key [OK]. The default Lock Code is the last 4 digits of your mobile telephone number. 4. Press 3 Phone Lock Setting. 5.
1. From the idle screen, press the Center Select Key [MENU], then use the Directional Key a to select Settings & Tools and press the Center Select Key [OK]. 2. Press 6 Phone Settings, 6 Security. 3. Enter the four-digit Lock Code, then press the Center Select Key [OK]. 4. Press 5 Restore Phone. 5. After reading the warning message that appears, press the System Select You can set your phone to search or roam for another network when you are not in your home area.
NOTE After you purchase your phone before you activate it by obtaining a phone number, the available settings will be Home Only, Automatic A, and Automatic B. After the phone is activated by obtaining a phone number, Home Only or Automatic settings will be available. SETTINGS & TOOLS NAM Selection To select the phone’s NAM (Number Assignment Module) if the phone is registered with multiple service providers: 1.
Answer Options To set how to answer an incoming call: 1. From the idle screen, press the Center Select Key [MENU], then use the Directional Key a to select Settings & Tools and press the Center Select Key [OK]. 2. Press 7 Call Settings, 1 Answer Options. 3. Press the Directional Key j up or down to select Flip Open, Any Key, or Auto w/Handsfree, then press the Center Select Key [MARK] and then the Left Soft Key [Done]. “ANSWER OPTIONS SET” will appear on the display.
TTY Mode You can attach a TTY device to your phone enabling you to communicate with parties also using a TTY device. A phone with TTY support is able to translate typed characters to voice. Voice can also be translated into characters and then displayed on the TTY. SETTINGS & TOOLS 1. From the idle screen, press the Center Select Key [MENU], then use the Directional Key a to select Settings & Tools and press the Center Select Key [OK]. 2. Press 7 Call Settings, 3 TTY Mode. 3.
Voice Privacy To turn the voice privacy feature On or Off: 1. From the idle screen, press the Center Select Key [MENU], then use the Directional Key a to select Settings & Tools and press the Center Select Key [OK]. 2. Press 7 Call Settings, 5 Voice Privacy. 3. Press the Directional Key j up or down to select On/Off, then press the Center Select Key [OK].
Normal: Sends out a tone for a fixed period of time even if you continue to press the key. Long: Sends out a continuous tone for the duration the key is pressed and held. Memory With the CASIO EXILIM Phone, you can view the information stored in built-in memory and on the memory card loaded in the phone. SETTINGS & TOOLS Save Options To select whether to save to Phone Memory or to Card Memory when saving a file: 1.
1. From the idle screen, press the Center Select Key [MENU], then use the Directional Key a to select Settings & Tools and press the Center Select Key [OK]. 2. Press 8 Memory, 2 Phone Memory, 1 Phone Memory Usage. 3. Press the Center Select Key [OK] to return to the previous screen. k Deleting and Moving Files SETTINGS & TOOLS To delete files stored in Phone Memory, and to move files from Phone Memory to Card Memory (purchased separately): 1.
NOTE Selecting Move All To Card in step 3 moves all the files stored in Phone Memory to Card Memory. NOTE Do not remove the memory card from the phone while a file is being moved to Card Memory. Card Memory Select this option to display Card Memory information, and to delete or move files saved in Card Memory. SETTINGS & TOOLS k Card Memory Usage To check the available Card Memory capacity, used capacity, and total capacity: 1.
My Pictures/My Videos/My Ringtones/My Music/My Sounds 4. Press the Right Soft Key [Options]. 5. Press the Directional Key j up or down to select Erase if you want to delete a file or Move if you want to move a file to Phone Memory, and then press the Center Select Key [OK]. 6. Press the Directional Key j up or down to select a file, press the Center Select Key [MARK] or the Right Soft Key [Mark All], and then press the Left Soft Key [Done]. 7.
My Number To view your phone’s Mobile Device Number (MDN), Mobile Identifications Number (MIN), and other device information: 1. From the idle screen, press the Center Select Key [MENU], then use the Directional Key a to select Settings & Tools and press the Center Select Key [OK]. 2. Press 9 Phone Info, 1 My Number. SETTINGS & TOOLS SW/HW Version To view the Software, PRL, ERI, Browser, Media Center, MSUI and HW versions, and MEID, BT Mac Address, and Warranty Date Code: 1.
Software Update k Status To check the status of a Software Update: 1. From the idle screen, press the Center Select Key [MENU], then use the Directional Key a to select Settings & Tools and press the Center Select Key [OK]. 2. Press 9 Phone Info, 4 Software Update, 1 Status. k Check new SETTINGS & TOOLS To check for and execute a Software Update: 1. From the idle screen, press the Center Select Key [MENU], then use the Directional Key a to select Settings & Tools and press the Center Select Key [OK]. 2.
NOTE After the software download is complete, you can press the Right Soft Key [Options] and then 2 Reject to reject the Software Update. SETTINGS & TOOLS k Install Deferred S/W 176 When there is a Software Update that has been deferred, the “Check New” item changes to “Install Deferred S/W.” Executing this option executes the deferred Software Update. 1.
Included Items This package includes all items listed below. Contact the retailer where you purchased the phone if any items are missing. • CASIO EXILIM Phone • Standard Lithium Ion Battery • Wall Charger Easy to use while traveling on business or pleasure. • Handset Charging Cradle Use with the Wall Charger to charge your phone.
Safety TIA Safety Information The following is the complete TIA Safety Information for wireless handheld phones. k Tips on Efficient Operation Do not touch the antenna unnecessarily when the phone is in use. Contact with the antenna affects call quality and may cause the phone to consume more power than otherwise needed. Safety k Driving Talking on the phone while driving is extremely dangerous and is illegal in some states. Remember, safety comes first.
k Electronic Devices Your wireless handheld portable telephone is a low power radio transmitter and receiver. When it is ON, it receives and also sends out radio frequency (RF) signals. Most modern electronic equipment is shielded from RF energy. However, certain electronic equipment may not be shielded against the RF signals from your wireless phone. Therefore, use of your phone must be restricted in certain situations.
Hearing Aids Some digital wireless phones may interfere with some hearing aids. In the event of such interference, you may want to consult your service provider (or call the customer service line to discuss alternatives). Other Medical Devices If you use any other personal medical device, consult the manufacturer of your device to determine if they are adequately shielded from external RF energy. Your physician may be able to assist you in obtaining this information.
Always request and obtain prior consent and approval of an authorized airline representative before using your phone aboard an aircraft. Always follow the instructions of the airline representative whenever using your phone aboard an aircraft, to prevent any possible interference with airborne electronic equipment. k Blasting Areas To avoid interfering with blasting operations, turn your phone OFF when in a “blasting area” or in areas posted “Turn off two-way radio”. Obey all signs and instructions.
In August 1996 the Federal Communications Commission (FCC) of the United States with its action in Report and Order FCC 96-326 adopted an updated safety standard for human exposure to radio frequency electromagnetic energy emitted by FCC regulated transmitters. Those guidelines are consistent with the safety standard previously set by both U.S. and international standards bodies. The design of this phone complies with the FCC guidelines and these international standards.
Safety guidelines are based on standards that were developed by independent scientific organizations through periodic and thorough evaluation of scientific studies. The standards include a substantial safety margin designed to assure the safety of all persons, regardless of age and health. The exposure standard for wireless mobile phones employs a unit of measurement known as the Specific Absorption Rate, or SAR. The SAR limit set by the FCC is 1.6 W/kg.
Safety The FCC has granted an Equipment Authorization for this model phone with all reported SAR levels evaluated as in compliance with the FCC RF exposure guidelines. SAR information on this model phone is on file with the FCC and can be found under the Display Grant section of http://www.fcc.gov/oet/fccid after searching on TYKNX9250. Additional information on Specific Absorption Rates (SAR) can be found on the Cellular Telecommunications & Internet Association (CTIA) web-site at http://www.phonefacts.
• Connect the equipment into an outlet on a circuit different from that to which the receiver is connected • Consult the dealer or an experienced radio/TV technician for help. FDA Information U.S. Food and Drug Administration Cell Phone Facts Consumer Information on Wireless Phones k What kinds of phones are the subject of this update? Safety The term “wireless phone” refers here to hand-held wireless phones with built-in antennas, often called “cell,”“mobile,” or “PCS” phones.
k Do wireless phones pose a health hazard? Safety The available scientific evidence does not show that any health problems are associated with using wireless phones. There is no proof, however, that wireless phones are absolutely safe. Wireless phones emit low levels of radiofrequency energy (RF) in the microwave range while being used. They also emit very low levels of RF when in the stand-by mode.
• Support needed research into possible biological effects of RF of the type emitted by wireless phones; • Design wireless phones in a way that minimizes any RF exposure to the user that is not necessary for device function; and • Cooperate in providing users of wireless phones with the best possible information on possible effects of wireless phone use on human health Safety FDA belongs to an interagency working group of the federal agencies that have responsibility for different aspects of RF safety to
Base stations are thus not the primary subject of the safety questions discussed in this document. Safety k What are the results of the research done already? 188 The research done thus far has produced conflicting results, and many studies have suffered from flaws in their research methods. Animal experiments investigating the effects of radiofrequency energy (RF) exposures characteristic of wireless phones have yielded conflicting results that often cannot be repeated in other laboratories.
k What research is needed to decide whether RF exposure from wireless phones poses a health risk? Safety A combination of laboratory studies and epidemiological studies of people actually using wireless phones would provide some of the data that are needed. Lifetime animal exposure studies could be completed in a few years. However, very large numbers of animals would be needed to provide reliable proof of a cancer promoting effect if one exists.
Safety been the development of a detailed agenda of research needs that has driven the establishment of new research programs around the world. The Project has also helped develop a series of public information documents on EMF issues. FDA and the Cellular Telecommunications & Internet Association (CTIA) have a formal Cooperative Research and Development Agreement (CRADA) to do research on wireless phone safety.
use a wireless phone connected to a remote antenna. Again, the scientific data do not demonstrate that wireless phones are harmful. But if you are concerned about the RF exposure from these products, you can use measures like those described above to reduce your RF exposure from wireless phone use. k What about children using wireless phones? Safety The scientific evidence does not show a danger to users of wireless phones, including children and teenagers.
absorption of RF energy in the head because the phone, which is the source of the RF emissions, will not be placed against the head. On the other hand, if the phone is mounted against the waist or other part of the body during use, then that part of the body will absorb more RF energy. Wireless phones marketed in the U.S. are required to meet safety requirements regardless of whether they are used against the head or against the body. Either configuration should result in compliance with the safety limit.
k What about wireless phone interference with medical equipment? Safety Radiofrequency energy (RF) from wireless phones can interact with some electronic devices. For this reason, FDA helped develop a detailed test method to measure electromagnetic interference (EMI) of implanted cardiac pacemakers and defibrillators from wireless telephones. This test method is now part of a standard sponsored by the Association for the Advancement of Medical Instrumentation (AAMI).
Emergency Calls Never rely solely upon your wireless phone for essential communications (e.g., medical emergencies), if it can be avoided, since a wireless phone requires a complex combination of radio signals, relay stations and landline networks for its operation. Consequently, emergency calls may not always be possible under all conditions on all wireless phone systems. Your wireless phone, however, may sometimes be the only available means of communication at the scene of an accident.
dependent on: (a) the use of digital technology by the wireless network; (b) GPS satellite signals being able to reach the handset (such transmissions do not always work indoors, for example); and (c) handset signals reaching wireless “base stations” (atmospheric and environmental conditions may cause variations in handset receiving signal strength).
Safety • Never use obscene, indecent, or profane language. • Never use your Cellular Phone to send false distress calls. • Never wiretap or otherwise intercept a phone call, unless you have first obtained the consent of the parties participating in the call. • Never make any anonymous calls to annoy, harass, or molest other people. • Never charge another account without authorization, to avoid payment for service. • Never willfully or maliciously interfere with any other radio communications.
Safety DO NOT use unauthorized accessories. DO NOT disassemble the phone or its accessories. If service or repair is required, return unit to an authorized PCD cellular service center. If unit is disassembled, the risk of electric shock or fire may result. DO NOT place this equipment inside the microwave or pressurized container. It may cause the explosion, product failure and fire. DO NOT throw device into the fire or heat. It may cause the explosion or fire. DO NOT short the terminal.
Safety 198 the specified timeframe, stop recharging. It may cause leakage, heat generation, explosion or fire. If device is damaged by dropping and the internal parts are exposed, do not touch the exposed parts. You might get electric shock or injured from damaged parts. Call the customer service for assistance. Do not place device on unstable area, such as wobbly stool or slanted places. Device may drop and cause injury. Also watch for shocks, particularly during vibrator mode.
To avoid injury, do not use device as the earpiece magnet picks up metal objects such as pins. Never bring device near a floppy disk, magnetic card, magnetic tape, MOs, MDs, prepaid card, or other similar objects. It may destroy or corrupt these data. Never press or poke display with your finger or other object. It may cause damage to display. Never twist device. It may cause product failure. DO NOT put stickers on LCD screen or keypad. these stickers may touch and press keys when the Flip Top is closed.
Safety • Use only the Wall charger provided with the phone. Using any charger other than the one included with the phone may damage your phone or battery. • Only use the battery and charger approved by the manufacturer. • Only use the battery for its original purpose. • Try to keep batteries in a temperature between 41°F (5°C) and 95°F (35°C). • If the battery is stored in temperatures above or below the recommended range, give it time to warm up or cool down before using.
Safety • Don’t leave the battery in hot or cold temps. Otherwise, it could significantly reduce the capacity and lifetime of the battery. • Don’t dispose of the battery into a fire. • Don’t short the positive electrode and negative electrode on battery pack. • Don’t nail, hit with hammer, or step on battery pack. It may cause fire or damage. • Don’t use the battery pack with damage or leak. Lithium ion batteries are recyclable.
Safety 202 a PCD authorized service center, if repair or replacement is required. Never alter the AC cord or plug on your travel charger or desktop charger. If the plug will not fit into the available outlet, have a proper outlet installed by a qualified electrician. Never allow any liquids or water to spill on the travel charger or desktop charger when it is connected to an AC power source.
Do not touch the electric plug when starts lightning. It may cause the electric shock from thunderbolt. Do not overload a power outlet with too many devices. Do not connect another Wall Charger to the Charging/Data Port (either directly or through the Headset Adapter), when charging the phone inserted in the Handset Charging Cradle. Damage or overheat may result.
problems such as tendonitis, carpal tunnel syndrome, or other musculoskeletal disorders: • Take a minimum 15-minute break every hour of game playing. • If your hands, wrists, or arms become tired or sore while playing, stop and rest for several hours before playing again. • If you continue to have sore hands, wrists, or arms during or after play, stop playing and see a doctor. Safety Camera Do not aim your camera at the sun.
What is Hearing Aid Compatibility? The Federal Communications Commission has implemented rules and a rating system designed to enable people who wear hearing aids to more effectively use these wireless telecommunications devices. The standard for compatibility of digital wireless phones with hearing aids is set forth in American National Standard Institute (ANSI) standard C63.19.
How will I know if my hearing aid will work with a particular digital wireless phone? Safety You’ll want to try a number of wireless phones so that you can decide which works the best with your hearing aids. You may also want to talk with your hearing aid professional about the extent to which your hearing aids are immune to interference, if they have wireless phone shielding, and whether your hearing aid has a HAC rating.
Safety sound and distorted hearing. Individual susceptibility to noiseinduced hearing loss and other potential hearing problems varies. The amount of sound produced by a portable audio device varies depending on the nature of the sound, the device, the device settings and the headphones. You should follow some common sense recommendations when using any portable audio device: • Set the volume in a quiet environment and select the lowest volume at which you can hear adequately.
k You can obtain additional information on this subject from the following sources: Safety American Academy of Audiology 11730 Plaza American Drive, Suite 300 Reston, VA 20190 Voice: (800) 222-2336 Email: info@audiology.org Internet: www.audiology.org National Institute on Deafness and Other Communication Disorders National Institutes of Health 31 Center Drive, MSC 2320 Bethesda, MD USA 20892-2320 Voice: (301) 496-7243 Email: nidcdinfo@nih.gov Internet: http://www.nidcd.nih.
industry’s recycling website www.recyclewirelessphones.com. To mail in your old wireless device to PCD Personal Communications for recycling purposes, simply package your old wireless device and any accessories (including discharged batteries) in appropriate shipping materials and mail to: For Recycling PCD Personal Communications LLC 555 Wireless Blvd. Hauppauge, NY 11788 Wireless phones also can be donated to the Wireless Foundation’s DONATE A PHONE® CALL TO PROTECT® Safety campaign.
12 MONTH LIMITED WARRANTY Personal Communications Devices, LLC.
(e) Defects in appearance, cosmetic, decorative or structural items such as framing and non-operative parts; (f) Product damaged from external causes such as fire, flooding, dirt, sand, weather conditions, battery leakage, blown fuse, theft or improper usage of any electrical source. The Company disclaims liability for removal or reinstallation of the product, for geographic coverage, for inadequate signal reception by the antenna or for communications range or operation of the cellular system as a whole.
12 MONTH LIMITED WARRANTY phone number and/or fax number and complete description of the problem, transportation prepaid, to the Company at the address shown below or to the place of purchase for repair or replacement processing. In addition, for reference to an authorized Warranty station in your area, you may telephone in the United States (800) 229-1235, and in Canada (800) 465-9672 (in Ontario call 416-695-3060).
Some states or provinces do not allow limitations on how long an implied warranty lasts or the exclusion or limitation of incidental or consequential damage so the above limitation or exclusions may not apply to you. This Warranty gives you specific legal rights, and you may also have other rights, which vary from state to state or province to province. IN USA: Personal Communications Devices, LLC. 555 Wireless Blvd.
Index 12 MONTH LIMITED WARRANTY ................ 210 A Accessibility ................ 204 Add New Devices........ 140 Airplane Mode ............. 157 Alarm Clock ................. 136 Alert Sounds ................ 149 All (RECENT CALLS) ... 127 Answer Options ........... 167 Auto Retry .................... 167 Auto Start On/Off ......... 155 Index B Backlight...................... 152 Banner ......................... 151 Basics of Storing Contact Entries............................ 39 Battery ...........
E Edit Codes ................... 161 Editing Contact Entries .. 43 Email .............................111 Emergency Calls ......... 194 Emergency Tone ......... 149 ERI ............................... 150 ERI Banner .................. 152 Extras ............................ 99 Info................................. 99 K Keypad Volume ........... 150 L Language .................... 160 Location ....................... 161 Lock Mode .................... 32 Lock Phone Now ......... 164 F FCC Regulations ...
Mute Function ................ 33 My Music ....................... 76 My Name Card ............ 123 My Number...................174 My Pictures .................... 84 My Ringtones ................ 75 My Sounds .................... 77 My Verizon ................... 129 My Video ....................... 91 Phone Info ................... 173 Phone Lock Setting ..... 163 Phone Memory ............ 170 Phone Number with Pauses ........................... 47 Phone Overview .............. 6 Phone Settings ........
T Take Picture ................... 54 Text Input ....................... 36 Text Input Modes ........... 36 TIA Safety Information ..................................... 178 Tools ............................ 130 TTY Mode .................... 168 Turning the Phone On and Off.................................. 20 Twist and Close the Phone ............................ 27 TXT Message .......101, 149 U Using a Memory Card ... 28 Using the Headset Adapter..........................
THIS PRODUCT IS LICENSED UNDER THE MPEG-4 VISUAL PATENT PORTFOLIO LICENSE FOR THE PERSONAL AND NON-COMMERCIAL USE OF A CONSUMER FOR (i) ENCODING VIDEO IN COMPLIANCE WITH THE MPEG-4 VISUAL STANDARD (“MPEG4-VIDEO”) AND/OR (ii) DECODING MPEG4 VIDEO THAT WAS ENCODED BY A CONSUMER ENGAGED IN A PERSONAL AND NON-COMMERCIAL ACTIVITY AND/ OR WAS OBTAINED FROM A VIDEO PROVIDER LICENSED BY MPEG LA TO PROVIDE MPEG-4 VIDEO. NO LICENSE IS GRANTED OR SHALL BE IMPLIED FOR ANY OTHER USE.
T9 Text Input is covered by U.S. Pat. 5,818,437, U.S. Pat. 5,953,541, U.S. Pat. 6,011,554, 6,307,548, U.S. Pat. 6,286,064, U.S. Pat. 6,307,549 and other patents pending. This Product incorporates technology from Nuance Communications, Inc. microSD is a registered trademark of the SD Card Association. ACCESS and NetFront are trademarks or registered trademarks of ACCESS CO., LTD. in Japan and other countries. Copyright © 1996 - 2006 ACCESS CO., LTD.