. Getting Started k CASIO Program-Link Package The CASIO Program-Link package includes the following items: • • • • Macintosh Program Disk PC Program Disk Communication cable (with Macintosh connector) CASIO Program-Link User’s Guide k Manual Conventions • The terms “Program-Link” and “this software” as used in this manual refer to the Program-Link software that comes with the FA-123 Package. • The term “calculator” as used in this manual refers to your CASIO Graphic Scientific Calculator.
• Any operation in this manual that is specifically identified as neither a computer nor calculator operation should be assumed to be a computer operation. All calculator operations are specifically identified as such. k System Requirements FA-123 Program-Link requires either of the following minimum systems. Windows Macintosh Computer IBM PC/AT or compatible Macintosh (68030 CPU or newer) Operating System Windows 3.
u Text files This type of file consists of two parts: a group and the multiple items stored under it. Except for graphic data, all items can be displayed on a computer screen, and programs can be edited on the computer.
2. Installation: Windows k Installing CASIO Program-Link 1. Insert the Windows installation disk into your computer’s floppy disk drive. 2. Double click on setup.exe to install Program-Link. • On the dialog box that appears, specify the installation path and then click OK. 3. A confirmation dialog box appears after installation is complete. Click OK. If the procedure described above does not install Program-Link for you, do the following. 1.
3. Installation: Macintosh k Installing CASIO Program-Link 1. Insert the Macintosh installation disk into your computer’s floppy disk drive. 2. Double-click the FA123 icon. • This starts a process that uncompresses the program file. 3. In accordance with the instructions that appear on the display, specify the name of the folder where you want the uncompressed program file to be stored. Click Save. 4. Some of the other files on the installation disk have to be copied to the folders described below. 4-1.
4. File Transfer The procedures described here can be used to upload calculator data to your computer, and to download programs and data from your computer to your calculator. • For details on how to operate your calculator during file transfers, see the section of the calculator’s User’s Guide titled “Data Communications.” k Types of Transfers There are tow ways to transfer items. • Transfer of a single data item.
Example Use the following procedure to send data from the ALGEBRA FX. Select Transmit in the LINK mode. Select Select and then select the data item you want to sent. Select Tran and then select YES. Data transfer starts at this time, with its progress indicated by a dialog box on the computer screen. Sample screen The message “Transmit ERROR!” appears if the computer is not set up to receive data. 3. When data transfer is complete, a new catalog window appears on the screen. Sample screen 4.
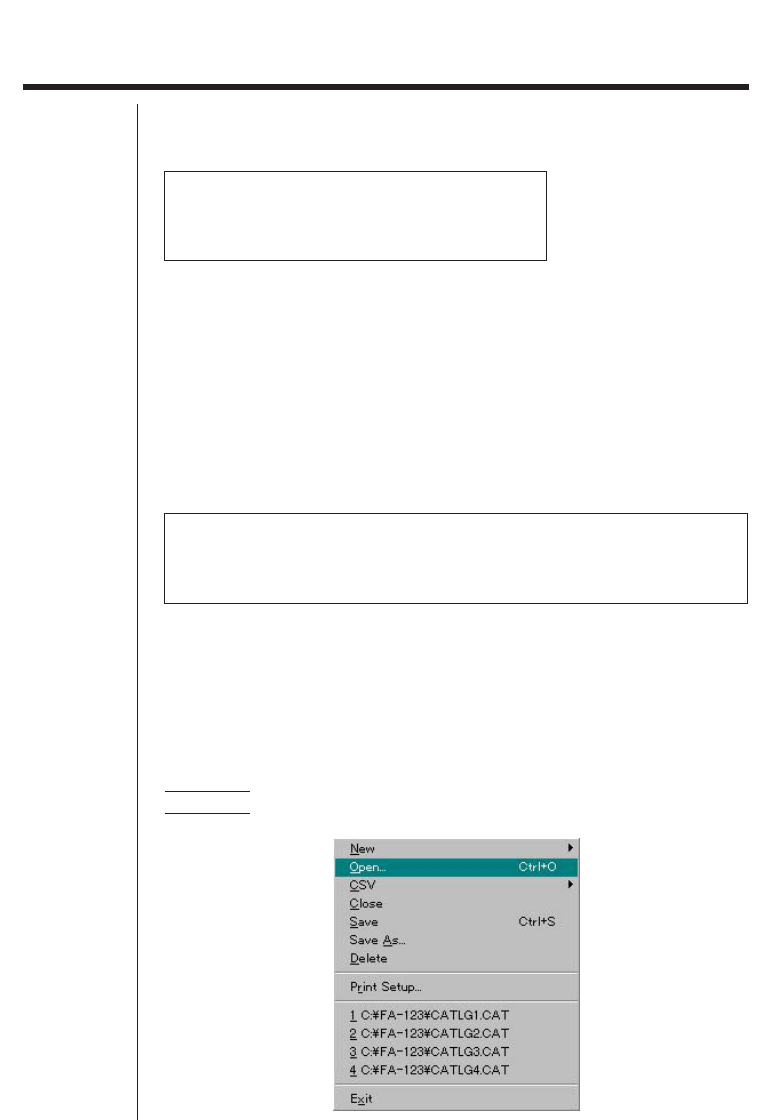
• Double check the following items whenever data transfer is not performed correctly. • Check for proper connection of the communication cable. • Check that the port was correctly selected using Link-Communications. • Make sure the correct Tool-Model Type (Link-Model Type on the Macintosh) is selected. k Transferring Files from Your Computer to Your Calculator 1. Select File-Open and open the catalog file that you want to use for the transfer. • Selecting File-Open causes a dialog box to appear.
k Back-up Data Transfer u To back up calculator data 1. Select Link-Receive on the computer screen. 2. Select Backup in the calculator’s LINK mode. Example Use the following procedure to back up data from the ALGEBRA FX. Select Transmit in the LINK mode. Select Backup and then select Tran. 3. Now proceed with step 3 under “Transferring Files from Your Calculator to Your Computer”. u To transfer backed up data to the calculator 1. Select File-Open and then select the back-up data file. 2.
5. Data Editing k Creating a New Catalog File 1. Select File-New-Model Type, and then on the sending unit select Model Type. Sample screen 2. Input data to create a new program or copy (or move) data from another catalog window. • For details on creating a program, see “Creating a New Item (Program)”. • For details on copying or moving data, see “Deleting, Copying, and Moving Groups and Items”. 3. Select File-Save As to save the data.
• Program passwords are ignored by this software. • When a program with password is transferred from the calculator to the computer, the password is ignored. • You cannot edit a BASE program. k Displaying, Editing, and Printing Items u Displaying and Editing an Item 1. While an item is selected, select Item-Open to display the contents of the item. • In addition to using Item-Open , you can also double click on an item to display its contents.
u Moving a Group and Item to Another Catalog File 1. Select the group and item to be copied and then select Edit-Cut. 2. Open the destination catalog file and then select Edit-Paste. • You could also drag the group and item to the destination window while holding down the control key (simply drag the group and item without holding down any key in the case of a Macintosh).
6. CSV Format Data File Conversion You can convert List, File, and Matrix data to CSV format, which can then be imported into a spreadsheet. You can also convert CSV format data to List, File, and Matrix data. k Converting List, File, or Matrix Data to CSV Format 1. Select the catalog file list, file, or matrix data you want to convert, and then select File-CSV-Save as CSV. 2. On the dialog box that appears, select the destination directory. 3. Click OK to convert the data to CSV format.
7. Screen Capture The screen image of the calculator can be captured as a bit pattern and transferred to your computer. • For details on how to operate your calculator for screen capture, see the section of the calculator’s User’s Guide titled “Data Communications.” k Capturing a Screen to Your Computer u ALGEBRA FX Series 1. Set up the calculator to send a screen shot to a computer. • Use the calculator’s LINK Mode set up (u3 (SET UP)) to specify Direct (direct send) for the H-Copy item. 2.
k Displaying and Printing a Captured Screen Image u Displaying a Captured Screen Image Select File-Open and open the image file to display the image. u Printing a Captured Screen Image 1. While the image is on the display, select File-Print . 2. Specify the printer, print options, number of copies, and enlargement factors, and then start the printing. • You can use the preview function (not available in the case of a Macintosh) to display an image of the printout on the screen.
8. Program Editor The program editor lets you edit the contents of programs. k Launching the Program Editor Create a new program or select an existing program to launch the program editor. u Command Input You can input commands using any one of the three following methods. • Selecting command from one of the following menus: MENU, PRGM, VARS, OPTN, KEY, SET UP, CATALOG • Inputting commands from the keyboard. • Displaying the calculator window and using the mouse to click on its keys.
9. Data Transfer with an Old Model Calculator Using this software to transfer data to the computer from an older model calculator automatically converts the data to the format used by CFX-9850 / fx-7400 Series and then stores it on disk. The following table shows how data is converted.