Chapter Getting Acquainted — Read This First! The symbols in this manual indicate the following messages. : Important notes : Notes : Reference pages P.
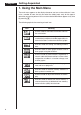
Chapter 1 Getting Acquainted 1. Using the Main Menu The main menu appears on the display whenever you turn on the calculator. It contains a number of icons that let you select the mode (work area) for the type of operation you want to perform. You can also make the Main Menu appear at any time by pressing m. The following explains the meaning of each icon. Icon Meaning Use this mode for arithmetic calculations and function calculations.
Getting Acquainted Chapter 1 uTo enter a mode Example To enter the RUN Mode from the Main Menu 1. Press m to display the Main Menu. 2. Use d, e, f, and c to move the highlighting to the RUN icon. 3. Press w to enter the RUN Mode. • You can also enter a mode without highlighting an icon in the Main Menu by inputting the number marked in the lower right corner of the icon. • When you enter a mode, up to four function key menu items appear at the bottom of the display.
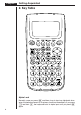
Chapter 1 Getting Acquainted 2. Key Table Alpha Lock Normally, once you press a and then a key to input an alphabetic character, the keyboard reverts to its primary functions immediately. If you press ! and then a, the keyboard locks in alpha input until you press a again.
Getting Acquainted Trace Page 6 6 45 Zoom Page Page 139 7 15 38 2 31 31 31 31 31 31 31 23 Page Sketch Page 24 23 V-Window Page Chapter 1 Page Page 30 30 82 21 16 31 30 31 31 17 17 Page Page Page 21 20 60 82 82 14 14 60 60 14 16 30 18 17 17 5
Chapter 1 Getting Acquainted 3. Key Markings Many of the calculator’s keys are used to perform more than one function. The functions marked on the keyboard are color coded to help you find the one you need quickly and easily. Function Key Operation l 1 log 2 10 x !l 3 B al The following describes the color coding used for key markings. Color Key Operation Orange Press ! and then the key to perform the marked function. Red Press a and then the key to perform the marked function. 4.
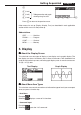
Getting Acquainted Chapter 1 2. Press !Z to display the mode’s set up screen. • This set up screen is just one possible example. Actual set up screen contents will differ according to the mode you are in and that mode’s current settings. 1 2 3 4 3. Use the f and c cursor keys to move the highlighting to the item whose setting you want to change. 4. Press the function key (1 to 4) that is marked with the setting you want to make. 5.
Chapter 1 Getting Acquainted uAngle unit (Angle) 1 (Deg) ........ Specifies degrees as default. 2 (Rad) ........ Specifies default. radians as 3 (Gra) ......... Specifies grads as default. 1 2 3 4 1 2 3 4 1 2 3 4 1 2 3 4 1 2 3 4 uStatistical Graph View Window Setting (S-Wind) P.120 1 (Auto) ........ Automatic setting of view window values for statistical graph drawing. P.120 2 (Man) ........ Manual setting of view window values for statistical graph drawing.
Getting Acquainted Chapter 1 [ 1 (List4) 2 (List5) 3 (List6) .... Table generation and graph drawing using list data. 1 2 3 [ 4 Press [ to return to the previous menu. Other menus for set up (Display, Simplfy, Frac) are described in each applicable section of this manual as they come up. Abbreviations STAT ............... Statistics PRGM ............. Program CONT.............. Contrast MEM ............... Memory 5.
Chapter 1 Getting Acquainted • Direct Command Execution Example: Selecting executes the DRAW command. k Exponential Display The calculator normally displays values up to 10 digits long. Values that exceed this limit are automatically converted to and displayed in exponential format. You can specify one of two different ranges for automatic changeover to exponential display. Norm 1 ............ 10 –2 (0.01) > |x|, |x| > 1010 Norm 2 ............ 10 –9 (0.
Getting Acquainted Chapter 1 k Special Display Formats This calculator uses special display formats to indicate fractions, and sexagesimal values. uFractions 12 .......... Indicates: 456 ––– 23 uSexagesimal Values .......... Indicates: 12° 34’ 56.78" • In addition to the above, this calculator also uses other indicators or symbols, which are described in each applicable section of this manual as they come up.
Chapter 1 Getting Acquainted 7. When you keep having problems… If you keep having problems when you are trying to perform operations, try the following before assuming that there is something wrong with the calculator. k Get the Calculator Back to its Original Mode Settings 1. In the Main Menu, select the RUN icon and press w. 2. Press ! Z to display the Set Up Screen. 3. Highlight “Angle” and press 2 (Rad). 4.