E fx-9860G Slim Hardware User’s Guide CASIO Worldwide Education Website http://edu.casio.com CASIO EDUCATIONAL FORUM http://edu.casio.
GUIDELINES LAID DOWN BY FCC RULES FOR USE OF THE UNIT IN THE U.S.A. (not applicable to other areas). NOTICE This equipment has been tested and found to comply with the limits for a Class B digital device, pursuant to Part 15 of the FCC Rules. These limits are designed to provide reasonable protection against harmful interference in a residential installation.
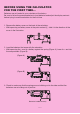
BEFORE USING THE CALCULATOR FOR THE FIRST TIME... Batteries are not loaded in your calculator at the factory. Be sure to follow the procedure below to load batteries and adjust the display contrast before trying to use the calculator for the first time. 1. Remove the battery cover on the back of the calculator. • While pressing on battery cover at the point marked , slide it in the direction of the arrow in the illustration. 2. Load the batteries that come with the calculator.
. Replace the battery cover. 5. Press the P button on the back of the calculator. Important! • Never use a toothpick, pencil, or any other object whose tip may break off easily. Doing so can lead to malfunction. P button 6. Hook your finger at the center of the calculator’s panels, and open them up. • This will display the Main Menu. Use the following procedure to adjust contrast as required. 7. Use the cursor keys to move the highlighting to the SYSTEM icon, press U, and then press ( ). 8.
Precautions when Using this Product A progress bar and/or a busy indicator appear on the display whenever the calculator is performing a calculation, writing to memory, or reading from memory. Busy indicator Progress bar Never press the P button or remove the batteries from the calculator when the progress bar or busy indicator is on the display. Doing so can cause memory contents to be lost and can cause malfunction of the calculator. The calculator is equipped with flash memory for data storage.
Handling Precautions • Your calculator is made up of precision components. Never try to take it apart. • Avoid dropping your calculator and subjecting it to strong impact. • Do not store the calculator or leave it in areas exposed to high temperatures or humidity, or large amounts of dust. When exposed to low temperatures, the calculator may require more time to display results and may even fail to operate. Correct operation will resume once the calculator is brought back to normal temperature.
Be sure to keep physical records of all important data! Low battery power or incorrect replacement of the batteries that power the unit can cause the data stored in memory to be corrupted or even lost entirely. Stored data can also be affected by strong electrostatic charge or strong impact. It is up to you to keep back up copies of data to protect against its loss. In no event shall CASIO Computer Co., Ltd.
Contents 1. Key Layout 2. Using the Backlight 3. Specifications 4. Restart and Reset 5.
1-1 Key Layout 1.
2-1 Using the Backlight 2. Using the Backlight Your calculator is equipped with a backlight for easy reading, even in the dark. You can conserve battery power by limiting backlight operation to only when you need it. S To turn on the backlight • Press <(LIGHT) to turn on the backlight. • Changing the Backlight On/Off Key You can configure the calculator so the backlight turns on when any key is pressed, instead of requiring the <(LIGHT) to toggle the backlight on and off.
3-1 Specifications 3. Specifications Variables: 28 Calculation range: –99 p1 s 10 to p9.999999999 s 1099 and 0. Internal operations use 15-digit mantissa. Exponential display range: Norm 1: 10–2 > |x|, |x| 1010 Norm 2: 10–9 > |x|, |x| 1010 Program capacity: 62000 bytes (max.) Storage memory capacity: 1.5MB (max.) Power supply: Two AAA-size batteries (LR03 (AM4)) Power consumption: 0.
3-2 Specifications Data Communications 3-pin serial port Method: Start-stop (asynchronous), half-duplex Transmission speed (BPS): 115200 bits/second (normal) 9600 bits/second (When connected to CFX-9850/fx-7400 series; Send/Receive commands) 38400 bits/second (Send38k/Receive38k commands) <115200 bits/second> Parity: EVEN Bit length: 8 bits Stop bit: Send: 1 bit Receive: 1 bit Includes parity (None) 1-bit X ON/X OFF Control: None <9600, 38400 bits/second> Parity: None Bit length: 8 bits Stop bit: Send:
4-1 Restart and Reset 4. Restart and Reset S Restart Should the calculator start to act abnormally, you can restart it by pressing the P button. Note, however, that you should only use the P button only as a last resort. Normally, pressing the P button reboots the calculator’s operating system, so programs, graph functions and other data in calculator memory is retained.
5-1 Power Supply 5. Power Supply This calculator is powered by two AAA-size (LR03 (AM4)) batteries. If the following message appears on the display, immediately turn off the calculator and replace the batteries as instructed. If you try to continue using the calculator, it will automatically turn off in order to protect memory contents. You will not be able to turn power back on until you replace batteries.
5-2 Power Supply I Replacing Batteries Precautions: Incorrectly using batteries can cause them to burst or leak, possibly damaging the interior of the calculator. Note the following precautions: • Be sure that the positive (+) and negative (–) poles of each battery are facing in the proper directions. • Never mix batteries of different types. • Never mix old batteries and new ones. • Never leave dead batteries in the battery compartment.
5-3 Power Supply 1. Press M(OFF) to turn off the calculator. 2. To ensure that you do not press the M key accidentally while replacing batteries, fold the calculator shut. 3. Remove the battery cover on the back of the calculator. • While pressing on battery cover at the point marked , slide it in the direction of the arrow in the illustration. 4. Remove both of the old batteries. 5. Load two new batteries, making sure their + and – ends are facing correctly.
5-4 Power Supply 6. Check to make sure that the springs are not sticking out to the side and that the batteries are not sliding out of position. Batteries loaded correctly. 7. Replace the battery cover. 8. Press the P button on the back of the calculator. Important! • Never use a toothpick, pencil, or any other object whose tip may break off easily. Doing so can lead to malfunction. 9. Hook your finger at the center of the calculator’s panels, and open them up. • This will display the Main Menu.
Manufacturer: CASIO COMPUTER CO., LTD. 6-2, Hon-machi 1-chome Shibuya-ku, Tokyo 151-8543, Japan Responsible within the European Union: CASIO EUROPE GmbH Casio-Platz 1 22848 Norderstedt, Germany This mark applies in EU countries only.
CASIO COMPUTER CO., LTD. 6-2, Hon-machi 1-chome Shibuya-ku, Tokyo 151-8543, Japan One or more of the following patents may be used in the product. U.S.Pats.