
Calculator User Manual

CASIO
13-4
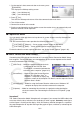
3. Press 1(USB Flash).
• The message “Preparing USB” will appear on the
calculator screen. Stand by and do not perform any
operation on the calculator. Establishing a connection
between the calculator and a computer will cause the
screen shown nearby to appear.
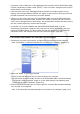
4. On your computer, open the calculator drive.
• The calculator drive will appear inside My Computer under Windows XP, and inside
Computer under Windows Vista or Windows 7. Use Windows Explorer to open the
calculator drive.
• Under Mac OS X, the calculator drive icon appears on the Mac desktop. Double-click the
icon to open it.
• The calculator drive represents calculator’s storage memory.
5. Perform the required operation on your computer to transfer the data.
• For details about data transfer operations, see “Transferring Data between the Calculator
and a Personal Computer” (page 13-5).
u To terminate the connection between the calculator and a computer
1. If the calculator is connected to a Windows computer, note the drive letter (E, F, G, etc.)
assigned to the calculator drive.
2. Depending on the type of operating system your computer is running, perform one of the
following operations.
• Windows: Click the “Safely Remove Hardware” icon in the toolbar in the lower right corner
of the display. On the menu that appears, select “USB mass storage device” whose letter
matches the calculator drive letter you noted in step 1 above. Check to make sure the
“Safe To Remove Hardware” message is displayed.
• Mac OS: Drag the calculator drive icon to the Eject icon (Trash icon). Check to make sure
that the calculator drive icon is no longer on your desktop.
3. The message “Updating Main Memory” will appear on the calculator screen. Stand by and
do not perform any operation on the calculator. The message “Complete!” will appear after
updating of main memory is complete. To close the message dialog box, press J.
4. Disconnect the USB cable from the calculator.