USER’S GUIDE GUÍA DEL USUARIO Please keep all information for future reference. Guarde toda información para tener como referencia futura. Safety Precautions Before trying to use the piano, be sure to read the separate “Safety Precautions”. Precauciones de seguridad Antes de intentar usar el piano, asegúrese de leer las “Precauciones de seguridad” separadas.
TO REDUCE THE RISK OF FIRE OR ELECTRIC SHOCK, REFER SERVICING TO QUALIFIED SERVICE PERSONNEL. IMPORTANT SAFETY INSTRUCTIONS 1. 2. 3. 4. 5. 6. 7. 8. 9. Read these instructions. Keep these instructions. Heed all warnings. Follow all instructions. Do not use this apparatus near water. Clean only with dry cloth. Do not block any ventilation openings. Install in accordance with the manufacturer’s instructions.
For more detailed information about the product and its operation, visit the CASIO website by accessing the nearby QR code or the URL below. About Music Score data You can download music score data as a PDF file from the CASIO website, which you can access using the URL or QR code below. You will then be able to view music scores on your smart device. https://support.casio.
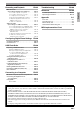
Contents Getting Ready EN-57 Assembling the Stand . . . . . . . . . . . . . . . . . To connect the cables . . . . . . . . . . . . . . . . . To install the music stand and headphones hook . . . . . . . . . . . . . . . . . . . Opening and Closing the Piano Lid . . . . . . . Removing the Protective Tape from the Keyboard . . . . . . . . . . . . . . . . . . . . . . . General Guide EN-57 EN-60 EN-61 EN-62 Power Outlet . . . . . . . . . . . . . . . . . . . . . . . . . EN-63 Connecting Headphones. . . . . . .
Recording and Playback EN-32 MIDI Recorder (Recording to Digital Piano Memory) . . . . . . EN-34 To record to a specific song track . . . . . . . . . . . . EN-34 To record the other track of a song . . . . . . . . . . . EN-35 To configure precount settings . . . . . . . . . . . . . . EN-35 To play back from Digital Piano memory . . . . . . . EN-36 To adjust the playback volume level of a MIDI Recorder song. . . . . . . . . . . . . . . . . . . . . EN-36 To delete recorded data . . . . . . . . . . . . . . .
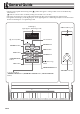
General Guide • The following explains the meaning of the $ symbol that appears on the product console and with the key names below. $ :Indicates a function that is enabled by holding down the button for some time. • The names shown here are always indicated in bold when they appear within the text of this manual. • Though the actual display of this digital piano shows light figures on a dark background, the screenshots in this manual are dark figures on a light background.
General Guide Bottom Pedal connector PHONES jacks English Rear DC 24V terminal Front USB port LINE IN R, L/MONO jacks MIDI OUT/IN terminals LINE OUT R, L/MONO jacks Power lamp Pedal Height Adjustment To open the keyboard cover 1. Holding the handles on the front of the cover with both hands, carefully lift it upwards. 2. Carefully push the cover into back towards the piano so it folds completely out of the way.
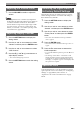
Power Outlet P u, q, w, i SETTING ENTER VOLUME After you finish assembling the stand, turn on the Digital Piano. For details, see “Getting Ready” on page EN-57. Turning Power On or Off 1. Press the P (Power) button to turn on Digital Piano power. • If you press P (Power) button only lightly, the display will light up momentarily but power will not turn on. This does not indicate malfunction. Press P (Power) button firmly and completely to turn on power. 2.
Power Outlet 1. Use the VOLUME controller to adjust the volume. • Your Digital Piano has a Volume Sync Equalizer feature that automatically enhances tone quality in accordance with the volume level. This feature ensures that low range and/or high range sounds are easier to hear, even at low volume levels. For details, see “General”3”Volume Sync EQ” in the “Parameter List” (page EN-41).
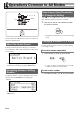
Operations Common to All Modes u, q, w, i ENTER EXIT /k Selecting an Item (Parameter) to Change Its Setting A dot (0) or arrow () mark to the left of a parameter name indicates that the parameter is selected. 1. Use the q and w arrow buttons to move the mark up or down. • Holding down either button moves the mark at high speed. The operations described in this section are common to all modes and functions.
Operations Common to All Modes Holding down a button displays a menu of functions and/or tones like the one shown below to appear. The content of the menu depends on the button that is held down.
Playing with Different Tones To press a tone group button to select a grand piano tone u, q, w, i SETTING 1. ENTER EXIT Press one of the buttons below. BERLIN GRAND (Berlin grand piano) HAMBURG GRAND (Hamburg grand piano) VIENNA GRAND (Vienna grand piano) LAYER METRONOME Tone group button • The name of the tone assigned to the button you pressed will appear on the display. • Pressing the button of the tone group that is currently selected scrolls through the group tones without leaving the group.
Playing with Different Tones With this method, all of the Digital Piano’s tones are included in the list, including those not assigned to a tone group button. 1. On the home screen (page EN-8), use the w and q arrow buttons to select the tone name you want. Using the Digital Piano’s Pedals Your Digital Piano comes equipped with three pedals: damper, soft, and sostenuto • The pointer () indicates the name of the currently selected tone. Pressing a keyboard key plays the selected tone.
Playing with Different Tones To adjust the half pedal trigger position 1. Press the SETTING button to display the setting screen. 2. Use the q and w arrow buttons to select “General” and then press the ENTER button. 3. Use the q and w arrow buttons to select “Half Pedal Pos.”. H a l f 4. Peda l Pos . Use the u (–) and i (+) arrow buttons to change the setting value and adjust the half pedal trigger position.
Playing with Different Tones The tones of your Digital Piano have built-in elements that give them the characteristic reverberation of an acoustic piano. Each of these elements can be individually adjusted as described below. Display Name Description Setting Range Hammer Response Hammer Response. The size of the hammers that strike the strings in an acoustic piano changes according to the key range, so the timing of note sounding also changes with the range.
Playing with Different Tones 1. 2. Press the SETTING button to display the setting screen. Use the q and w arrow buttons to select “Acoustic Simulator” and then press the ENTER button. A c o u s t i c S i mu l a t o r > E n t 3. Use the q and w arrow buttons to select the item you want to adjust. 4. Use the u (–) and i (+) arrow buttons to change the setting. 5. Press the SETTING button to exit the setting screen.
Playing with Different Tones Use the u and i arrow buttons to select a Hall Simulator name. Hall simulator Number Description Name OFF Off 1 ROOM Room 2 SALON Salon 3 N.Y.
Playing with Different Tones To adjust brilliance 1. Press the SETTING button to display the setting screen. 2. Use the q and w arrow buttons to select “Effect” and then press the ENTER button. 3. Use the q and w arrow buttons to select “Brilliance”. B r i l l i a n c e Splitting the Keyboard for Duet Play You can split the keyboard in the center for duet play so the left and right sides have the same ranges.
Playing with Different Tones Use the u and i arrow buttons to enter or exit the Duet Mode. • Off: Disabled On: Enabled (Both left and right keyboard sounds are input from the left and right speakers.) Pan: Enabled (Left side keyboard play is output from the left speaker and right side play is output from the right speaker. The Duet Pan Mode effect is applied only while a grand piano tone is selected.) • Turning on layer (page EN-18) automatically exits the Duet Mode. 6.
Playing with Different Tones Layering Two Tones 8. Use the following procedure to layer two tones, so they sound at the same time. 1. To cancel layering and switch to a single tone (Upper 1), press the LAYER button or EXIT button. • Each press of the LAYER button toggles between unlayered (one tone) and layered (two tones). • Entering the Duet Mode (page EN-16) or Duet Pan Mode will disable layering. Press the LAYER button.
Playing with Different Tones You can use the procedure below to change the octave of each layer. 1. Hold down the LAYER button until the screen shown below appears. Splitting the Keyboard between Two Different Tones You can use the procedure below to assign different tones to the right range and left range of the keyboard, so it sounds like you are playing an ensemble between two instruments. Split point Acoustic Bass 2.
Playing with Different Tones 5. Select the tone for the right side range. • Use the q and w arrow buttons to select “U1” and then press the ENTER button. 6. To modify split settings 1. Hold down the LAYER button until the screen shown below appears. 2. Use the q and w arrow buttons to select an item. Select a tone and then press the ENTER button. • If you want to use layering for the right keyboard (page EN-18), repeat steps 5 and 6 to select the “U2” (Upper 2) tone. 7. Press a keyboard key.
Playing with Different Tones The metronome lets you play and practice along with a steady beat to help keep you on tempo. To start and stop 1. Use the q and w arrow buttons to one of the items below. Display Name Beat. Specifies the beat setting. The 0 to 9 first beat of each measure is a bell sound, while the remaining beats are clicks. • A Beat setting of “0” plays a straight click, without a bell sound. Tempo Tempo. Adjusts the tempo setting.
Playing with Different Tones Changing Keyboard Response to Touch Pressure (Touch Response) Touch Response alters tone volume in accordance with keyboard pressure (speed). This provides you some of the same expressivity you get on an acoustic piano. Pressing fast produces louder notes. Pressing slowly produces softer notes. Do not try to use too much pressure. To change touch response sensitivity 4. Use the u and i arrow buttons to select one of the settings below for touch response.
Playing with Different Tones Use the tuning feature when you need to adjust the pitch slightly to play along with another musical instrument. Also, some artists perform their music with slightly altered tuning. You can use the tuning feature to adjust tuning so it exactly matches a performance on a CD. • The tuning feature specifies the frequency of the A4 note. You can set a frequency within the range of 415.5 to 465.9 Hz. The initial default setting is 440.0 Hz.
Playing with Different Tones Octave Shift Octave Shift lets you raise or lower the pitch of the keyboard notes in octave units. • The octave shift setting range is –2 to +2 octaves. • For information about changing the split function octave, see “To modify split settings” on page EN-20. 1. Press the SETTING button to display the setting screen. 2. Use the q and w arrow buttons to select “Keyboard” and then press the ENTER button. 3. Use the q and w arrow buttons to select “Octave Shift”.
u, q, w, i EXIT CONCERT PLAY SONG /k ENTER METRONOME • Use the Digital Piano’s metronome is not supported during Concert Play. • The Concert Play contains actual recordings of an orchestra. Because of this, the instrument sounds are different from the tones that can be selected with this piano (page EN-10). • Due to conditions when a live recording was made, playback may include the sound of the performer’s breathing, performance noise, or other noise. To listen to a Concert Play Song (Listen Mode) 1.
Using Built-in Songs (Concert Play, Music Library) 4. If you want to play back at a slower tempo (80%), press the METRONOME button so “SLOW” is displayed. To play along with an orchestra using Concert Play (Play Mode) 1. Perform steps 1 and 2 of the procedure under “To listen to a Concert Play Song (Listen Mode)” (page EN-25) to select a song. 2. Use the CONCERT PLAY button to enter the Play Mode.
To adjust the playback volume level of a Concert Play song To play back Concert Play songs obtained with a computer, etc. 1. 1. Insert the USB flash drive into the Digital Piano’s USB flash drive port. 2. 3. Press the CONCERT PLAY button. 2. Hold down the CONCERT PLAY button until the setting screen shown below appears. Use the u (–) and i (+) arrow buttons to adjust the volume. • The message “No Media” will appear on the display if there is no USB flash drive plugged into the Digital Piano.
Using Built-in Songs (Concert Play, Music Library) To play back a specific music library song 1. 2. To practice with a music library song You can turn off the left hand part or right hand part of a song and play along on the Digital Piano. Press the SONG button. Use the u and i arrow buttons to select “MUSIC LIB”. • The Music Library includes a number of duets. While a duet is selected, you can turn off the first piano (Primo) or second piano (Secondo) tone and play along with the song.
Using Built-in Songs (Concert Play, Music Library) You can use your Digital Piano to play back audio files*1 and MIDI files*2 stored on a commercially available USB flash drive. See “USB Flash Drive” on page EN-46 for more information. *1 WAV format (Linear PCM, 16bit, 44.1 kHz, Stereo) *2 Standard MIDI files (SMF format 0/1), MIDI Recorder song files (CSR format), CASIO MIDI files (CM2 format) To adjust the playback volume level of song data 1.
Demo Song 2. u, q, w, i EXIT SONG CONCERT PLAY • This starts demo play. • You can use the u and i arrow keys to scroll through song groups in the following sequence: Grand Piano demo songs 3 Concert Play songs 3 Music Library songs. Selecting a different song group causes song 1 of the group to be selected. • For information about the songs in each group, see the song lists on page A-2. • You can also switch to a Grand Piano group song while demo play is in progress.
Demo Song English Comparing Grand Piano Tones A simple operation lets you play demo songs that highlight the particular characteristics of each of the following grand piano tones so you can hear the difference between them: BERLIN GRAND, HAMBURG GRAND, VIENNA GRAND. 1. Hold down the button of the tone whose demo song you want to hear (BERLIN GRAND, HAMBURG GRAND, or VIENNA GRAND) until the first demo tune assigned to the tone starts to play.
Recording and Playback u, q, w, i EXIT REC SONG /k ENTER METRONOME Your Digital Piano can record what you play on the keyboard and play it back when you want. The Digital Piano has two recording functions: a MIDI Recorder and an Audio Recorder. Select the function that suits the needs for the type of recording you want to make. • CASIO COMPUTER CO., LTD.
Recording and Playback ■ Playback Features Plays back Track 1 and Track 2 (simultaneously or individually). • With the MIDI Recorder, the Digital Piano automatically performs playback using its internal sound source in accordance with the performance information recorded as MIDI data. What you can do... Play on the keyboard along with playback of Tracks 1 and 2 Track 1 3 While playing back... Track 2 3 While playing back... Audio Recorder You can play back audio data from a USB flash drive.
Recording and Playback MIDI Recorder (Recording to Digital Piano Memory) After recording to either of the tracks of a song, you can record to the other track while listening to playback what you recorded in the first track. • The items below are reflected in contents when recording to the tracks.
Recording and Playback 6. You can listen to playback of the track you recorded as you record to the other track. • L: Track 1 R: Track 2 • “L” and “R” indicate status information about the left and right tracks as described below. – If you selected “Play” in step 3, above: Flashing: Track to be recorded. Lit: Track to be played back. – If you selected “Mute” in step 3, above: Flashing: Track to be recorded. Unlit: Track to be muted.
Recording and Playback To play back from Digital Piano memory 1. 2. Press the SONG button. PLAY Use the SONG button to select the track you want to play back. • Each press of SONG button cycles through the settings shown below. L: Track 1 R: Track 2 L R: Track 1 and Track 2 4. 1. Hold down the SONG button until the setting screen shown below appears. 2. Use the q and w arrow buttons to select “MIDI Volume”. 3. Use the u (–) and i (+) arrow buttons to adjust the volume.
Recording and Playback Use the u and i arrow buttons to select the track to which you want to delete and then press the ENTER button. • L: Track 1 R: Track 2 • This will cause the confirmation message “Sure?” to appear. 4. Press the i arrow button to execute the delete operation. • To cancel the delete operation, press the u arrow button. • The message “Please Wait...” will remain on the display while the operation is being performed. Do not perform any operation while this message is on the display.
Recording and Playback To record keyboard play while playing back a MIDI Recorder song or song data 1. 2. Hold down the REC button until the setting screen shown below appears. Use the w and q arrow buttons to select “Audio Rec with MIDI”. A u d i o Re c w i t h M I D I 3. • Use the steps below to play back the last song you recorded. • For information about selecting a file for playback see “Playing Back Song Data Stored on a USB Flash Drive” (page EN-29).
Recording and Playback English To delete the currently selected Audio Recorder song data • The procedure below deletes all of the data of the selected file. Note that the delete operation cannot be undone. Check to make sure you really do not need the data in Digital Piano memory before you perform the following steps. 1. Hold down the SONG button until the setting screen shown below appears. 2. Use the q and w arrow buttons to select “Audio Delete” and then press the ENTER button. 3.
Configuring Digital Piano Settings 3. Use the u and i arrow buttons to change the currently selected value or setting. u, q, w, i SETTING SONG CONCERT PLAY REC ENTER LAYER METRONOME • For details about setting procedures, see “Changing a Number or a Value” in “Operations Common to All Modes” (page EN-8). 4. The setting screens explained in this section can also be displayed using the SETTING button. This section explains how to display settings and parameter list. Configuring Settings 1.
Configuring Digital Piano Settings Display Text Duet >Ent Description Settings Go here for more information Duet Mode parameters. Duet Mode Duet Mode setting • The Hall Simulator and chorus cannot be applied while in the Duet Pan Mode. Upper Octave Octave of the right keyboard Lower Octave Octave of the left keyboard (See the page to the right.
Configuring Digital Piano Settings Display Text Keyboard >Ent Description Go here for more information Settings Keyboard parameters Touch Response Touch Response (See the page to the right.) Changing Keyboard Response to Touch Pressure (Touch Response) (page EN-22) Keyboard Volume Keyboard Volume. Adjusts the volume levels of all parts controlled by the keyboard. 0 to 127 – Transpose Changes the pitch of notes in semitone units.
Configuring Digital Piano Settings Song >Ent Description Go here for more information Settings Song data parameters • The editing screen can also be displayed by holding down the SONG button. MIDI Volume Music Library, MIDI Recorder, Standard MIDI file, playback volume Audio Volume Audio Recorder song playback volume To adjust the playback volume level of song data (page EN-29) ML Clear >Ent User music library clear – 1.
Configuring Digital Piano Settings Display Text General >Ent Description Go here for more information Settings Other Digital Piano parameters LCD Contrast Digital Piano display contrast Auto Resume Digital Piano setup backup. When this setting is Off enabled, the Digital Piano remembers its current (Disabled), settings when it is turned off, and restores them the On (Enabled) next time power is turned on. • The settings below are not remembered.
Configuring Digital Piano Settings Display Text Description Settings Local Control Local Control. Selecting “Off” for Local Control cuts off the Digital Piano’s sound source, so no sound is produced by the Digital Piano when keys are pressed. • Performing certain Digital Piano operations may cause Local Control to turn on automatically. Off (Disabled), On (Enabled) Keyboard CH Send channel.
USB Flash Drive u, q, w, i ENTER SETTING Your Digital Piano supports the following USB flash drive operations. USB Flash Drive Digital Piano (1) (2) (1) USB Flash Drive on the Digital Piano 1-1. Playing back audio data • Audio Recorder songs Playing Back Song Data Stored on a USB Flash Drive (page EN-29) • General audio data Saving Standard Song Data to a USB Flash Drive (page EN-50) • Concert Play songs obtained with a computer, etc. Concert Play Songs Obtained with a Computer, etc.
USB Flash Drive This section explains the information below, which is required to prepare a USB flash drive before using it with the Digital Piano.
USB Flash Drive Data Types Supported by the Digital Piano Audio Data • WAV format: Standard audio file format mainly used by Windows. This format needs to be supported in order to play back on a computer or portable music player. Linear PCM, 16-bit, 44.1kHz, stereo WAV format (File name extension: .WAV) is required for playback on a computer or portable music player. MIDI data • CSR format: CASIO original file format. This file format adds CASIO proprietary data to MIDI data. (File name extension: .
USB Flash Drive • Be sure to observe the precautions provided in the documentation that comes with the USB flash drive. • Avoid using a USB flash drive under the following conditions. Such conditions can corrupt data stored on the USB flash drive. – Areas subjected to high temperature, high humidity, or corrosive gas – Areas subjected to strong electrostatic charge and digital noise • Never remove the USB flash drive while data is being written to or loaded from it.
USB Flash Drive To format a USB flash drive 6. Formatting a USB flash drive on the Digital Piano will automatically create the folders described below. • MUSICDAT: Stores the following types of data: Auto recording/playback songs, Music Library songs, MIDI songs, etc. • CP: Concert Play songs obtained with a computer, etc. • Be sure to format a USB flash drive on the Digital Piano before using it for the first time.
USB Flash Drive Digital Piano memory data (MIDI recorder songs) can be saved to a USB flash drive. • MIDI Recorder songs can be converted to standard MIDI (SMF) files and stored on the USB flash drive. • During recording of an Audio Recorder song, the data is stored directly to the USB flash drive, so the operation below is not required. 1. Insert the USB flash drive into the Digital Piano’s USB flash drive port. 2. 3. Press the SETTING button. 4. 8.
USB Flash Drive Loading USB Flash Drive Data into Digital Piano Memory MIDI data (MIDI Recorder songs, songs downloaded from the CASIO website, standard MIDI files, etc.) stored on a USB flash drive can be loaded to Digital Piano memory and stored in Music Library numbers 61 through 70.
USB Flash Drive You can use the procedure below to delete a specific file from a USB flash drive. 1. 2. 3. 4. Insert the USB flash drive into the Digital Piano’s USB flash drive port. Renaming a USB Flash Drive File Use the procedure below to rename a file on a USB flash drive using Digital Piano operations. 1. Insert the USB flash drive into the Digital Piano’s USB flash drive port. 2. 3. Press the SETTING button. Press the SETTING button.
USB Flash Drive Error Indicators The table below shows messages that appear on the Digital Piano display when data transfer fails or when another type of error is generated. • To clear an error display, press the EXIT button. Display No Media Action 1. Correctly plug the USB flash drive into the USB flash drive port. 2. Do not remove the USB flash drive while any operation is in progress. 3. Unprotect the USB flash drive. 4. Use a USB flash drive that does not have anti-virus software. 5.
You can connect the Digital Piano to a computer and exchange MIDI data between them. You can send play data from the Digital Piano to commercially available music software running on your computer, or you can send MIDI data from your computer to the Digital Piano for playback. Minimum Computer System Requirements The following shows the minimum computer system requirements for sending and receiving MIDI data.
Connecting to a Computer Using MIDI What is MIDI? The letters MIDI stand for Musical Instrument Digital Interface, which is the name of a worldwide standard for digital signals and connectors that makes it possible to exchange musical data between musical instruments and computers (machines) produced by different manufacturers. • For details about MIDI parameters, see “Configuring Settings” on page EN-40, and “MIDI >Ent” in the “Parameter List” on page EN-41.
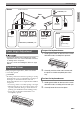
Assembling the Stand Before assembling the stand, first take a few moments to check that all of the items shown below are present. • This stand does not include any of the tools required for assembly. It is up to you to prepare a large Philips head (+) screwdriver for assembly. *CAUTION • Assembly of the stand should be performed by at least two people working together. The Digital Piano unit is particularly heavy. When moving it, get at least one other person to help you and handle with care.
Getting Ready 1. Unfasten the band that bundles the pedal cable to the back of crosspiece and pull the pedal cord out from the crosspiece. 3. Slide back panel into the grooves of the side panels. • When installing back panel , make sure that the high screw holes of the back panel are to the right, and the low screw holes are to the left. 1 Low Pedal cable High 2. Attach side panels and to crosspiece . Secure the side panels using four screws .
Getting Ready Next, secure the bottom of the back panel with the three screws. • If you cannot see the screw holes along the bottom the back panel , slide the back panel to the left or right. 8. Place the piano onto the stand. • In order to ensure you do not get your fingers pinched between the piano and the stand, grasp the piano on its sides (not its ends) at the locations marked with stars () in the illustration. At least 10cm 6.
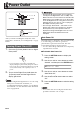
Getting Ready 9. First, use the two screws to secure the back of the piano (both left and right side) to the stand. Next, use the two screws to secure the front of the piano (both left and right side). • If you have trouble insert the screws, better align the back of the piano unit and the stand side panels (at the position marked in the illustration). To connect the cables 1. Insert the plug of the AC adaptor that comes with the Digital Piano into its power terminal (DC 24V).
Getting Ready Orienting the pedal plug as shown in the illustration, plug it into the pedal connector on the bottom of the piano. • Secure the pedal cord with the clip. To install the music stand and headphones hook 1. Install the music stand by inserting its pegs into the holes in the top of the piano. 2. Install the headphones hook. Pedal plug 3. Plug the power cord of the AC adaptor that comes with the Digital Piano into a household power outlet as shown in the illustration below.
Getting Ready Opening and Closing the Piano Lid • Use both hands whenever opening or closing the lid, and take care that you do not close it on your fingers. • Do not open the lid too wide. Doing so creates the risk of damage to the cover and Digital Piano. • Stand in front of the Digital Piano on the right side when opening or closing the lid. To close the lid 1. 2. Carefully lift up slightly on the lid.
Getting Ready Protective tape is affixed to the front edges of the keyboard keys to protect them during shipment. Remove the protective tape before using the Digital Piano. ■ Disconnect Protection Precautions (1) Never pull on the cord with excessive force. (2) Never repeatedly pull on the cord. (3) Never twist the cord at the base of the plug or connector. (4) Loop and bundle the power cord, but never wind it around the AC adaptor.
Getting Ready Connecting Headphones Front PHONES jacks Stereo standard plug Connect commercially available headphones to the PHONES jacks. Connecting headphones to either of the PHONES jack cuts off output to the speakers, which means you can practice even late at night without bothering others. To protect your hearing, make sure that you do not set the volume level too high when using headphones. • Be sure to push the headphones plug into the PHONES jacks as far as it will go.
Getting Ready Use commercially available cables to connect the amplifier to the Digital Piano’s LINE OUT jacks as shown in Figure . LINE OUT R jack output is right channel sound, while LINE OUT L/MONO jack output is left channel sound. Connecting to the LINE OUT L/MONO jack only outputs a mixture of both channels. It is up to you to purchase connecting cable like the one shown in the illustration for connection of the amplifier. Use the Digital Piano’s VOLUME controller to adjust the volume level.
Troubleshooting Problem No sound is produced when I press a keyboard key. The pitch of the Digital Piano is off. Cause 1. The VOLUME controller is set to “MIN”. 2. Headphones or an adaptor plug is plugged into one of the PHONES jacks. 3. MIDI Local control is turned off. 4. The Speaker Out is set to Off. 5. The Keyboard Volume is set to 0. 1. The Digital Piano’s key setting is something other than “440.0Hz”. 2. Digital Piano tuning is incorrect. 3. Octave shift is enabled. 4.
Troubleshooting See Page A tone’s quality and volume This is an unavoidable result of the digital sampling process,* and does not indicate malfunction. sounds slightly different * Multiple digital samples are taken for the low range, middle range, and high range of the depending where it is original musical instrument. Because of this, there may be very slight differences in tonal played on the keyboard. quality and volume between sample ranges.
Reference Product Specifications Model GP-310BK/GP-310WE Keyboard 88-key piano keyboard • Layer, Split • Duet: Adjustable tone range (–2 to +2 octaves) • Transpose: 2 octaves (–12 to 0 to +12) • Octave shift: 4 octaves (–2 to 0 to +2) Sound Source • • • • • • Acoustic Simulator Damper Resonance, Damper noise, Hammer response, String resonance, Lid simulator, Key on action noise, Key off action noise Effects Brilliance (–3 to 0 to 3), Hall simulator (12 types), Chorus (4 types), DSP, Headphone mode,
Reference • • • • • • • • PHONES jacks: Stereo standard jacks × 2 Power: 24V DC MIDI OUT/IN terminals LINE IN R, L/MONO jacks: Standard jacks × 2 Input impedance: 9.0kΩ Input voltage: 200mV LINE OUT R, L/MONO jacks: Standard jacks × 2 Output impedance: 2.3kΩ Output voltage: 1.
Reference Operating Precautions Be sure to read and observe the following operating precautions. • With a model that has a recording function or other data storage function, be sure to back up any data you want to maintain to another medium before submitting this product for servicing or repair. Stored data may be accessed or even deleted as part of servicing or repair procedures. ■ Location Avoid the following locations for this product.
Reference Model: AD-E24500LW 1. Read these instructions. 2. Keep these instructions on hand. 3. Heed all warnings. 4. Follow all instructions. 5. Do not use this product near water. 6. Clean only with a dry cloth. 7. Do not install near radiators, heat registers, stoves, or any other source of heat (including amplifiers). 8. Use only attachments and accessories specified by the manufacturer. 9. Refer all servicing to qualified service personnel.
Appendix/Apéndice Tone List/Lista de tonos Tone Group/ No./Nº Grupo de tonos BERLIN GRAND HAMBURG GRAND VIENNA GRAND VARIOUS PIANO ELECTRIC PIANO HARPSI./ VIB.
Appendix/Apéndice • Cada uno de los tonos de piano de cola tiene sus características propias que los distinguen. Cada tono se caracteriza por un valor expresivo propio, de manera que es importante seleccionar el tono que mejor se adapte a la canción que está acompañando o a sus preferencias personales. Nombre del tono BERLIN GRAND MELLOW BRIGHT HAMBURG GRAND Descripción Tono claramente definido, nítido, exquisito y elegante.
Appendix/Apéndice Music Library List/ Lista de la biblioteca musical No./Nº A-3 Song Name/Nombre de la canción 1 Nocturne Op.9-2 2 Fantaisie-Impromptu Op.66 3 Étude Op.10-3 “Chanson de l’adieu” 4 Étude Op.10-5 “Black Keys” 5 Étude Op.10-12 “Revolutionary” 6 Étude Op.25-9 “Butterflies” 7 Prélude Op.28-7 8 Valse Op.64-1 “Petit Chien” 9 Valse Op.64-2 10 Moments Musicaux 3 11 Impromptu Op.
Key’s Ch’s After Touch Control Change Pitch Bender Note ON Note OFF Velocity True voice 0, 32 1 5 6, 38 7 10 11 64 65 66 67 O X X X O X X O X O O X X X O 9nH v = 1 - 127 O 8nH v = 0 - 127 0 - 127 Mode 3 X Default Messages Altered Mode Note Number 1 - 16 1 - 16 Default Changed Transmitted O O O O O O O O O O O O X O O 9nH v = 1 - 127 X 9nH v = 0, O 8nH v = 0 - 127 0 - 127 0 - 127*1 Mode 3 X 1 - 16 1 - 16 Recognized Remarks Version : 1.
X O X X : Local ON/OFF : All notes OFF : Active Sense : System Reset Mode 1 : OMNI ON, POLY Mode 3 : OMNI OFF, POLY Remarks Mode 2 : OMNI ON, MONO Mode 4 : OMNI OFF, MONO *2: For details, see MIDI Implementation at the CASIO website (page EN-1). *3: This Instrument treats a hall simulator as a reverb.
This recycle mark indicates that the packaging conforms to the environmental protection legislation in Germany. Esta marca de reciclaje indica que el empaquetado se ajusta a la legislación de protección ambiental en Alemania.