User Guide
Important Customer Information Data Plans and Features: Content and Internet Access Many services and applications offered through your device may be provided by third parties. Before you use, link to or download a service provided by a third party, or an application such as a non-Verizon Wireless location-based GPS type service, chat room, marketplace or social network from your device, you should review the terms of such service or application and applicable privacy policy.
Contents Getting Started with Your Phone ............................... 6 Phone overview ............................................................................6 Feature overview .........................................................................11 Inserting and removing the battery ..............................................13 Removing and inserting a microSD card .....................................17 Inserting the SIM Card ................................................................
Contents Voicemail ....................................................................................67 Visual Voice Mail .........................................................................68 Contacts .................................................................. 74 Opening your contacts................................................................74 Adding a new contact .................................................................76 Editing contact details ................................
Reading your messages............................................................117 Responding to messages .........................................................118 Searching your messages .........................................................119 Working with messages in batches ...........................................119 Composing and sending email ..................................................119 Working with account folders ....................................................
Contents Calendar ................................................................ 170 Viewing your calendar and events .............................................170 Creating an event......................................................................177 Editing or deleting an event .......................................................178 Setting an event reminder .........................................................179 Responding to an event reminder .............................................
Quickoffice® ..............................................................................211 Clock ........................................................................................212 Calculator .................................................................................214 Sound Recorder .......................................................................215 Voice Command .......................................................................216 Desk Cradle ................................
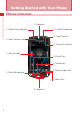
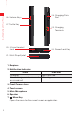
Getting Started with Your Phone Getting Started with Your Phone Phone overview 1. Earpiece 2. Notification Indicator 13. Third Microphone 12. Light Sensor 3. Front Camera Lens 11. Proximity Sensor 4. Touchscreen 10. Back Key 9. Home Key 8. Recent Apps Key 5. Main Microphone 7. Menu Key 6.
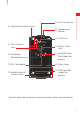
24. Temperature Sensor 23. LED Flash 15. Rear Camera Lens Getting Started with Your Phone 25. Pressure Sensor 14. Top Internal Antenna Area* 22. Battery Cover Lock 16. Secondary Microphone 21. microSD Card Slot (under the battery) 17. NFC Touchpoint 20. Back Cover 18. Bottom Internal Antenna Area* 19. SIM Card Slot (under the battery) * For best signal, do not touch or cover these areas while using your phone.
Getting Started with Your Phone 26. Volume Keys 28. Charging/Data Port 27. Tactile Key 29. Charging Terminals 30. 3.5mm Headset Jack 32. Power/Lock Key 31. Wrist-Strap Eyelet 1. Earpiece 2. Notification Indicator State Charging New message, email, voicemail or missed call Indicator Lights up in red Blinks in green 3. Front Camera Lens 4. Touchscreen 5. Main Microphone 6. Speaker 7. Menu Key Opens the menu for the current screen or application.
8. Recent Apps Key Opens a list of recently used applications. 9. Home Key 10. Back Key Returns to the previous screen. Use to close pop up or menu screens. 11. Proximity Sensor If the proximity sensor is covered, you may not be able to operate the phone as a result. 12. Light Sensor Senses the ambient light and automatically adjusts display brightness Getting Started with Your Phone Returns to the Home screen. accordingly (applicable when Automatic brightness is enabled). 13.
27. Tactile Key Press and hold to open the application assigned to the actile key. Getting Started with Your Phone By default, Glove Mode opens. 28. Charging/Data Port Plug in the SB Cable here included in the bo . 29. Charging Terminals he terminals used to charge the phone when it is placed in the cradle sold separately . 30. 3.5mm Headset Jack Some headset plugs may be unusable depending on its e ternal dimensions. Compatible size: Ma Ø .
NOTES • Descriptions and instructions in this manual are based on the software version and default settings of the phone when or the software version is updated. • Screen images in this manual are shown for reference only and may differ from what appears on your phone. Feature overview Water resistance Getting Started with Your Phone purchased. Operations may differ when any settings are changed The CASIO G’zOne COMMANDO™ 4G LTE is water resistant.
• If the CASIO G’zOne COMMANDO™ 4G LTE body is wet, shake to drain excess water. Getting Started with Your Phone • When the CASIO G’zOne COMMANDO™ 4G LTE body is wet, water can seep into the gaps of the microphones, sensors and other locations. If the product was exposed to water, your clothes or bag may get wet, and sounds may become difficult to hear. Shock resistance The rugged construction of the CASIO G’zOne COMMANDO™ 4G LTE provides outstanding shock and vibration resistance.
Battery Charging Terminals Battery Terminals • Do not clean terminals inside the phone, as they may be damaged. • If mud or sand adhere to the phone, do not use the phone until it is completely wiped off. • Do not place the phone directly on sand. If sand gets into the Earpiece or Speaker, sound may become difficult to hear. • Completely close the earphone cover to ensure dust resistance.
1. Slide the Battery Cover Lock upward to the Getting Started with Your Phone FREE position, as shown in the figure. 2. Insert your fingertip in the groove 1 and pull 1 up on the back cover in the direction of the arrow 2. When the back cover is disengaged, pull it in the direction of the 3 2 arrow 3. 3. To insert the battery, slide the battery into the slot by aligning the battery contacts with the terminals in the battery compartment 1 and press down 2 until it fits into place. 4.
To remove the battery, slide the Battery Lock to the right to the FREE position 1. 3 Insert your fingertip in the groove 2 and 2 arrow 3. 5. Insert the battery cover tabs into the slots 1 and press the back cover in the direction of the arrow 2. 2 1 Getting Started with Your Phone 1 pull up on the battery in the direction of the 6. Press down firmly on all sides of the back cover as shown by the arrows in the right figure. 7.
Warning! • Do not twist the back cover as shown in the Getting Started with Your Phone right figure. Doing so can damage the phone and the back cover. • When inserting the battery, please insert the battery parallel to the slot surface. Incorrectly inserting the battery can damage the terminal contacts. • Do not press hard on the back cover if the tabs are not properly inserted into the slots of the phone. Doing so may damage the battery cover tabs.
Removing and inserting a microSD card To expand the memory of your device, you can insert a microSD card in the phone. Warning! • The microSD card is very small. Make sure you do not drop it. • Failure to completely reseal the back cover after removal may result in damage if the phone is exposed to water. • Do not touch the microSD card terminal with your finger or hand. It Getting Started with Your Phone Removing a microSD card can contaminate the terminal and cause contact failure. 1.
4. Insert the battery and replace the back cover making sure to slide the Battery Lock and Battery Cover Lock to the LOCK position. Getting Started with Your Phone (For instructions on how to insert the battery and the back cover, refer to steps 3 through 7 of “Inserting and removing the battery” beginning on page 13.) Inserting a microSD card Warning! • Ensure the phone is turned off and the Wall/USB Charger is not connected.
1. Remove the back cover and the battery. (For instructions on how to remove the back cover and the battery, refer to steps 1 through 4 of “Inserting and removing the battery” the phone and the card are facing each other, and carefully insert the microSD card into the slot, as shown in the right figure. 3. Insert the battery and replace the back cover making sure to slide the Getting Started with Your Phone beginning on page 13.) 2.
Charging the phone To charge the battery: Getting Started with Your Phone 1. Open the Charging/Data Port cover with your fingertip. Plug the USB Cable (included in box) into the Charging/Data Port. 2. Connect the other end of the USB Cable to the USB port on the Wall Charger (included in box). 3. Plug the Wall Charger power plug into an electrical outlet. 4. After the phone is completely charged, unplug the USB Cable from the Charging/Data Port, then close the port cover.
Touchscreen operations Most of the phone operations are performed on the Touchscreen by touching or dragging. • When working in glove mode, there are some gloves that cannot be used to operate the phone, such as thick gloves, etc. • Touch the Touchscreen lightly with your finger. Do not press hard or use a plastic pen, etc.
Drag Touch and hold an item on the screen and then, without lifting your Getting Started with Your Phone finger, move the item to the target position. Swipe or slide To swipe or slide, move your finger quickly in a horizontal or vertical direction on the Touchscreen. For example, you can swipe the Home screen to view the left/right Home screen extension panels, or slide the screen up or down to scroll through an email list. Double tap A double tap is a quick succession of two taps to the Touchscreen.
Rotate the screen In many applications, rotating the phone also rotates the orientation of the screen display. Getting Started with Your Phone NOTE The screen rotation is enabled by default. To disable it, tap the Menu key on the Home screen, then tap Settings > Display and uncheck Auto-rotate screen.
Turning the phone on and off Turning the phone on Getting Started with Your Phone 1. Press and hold the Power/Lock Key until the display lights up. NOTES • When you first turn on the phone, you are prompted to perform Initial setup. See “Setup Wizard” on page 25. • If your phone is left for a certain period of time without operation, the screen display will turn off and the Touchscreen will be locked.
Setup Wizard The Setup Wizard will start when you turn on the phone for the first time. the SIM Card, the device will automatically be activated. Then your phone will display your new Verizon Wireless Mobile phone number. Tap Next > Next. If SIM Card is not inserted, tap the Home key and tap Leave Wizard. 4. If Sync contacts is checked, you can restore or backup your Getting Started with Your Phone 1. Press and hold the Power/Lock Key until the display lights up. 2.
9. Tap one of the following options: Setup Summary: Review setup configuration. Getting Started with Your Phone How-to Videos: Watch Video tutorials to learn how to use functions on your phone. Done: Finishes the initial setup to use your phone. 10. When your phone setup is completed, your phone screen will say “Congratulations!”. Tap Done with setup. NOTES • If Emergency is tapped, you can place an emergency call without unlocking the phone.
Basics Turning the screen on and off You can turn off the screen to conserve the battery. The Touchscreen is Basics locked while the screen is off to prevent accidental operation. NOTE The screen also turns off when the phone is not used for a certain period of time. You can set the time until the screen goes off with Sleep under Display settings. See “Display” on page 225. 1. Press the Power/Lock Key to turn on your screen. Your Lock Screen will appear. 2. Double tap the icon to unlock it. 3.
NOTES • The display can be awakened by tapping Tactile key and Volume key in addition to the Power key. Basics • If you lock your screen, you must draw the unlock pattern, use facial recognition or enter a PIN/password to unlock it. See “Locking your screen” on page 49. Getting to know the Home screen The Home screen is your starting point to access all the features on your phone. It displays application icons, widgets, shortcuts, and other features.
• Tap the Apps icon at the bottom of the screen to view all installed applications. See “Opening and switching applications” on page 35. Slide your finger left or right across the Home screen. Basics Viewing other parts of the Home screen These additional screens provide more space for widgets, shortcuts, and other items. Returning to the Home screen 1. Tap the Home key at any time, in any application. To return to the Home screen while in glove mode, see “Glove mode” on page 219.
• The default Home screen will blink when Set default home screen is tapped. Basics Tap one of the Home screen thumbnails to set it as default. Monitoring your phone’s status The Status bar is at the top of every screen. It displays icons indicating you have received notifications (on the left) and icons indicating the phone’s status (on the right), along with the current time.
Silent mode-Vibrate Battery is charging Speakerphone is on Phone microphone is mute Location information is available Battery is very low No SIM Card Battery is low E911 Only Battery is partially drained Alarm is set Battery is full Unrecognized SIM Card Basics Silent mode-Mute Notification icons The following icons indicate that you have received a notification. See “Responding to a notification” on page 33 for more information.
Basics Carrier data use threshold approaching or exceeded FM Radio Application update available Music System update available Player Music Uploading data GPS is on Downloading data BUA+ Connected to VPN Screenshot captured Receiving location data from GPS Wi-Fi Direct Select input method Managing notifications Notification icons report the arrival of new messages, calendar events, and alarms, as well as ongoing events, such as current call status.
NOTE Applications whose activities produce notifications, such as Email and Gmail, have their own settings to configure whether or not notifications are displayed, and how they are handled, such as on those applications for details. Basics whether they sound a ringtone, vibrate, and so on. See the sections Opening the Notifications panel 1. Drag the Status bar down from the top of the screen. The Notifications panel displays your wireless provider and a list of your current notifications.
For example, new email notifications will open your inbox, and network disconnection notifications will open a list of configured Basics networks to reconnect. NOTE Swipe a notification left or right to remove it from the Notifications panel. Clearing all notifications 1. Open the Notifications panel. 2. Tap Clear at the right of the panel. All event-based notifications are cleared; ongoing notifications remain in the list. Accessing additional functions 1. Open the Notifications panel. 2.
Opening and switching applications The Apps screen, which you open from the Home screen, holds icons for all of the applications on your phone, including any applications downloaded and installed from the Play Store or other sources. exit. You can quickly switch between running applications to use several Basics When you open an application, the other applications being used do not at once. NOTE To learn how to discover and install additional applications and games, see “Play Store™” on page 201.
• You can add an application icon or a widget to the Home screen by touching and holding it on the Apps screen until it vibrates, and then dragging it to another location on the Home screen. Basics • You can rearrange the order of the icons. Tap the App icon Menu key > > Sort and tap Apps A to Z, Apps Frequent or Apps Date. • Tap the Back key or the Home key to close the Apps screen.
touching and holding it on the Apps screen until it vibrates, and then dragging it to a desired location on the Home screen. Widgets: Add any of a variety of miniature applications (widgets) to your Home screen, including a clock, music player, picture frame, news. You can also download other widgets from Play Store. Basics power manager, calendar showing upcoming appointments, and Moving an item on the Home screen 1. Touch and hold the item you want to move until it vibrates. 2.
Basics Renaming a folder 1. Tap the folder to open it. 2. Tap the folder’s name. 3. Enter a new name. 4. Tap the Enter key on keyboard. Changing the Home screen wallpaper 1. From the Home screen, tap the Menu key 2. Tap one of the following wallpaper types: > Wallpaper. Gallery: Choose a picture taken using the camera or saved to your phone as a wallpaper. You can crop the picture before setting it as the wallpaper. Live wallpapers: Opens a scrolling list of animated wallpapers installed on your phone.
Working with widgets This phone comes pre-installed with various widgets. You can also download widgets from the Play Store. You can access Amazon’s Kindle Store, Shop, and Music applications. Basics Amazon Clock You can select the clock to display on the Home screen from three types of Analog Clocks, a Compass Clock, three types of Digital Clocks, and a World Clock. Audible You can listen to digital audio books. Book You can access over 3 million eBooks on the go.
Contact You can set your frequently accessed contacts as a widget. Basics Direct dial You can create a shortcut for calling a registered telephone number with one tap. Direct message You can create a shortcut for creating a message to a registered contact. Directions & Navigation You can create a shortcut for quick navigation to a registered address. Email The Email widget displays the number of unread Emails. Tap the widget to open the Email application.
G’zGEAR® G’zGEAR comes with various widgets: G’zGEAR BAROMETER, G’zGEAR EARTH COMPASS, G’zGEAR MOONRISE MOONSET, G’zGEAR PEDOMETER, G’zGEAR SUNRISE SUNSET, G’zGEAR 198 for details. Basics TIDES, G’zGEAR VIRTUAL TREK. See “Widgets in G’zGEAR” on page G’zWORLD You can use G’zWORLD widget to share your location with other people by using the map. You can find the direction of the way you want to go. It’s possible to pin your current location. You can also share the information with your friends.
Google+™ posts You can update or read Google+ posts from your friends. Basics Memo You can use the Memo widget to keep a memo displayed on the Home screen. Music You can use the Music widget to control the playback of music from the Home screen. Music playlist You can play your favorite playlist easily by adding this widget. My Verizon Data You can use the My Verizon Data widget to access My Verizon Mobile to display an overview of your data usage.
Play Store™ The Play Store widget displays recommended applications, tap to view details and install it. You can use the Power control widget to turn Wi-Fi, Bluetooth, GPS, or Basics Power control Auto-sync on or off. You can also adjust the brightness of the screen from the Home screen. Power saving mode You can use the Power saving mode widget to turn Power saving mode on or off. Quick Communication You can call, send messages or send voicemails directly to a contact.
Slacker Radio You can listen to free personalized radio or create your own custom Basics radio stations from millions of songs. Task You can add, view and manage tasks. Traffic You can set up a variety of locations for real-time updates to show your journey time to a destination depending on your current location. Voice Memo You can use the Voice Memo widget to record and save voice recordings to Internal Storage Memory. Recorded voice data is available from My Recordings in Music.
Working with menus There are two kinds of Android menus: option menus and context menus. Option menus contain action items based on the current screen or Basics Option menus application, not to any specific item on the screen. You can open option menus by tapping the Menu key If you tap the Menu key . Not all screens have option menus. on a screen with no option menu, nothing will happen. Some screens have more option menu items than can fit in the main menu.
Basics When you touch and hold some items on a screen, a context menu appears. Quickly connecting to your contacts As you build up your list of contacts on your phone, you can use Quick Contact for Android in many applications to quickly start a chat, email, or text message; to place a call; or to locate your contacts. Quick Contact for Android is a special icon to open a popup with options for quickly communicating with a contact. 1. Identify a Quick Contact icon by its frame.
3. Tap an icon to open its application and start communicating with your contact right away. You can also tap an icon to edit the contact’s information in Contacts, to view the contact’s address in VZ Navigator ®, and so on, your phone. Basics depending on which applications and accounts are configured on NOTE You can add a shortcut for a contact to your Home screen, which you can then tap to open Quick Contact for Android.
Airplane mode Some locations may require you to turn off your phone’s wireless connections. You can turn off all these wireless connections at once by Basics placing your phone in Airplane mode. 1. Press and hold the Power/Lock Key until the pop-up menu appears. 2. Tap Airplane mode. 3. Tap OK to confirm. The Airplane mode icon will appear in the Status bar. NOTE You can switch Airplane mode ON/OFF by tapping the icon in the Notifications panel.
Locking your screen You can lock your screen so that only you can unlock it to place calls, access your data, buy applications, and so on. Basics 1. From the Home screen, tap the Menu key > Settings > Security. 2. Tap Screen lock 3. Tap Tap, Face Unlock, Pattern, PIN, or Password. If you tap Face Unlock, you will be guided to look at your phone. Read the on-screen notification and tap Set it up. Then follow the on-screen instructions.
Optimizing battery life You can extend your battery’s life by turning off unwanted features and applications. You can also monitor how applications and system Basics resources consume battery power. Extending the life of your battery You can extend the life of your battery by performing the following operations: • Turn off wireless communications you are not using. If you are not using Wi-Fi, Bluetooth, or GPS, use the Settings application to turn them off.
Monitoring and controlling what uses the battery The Battery Use screen shows which applications consume the most battery power. You can also use it to turn off installed applications that you have 1. From the Home screen, tap the Menu key > Settings > Battery. Basics downloaded if they are consuming too much power. The Battery Use screen lists the applications consuming the battery, from greatest to least battery use.
Entering and Editing Text Entering text You can enter text using the onscreen keyboard. Some applications Entering and Editing Text open the keyboard automatically. In others, you tap a text field where you want to enter text to open the keyboard. 1. Tap a text field for keyboard. 2. Type text. The characters you have entered appear in a selection list above the keyboard, with suggestions for the word you are typing to the right. Tap the left or right arrow in the selection list to view more suggestions.
NOTES • If you tap a suggested word that is not in the predictive text dictionary, it is automatically added to the dictionary. • Depending on the key, the list of relevant characters or symbols pops up when you touch and hold the key. You can enter a . To show the keyboard, tap a text field. Entering numbers, punctuations, and symbols 1. Tap the ?123 key on the onscreen keyboard. Entering and Editing Text character or symbol by tapping it in the list.
Keyboard: Full QWERTY keyboard same as that of PC. This keyboard is displayed by default. Reduced keyboard: The keyboard with two alphabetical characters assigned to one key. Entering and Editing Text Phone keypad: Keypad similar to those of found on basic cell phones. Keyboard Reduced Keyboard 3. Tap the left arrow icon Phone Keypad to hide the options. NOTES • You can enter words by tracing from key to key on the XT9 onscreen keyboard.
Shift Case key ?123 key you type. Touch and hold for all caps. See “Entering numbers, punctuations, and symbols” on page 53. Deletes the preceding character. If Word Reselection of XT9 Text Input settings is checked, by placing the cursor at the end of the word and tapping the Delete key once, the word is highlighted and the original selection list Enter key Punctuation key is displayed.
Entering words using Trace Input feature On the Full QWERTY keyboard, you can enter a word by tracing from key to key with your finger held on it. If, for example, you want to enter “Word”, trace from W to D key on the keyboard as shown in the figure Entering and Editing Text below. NOTE XT9 mode automatically adds punctuation, capitalization and accents to words as you type. For example, typing c-a-n-t will result in “can’t” with the apostrophe added automatically.
NOTES • To rotate the screen to horizontal automatically as you turn the phone sideways, Auto-rotate screen of Display settings must be checked. See “Display” on page 225. • The horizontal keyboard may not be available in some applications. You can edit the text entered in text fields. Use the menu commands to cut, copy, and paste text, within or across applications. Entering and Editing Text Editing text NOTE Some applications do not support editing of some or all of the text displayed.
NOTES • You can select all the text in the text field by touching and holding the text field, then tapping the icon from the icon menu that appears. Entering and Editing Text • You can unselect the text by tapping unselected text in the same or in another text field, or tapping the Back key . Cutting or copying text 1. Select the text to cut or copy. 2. Tap the icon to cut or tap the icon to copy in the icon menu.
Phone You can use the Phone application to make calls. You can dial an incoming, outgoing, or missed call number recorded in the call log. Placing a call on the Home screen. Tap a tab to switch to Call log or Favorites. Phone 1. Tap the phone icon Tap to erase digits one by one. Touch and hold to erase the entire phone number. Touch and hold to open the Visual Voice Mail. Tap to pick a dialing number from contacts. Tap to open Voice command. Tap to place a call. 2.
3. Tap the call icon to place a call. The call in progress screen appears. ERI (Enhanced Roaming Indicator) Name in Contacts or caller’s phone number. Phone Call duration Tap to end a call. Tap to display the dialpad for sending a DTMF tone. Tap to call another person. Tap to switch Speaker, Handset earpiece or Bluetooth mode. Tap to mute the microphone. • Press the Volume Keys 4. Tap the end call icon to adjust the call volume. to end a call.
Answering a call When there is an incoming call, the screen will show information such as the caller’s phone number or name depending on the information stored in Contacts. Locked Screen Phone Name in Contacts or phone number. Double tap to reject call. Double tap to answer. Double tap to reject call and send message to caller. Unlocked Screen Name in Contacts or phone number. Tap to reject call. Tap to answer call. Tap to reject call and send message to caller.
NOTES • All incoming calls are recorded in the Call log. • If there is an incoming call while another call is in progress, the first caller will be put on hold if you choose to answer the new call. Phone Rejecting an incoming call When there is an incoming call, it will appear on the screen. • If the screen is unlocked, tap the icon to reject a call. . • If the screen is locked, double tap the icon NOTE When you reject a call, the caller is sent directly to voicemail.
NOTE You can select a ringtone that comes with the phone, or one that you saved as a ringtone by using the Music application. See “Using a song as a phone ringtone” on page 166. Phone Operation during a call Switching to the speakerphone 1. To turn on the speakerphone, tap the speaker icon on the call in progress screen. 2. To turn off the speakerphone, tap the speaker icon again on the call in progress screen. NOTES • When the speakerphone is turned on, the third microphone picks up the sounds.
Switching between a Bluetooth headset and the phone When a Bluetooth headset is connected to your phone, you can switch between using your Bluetooth headset or just your phone. 1. While placing a call using a Bluetooth headset, tap the Bluetooth icon Phone on the call in progress screen and tap Speaker or Handset earpiece to switch to using just your phone. 2. Tap the Bluetooth icon on the call in progress screen and tap Bluetooth to switch to using the Bluetooth headset.
Switching between multiple calls If you accept a new call when you are already on a call, you can switch between the two calls. 1. When there is another incoming call while you are already on a call, the Incoming call screen opens. 2. Tap the icon to answer a new call. 3. Tap the swap icon to put the current call on hold and connect to Phone When you answer the new call, the current call is placed on hold. another call. 4. Tap the end call icon to disconnect both calls at once.
3. Tap a phone number or name. Phone The details of the Call log appear. If the phone number is not in Contacts, Add to contacts is displayed and you can tap to add the phone number to Contacts. If the phone number is already in Contacts, picture ID is displayed and you can tap to open the details of the Contact. Tap to place a call. Tap to send a text message. 4. Tap Call XXX-XXX-XXXX(phone number) to place a call.
2. Tap the Voice Command icon . The Voice Command opens, listens for your spoken instructions, and displays some hints for how to use it. 3. Say “Call” followed by the name of the contact to call. Or, follow one of the suggestions for dialing a number or controlling your phone in other ways.
Listening to your voicemail 1. Tap the Voicemail icon on the Home screen or in the Apps screen. The Voicemail menu screen opens. Phone 2. Tap Call Voicemail to dial *86. 3. The dialpad will automatically appear on the call in progress screen. Follow the instructions and enter a number or the # sign as requested. 4. Follow the prompts to enter your password and retrieve your messages. NOTE When you have a new voicemail message, the new voicemail icon appears on the Status bar.
Subscribing to Visual Voice Mail 1. Tap the Voicemail icon on the Home screen or in the Apps screen. The Voicemail menu screen opens. 2. Tap Subscribe to Visual Voice Mail > Accept. 3. Tap OK > Subscribe > Accept > Accept > Exit. are described above. To subscribe, follow the on-screen instructions. Phone Typical steps when you access the Visual Voice Mail for the first time 4. Wait 5 minutes before starting to use Visual Voice Mail.
Listening to your voicemail 1. Tap the Voicemail icon on the Home screen or in the Apps screen. Phone The Visual Voice Mail screen opens. Touch and hold the check box to select voicemail. Selecting voicemail changes the menu on the bar. From the menu, you can select Delete, Check OFF, Lock, and Star. A heard voicemail An unheard voicemail Tap to compose and send a voicemail. Tap to update the voicemail list. Tap to search for a voicemail. Tap to change the order of the voicemail list. 2.
NOTE When you have a new voicemail message, a new voicemail icon appears in the Status bar. If you have already subscribed to Visual Voice Mail, drag the Status bar down to open the Notification panel and tap New voicemails to open Visual Voice Mail. The following menu is available on the Visual Voice Mail screen. • Tap the Menu key Phone Using the menu on the Visual Voice Mail screen to access the following options: Select All: Selects all voicemails. Deselect All: Deselects all voicemails.
Deleting multiple voicemails 1. From the Visual Voice Mail screen, tap the Menu key > Select All. All voicemails will be check-marked. Tap a check-marked voicemail to un-check it. Phone 2. Tap the icon . Composing and sending a voicemail 1. From the Visual Voice Mail screen, tap the Compose icon . The Compose Voice Message screen is displayed. Send the voicemail. Tap and enter a phone number or a contact’s name. Open contact lists. Tap to stop recording or playback. Tap to start recording.
NOTE Tap the Menu key on the Voicemail composing screen to access the following options: Mark Urgent: Sets the status of the voicemail to urgent. Mark Private: Sets the status of the voicemail to private. 1. From the Visual Voice Mail screen, tap the Menu key > Phone Changing Visual Voice Mail settings Preferences. 2. Change the following settings as necessary.
Contacts The Contacts application gives you quick and easy access to the people you want to reach. The Contacts application allows you to store names, phone numbers, and other information in your phone’s memory. Contacts Opening your contacts Open Contacts to add, view, and communicate with your friends and acquaintances. Opening your contacts 1. Tap the Contact icon on the Home screen. All of your contacts are displayed alphabetically in a scrolling list. Tap to view Groups.
Viewing details about a contact 1. Open your contacts. 2. Tap the contact whose details you want to view. Entries for communicating with the contact are followed by details. Slide down to view map. Contacts Tap a contact method to start communicating with the contact. Tap an icon to call, email, text, map, and so on. Tap an icon to view communication log. • Tap a communication method to start dialing, texting, or emailing the contact by using the listed number, address, and so on.
Adding a new contact You can add contacts on your phone and synchronize them with the contacts in your Google, Backup Assistant Plus, Microsoft Exchange ActiveSync, or other accounts that support syncing contacts. Contacts 1. Open your contacts. 2. Tap the icon . 3. If you have more than one account for contacts, tap the account you want to add the contact to. The Edit contact screen opens. Enter the contact’s name. Tap to select a picture. Tap to open a menu with preset labels.
6. Tap Add new to add more than one entry for that category—for example, to add both work and home numbers. Tap the label to the right of the contact information to open a menu with preset labels, such as Mobile, Work, Home, Work Fax, Home Fax, CUSTOM for a phone number. 7. To add a category, tap Add another field and tap on the category you would like to add from the list that is displayed. to take a photo or choose a photo from your Gallery to represent the contact. 9. Tap Save to finish. Contacts 8.
Editing contact details You can change or add contact details. NOTE Some contact entries contain information from multiple sources: information that you added manually or Contacts linked from Contacts multiple accounts to consolidate duplicates and so on. If you find duplicate entries in Contacts, you can link them into a single entry, as described in “Linking contacts” on page 83.
Diverting all of a contact’s calls to your voicemail 1. Open your contacts. 2. Tap the name of a contact in the list to view its details. 3. Tap the Menu key > All calls to voicemail. When this contact calls, your phone will not ring and the caller is sent directly to your voicemail. 1. Open your contacts. 2. Tap the name of a contact in the list to view its details. 3. Tap the Menu key > Set ringtone. 4.
Deleting a contact 1. Open your contacts. 2. Tap the name of a contact in the list to view its details. 3. Tap the Menu key > Delete > OK. NOTES Contacts • If you delete a contact from Google Contacts (or another account with editable contacts), the contact is also deleted from Contacts on the web the next time you sync your phone. • You cannot delete contacts from a read-only account. Instead, a dialog informs you that the contact will be hidden.
Communicating with your contacts From the Contacts or Favorites tab, you can quickly call or send a text (SMS) or multimedia message (MMS) to a contact’s default phone number. You can also open details to view a list of all the ways you can communicate with that contact. Connecting by using Quick Contact for Android Contacts 1. Tap a contact’s picture to open Quick Contact for Android. Tap the icon for the way you want to connect. Tap to open Quick Contact. Tap to start the corresponding application.
Changing which contacts are displayed You can hide contacts that don’t have phone numbers. You can also configure which account’s groups of contacts you want to display in the Contacts list. Contacts Changing what account’s groups are displayed 1. Open your contacts. 2. Tap the Menu key > Contacts to display > Customize. 3. Tap an account to open its list of groups. The account’s groups depend on the type of account. 4. Check or uncheck the groups whose contacts you want to view in Contacts. 5. Tap OK.
Linking or Unlinking contacts information Linking contacts When you add an account or add contacts in other ways, such as by exchanging emails, Contacts attempts to avoid duplication by linking any new contact information with existing contacts under a single entry. You can also link contacts manually. This is the contact you will see in Contacts after the link. 3. Tap the Menu key 4. Tap the Menu key > Edit. Contacts 1. Open your contacts. 2. Tap the contact entry to which you want to add information.
Importing, exporting, and sharing contacts If you have contacts stored in vCard format on a microSD card, you can import them into Contacts on your phone. You can export contacts in vCard format to a microSD card, to back them up to a PC or other Contacts device. You can also send a contact in vCard format via email. Importing contacts from your microSD card You can copy individual or group contacts in vCard format onto your microSD card and then import them into one of your accounts on the phone.
Exporting contacts to your microSD card You can export all of the contacts on your phone to your microSD card, as a group vCard file. You can then copy this file to a PC or another device that can work with files in this format, such as an address book application. 1. Open your contacts. 2. Tap the Menu key > Import/export > Export to SD card > OK. contacts.
Working with Groups Once you add contacts to a group, you can broadcast messages or emails to all members of the group. Contacts Adding a new group 1. Tap the Contact icon on the Home screen. 2. Tap the Groups tab. 3. Tap the icon . 4. If you have more than one account with contacts, tap the account to which you want to add the group. 5. Enter the group name and person’s name who you want to add the group. 6. When you are finished, tap Save. Adding contacts to a group 1. Open the Groups tab. 2.
Editing a group name 1. Open the Groups tab. 2. Tap the group you want to edit. 3. Tap the Menu key > Edit. 4. Edit the group name. 5. Tap Save to finish. 1. Open the Groups tab. 2. Tap the group whose contact you want to remove. 3. Tap the Menu key > Edit. 4. Tap at the right of the contact you want to remove. 5. Tap Save to finish. Contacts Removing a contact from a group Deleting a group 1. Open the Groups tab. 2. Tap the group you want to delete. 3. Tap the Menu key > Delete > OK.
Working with Favorites The Favorites tab contains the contacts starred as favorites followed by a list of the contacts you communicate with most frequently. Contacts Adding a contact to your favorites 1. Tap the Contact icon on the Home screen. 2. Tap the Contacts tab. 3. Tap a contact to view its details. 4. Tap the star to the right of the contact’s name. The star turns gold and the contact is added to your favorites. Opening a list of your favorite contacts 1. Tap the Contact icon on the Home screen.
Configuring Backup Assistant Plus SM Backup Assistant Plus safeguards your phone’s contacts and automatically saves a copy of the names, phone numbers, email addresses, etc., stored in your phone. You can view, print, add, delete, or edit your contacts online. NOTE backup schedule and other factors. See verizonwireless.com/ backupassistant for more details. Contacts Subject to specific terms of use.
Syncing Contacts manually You need to sync your Contacts manually, if you unchecked Autosync. Contacts 1. Tap the Contact icon on the Home screen. 2. Tap the Contacts tab. 3. Tap the Menu key > Backup Assistant Plus. 4. Tap Backup now. Changing schedule for auto-syncing You can change the scheduled time to perform auto-syncing. 1. Tap the Contact icon on the Home screen. 2. Tap the Contacts tab. 3. Tap the Menu key > Backup Assistant Plus. 4. Tap Set Schedule. 5.
Connecting to Networks Connecting to mobile networks When you buy your phone and sign up for service, your phone is configured to use your provider’s mobile networks for voice and data communication. The icons in the Status bar indicate which type of data network you are connected to and the network signal strength.
Configuring system select You can set your phone to search or roam for another network when you are not in your carrier’s range. Leave this setting as default unless you want to alter the system selection as instructed by your service provider. 1. From the Home screen, tap the Menu key > Settings > More... > Mobile networks > System select. Connecting to Networks 2. Tap one of the following: Home only: Only within your home area or affiliated area. Automatic: Scan for signal automatically.
Connecting to Wi-Fi networks Connecting to a Wi-Fi network “hotspot” or wireless access point enables faster data transmission. Some access points are open and free to connect while others are hidden or protected by passwords and other security measures requiring additional configuration. The following Status bar icons indicate Wi-Fi status.
NOTES • Tap a network name on the Wi-Fi settings screen while connected to a network to display detailed information such as speed, security, address, etc. • Touch and hold a network name on the Wi-Fi settings screen while connected to the network for the following options: Forget network: Erases saved information for the added Wi-Fi Connecting to Networks network. Use this for a Wi-Fi network if you do not want to connect automatically to that network or no longer use that network.
NOTE The phone will connect automatically to added Wi-Fi networks when you enter its access range. Receiving notifications when open networks are in range Set to receive notifications in the Status bar when your phone detects an open Wi-Fi network when Wi-Fi is on. NOTE An open Wi-Fi network icon is displayed in the Status bar when Connecting to Networks 1. From the Home screen, tap the Menu key > Settings > Wi-Fi. 2. Slide the Wi-Fi switch from the OFF position to the ON position. 3.
Connecting to virtual private networks Virtual Private Networks (VPNs) allow you to connect to resources inside a secured local network from outside that network. To connect to VPN, configure VPN settings in Settings. A VPN Client can be used to connect more easily. NOTE Connecting to Networks There are numerous systems for securing VPN connections, including some that rely on secure certificates or other methods to ensure that only authorized users can connect.
Connecting to a VPN 1. From the Home screen, tap the Menu key > Settings > More... > VPN for a list of configured VPNs. 2. Tap the VPN to connect. 3. Enter any required credentials then tap Connect. NOTE When you are connected to VPN, a VPN icon is displayed in the Drag the status bar down to open the Notification panel, then tap the ongoing notification for the VPN connection to disconnect. VPN Client Connecting to Networks Status bar. You can configure VPN connections easily with the VPN Client.
Working with secure certificates If your VPN or Wi-Fi network relies on secure certificates, you must obtain the certificates and save them to your phone’s secure credential storage before you can configure access to the VPN or Wi-Fi network. For specific instructions, contact your network administrator. Installing a secure certificate from the microSD card Connecting to Networks The installed certificate can be used to connect to a secured network. 1.
Connecting to Devices Connecting to a Headset You can connect a compatible headset device equipped with a standard 3.5mm plug to your phone for safe, convenient, hands-free conversations. 1. To open the Headset Jack cover, insert your fingertip into the notch and open the cover. 2. Plug the connector into the Headset Warning! • Do not forcibly insert/remove the connector into/from the Headset Jack. Insert/remove it carefully.
Connecting to a PC via USB You can connect your phone to a PC with the USB Cable (included in box), to transfer music, pictures, and other files between your phone’s internal/external storages and the PC. NOTES • EUT (End User Upgrade Tool) is designed to upgrade the latest software from a PC to a device using a USB connection.
NOTES • To manually end the EUT mode, drag down the Status Bar, tap Preparing upgrade tool and tap End upgrade tool. • While the phone’s storage is mounted as a drive on your PC, you will not be able to share your phone’s data connection with your PC via USB. Disconnecting your phone from the PC Carefully follow your PC’s instructions to unmount the storage, and disconnect USB device correctly to avoid losing information. 1. Unmount the phone’s storage from your PC. 2. Disconnect the USB cable.
Connecting to Bluetooth® devices Bluetooth is a short-range wireless communications technology that devices can use to exchange information over a distance of about 8 meters. The most common Bluetooth devices are headphones for placing calls or listening to music, hands-free kits for cars, and other portable devices, including laptops and cell phones. To connect to a Bluetooth device, you must turn on your phone’s Bluetooth.
Turning Bluetooth on or off 1. From the Home screen, tap the Menu key > Settings. 2. Slide the Bluetooth switch to the ON or OFF position. NOTE Turn off Bluetooth when you are not using it to extend the life of your battery between charges. You may also be required to turn Bluetooth off in some locations. Bluetooth should be turned off during flight by setting it to Airplane mode. Your phone’s Bluetooth name is visible to other devices when you connect them.
3. If a device you want to pair with isn’t listed, make it discoverable. Check the device’s manual to learn how to make it discoverable by your phone as well as other instructions on pairing. 4. If your phone stops scanning before you make the other device discoverable, tap SEARCH FOR DEVICES. 5. Tap the ID of the device in the list to pair them. The devices will pair.
Disconnecting from a Bluetooth device 1. Tap the device in the Bluetooth settings screen. 2. Tap OK. Unpairing a Bluetooth device You can unpair a Bluetooth device to erase all pairing information about the device. 1. Tap the icon 2. Tap Unpair. in the Bluetooth settings screen. Configure operation settings when a Bluetooth Smart compatible device is connected. 1. From the Bluetooth settings screen, tap the Menu key > Bluetooth Smart settings.
Sharing your phone’s mobile data connection You can share your phone’s 4G data connection with up to ten devices at once by turning your phone into a Mobile Hotspot. When your phone is sharing its data connection, an icon appears in the Status bar and an ongoing notification in the Notifications panel. Mobile Hotspot is active Connecting to Devices (Number indicates devices connected) NOTE Mobile Hotspot requires a subscription to Mobile Hotspot/Mobile Broadband Connect service.
Renaming or securing your mobile hotspot You can change the name of your phone’s Wi-Fi network name (SSID) and secure its Wi-Fi network. 1. From the Home screen, tap the Menu key > Settings > Mobile Hotspot. 2. Tap Network settings. 3. Tap Configure Mobile Hotspot. You can change the network SSID (name) that other PC see when scanning for Wi-Fi networks. connecting with other PC’s. 4. Tap Save.
NFC You can use the NFC function to share information between your phone and another NFC device, typically by touching the devices together back-to-back. 1. From the Home screen, tap the Menu key > Settings > More.... 2. Tap NFC and tap Enable in the dialog to turn on NFC. NFC must be turned on in order to use Android Beam. Connecting to Devices 3. Tap Android Beam. 4. Slide the Android Beam switch from the OFF position to the ON position.
Stopping music playback 1. Tap the Apps icon on the Home screen. 2. Tap the DLNA icon . 3. Tap the MyPhone icon to select Now playing list. 4. Tap Audio. 5. Tap the icon to stop music playback.
Accounts and Sync You can sync contacts, email, calendar events, and other information with your phone, from multiple Google accounts, Microsoft Exchange ActiveSync accounts and personal email accounts, depending on the applications installed on your phone. For example, you can start by adding your personal Google account, so your personal email, contacts, and calendar are always available.
Adding an account NOTE To add some accounts, you may need to obtain details from an IT support representative about the service to connect such as the account’s domain or server address. 1. From the Home screen, tap the Menu key > Settings > Accounts & sync. The Accounts & Sync Settings screen displays your current sync information about the account. Accounts and Sync settings and a list of your current accounts. 2. Tap ADD ACCOUNT. 3. Tap the type of account to add. 4.
Removing an account You can remove an account and all information associated with it from your phone, including email, contacts, settings, and so on. 1. From the Home screen, tap the Menu key > Settings > Accounts & sync. The Accounts & Sync Settings screen displays your current sync settings and a list of your current accounts. Accounts and Sync 2. Tap the account to remove. 3. Tap the Menu key > Remove account > Remove account.
Configuring general sync settings 1. From the Home screen, tap the Menu key > Settings > Accounts & sync. The Accounts & Sync Settings screen opens. 2. Slide the Accounts & Sync switch to the ON or OFF position to control whether changes you make to information on the phone or on the web are automatically synced with each other. For example, when this option is checked, changes that you make in Contacts on the phone are automatically made in Google Contacts on the web. tools to sync data manually.
2. Tap the account whose sync settings you want to change. The Data and Synchronization screen opens, displaying a list of the types of information the account can sync. Checked items are configured to sync to your phone. 3. Check the types of information you want to sync to the phone. By unchecking, selected informations will not be synced.
Email You can use the Email application to read and send email. The Email includes a wizard that makes it easy to configure several popular email service providers. Opening Email 1. Tap the Apps icon 2. Tap the Email icon on the Home screen. to open. The first time you open Email, the Select service screen opens to help you add an email account, as described in “Adding and editing email accounts” on page 121.
Tap an account to select account and its folder. Number of unread emails The default account for sending email is indicated with a checkmark. • The default account for sending email is indicated with a mark. Email 2. Tap an account to open its Inbox. An unread message. Previously read messages. • Only some of your account’s recent emails are downloaded to your phone. NOTE You can change how many days or weeks of email to store on your phone. See “Adding and editing email accounts” on page 121.
Reading your messages You can read messages in the Inbox or other folders for individual accounts. NOTE When you receive a new message, a notification shows in the Status bar, unless Email notifications are tunred off in the Email Account settings, where you can also set whether or not the phone vibrates with the notification, and associate it with a ringtone. 1. Open an account’s Inbox or another folder of messages. 2. Tap the message to read.
Responding to messages You can reply to, or forward, a message that you receive. You can also delete messages and manage them in other ways. Replying to, or forwarding a message 1. With a message opened, tap the icon to reply, or tap the icon > Reply all or Forward. The Compose message screen opens with the addresses (only when replying), subject, and a copy of the message you are responding to already filled in.
Searching your messages 1. Open an account’s Inbox, or another folder of messages. 2. Tap the search icon . 3. Enter the word(s) you want to search for. 4. Tap the search icon to start the search. The list of searched emails is displayed. Working with messages in batches You can delete, star, or mark as unread a batch of messages at once. 1. Open an account’s Inbox or another folder of messages. 2. Check the checkbox at the left of each message.
7. Tap Send. NOTES • If you are not ready to send the message, tap the Menu key > Save draft to save it in a Drafts folder. Tap a draft message in a Drafts folder to resume working on it. Your message is also saved as a draft if you tap the Back key before sending it. • If you are not connected to a network--for example, if you are working in airplane mode--the messages that you send are stored Email in your Outbox folder until you are connected to a network again.
Adding and editing email accounts The first time you open Email, you are prompted to set up an email account. After that, you can configure Email to send and receive email from additional accounts. You can set up the same email accounts used on a PC in a web browser or with another email application. If your service provider requires additional settings or is not listed as an option in Email, enter the necessary details manually.
Deleting an email account Email 1. Open the Accounts screen. 2. Tap the Menu key > Settings. 3. Tap the account you want to delete. 4. Tap Remove account > OK.
Messaging Checking sent and received messages You can check the messages you exchanged with individual people as a separate thread. 1. Tap the Apps icon on the Home screen. 2. Tap the Messaging icon . The Messaging screen opens. Tap to open Quick Contacts. Tap to open an ongoing message thread. Messaging Tap to compose a new text or multimedia message. Tap to search text or multimedia message. 3. Tap the thread of the exchanged message you want to check. The Message thread screen opens.
• If the message contains a multimedia file, you can tap Play to open, view, or listen to the file. NOTE When there is a new message, the new message icon appears on the Status bar. Drag the status bar down to open the Notifications panel and tap the new message to open the Message thread screen. Using the menus on the Messaging screen The following options are available on the Messaging screen. • Tap the icon to compose a new text or multimedia message. See “Sending a message” on page 125.
Delete conversation: Deletes the displayed thread. If there are locked messages, check Delete locked messages and then tap Delete. (Tap More if this option is not visible in the menu.) All conversations: Returns to the Messaging screen. (Tap More if this option is not visible in the menu.) • Touch and hold a message on the Message thread screen to access the following options: Copy text: Copy whole texts on the Message conversation which you selected.
5. You can tap a suggestion or continue entering the phone number. 6. Tap the “Type message” field and start entering your message. 7. Tap Send. The Message thread screen opens and the sent message appears. A message thread is created and the message from the recipient is displayed on the same screen. NOTES • You can also select the person you would like to message from Contact by tapping the CONTACT icon • If you tap the Back key in the “To” field. while composing a message, it is saved as a draft.
7. To add a subject, tap the Menu key > Add subject and enter the subject. 8. To attach a file, tap the Menu key > Attach and tap one of the following multimedia file types. Pictures: Allows you to select and attach a picture saved on the microSD card. Take picture: The Camera application opens so you can take a picture and attach it. Videos: Allows you to select and attach a video saved on the microSD card.
Sending a group massage NOTE All messages are billed per recipient at your plan’s standard rates. Group Conversation: Like email, all recipients with compatible phones can see everyone. Sent as multimedia messages. Individual Messages: Like an email “Bcc” list, recipients can’t see Messaging anyone on the list and can reply only to you. 1. Tap the Apps icon on the Home screen. 2. Tap the Messaging icon to open. 3. Tap the icon . 4. Tap the icon to open contact lists. 5.
Use callback number: Automatically adds a callback number when composing a message. Select callback number: You can select your phone number or entered number as the callback number. Quick Text: Manage quick text list. STORAGE Delete old messages: Check to delete older messages in a thread when the Text message limit or Multimedia message limit is reached. Uncheck to keep all messages. Text message limit: Allows you to set the number of messages to save per thread of text messages.
LOCATION SETTINGS Auto Wi-Fi Enable: Check to enable Wi-Fi automatically when starting location map. NOTIFICATIONS Enable Popup: A popup will appear when a new message arrives. Mark as read on close: Upon closing the popup window, messages will be marked as read. Notifications: Check to receive a notification whenever you receive a new message. Choose ringtone: Allows you to select the ringtone to sound when you receive a new message notification.
Browser The Browser allows you to view web pages. Opening Browser 1. Tap the Browser icon on the Home screen or in the Apps screen. The Browser opens with the web page you most recently viewed. If you have not used the Browser recently, your home page is displayed. NOTES • The Browser also opens when you tap a link to a web page included in an email or text message.
2. Enter the address (URL) of the web page. As you enter the address, the search function shows suggestions of web pages and queries. 3. Tap the suggestion or continue to enter the full address and tap the Enter key . NOTES • The URL bar may not be displayed at the top of the Browser screen on some websites. In that case, drag the page downward to display the URL bar. Browser • If it takes long time to open the specified web page, or if you change your mind, you can cancel the downloading of the page.
Scrolling a web page On the Browser screen, slide the page toward the desired direction with your finger. Zooming in or out of a web page • Place two fingers on the desired area of the screen at once and spread them apart to zoom in. Double tap after zooming in this way, to reflow a column of text to fit the screen. • Place two fingers on the desired area of the screen at once and pinch them together to zoom out. • You can also zoom in to the desired section of a web page by double tapping it.
Tap to end your search. Tap to jump to the previous or next matching word. 4. Tap the up arrow icon or down arrow icon to jump to and highlight the previous or next matching word. Browser 5. Tap the close icon to end your search. Copying text on a web page 1. Tap and hold the text or word you want to select. The nearest word highlights, with a tab at each end of the selection. Drag the tabs to change the selection. 2. Drag either selection tab to expand or reduce the range of selected text. 3.
Navigating between web pages Opening a link Tap a link you want to open on the web page. NOTES • When you touch and hold a link, the following options will appear: Open: Opens the linked web page. Open in new tab: Opens the linked web page in a new tab. Save link: Saves the linked web page as a file. Copy link URL: Copies the link’s URL to the clipboard. Select text: Selects text so that you can copy, share, find or web search.
NOTES • Bookmarked pages have a gold star next to their title. • When you tap a gold star next to the page’s title, the page is deleted from the bookmark. • When you tap a gray star next to the page’s title, the page is added to the bookmark. Viewing the history of the visited web pages 1. Tap the icon > on the URL bar. If the URL bar is not visible, scroll up until the URL bar can be seen. 2. Tap the History tab.
Working with bookmarks You can bookmark frequently visited web pages to quickly view them. Bookmarking a web page 1. Tap the Menu key while viewing the Browser screen. 2. Tap Save to bookmarks. 3. Edit the name or URL as needed and tap OK. Viewing bookmarked pages 1. Tap the icon > on the URL bar. If the URL bar is not visible, scroll up until the URL bar can be seen. You will see the Bookmarks tab. 2. Tap a bookmark to open.
Downloading files Image files, web pages, and applications can be downloaded from websites. Downloaded files will be stored in the phone’s memory. NOTES • The way to download image files, documents, applications and other files depends on the web page. Download files according to the web page instructions. • By default, the Phone is set to disable the installation of applications downloaded from web pages. To enable installation of applications, check Unknown sources of Application settings.
Downloading an image and setting it as wallpaper 1. Touch and hold an image on a web page for context menu. The context menu opens. 2. Tap Set as wallpaper. The images is downloaded and set as wallpaper of the Home screen. Working with multiple Browser windows You can open up to 16 Browser windows at a time and switch between them. Opening a new Browser window 1. Tap the icon > on the URL bar. If the URL bar is not visible, scroll up until the URL bar can be seen.
Closing a Browser window 1. Tap the icon on the URL bar. If the URL bar is not visible, scroll up until the URL bar can be seen. The list of Browser windows is displayed. 2. Tap the close icon of the Browser window you want to close. Changing Browser settings 1. Tap the Menu key while viewing the Browser screen. 2. Tap Settings. 3. Change the following settings as needed: General Set home page: Allows you to set the current web page as a home page. You can also edit the URL.
Clear form data: Tap to delete all the information which the Browser remembers about what you have entered on forms. Enable location: When checked, you permit websites with location-specific contents to ask whether you want to share your location information, using the Phone’s location information. To provide your location information for a website, you must also have location sharing enabled in My Location of Location & security settings. See “Location Services” on page 228.
Advanced Set search engine: You can select the internet search engine such as Google, Yahoo or Bing. Open in background: When checked, the linked page opened in a new window will open in the background. When unchecked, new windows will open in place of the current window. Enable JavaScript: When checked, the Browser allows JavaScript to run. When unchecked, the Browser prevents JavaScript from running. Enable plug-ins: When checked, plug-ins are enabled on web pages.
Bandwidth management Search result preloading: Allows browser to preload high confidence search results in the background. Load images: When checked, the Browser loads images when displaying web pages. When unchecked, the Browser does not load images when displaying web pages. Labs Quick controls: When checked, you can slide thumb from the left or right edge to open quick controls and hide app and URL bars. Fullscreen: When checked, you can use fullscreen mode to hide the status bar.
Camera The Camera application is a combination of both the camera and camcorder, which allows you to take pictures, shoot videos, and share them. Opening Camera 1. Tap the Apps icon on the Home screen. 2. Tap the Camera icon . Camera opens, ready to take a picture. Tap to preview your pictures or videos in Gallery. Tap to set brightness Tap to set Camera mode Tap to set Scene Camera Tap to set Focus Tap to take a picture or shoot a video.
Taking pictures and shooting videos NOTE Be sure to clean the protective lens cover with a microfiber cloth before taking pictures. A lens cover with smudges from fingers can cause blurry pictures with a “halo” effect. Taking a picture 1. Tap the Apps icon on the Home screen. 2. Tap the Camera icon . Camera opens, ready to take a picture. 3. You can adjust your white balance, flash, and other settings, or leave them on automatic. The preview image changes as you change the settings.
NOTES • To focus first and then take a picture, touch and hold the Shutter icon to focus on a subject, then lift your finger to take a focused picture. If you want to cancel taking the picture, slide your finger off the Shutter icon and release your finger. • Pictures that you take with digital zoom may be smaller (in pixels) than the size you set with the Picture Size setting. • Orientation of a picture is determined according to the phone orientation when taking a picture. Shooting a video 1.
Changing Camera settings The Camera application has automatic settings that you can use to take quick point-and-shoot photographs and videos. But Camera also has a number of ways to control your exposures, including controlling the focus, turning the flash on and off, and adjusting the white balance. You can even shoot negatives or use other special effects.
Scene: Tap to open the Scene settings menu. • Auto: Camera detects mode that works best for the scene. • Portrait: Suited for portraits. • Landscape: Suited for taking landscape photos clearly. • Night view: Suited for night scenes. • Backlight: Suited for backlight objects. Improve crushed blacks. • Portrait + Landscape: Suited for taking photos of people in front of a landscape. • Portrait + illumination: Suited for taking portraits at night. • Cooking: Suited for taking pictures of food clearly.
Common settings: Tap to open the Common settings menu. • Light: Tap to turn light on/off. • Self timer: Tap to set length of self timer. • Location info: Tap to add where the photo was taken. • White balance: Tap to select how Camera adjusts colors in different kinds of light to achieve the most natural-looking colors for your shots. Or you can allow Camera to adjust the white balance automatically.
Camcorder settings Camera mode: Tap to open the Camera mode menu. • Standard: Tap to take high quality videos for a variety of scene types. • Live effects: Tap to switch backgrounds and add silly faces while creating a video. • Slow motion: Details of fast-moving scenes not usually visible are captured in slow motion mode. • Set application: Tap to register apps. Scene: Tap to open the Scene settings menu. • Portrait: Suited for portraits. • Landscape: Suited for taking landscape videos clearly.
• Location info: Tap to add where the video was taken to the Video itself. • White balance: Tap to select how Camera adjusts colors in different kinds of light, to achieve the most natural-looking colors for your shots. Or you can allow Camera to adjust the white balance automatically. Auto Daylight Cloudiness Incandescent lamp Light(daylight) Light (neutral) • Color effect: Tap to set color scheme to your own taste. Full color Sepia Negative Camera Monotone • Quality: Tap to select image quality.
Gallery You can use the Gallery application to view pictures and play videos taken with the Camera, downloaded, or copied onto your microSD card. Gallery and albums 1. Tap the Apps icon on the Home screen. 2. Tap the Gallery icon . The main Gallery screen opens displaying the pictures and videos on your microSD card, including those taken with Camera and downloaded from websites or other locations. Tap in any view to return to the main Gallery screen. Tap to open Camera.
Working with albums Albums are groups of images and videos in folders on your microSD card. Opening an album and viewing its contents 1. Tap the Apps icon on the Home screen. 2. Tap the Gallery icon to open. 3. Tap the album with the contents you want to view. The album opens and displays the pictures and videos it contains in a chronological order. The name of the album is shown at the top of the screen. Tap to return to the main Gallery screen. Tap to play slide show. The name of the album.
Working with batches of pictures or videos In addition to working with whole albums and with individual pictures, you can select one or more pictures or videos in an album to work on them in batches—for example, to send a few pictures from an album to a friend. 1. Open the album to view the pictures and videos to work with. 2. Touch and hold a picture or video. Or, tap the Menu key > Select item. 3. Tap to select or unselect the items you want to work with.
5. Tap the application you want to use to share the selected albums. The application that you select will open with the pictures from the selected albums or links, attached to a new message. For information about addressing and sending the message, see the section on that application. NOTES • If you are sharing an album via Gmail, do not delete the original of an attachment before the message is completely sent (wait until it has the Sent label, not the Outbox label), or the attachment will not be sent.
Working with pictures Use the Gallery to view pictures that you have taken with Camera, downloaded, or copied onto your microSD card. You can also edit the pictures on your microSD card and share them with friends. Viewing and browsing pictures 1. Tap the Apps icon on the Home screen. 2. Tap the Gallery icon to open. 3. Tap the album whose contents you want to view. 4. Tap a picture to view it. Tap to return to the album. Tap to share this image. Tap the picture to see the controls.
Rotating a picture 1. Tap a picture to view the controls. 2. Tap Menu > Rotate left or Rotate right . The picture is saved with the new orientation. Using a picture as a contact icon or as Home screen wallpaper 1. Tap a picture to view the controls. 2. Tap Menu > Set picture as. If you tap Contact photo, you will be prompted to select the contact that will be associated with the picture, and then to crop the picture. If you tap Wallpaper, you will be prompted to crop the picture.
Viewing the location of a picture on map If you have configured Camera to save location information with your pictures (see “Changing Camera settings” on page 147), you can view the location where you took the picture on a map. 1. Tap a picture to view the controls. 2. Tap Menu > Show on map > Maps or VZ Navigator. Google Maps or VZ Navigator ® opens, centered on the location stored in the picture.
Deleting a picture You can delete a picture from your microSD card. 1. Tap a picture to view the controls. 2. Tap Menu > Delete. 3. Tap Confirm delete. Working with videos Use Gallery to play or share the videos that you have taken with Camera. Playing videos 1. Tap the Apps icon on the Home screen. 2. Tap the Gallery icon to open. 3. Tap the album with the contents you want to view. 4. Tap a video to play it. Video always plays back in landscape mode.
Sharing a video You can share a video by sending it in an email or with a multimedia (MMS) message. You can also share a video by uploading it to the YouTube web site. 1. While viewing an album, touch and hold a video. Or, tap the Menu key > Select item. 2. Tap the videos to share. 3. Tap the icon at the top of the screen. 4. Tap the application you want to use to share the selected videos. The application you select will open with the video attached to a new message.
Music You can use the Music application to organize and play music and audio files transferred from your PC to your microSD card. Copying music files to the phone’s Memory The Music application plays audio files stored on your phone’s internal memory or microSD card, so before you open Music, you must copy or download audio files from your PC or internet.
NOTES • You can use subfolders on the phone’s memory to organize your music files, or simply copy the audio files to the top level of the phone’s memory. • If the music files have accompanying artwork in JPEG format, include it in the same folder as the music files. Warning! • When connecting your phone to a PC and mounting its microSD card, you must follow your PC’s instructions for connecting and disconnecting USB devices to avoid damaging or corrupting the files on your microSD card.
When the music catalog creation is complete, the Music library screen opens with tabs that you can tap to view your music library organized by Online, Artists, Albums, Songs, or Playlists. Tap a tab to view your library in one of four ways. Tap the summary of the current track to open the Playback screen. NOTE You can return to the Music library screen from the Playback screen > Library. Music by tapping the Menu key Searching for music in your library 1.
NOTES • You can also delete the song that is playing by tapping the Menu key > Delete > OK on the Playback screen. • When your phone is connected to a PC, you can also delete music files from the phone’s memory. Playing music 1. Tap a song in your library to listen to it. The Playback screen opens and the song you tapped starts to play. The tracks in the current playlist play in order until the last track of the playlist (unless you choose a repeat option).
NOTES • You can adjust the volume of music by pressing the Volume Keys . A panel opens to show the current media volume; the indicator moves as you adjust the volume. • You can start playback from the first song in the list by tapping the Menu key > Play all while viewing a list of tracks in an album or in the Songs tab. • You can return to the Playback screen from most other screen in the Music application by tapping the summary of the current track shown at the bottom of the screen.
NOTES • To view the current playlist that Party Shuffle is playing, tap the playlist icon on the Playback screen. • You can add a track to the end of the Party Shuffle playlist by touching and holding the name of a track in your library. Tap Add to playlist and then Current playlist. The track is added to the end of the Party Shuffle playlist. Using a song as a phone ringtone You can use a song as your phone ringtone, in place of one of the ringtones that come with the phone. 1.
Working with playlists You can create playlists to organize your music files into sets of songs, which you can play in the order you set or in a shuffle. Creating a playlist 1. When viewing a list of songs in the library, touch and hold the first song you want to add to the new playlist. 2. Tap Add to playlist. 3. Tap New. 4. Enter a name and tap Save. The new playlist is added to the Playlist library.
Rearranging songs in a playlist 1. Open a playlist by tapping it in the Playlists tab. 2. Drag the directional icon next to the song up or down to change its order in the playlist. NOTE You can also open the currently playing playlist by tapping the playlist icon in the Playback screen. Removing a song from a playlist 1. Open a playlist by tapping it in the Playlists tab. 2. Touch and hold a song and then tap Remove from playlist.
NOTES If you don’t have an application dedicated to creating playlists on your PC, you can create a playlist in a text editor, using the following guidelines: • Enter each music file name to include in the playlist on its own line. • Use music file names as displayed on your PC. Music ignores all but the track names when displaying the playlist. • Save the file with the .
Calendar Calendar on the phone works with the web-based Google Calendar service for creating and managing events, meetings, and appointments. It also works with the Microsoft Exchange ActiveSync calendar service. NOTE Calendar on the phone is optimized for the phone. Some Calendar features, such as creating Calendars, are only available in Google Calendar on the web. Visit http://calendar.google.com to learn about the features of the web version of Calendar.
Opening your calendar Open Calendar to view events you have created or that others have invited you to. 1. Tap the Apps icon on the Home screen. 2. Tap the Calendar icon to open. The calendar displays events added to your phone for each account that is set to synchronize with the calendar. Changing your calendar view Calendar has four views: Agenda, Day, Week, and Month. 1. Tap the name of month on top of the screen > Day, Week, Month or Agenda.
Working in Agenda view Agenda view is a list of your events in chronological order. All-day and multiday events are listed at the start of each day. 1. Tap the name of month on top of the screen > Agenda. Tap an event to view its details. Calendar Drag up or down to view earlier or later events. • Tap an event to view its details. A screen with details about the event opens. See “Viewing event details” on page 176.
Working in Day view Day view displays a chart of the events of one day in a table of one hour rows. The red line indicates the current time. All-day and multiday events are displayed at the top. Part of the title of each event is displayed in the rows that correspond to when it occurs. 1. Tap the name of month on top of the screen > Day. Drag left or right to view earlier or later days. Touch and hold a time slot or an event to create a new event at that time. Tap an event to view its details.
Working in Week view Week view displays a chart of the events of one week. All-day and multiday events are displayed at the top. 1. Tap the name of month on top of the screen > Week. An all-day event. Tap and hold a time slot or an event to create a new event at that time. Tap an event to view its details. Calendar Drag left or right to view earlier or later days. • Tap an event to view its details. A screen with details about the event opens.
Working in Month view Month view displays a chart of the events of one month. Segments with scheduled events turn blue in each day’s vertical bar. 1. Tap the name of month on top of the screen > Month. Tap a day to view the events of that day. Drag up or down to view earlier or later months. Calendar • Tap a day to view its events in Day view.
Viewing event details Depending on the view, you can show more information about an event in a number of ways. 1. In Agenda, Day, or Week view, tap an event to view its details. In Month view, tap one of the days to switch to Day view. Then tap an event to view its details. Tap to delete this reminder. Tap to set whether you’ll attend this event. Other attendees’ status is shown below yours. Tap to change when you want to be reminded about this event. Calendar Tap to add another reminder for this event.
Creating an event You can use Calendar on your phone to create events that appear on your phone and in Google Calendar on the web. 1. In any Calendar view, tap the Menu key > New event to open an Event details screen for a new event. Calendar 2. Add details about the event. Enter an event name, location, time, and optional additional details about the event. If you have more than one calendar, you can choose which calendar to add an event on. Tap Add reminder to add more reminders. 3.
NOTE You can also touch and hold a spot in Day, Week, or Month view. Tap New event to open the Event details screen with that day and time already entered. Editing or deleting an event You can edit or delete an event that you created on the phone or on the web. You can also edit or delete events created by others, if you have their permission. Editing an event 1. Open the summary of the event. 2. Tap the icon . Calendar The Event Details screen opens. 3. Make your changes to the event. 4.
Setting an event reminder You can set one or more reminders for an event. Setting an event reminder 1. Open the event summary. 2. If you already have a reminder set, tap Add reminder to add a reminder. A new reminder is added, for 10 minutes before the event. 3. Tap the reminder time, then in the dialog tap to set when you want to be reminded for an event. NOTES • When the time comes, you receive a notification about the event.
2. Perform any of the following operations with the Calendar notifications list as needed: • Tap an event to view more information about that event. • Tap Snooze all to turn off all event reminders for 5 minutes. • Tap Dismiss all to delete all reminders in the list. • Tap the Back key to keep the reminders pending. The icon remains in the Status bar and the reminders remain in the Notifications panel.
Setting which calendars are visible 1. Tap the Menu key > Calendars to display. The Calendars screen displays all the calendars you have added or subscribed to for each account that is configured to synchronize events to your phone, organized by account. (Calendars for accounts you have configured not to synchronize Calendar events are not included in the list.) 2. Tap the name of an account to show or hide its calendars on your phone. Setting which calendars are synchronized 1.
Changing Calendar settings You can change the following settings for how Calendar displays events and how it notifies you of upcoming events. 1. Open a Calendar view, tap the Menu key > Settings. 2. Change any of the following settings as needed: Hide declined events: Check to hide events you have declined invitations to. Show week number: When checked, the week number shows on your calendar. Week starts on: Allows you to set a starting week such as Locale default, Saturday, Sunday or Monday.
Verizon Tones Verizon Tones application lets you preview and buy from Verizon Wireless’ extensive catalog of Ringtones, Ringback Tones, and Ringback Tones Jukeboxes. You can download, manage, preview, and play the latest Tones content from your phone. Opening Verizon Tones 1. Tap the Apps icon on the Home screen. 2. Tap the Verizon Tones icon . 3. The first time you start Verizon Tones, you will be prompted to subscribe to the service. Follow the on-screen instructions to install and use Verizon Tones.
VZ Navigator® Now you can find the address of an excellent restaurant or the nearest ATM. Check movie times. Discover the latest hot spots. And know exactly how to get where you are going. VZ Navigator puts all the advanced features of the latest GPS devices and systems on your phone — at a fraction of the price. NOTES • To use VZ Navigator, check the VZW Location Services option of Location Services to enable the GPS function. See “Location Services” on page 228.
My Verizon Mobile You can use My Verizon Mobile to manage your Verizon Wireless account, i.e. you can view minute, message and data usage, and adjust allowance minutes on current plans. NOTE No airtime or minute charges apply when accessing My Verizon Mobile. Opening My Verizon Mobile 1. Tap the Apps icon on the Home screen. 2. Tap the My Verizon Mobile icon . The My Verizon Mobile screen opens.
G’zGEAR® G’zGEAR provides seven useful tools for outdoor activities. Warning! Do not use G’zGEAR while engaging in any dangerous sports. NOTE To get the current location with GPS, check the Standalone GPS Services option of Location Services to enable GPS function. See “Location Services” on page 228. Opening G’zGEAR 1. Tap the Apps icon on the Home screen. 2. Tap the G’zGEAR icon . G’zGEAR® The G’zGEAR Home menu screen opens. Tap the respective tool icon to open each tool. Tap to configure G’zGEAR.
• Tap How To Use, then the name of the tool to display how to use it. Earth Compass The Earth Compass tool allows you to view the direction measured with the built-in electronic compass. NOTES • When using the electronic compass, orient the phone so it is horizontal. The compass becomes less accurate when the phone is tilted. • Any of the following actions can create accuracy issues with the electronic compass. If any of these occur, recalibrate the electronic compass as soon as possible.
• The electronic compass uses the Earth’s magnetic field to determine direction. The direction readings produced by the electronic compass can be different from actual compass readings due to environment and temperature. • Direction readings taken in any of the following locations may result in very inaccurate readings. - Near buildings (especially ferro-concrete structures), large metal objects (trains, motor vehicles, etc.
Earth Compass You can check the direction in Compass mode. The Layer Compass mode screen displays seven types of layers on top of the compass. My Layer enables you to display the point you added on the compass. 1. From the G’zGEAR Home menu screen, tap Earth Compass. 2. The Layer Compass mode screen displays the object in the direction you point the phone. • The layer switches each time you tap Switch Layer.
4. Tap Next to add the current location displayed on the map as a point. To update the current location, tap Current Location. 5. Tap to select an icon and tap Next. 6. Tap to select the color of an icon and tap Next. 7. Enter a name for the point and tap Next. 8. Tap OK to add the point. Thermometer You can check the current temperature with the Thermometer tool. NOTES • The Thermometer cannot be used while the phone is being charged.
Switch Mode: Change Temperature Trip mode and Temperature Comparison. Temperature Trip mode Temperature Trip takes you on an air balloon trip to cities with the similar current temperature, from among 30 cities around the world. Each time you visit a city, up to five flags are displayed. 1. From the G’zGEAR Home menu screen, tap Thermometer. 2. The Temperature Trip screen displays a map of the world and a balloon moves to the city with the similar current temperature.
Current View mode The Current View mode screen displays the current tide. 1. From the G’zGEAR Home menu screen, tap Tides. 2. The Current View screen displays the current tide, time of sunrise and sunset, and time of high and low tides. Home: Returns to the G’zGEAR Home menu screen. Select Point: Same as One-Day View mode. You can also set the time to display the tidal information by sliding the time up or down.
You can also set the date to display the sunrise and sunset information by sliding the year and month up or down. Moonrise Moonset mode You can check the time of moonrise and moonset and the position of the Moon. 1. From the G’zGEAR Home menu screen, tap Sun/Moon. 2. The Moonrise Moonset screen displays the time of moonrise and moonset and the position of the Moon.
Compass: Select Compass On to display the constellations in the direction the phone is pointed at, using the built-in compass. If you select Compass Off, you can drag the screen to scroll the display. Current location: Updates the current location using GPS. You can also set the date and time to display the constellation by sliding up or down the number of year, month and time. Constellation Finder You can locate constellations in the sky using Constellation Finder. 1.
Walking Counter You can count the number of steps you traveled with the Walking Counter tool. NOTES • The pedometer counts your steps while the phone power is on. You do not need to open G’zGEAR to count your steps. • The counter is reset everyday at midnight. • The pedometer detects the small vibrations generated when you are walking or jogging and counts them as steps. The error of the count increases if your steps cannot be detected normally or if vibration other than from walking or jogging is detected.
Pedometer mode In Pedometer mode, you can check the number of steps you traveled in a day, etc. 1. From the G’zGEAR Home menu screen, tap Walking Counter. 2. The Pedometer screen displays the number of steps you took for the day, a chart displaying the number of steps you took for the last few days, the distance you walked and the estimated number of calories you burned. • Tap Day, Week, or Month on the list to display the details. Time display: Tap to change the mode between daily, weekly or monthly.
Configuring G’zGEAR 1. From the G’zGEAR Home menu screen, tap Settings. 2. Change the following settings as necessary. Calibrate compass: Allows you to calibrate the electronic compass. GPS Location Services: Check to automatically set the current location while using G’zGEAR. G_Switch: Check to enable the switching of tools by shaking the phone to the left. When shaking the phone, be sure to hold the phone firmly and make sure not to hit the phone against nearby objects.
setting to provide notification of changes in pressure to watch via Bluetooth. Restore defaults: Resets all G’zGEAR settings to defaults. Widgets in G’zGEAR G’zGEAR provides seven different widgets. For instructions on how to add a widget to the Home screen, see “Adding an item to the Home screen” on page 36. G’zGEAR BAROMETER The Barometer widget displays an Atmospheric Pressure. When tapped, G’zGEAR opens to display the Barometer screen.
G’zGEAR TIDES The Tides widget displays the time of high and low tides at the selected point. When tapped, G’zGEAR opens to display the One-day view mode of Tides screen. G’zGEAR VIRTUAL TREK The Virtual Trek widget displays the name of the selected trail, distance hiked, and percentage completed. When tapped, G’zGEAR opens to display the Virtual Trek screen.
G’zWORLD G’zWORLD allows you to record your field activities and share them with others via LIVE G. You can also use them in an original map just for yourself. NOTE LIVE G is a service that allows greater enjoyment of outdoor and leisure activities by providing nature and sensor information and letting you record/share field activities. Opening G’zWORLD 1. Tap the Apps icon on the Home screen. 2. Tap the G’zWORLD icon . G'zWORLD The G’zWORLD screen opens.
More Applications Play Store™ Play Store provides direct access to applications and games to download and install on your phone. Opening Play store 1. Tap the Apps icon on the Home screen. 2. Tap the Play Store icon . The Play Store home screen opens. If you have not already set up a Google account, you will be transferred to the Add a Google account screen. For details on setting up a Google account, see “Setup Wizard” on page 25.
Searching for applications 1. Tap the search icon at the top right of the screen. 2. Enter all or part of an application’s name or description, or the developer’s name you want to search for and tap the search icon on the keyboard. 3. Tap a search result to open that application’s details screen. Downloading and installing an application NOTE Before you can download a paid application, you must set up a billing arrangement, as described in “Creating a Google Wallet account” on page 203. 1.
app and complete your purchase. If you’ve enabled a PIN code for purchases, you’ll be asked to enter it at this time. 5. You will receive a series of notifications when downloading the application and then installing on your phone. 6. When the application is installed, you can tap the notification to open the application, or open it by tapping its icon in the Apps screen.
Uninstalling an application 1. On the Play Store home screen, tap the Menu key 2. Tap the application to uninstall. > My Apps. The details screen for the application opens. 3. Tap Uninstall > OK. Requesting a refund for an application If you are not satisfied with an application, you can ask for a refund within 15 minutes after your purchase. Your credit card will not be charged and the application will be uninstalled from your phone.
YouTube™ YouTube is Google’s online video streaming service for viewing and uploading videos. Opening YouTube 1. Tap the Apps icon on the Home screen. 2. Tap the YouTube icon . The YouTube home screen appears. • To display the YouTube menu, tap YouTube at the top left, or swipe the screen to right. Tap to search for a video. Swipe to left to view list of videos. YouTube menu 1. On any YouTube screen, tap a video to play it. 2.
Searching for videos 1. At the top of the YouTube home screen, tap the search icon . 2. Enter the text to search for. 3. Tap a suggestion below the search box or tap the search icon . 4. Scroll through the search results and tap a video to watch it. Sharing your videos on YouTube You can shoot a video on the phone’s camcorder and upload it to YouTube. NOTE You need to sign in to your YouTube account before you can upload a video.
• Uploads: Opens a dialog which network preferences you can upload. Search • Clear search history: Tap to clear your search history, so that your previous searches will not be presented as suggestions in new searches.
Gmail™ Gmail is Google’s web-based email service. Your messages are stored on Google servers, but you can read, write, and organize messages with the Gmail application on your phone or by a web browser. Because your mail is stored on Google servers, you can search your entire message history, backed by the speed and power of Google search. NOTE For more information about Gmail, visit the Google website at the following URL: http://mail.google.com.
• Conversations with new messages have bold subject lines. To read a message in a conversation, tap its subject. • The current Google account is displayed at the top of the Inbox. If you have more than one account, tap the current account to switch accounts. Reading a message 1. Open your Inbox. 2. Tap a conversation that contains the message you want to read. Composing and sending a message 1. When viewing the Inbox or other list of conversations, tap the icon 2. Enter an address for the message. .
Google Talk™ Google Talk is Google’s instant messaging service. You can use it to communicate in real time with other people who also use Google Talk, on a phone, on the web, or with a desktop application. NOTE For more information about Google Talk, visit the Google website at the following URL: http://www.google.com/talk/. Opening Google Talk and signing in 1. Tap the Apps icon 2. Tap the Talk icon on the Home screen. to open. When you first open Google Talk, your Friends list is displayed.
FM Radio FM Radio allows you to access to the entire FM music library featuring millions of songs from thousands of artists. Listen to over 120 expert programmed radio stations or create your own custom stations. 1. Tap the Apps icon on the Home screen. 2. Tap the FM Radio icon to open. 3. Follow the on-screen instructions. NOTE You need a wired headset to work as an FM antenna. Please plug in your headset.
Clock You can set an alarm by modifying an existing alarm or by adding a new one. Setting an alarm 1. Tap the Apps icon on the Home screen. 2. Tap the Clock icon to open. 3. Tap the icon . 4. Tap an existing alarm to change its time and other attributes. The Set alarm screen opens. Check Turn alarm on. 5. Tap Time to set the alarm. In the dialog, change the time by tapping the or icons. Or tap the digits to change the hours and minutes directly. 6.
Adding an alarm 1. Tap the Apps icon on the Home screen. 2. Tap the Clock icon to open. 3. Tap the icon > Add alarm. 4. Set the alarm’s time and other attributes. See “Setting an alarm” on page 212. 5. Tap OK. Changing Alarm Clock settings 1. Tap the Apps icon on the Home screen. 2. Tap the Clock icon to open. 3. Tap the Menu key > Settings. 4. Change the following settings as necessary. Alarm in silent mode: Check to play alarms even when the phone is in Silent mode.
Calculator Use the Calculator to solve simple arithmetic problems or use its advanced operators to solve more complex equations. 1. Tap the Apps icon on the Home screen. 2. Tap the Calculator icon . Calculator opens with Basic panel. 3. Enter numbers and arithmetic operators. NOTES • Tap DELETE to delete the last number or operator you entered. Touch and hold DELETE to delete everything in the display.
Sound Recorder Use the Sound Recorder to record sound, such as voice, and save the recorded data on your phone’s internal storage and microSD card. 1. Tap the Apps icon on the Home screen. 2. Tap the Sound Recorder icon to open. 3. Tap the start record icon . The Sound Recorder starts recording a sound. 4. Tap the stop record icon . 5. Perform any of the following operations as necessary. • Tap Save Recording to save the recorded data. • Tap Discard to discard the recorded data.
Voice Command The Voice Command application allows users to: access other applications, check status, process phone calls, and create text messages. Your phone recalls the number from your Contacts, displays it briefly, and then dials it. NOTE When you open the Voice Command application for the first time, its tutorial will be displayed. You will be able to learn about Voice Commands following the on-screen instructions. Opening and Using Voice Command 1. Tap the Apps icon on the Home screen. 2.
Send Email : To create an email, say “Send email,” and the command system will prompt you for the name. You can state the name (for example, “Send email to Bob”) and the Email application will automatically start. Go To
Desk Cradle The Clock application is automatically activated when you place your phone on the cradle that is sold separately and charging starts. 1. Place the phone on the cradle (sold separately). The Clock application opens. Current time, day, and date are displayed. Tap to open the Alarm Clock application. Tap to start the slideshow. Tap to open the Music application. • Tap the Alarm Clock icon Tap to return to the Home screen. to open the Alarm Clock application. See “Clock” on page 212.
Glove mode You can use your phone with gloves. 1. From the Home screen or lock screens, press and hold Tactile Key . By default, Glove Mode opens. If you assigned another function to Tactile key, tap the Apps icon on the Home screen and tap the Glove mode icon . Check the Notification. Email, Messaging, and Visual Voice Mail Open camera. Dialer, Recent, and People or tap Tap here to exit glove mode > Exit glove mode. You can also turn off glove mode by tapping Glove mode on the Notification panel.
Task You can create and manage tasks. More Applications 1. Tap the Apps icon on the Home screen. 2. Tap the Task icon to open. 3. Tap the icon . 4. Enter the Title, Due Date, Priority, Reminder, Repeat and Note. 5. Tap Done to finish.
Settings You can use the Settings application to configure how your phone looks, sounds, communicates, protects your privacy, and operates in many other ways. Opening Settings 1. From the Home screen or the Apps screen, tap the Menu key > Settings. The Settings application opens. NOTE You can also open the Settings application by tapping the Settings icon in the Apps screen. Wireless & networks Airplane mode Airplane mode: Turn on to disable outgoing wireless radio transmissions.
SCAN: Scan manually for networks. MORE: Add network, Wi-Fi Protected setup, Manage Networks. ADVANCED: Network notification, Keep Wi-Fi on during sleep, MAC address, IP address. Mobile Hotspot For details about these settings, see “Sharing your phone’s mobile data connection” on page 106. Mobile Hotspot: Turn on to share your phone’s mobile network data connection as a portable Wi-Fi hotspot.
Data usage alert: Your phone will alert you when your mobile data usage reaches the amount you selected. Data statistics: By enabling this feature, power consumption will increase on high data rate networks such as LTE... Data usage cycle: Displays your current data usage cycle. Tap the dropdown menu to change the cycle date. More... VPN: • Add VPN network: Opens a screen that prompts you to select the type of VPN to add. You are then prompted for VPN configuration details.
DEVICE Sound Volumes: Opens a dialog where you can set the volume of the ringtones that sound when you receive a phone call or a notification, or of different media (music, videos, an so on), and for alarms. Silent mode: Select Mute or Vibrate all sounds (including call and notification ringtones) except the audio from music, videos, and other media and any alarms you have set. (You must silence media and alarms in their respective applications.
Display Brightness: Opens a dialog for adjusting the brightness of the screen. You can check Automatic brightness to set the phone to adjust the brightness automatically, using the phone’s built-in light sensor. If you uncheck that option, you can use the slider to set the brightness level you want at all times when using the phone. For the best battery performance, use the dimmest possible brightness level at which you are comfortable.
Unmount SD card: Unmounts the microSD card from your phone so that you can format the card or safely remove it when the phone is on. This setting is dimmed if there is no microSD card installed, or if you have already unmounted the microSD card. Erase SD card: Permanently erases everything on a microSD card and prepares it for use with your phone. USB Ask on plug: Check to display the pop-up menu for selecting USB mode when using the USB connection.
Applications Manager Use the Applications Manager to view details about the applications installed on your phone, to manage the data, to forcibly stop installation, and to set whether or not you want to permit installation of applications. Applications Manager: Opens the Downloaded tab on the Manage applications screen and displays the downloaded applications in alphabetical order. Tap the Running tab or All tab, to display the list of applications corresponding to each tab.
Location Services You can configure whether to use the Location Services such as for indicating your current location on the map application. E911: This is for indication only, and cannot be changed. E911 Location cannot be turned off on any mobile phone. VZW Location Services: Check to enable Verizon Wireless and third party authenticated and validated location services. Standalone GPS Services: Check to use location services based on Standalone GPS.
When you use your mobile browser or other services and applications, you authorize Verizon Wireless to collect, use and disclose your Location Information to provide you with any location services. Verizon Wireless does not retain Location Information longer than necessary to provide the services to you. We will not knowingly disclose your Location Information to third parties without your consent, except as required by law.
Manage SIM text messages: Check to allow manage SIM text messages. PASSWORDS Make passwords visible: Check to briefly show each character of the password as you enter them, so that you can see what you’ve entered. DEVICE ADMINISTRATION Device administrators: Allows you to add or remove device administrators. Device security policy: Opens a list of applied device security policy.
Language & Input Language: Opens the Language screen, where you can select the language for your phone. Selectable languages are English, Spanish, Chinese, Korean and Japanese. Spelling correction: Checking this option activates spelling correction. Personal dictionary: Opens a list of the words you have added to the dictionary. Tap a word to edit or delete it. Tap the icon to add a word. KEYBOARD & INPUT METHODS Default: Select the default input method.
up, including your Wi-Fi passwords, Browser bookmarks, a list of the applications you have installed, the words you have added to the dictionary used by the onscreen keyboard, and most of the settings that you configure with the Settings application. Some third party applications may also take advantage of this feature. If you uncheck this option, you stop the backing up of your data to your account, and any existing backups are deleted from Google servers. Backup account: Select the account to backup.
Tactile key For details about these settings, see “Selecting an application to be opened by the Tactile Key” on page 48. Disable Tactile key: Check to disable Tactile key. Assign app to Tactile key: Allows you to select the application to be activated when pressing and holding the Tactile Key . SYSTEM Date & time Automatic date & time: Check to use network-provided time. Automatic time zone:Check to use network-provided time zone.
Auto-rotate screen: Check to change the screen’s orientation automatically depending on the device orientation(portrait or landscape). Speak passwords: Check to enter a password by speaking it. Touch & hold delay: Set the time that the screen needs to interpret touch as touch and hold. Install web scripts: You can allow apps to install scripts from Google that make their Web content more accessible. About Phone System updates: Opens a screen that reports availability of Android system software updates.
Safety TIA Safety Information The following is the complete TIA Safety Information for wireless handheld phones. k Tips on Efficient Operation Do not touch internal antenna area unnecessarily when the phone is in use. Contact with internal antenna area affects call quality and may cause the phone to consume more power than otherwise needed. k Driving Talking on the phone while driving is extremely dangerous and is illegal in some states. Remember, safety comes first.
k Electronic Devices Your wireless handheld portable telephone is a low power radio transmitter and receiver. When it is ON, it receives and also sends out radio frequency (RF) signals. Most modern electronic equipment is shielded from RF energy. However, certain electronic equipment may not be shielded against the RF signals from your wireless phone. Therefore, use of your phone must be restricted in certain situations.
Other Medical Devices If you use any other personal medical device, consult the manufacturer of your device to determine if they are adequately shielded from external RF energy. Your physician may be able to assist you in obtaining this information. Hospitals and Health Care Facilities Turn your phone OFF in health care facilities when any regulations posted in these areas instruct you to do so. Hospitals or health care facilities may be using equipment that could be sensitive to external RF energy.
k Blasting Areas To avoid interfering with blasting operations, turn your phone OFF when in a “blasting area” or in areas posted “Turn off two-way radio”. Obey all signs and instructions. k Potentially Explosive Atmospheres Turn your phone OFF when in any area with a potentially explosive atmosphere and obey all signs and instructions. Sparks in such areas could cause an explosion or fire resulting in bodily injury or even death.
This phone has been tested and rated for use with hearing aids for some of the wireless technologies that it uses. However, there may be some newer wireless technologies used in this phone that have not been tested yet for use with hearing aids. It is important to try the different features of this phone thoroughly and in different locations, using your hearing aid or cochlear implant, to determine if you hear any interfering noise.
power required to reach the network. In general, the closer you are to a wireless base station antenna, the lower the power output. Before a phone model is available for sale to the public, it must be tested and certified to the FCC that it does not exceed the limit established by the government adopted requirement for safe exposure. The tests are performed in positions and locations (e.g., at the ear and worn on the body) as required by the FCC for each model.
This equipment has been tested and found to comply with the limits for a class B digital device, pursuant to Part 15 of the FCC Rules. These limits are designed to provide reasonable protection against harmful interference in a residential installation. This equipment generates, uses and can radiate radio frequency energy and, if not installed and used in accordance with the instructions, may cause harmful interference to radio communications.
FDA Information U.S. Food and Drug Administration Cell Phone Facts Consumer Information on Wireless Phones k What kinds of phones are the subject of this update? The term “wireless phone” refers here to hand-held wireless phones with built-in antennas, often called “cell,”“mobile,” or “PCS” phones. These types of wireless phones can expose the user to measurable radiofrequency energy (RF) because of the short distance between the phone and the user’s head.
have not been confirmed by additional research. In some cases, other researchers have had difficulty in reproducing those studies, or in determining the reasons for inconsistent results. k What is FDA’s role concerning the safety of wireless phones? Under the law, FDA does not review the safety of radiation-emitting consumer products such as wireless phones before they can be sold, as it does with new drugs or medical devices.
• Occupational Safety and Health Administration • National Telecommunications and Information Administration The National Institutes of Health participates in some interagency working group activities, as well. FDA shares regulatory responsibilities for wireless phones with the Federal Communications Commission (FCC). All phones that are sold in the United States must comply with FCC safety guidelines that limit RF exposure.
2000. Between them, the studies investigated any possible association between the use of wireless phones and primary brain cancer, glioma, meningioma, or acoustic neuroma, tumors of the brain or salivary gland, leukemia, or other cancers. None of the studies demonstrated the existence of any harmful health effects from wireless phone RF exposures. However, none of the studies can answer questions about long-term exposures, since the average period of phone use in these studies was around three years.
animal studies are conducted to address important questions about the effects of exposure to radiofrequency energy (RF). FDA has been a leading participant in the World Health Organization International Electromagnetic Fields (EMF) Project since its inception in 1996. An influential result of this work has been the development of a detailed agenda of research needs that has driven the establishment of new research programs around the world.
distance. For example, you could use a headset and carry the wireless phone away from your body or use a wireless phone connected to a remote antenna. Again, the scientific data do not demonstrate that wireless phones are harmful. But if you are concerned about the RF exposure from these products, you can use measures like those described above to reduce your RF exposure from wireless phone use.
On the other hand, if the phone is mounted against the waist or other part of the body during use, then that part of the body will absorb more RF energy. Wireless phones marketed in the U.S. are required to meet safety requirements regardless of whether they are used against the head or against the body. Either configuration should result in compliance with the safety limit.
The final draft, a joint effort by FDA, medical device manufacturers, and many other groups, was completed in late 2000. This standard will allow manufacturers to ensure that cardiac pacemakers and defibrillators are safe from wireless phone EMI. FDA has tested hearing aids for interference from handheld wireless phones and helped develop a voluntary standard sponsored by the Institute of Electrical and Electronic Engineers (IEEE).
k FCC Enhanced 911 (E911) Rules Background The Federal Communications Commission (FCC) requires wireless carriers to transmit specific latitude and longitude location (Automatic Location Identification = ALI) information as well as “911” calls to Public Safety Answering Points (PSAPs) to identify the location of the caller in case of emergency.
911 in Lock Mode The “911” call service is available even in the lock mode. 1. Tap Emergency call. 2. Enter “911” then tap the call icon . 3. The call connects. 4. The phone exits the Lock Mode for 5 minutes. 5. To exit emergency mode, drag the status bar downward and tap Emergency call back mode > Yes. 911 Using Any Available System 1. Tap Emergency call. 2. Enter “911” then tap the call icon . 3. The call connects. 4. The phone remains in Emergency Mode for 5 minutes. 5.
• Never refuse to yield the line when informed that it is needed for an Emergency Call. Also, never take over a line by stating falsely that it is needed for an emergency. General Safety k Precautions Your Handheld Portable Telephone is a high quality piece of equipment. Before operating, read all instructions and cautionary markings on the product, battery and adapter/charger.
• To avoid the risk of electric shock, do not use this device while there is lightning outside. • By placing it under a faucet or shower and adding water-pressure, or submerging it under water for a long time, the warranty will be invalid because the device will become non-repairable. If, by accident, you spill fluid, such as water, on the device, turn off the power, remove the battery and wipe off the fluid with a dry, clean cloth.
• Do not touch the device, battery or charging device while the phone is being recharged. It may cause a low-temperature burn. • If you are using the metal strap, be sure that it does not touch the charging terminal, especially the plug, while recharging. It may cause an electric shock, fire, injury or product failure. • To avoid injury or getting into an accident, check around you to ensure your safety while placing a call, messaging, taking a picture or playing a game with this device.
DOs • Only use batteries specific to your phone model. • Use only the USB/Wall Charger provided with the phone. Using any charger other than the one included with the phone may damage your phone or battery. • Only use the battery and charger approved by the manufacturer. • Only use the battery for its original purpose. • Try to keep batteries in a temperature between 41°F (5°C) and 95°F (35°C).
• Don’t dispose of the battery in a fire. • Don’t short the positive electrode and negative electrode on the battery. • Don’t nail, hit with a hammer, or step on the battery. It may cause fire or damage. • Don’t use the battery with damage or a leak. Lithium ion batteries are recyclable. When you replace your battery, please request the repair center to recycle the battery in accordance with RBRC standards.
attempting any cleaning. Always use a dry, soft cloth dampened with water to clean the equipment, after it has been unplugged. • Handling the cord on this product or cords associated with accessories sold with this product, will expose you to lead, a chemical known to the State of California to cause birth defects or other reproductive harm. Wash your hands after handling. • Always disconnect the wall charger from the power source when it is not in use.
CE Safety Information k Power Supplies • The adapter shall be installed near the equipment and easily accessible. • The Phone used Be sure to L.P.S [Limited power sources] power supplies. The connection to USB interfaces has to be limited to USB 2.0 version or higher. • For CE conformity: the Mobile Phone shall be used with travel charger that is approved acc. to EN 301 489-34. k Protect Your Hearing Listening to a headset at high volumes can damage your hearing.
Games k Seizures/Blackouts Warning A very small percentage of individuals may experience epileptic seizures when exposed to certain light patterns or flashing lights. Exposure to certain patterns or backgrounds on a computer screen, or while playing video games, may induce an epileptic seizure in these individuals. Certain conditions may induce previously undetected epileptic symptoms even in persons who have no history of prior seizures or epilepsy.
Camera • Do not aim your camera at the Sun. The sunlight passing through the Camera/Camcorder Lens may cause damage to the camera. • Do not use your camera’s flash close to a person’s eyes. This may cause the person to lose eyesight temporarily and result in an accident. • Do not expose the Camera/Camcorder Lens to direct sunlight for a long period of time. It may cause explosion or fire from light-focus action. • Do not use the flash on an automobile driver.
used with hearing aids operating in the telecoil mode thus reducing unwanted background noise. How will I know which wireless phones are Hearing Aid Compatible? The Hearing Aid Compatibility rating is displayed on the wireless phone box. A phone is considered Hearing Aid Compatible for acoustic coupling (microphone mode) if it has an “M3” or “M4” rating. A digital wireless phone is considered Hearing Aid Compatible for inductive coupling (telecoil mode) if it has a “T3” or “T4” rating.
k Teletypewriter (TTY) Devices You can use an optional teletypewriter (TTY) device with your phone to send and receive calls. You must plug the TTY device into the phone’s headset connector and set the phone to operate in one of three TTY modes. A TTY is a communication device used by people who are hard of hearing or have a speech impairment. TTY does not work from mobile phone to mobile phone. Your phone has a 3.5mm jack. Use a TSB-121 compliant cable (provided by the TTY manufacturer) and a 3.5mm to 2.
• Set the volume in a quiet environment and select the lowest volume at which you can hear adequately. • When using headphones, turn the volume down if you cannot hear the people speaking near you or if the person sitting next to you can hear what you are listening to. • Do not turn the volume up to block out noisy surroundings. If you choose to listen to your portable device in a noisy environment, use noise-cancelling headphones to block out background environmental noise.
Bethesda, MD USA 20892-2320 Voice: (301) 496-7243 Email: nidcdinfo@nih.gov Internet: www.nidcd.nih.gov/health/hearing National Institute for Occupational Safety and Health Hubert H. Humphrey Bldg. 200 Independence Ave., SW Washington, DC 20201 Voice: 1-800-35-NIOSH (1-800-356-4674) Internet: www.cdc.gov/niosh/topics/noise/default.html RECYCLE YOUR CELL PHONE! Carriers marketing this cell phone have an in-store phone take-back program.
West Dexter, MI 48130 -ORDrop the phone off at a local collection center. For a list of collection centers, visit www.wirelessfoundation.org/CalltoProtect/dropoff.cfm Before returning any wireless device for recycling purposes, please remember to terminate your service on the device, clear the device of any stored information and remove the device’s SIM card, if it has one (please contact your wireless provider to find out if your device contains a SIM card and for assistance on how to remove it).
Warranty NEC Corporation of America (the “Company”) warrants to the original retail purchaser of this handheld portable cellular telephone, that should this product or any part thereof during normal consumer usage and conditions, be proven defective in material or workmanship that results in product failure within the first twelve (12) month period from the date of purchase, such defect(s) will be repaired or replaced (with new or rebuilt parts) at the Company’s option, without charge for parts or labor dir
sand, weather conditions, battery leakage, blown fuse, theft or improper usage of any electrical source. The Company disclaims liability for removal or reinstallation of the product, for geographic coverage, for inadequate signal reception by the antenna or for communications range or operation of the cellular system as a whole.
THE EXTENT OF THE COMPANY’S LIABILITY UNDER THIS WARRANTY IS LIMITED TO THE REPAIR OR REPLACEMENT PROVIDED ABOVE AND, IN NO EVENT, SHALL THE COMPANY’S LAIBILITY EXCEED THE PURCHASE PRICE PAID BY PURCHASER FOR THE PRODUCT. ANY IMPLIED WARRANTIES, INCLUDING ANY IMPLIED WARRANTY OF MERCHANTABILITY OR FITNESS FOR A PARTICULAR PURPOSE, SHALL BE LIMITED TO THE DURATION OF THIS WRITTEN WARRANTY. ANY ACTION FOR BREACH OF ANY WARRANTY MUST BE BROUGHT WITHIN A PERIOD OF 12 MONTHS FROM DATE OF ORIGINAL PURCHASE.
NEC Corporation of America 6535 HWY 161 Irving, TX 75039 (800)637-5917 Warranty 269
Index A C About Phone settings ........234 Accessibility .......................260 Accessibility settings ..........233 Accounts & sync settings ...227 Accounts and sync ............ 110 Agenda view ...................... 172 Airplane mode......................48 Alarm ................................. 212 Album ................................152 Amazon................................39 Answering a call ...................61 Applications Manager settings ...........................................
Direct dial .............................40 Direct message ....................40 Directions & Navigation ........40 Display settings ..................225 DLNA .................................108 Double tap ...........................22 Downloading an application .........................202 Downloading files ...............138 Drag .....................................22 Dust resistance ....................12 E Earth Compass ..................187 Editing text ...........................57 Email ........
I Inbox .......................... 115, 208 Inserting a microSD card .....18 Inserting the battery .............13 Inserting the SIM Card .........19 Installing an application ......202 K Keyboard type .....................53 L Language & Input settings ...........................................231 Library................................162 Location Based Services (LBS) ..................................228 Location Services settings ...........................................228 Index M 272 Memo....
Q Quick Communication .........43 Quick Contact ................46, 81 Quickoffice® ....................... 211 R Read out ..............................43 RECYCLE YOUR CELL PHONE! .............................264 Rejecting an incoming call ...62 Removing a microSD card ...17 Removing the battery...........13 Requesting a refund for an application .........................204 Restarting the phone ...........24 Ringtone ......................62, 166 Roaming ..............................
Turning the phone on and off.........................................24 Turning the screen on and off.........................................27 Wireless & networks settings ..............................221 Y YouTube™ ....................44, 205 U Uninstalling an application ...........................................204 USB connection .................100 USB settings ......................226 V Verizon Tones.....................183 Viewing pictures.................
Declaration of Conformity Hereby, NEC CASIO Mobile Communications, Ltd. declares that this product is compliance with the essential requirements and other relevant provisions of Directive 1999/5/EC. Declaration of Conformity can be found on http://www.nec-casiomobile.com/support/doc.html This mobile phone complies with the EU requirements for exposure to radio waves.
THIS PRODUCT IS LICENSED UNDER THE MPEG-4 VISUAL PATENT PORTFOLIO LICENSE FOR THE PERSONAL AND NON-COMMERCIAL USE OF A CONSUMER FOR (i) ENCODING VIDEO IN COMPLIANCE WITH THE MPEG-4 VISUAL STANDARD (“MPEG4-VIDEO”) AND/OR (ii) DECODING MPEG-4 VIDEO THAT WAS ENCODED BY A CONSUMER ENGAGED IN A PERSONAL AND NON-COMMERCIAL ACTIVITY AND/OR WAS OBTAINED FROM A VIDEO PROVIDER LICENSED BY MPEG LA TO PROVIDE MPEG-4 VIDEO. NO LICENSE IS GRANTED OR SHALL BE IMPLIED FOR ANY OTHER USE.
Verizon Wireless. Verizon Wireless and the Verizon Wireless logos are trademarks of Verizon Trademark Services LLC. All company names, trademarks, logos and copyrights not property of Verizon Wireless are the property of their respective owners.
covered under GNU General Public License (GPL), GNU Lesser General Public License (LGPL) and other open source licenses. For details about the relevant software, see the information on this product at: Index http://casiogzone.
NOTES
NOTES
NOTES
NOTES
NOTES
NOTES