
User Manual

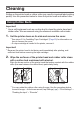
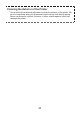


Table Of Contents
- Contents
- Safety Precautions
- Precautions During Use
- Printer and Bundled Accessories
- Operational Flow for This Printer
- Installing the App
- Names of Parts and Their Functions
- Power Supply
- Turning the Power On and Off
- Installing/Removing Tape Cartridges
- Connecting to a Smartphone
- Printing
- Cleaning
- Troubleshooting
- List of Printer Statuses and LED Indicator Displays
- Specifications

Affixing a Label to a Surface
1. If required, use scissors or some other implement to trim the
label to the desired size or shape.
2. Peel off the backing of the label and affix the label to the desired
surface.
•
Bending a corner of the label makes the backing easier to peel off.
H
APPY
!
P
PY
!
•
Removing a label from a surface where it was affixed may cause adhesive
residue to remain on the surface.
Important!
Do not try to affix a label to the objects or at the locations described below.
•
On a surface exposed to direct sunlight or rain
•
On the body of a person or animal
•
On a utility pole, on a fence or structure not owned by you, etc.
•
On a container used for heating in a microwave oven
Note that touching the adhesive surface of the label with fingers or hands that
are coated with hand cream or a similar material may make the label more likely
to peel off.
Incompatible Surfaces
•
Rough or grainy surfaces
•
Wet, oily, dusty, or otherwise soiled surfaces
•
Special plastic (silicon, polypropylene, etc.) surfaces
31