ES USER’S GUIDE GUÍA DEL USUARIO LK70S-ES-1 LK70S_es_Cover.p65 1 04.8.
GUIDELINES LAID DOWN BY FCC RULES FOR USE OF THE UNIT IN THE U.S.A. (not applicable to other areas). NOTICE This equipment has been tested and found to comply with the limits for a Class B digital device, pursuant to Part 15 of the FCC Rules. These limits are designed to provide reasonable protection against harmful interference in a residential installation.
Safety Precautions Congratulations on your selection of the CASIO electronic musical instrument. • Before using the instrument, be sure to carefully read through the instructions contained in this manual. • Please keep all information for future reference. Symbols Various symbols are used in this user’s guide and on the product itself to ensure that the product is used safely and correctly, and to prevent injury to the user and other persons as well as damage to property.
Safety Precautions DANGER Alkaline Batteries Perform the following steps immediately if fluid leaking from alkaline batteries ever gets into your eyes. 1. Do not rub your eyes! Rinse them with water. 2. Contact your physician immediately. Leaving alkaline battery fluid in your eyes can lead to loss of sight. WARNING Smoke, Strange Odor, Overheating Continued use of the product while it is emitting smoke, a strange odor, or heat creates the risk of fire and electric shock.
Safety Precautions Dropping and Impact Continued use of this product after it has been damaged by dropping or subjecting it to strong impact creates the risk of fire and electric shock. Take the following steps immediately. 1. Turn off power. 2. If you are using the AC adaptor for power, unplug it from the wall outlet. 3. Contact your original retailer or an authorized CASIO Service Provider. Plastic Bags Never place the plastic bag the product comes in over your head or in your mouth.
Safety Precautions Connectors Connect only the specified devices and equipment to the product’s connectors. Connection of a non-specified device or equipment creates the risk of fire and electric shock. Location Avoid the following locations for this product. Such locations create the risk of fire and electric shock. • Areas subject to high humidity or large amounts of dust. • In food preparation areas or other areas subject to oil smoke.
Main Features ❐ 100 tones A wide selection of tones includes grand piano and synthesized sounds, drum sets, and much more. ❐ 3-Step Lesson System The 3-Step Lesson System lets you practice at your own pace. The keyboard automatically grades your performances, so you can trace your progress as you improve. • 3-Step Lesson System: Use any of the keyboard’s built-in tunes and SMF data from a SmartMediaTM card to learn to play as the keyboard keys light to teach you the correct notes.
Contents Safety Precautions ................ E-1 Basic Operations ................. E-17 To play the keyboard .............................. E-17 Main Features ........................ E-5 Selecting a Tone ..................................... E-17 Contents ................................. E-6 Turning the Key Light System On and Off.............................................. E-18 General Guide ........................ E-8 Playing a Built-in Tune........ E-19 Attaching the Score Stand ...........
Contents Keyboard Settings .............. E-32 Appendix ................................ A-1 Transposing the Keyboard ..................... E-32 Tone List / Note Table ............................... A-1 About FUNCTION button ....................... E-32 Fingered Chord Charts ............................ A-5 Adjusting Accompaniment Volume ......... E-33 Rhythm List .............................................. A-7 Tuning the Keyboard .............................. E-33 Song Bank List ............
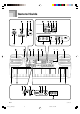
General Guide 2 1 5 6 3 F L 4 7 A G H I J 8 9 B K 0 C D E F *1 *2 M *3 O P Q R S N T U E-8 LK70S_e_08-18.p65 653A-E-010A 8 04.8.
General Guide 1 MIC VOLUME knob F Speaker 2 PLAY/STOP button G MIC jack 3 KEY CONTROL/TRANSPOSE buttons H RHYTHM list 4 KEY LIGHT button I TONE list 5 FUNCTION button J Display 6 SONG BANK button K SONG BANK list 7 DATA ACCESS lamp L CHORD root names 8 CARD button M Percussion instrument list 9 TONE button N Voice 1 to 5 0 RHYTHM button O Power indicator P POWER/MODE switch ● 3-STEP LESSON SYSTEM Q MAIN VOL.
General Guide *2 V Number buttons W [+]/[–] buttons • For input of numbers to change a displayed number or setting. • Negative values cannot be input using the number buttons. Use [+] (increase) and [–] (decrease) instead. *3 X X Card slot Rear Panel Y Y SUSTAIN jack Z [ \ \ USB port Z DC 9V jack [ PHONES/OUTPUT jack E-10 LK70S_e_08-18.p65 653A-E-012A 10 04.8.
Quick Reference SONG BANK Number buttons POWER indicator STEP2 POWER/MODE START/STOP This section provides a quick overview of keyboard operation using steps one and two of the 3-step lesson feature. To play the keyboard 1 Set the POWER/MODE switch to NORMAL. • This causes the power indicator to light. STEP1 4 Press the STEP 1 button or STEP 2 button. • The keyboard sounds a count beat and waits for you to play something on the keyboard. The keys that you need to press first flash.
Care of your keyboard Quick Reference If you selected lesson Step 1 • Play the notes on the keyboard. • Accompaniment (left-hand part) plays in time with the notes. • With Step 1, the correct melody note is played no matter which keyboard key you press. Avoid heat, humidity or direct sunlight. Do not overexpose the instrument to direct sunlight, or place it near an air conditioner, or in any extremely hot place. Do not use near a TV or radio.
Power Supply This keyboard can be powered by current from a standard household wall outlet (using the specified AC adaptor) or by batteries. Always make sure you turn the keyboard off whenever you are not using it. Using batteries Always make sure you turn off the keyboard before loading or replacing batteries. To load batteries 1 2 Remove the battery compartment cover. Load 6 AA-size batteries into the battery compartment. • Make sure that the positive (+) and negative (–) ends are facing correctly.
Power Supply CAUTION Using the AC Adaptor Make sure that you use only the AC adaptor specified for this keyboard. Specified AC Adaptor: AD-5 [Rear Panel] DC 9V jack AC adaptor AD-5 AC outlet Misuse of the AC adaptor creates the risk of fire and electric shock. Always make sure you observe the following precautions. • Do not locate the electric cord near a stove or other sources of heat. • Never pull on the cord when unplugging from the electrical outlet. Always grasp the AC adaptor when unplugging.
Power Supply Auto Power Off When you are using battery power, keyboard power turns off automatically whenever you leave it on without performing any operation for about 6 minutes. When this happens, adjust the POWER/MODE switch to turn power back on. NOTE • Auto Power Off is disabled (it does not function) when you are using the AC adaptor to power the keyboard. To disable Auto Power Off Hold down the TONE button while turning on the keyboard to disable Auto Power Off.
Connections Connection Example Phones/Output Jack PIN plug (red) PREPARATION • Before connecting headphones or other external equipment, be sure to first turn down the volume settings of the keyboard and the connected equipment. You can then adjust volume to the desired level after connections are complete.
Basic Operations KEY LIGHT TONE Number buttons [+] / [–] POWER/MODE MAIN VOL. This section provides information on performing basic keyboard operations. To play the keyboard 1 2 3 Set the POWER/MODE switch to NORMAL. Use the MAIN VOL. slider to set the volume to a relatively low level. Selecting a Tone This keyboard comes with 100 built-in tones. Use the following procedure to select the tone you want.
Basic Operations NOTE • Always input all two digits for the tone number, including leading zeros (if any). If you input only one digit and stop, the display will automatically clear your input after a few seconds. • You can also increment the displayed tone number by pressing [+] and decrement it by pressing [–]. • When the drum set is selected (tone number 99), each keyboard key is assigned a different percussion sound. See page A-3 for details.
Playing a Built-in Tune SONG BANK TONE Number buttons [+] / [–] START/STOP Your keyboard comes with a total of built-in 60 tunes. You can play back built-in tunes for your own listening pleasure, or you can use them for practice and even sing-along. TEMPO 4 RHYTHM Press the START/STOP button to start play of the tune. A l oha Oe To play back a Song Bank tune PREPARATION • Adjust the main volume (page E-17). 1 Find the tune you want to play in the SONG BANK List, and note its number.
Playing a Built-in Tune Adjusting the Tempo Each tune has a preset default tempo (beats per minute) that is set automatically whenever you select a tune. While the tune is playing, you can change the tempo setting to a value in the range of 40 to 255. To change the tone used for the melody of a Song Bank tune 1 Following step 3 of the procedure on page E-19, press the TONE button. To set the tempo 1 Use the TEMPO buttons to set the tempo. : Increases the tempo value. : Decreases the tempo value.
3-Step Lesson System SPEAK STEP START/STOP With the 3-Step Lesson System, you can practice built-in tunes and SMF data from a SmartMedia card, and even plot your progress according to the evaluation points the keyboard awards you. * See “Using a SmartMedia card” on page E-40 for information about using the SMF data from a SmartMedia card for playback.
3-Step Lesson System Key Lighting System Operation and Display Contents During 3-step Lesson Play Whenever you select an Auto Accompaniment tune (00 to 49) for 3-step lesson play, the key lighting system shows you which keys to press, while the display shows you the fingerings. Note Pitch The keyboard key that should be pressed lights. The fingers you should use to play the notes are also shown on the display. Note Length Keyboard keys stay lit for as long as the note should be played.
3-Step Lesson System • Voice fingering guide will use a simulated human voice to call out fingering numbers. See “Voice Fingering Guide” on page E-25 for details. Evaluation Results After you finish playing, the keyboard calculates an evaluation of your total performance, from beginning to end, and displays your total score on the monitor screen. The greater the score, the higher your evaluation is.
3-Step Lesson System Step 2 – Master the notes. Step 3 – Play at normal speed. 1 2 1 2 Select the tune you want to use. Press the STEP 2 button to start Step 2 play. • After a count sounds, the keyboard stands by and waits for you to play the first note of the tune. • Voice fingering guide will use a simulated human voice to call out fingering numbers. See “Voice Fingering Guide” on page E-25 for details. Select the tune you want to play. Press the STEP 3 button to start Step 3 play.
3-Step Lesson System Evaluation: Find out how the keyboard evaluates your Step 3 play. Use the SCORING button to check the evaluation of your play in Step 3. 1 Press the SCORING button. • This causes the SCORING indicator to appear on the display. • A count beat sounds and then evaluation mode starts. Voice Fingering Guide Voice fingering guide uses a simulated human voice to call out fingering numbers during Step 1 and Step 2 one-hand part practice.
Using a Microphone for Sing Along MIC VOLUME PLAY/STOP SONG BANK CARD Number buttons [+] / [–] KEY CONTROL/TRANSPOSE You can select any of the 60 Song Bank tunes or SMF data from a SmartMedia card, and sing along with its accompaniment. Using the microphone jack Connecting a commercially available microphone* to the MIC jack makes it possible to sing along with the keyboard’s builtin tunes or with SMF playback.
Using a Microphone for Sing Along To use a microphone for sing along 4 • Now use the microphone to sing along with the playback. • The Sing Along Mode is similar to the Song Bank Mode. The only difference is that the melody part in the Sing Along Mode is played back at a lower volume. Also a different tone setting is used in the Sing Along mode to make sing along easier. PREPARATION • Adjust the main volume (page E-17) and microphone volume (page E-26).
Auto Accompaniment Number buttons POWER/MODE FILL-IN SYNCHRO TEMPO START/STOP RHYTHM 6 Playing rhythms This keyboard features a collection of 50 exciting built-in rhythm patterns. Each pattern provides percussion back up for all your performances. To select and play a rhythm 1 2 3 • Each time you press one of the TEMPO buttons while the tempo value is displayed, the tempo setting changes one step, within the range of 040 to 255. • The initial default tempo setting when you turn on power is 120.
Auto Accompaniment About the accompaniment keyboard The lower (left) 1.5 octaves are reserved for use as an accompaniment keyboard whenever you select CASIO CHORD or FINGERED with the POWER/MODE switch. The panel above the accompaniment keyboard keys is marked with the names of the notes they play. The remainder of the keyboard (the part that is not included in the accompaniment keyboard) is called the melody keyboard.
Auto Accompaniment IMPORTANT! Using standard fingerings The FINGERED mode lets you play a wider variety of chords. In this mode, you can start play of an accompaniment pattern by pressing three or four of the accompaniment keyboard keys. This keyboard is capable of recognizing 15 different chords. The following shows the fingerings of these chords with a root of C.
Auto Accompaniment To play a FINGERED autoaccompaniment 1 2 3 Use the POWER/MODE switch to select FINGERED. Select an auto-rhythm as described under “To select and play a rhythm” on page E-28. Start play of the rhythm. • If you want to start play of the normal rhythm pattern, press the START/STOP button. • You can also use synchro start (on this page) to start rhythm play. 4 Play a chord on the accompaniment keyboard to start play of the auto-accompaniment.
Keyboard Settings FUNCTION Number buttons [+] / [–] KEY CONTROL/TRANSPOSE RHYTHM Transposing the Keyboard Transpose lets you raise and lower the overall key of the keyboard in semitone units. If you want to play an accompaniment for a vocalist who sings in a key that’s different from the keyboard, for example, simply use transpose to change the key of the keyboard. To transpose the keyboard 1 2 Press the RHYTHM button to enter the Rhythm Mode.
Keyboard Settings Adjusting Accompaniment Volume Tuning the Keyboard You can adjust the volume of the accompaniment independently of the notes you play on the keyboard. You can specify a volume level in the range of 00 (minimum) to 99 (maximum). Use the following procedure to fine tune the keyboard to match the tuning of another musical instrument. To adjust the accompaniment volume 1 1 Press the FUNCTION button until the accompaniment volume adjustment screen appears.
Connection to a Computer FUNCTION Number buttons [+] / [–] LEFT Connecting to a Computer The keyboard’s USB port makes it quick and simple to connect to a computer. After installing the USB driver onto your computer from the CD-ROM that comes with the keyboard, you will be able to use commercially available MIDI software on your computer to exchange data between the keyboard and your computer. Using the USB port 2 RIGHT Use a commercially available USB cable to connect the keyboard to the computer.
Connection to a Computer Expanding the Selections in the Song Bank Tunes You can transfer song data from your computer to the keyboard. You can store up to 5 tunes as Song Bank tunes 60 through 64. For SMF data you purchase or create, you need to use special CASIO conversion software to convert it to CASIO format before transferring it to the keyboard. You can obtain a copy of the special CASIO conversion software by downloading it at the Web page shown below.
Connection to a Computer NAVIGATE CHANNEL (Default: 4) When messages are received from a computer for play on this keyboard, the navigate channel is the channel whose note data appears on the display. You can select one channel from 01 to 16 as the navigate channel. Since this setting lets you use the data on any channel of commercially available SMF data to light on the on-screen keyboard guide, you can analyze how different parts of an arrangement are played.
Connection to a Computer LOCAL CONTROL (Default: On) oFF: Anything played on the keyboard is output as a message from the USB port, without being sounded by the internal sound source. • Note that no sound is produced by the keyboard if LOCAL CONTROL is turned off and no external device is connected. 1 Press the FUNCTION button until the LOCAL CONTROL screen appears. Example: When LOCAL CONTROL is on Lo c a l 2 Use the [+] and [–] or [0] and [1] buttons to turn the setting on and off.
Connection to a Computer Messages PROGRAM CHANGE The MIDI messages explained here can be sent and received when the keyboard is connected to a computer by USB connection. Note, however, that you need to install the USB driver from the CD-ROM that comes with the keyboard on your computer to send and receive these MIDI messages. There is a wide variety of messages defined under the MIDI standard, and this section details the particular messages that can be sent and received by this keyboard.
Connection to a Computer *1 The BANK SELECT setting of PROGRAM CHANGE can be used to access any of this keyboard’s 100 panel tones and 128 GM tones when selecting tones on this keyboard from an external machine. See the “Tone List” on page A-1 for details about PROGRAM CHANGE and BANK SELECT combinations. Example: To select tone number 96 (panel tone “FLUTE 1”) from a computer.
Using a SmartMedia Card PLAY/STOP FUNCTION CARD Number buttons [+](YES) / [–](NO) START/STOP Your keyboard is equipped with a card slot that supports use of SmartMediaTM memory cards. This makes it possible for the keyboard to directly read commercially available SMF data, which has been saved to a SmartMedia card from your computer, for sing along and lessons. SmartMedia data can be used the same way as built-in tunes. This keyboard supports SMF (FORMAT 0) data.
Using a SmartMedia Card • A SmartMedia card that has been in the card slot for a long time may feel hot when you remove it. This is normal and does not indicate malfunction. • Note that a SmartMedia card has a limited service life. After long use, you may not be able to store data to, read data from, and/or delete data from a card. When this happens, you will need to purchase a new SmartMedia card. CASIO COMPUTER CO., LTD.
Using a SmartMedia Card Reading a SmartMedia card NOTE • SMF data is converted to a format that can be played by this keyboard, and then stored in keyboard memory. Whether or not the data can fit in keyboard memory depends on the size of the converted data. 1 2 3 ■ To use SMF data in a 3-Step Lesson 3-1 Press the STEP 1, STEP 2, or STEP 3 button. • If an error message appears, see “SmartMedia Card Error Messages” on page E-43 for information about what you need to do.
Using a SmartMedia Card SmartMedia Card Error Messages Display Message Cause Action Er Card R/W There is something wrong with the card. Use a different card. Er No Card (1) The card is not set correctly in the card slot. (2) There is no card in the card slot or the card was removed part way through a card operation. (1) Remove the card and reinsert it correctly (page E-41). (2) Insert a card into the card slot. Never remove a card from the card slot while a card access operation is in progress.
653A-E-046A LK70S_e_32-44.p65 44 04.8.
Troubleshooting Problem Possible Cause No keyboard sound (1) Power supply problem. (2) Power is not turned on. (3) Volume setting is too low. (4) The POWER/MODE switch is in the CASIO CHORD or FINGERED position. (5) LOCAL CONTROL is off. Any of the following symptoms while using battery power.
Troubleshooting Problem Possible Cause Action See page Static noise when a microphone is connected. (1) Use of a microphone that is a different from the type that is recommended. (2) Use of the microphone in the vicinity of fluorescent lighting. (1) Use a recommended type microphone. Page E-26 (2) Move the microphone away from source of the static. Page E-26 (1) Microphone volume setting is too low. (2) Microphone ON/OFF switch is set to OFF. (1) Increase the microphone volume setting.
Specifications Model: LK-70S Keyboard: 61 standard-size keys, 5 octaves Key Light System: Can be turned on and off (up to 10 keys can be lit at the same time) Tones: 100 Rhythm Instrument Tones: 52 Polyphony: 24 notes maximum (12 for certain tones) Auto Accompaniment Rhythm Patterns: Tempo: Chords: Rhythm Controller: Accomp Volume: 50 Variable (216 steps, = 40 to 255) 2 fingering methods (CASIO CHORD, FINGERED) START/STOP, FILL-IN, SYNCHRO 0 to 99 (100 steps) <3-Step Lesson System> 3-step Less
Appendix/Apéndice Tone List / Note Table Lista de sonidos / Tabla de notas NOTE NOTA • The display screen will show “– –” for the number whenever a program change number other than those listed below is received over the navigate channel. No./ No Tone Name/ Nombre de sonido Range Type/ Tipo de gama • La pantalla de presentación mostrará “– –” para el número, siempre que se recibe un número de cambio de programa diferente al listado debajo sobre el canal de navegación.
Appendix/Apéndice No.
Appendix/Apéndice No.
Appendix/Apéndice A=440Hz Range Type C-1 C0 C1 C2 C3 C4 C5 C6 C7 G7 C8 C9 G9 A (Standard type) (Tipo estándar) B “17 GLOCKENSPIEL”/ “77 PICCOLO” “17 GLOCKENSPIEL”/ “77 PICCOLO” C Low pitch instruments Instrumentos de altura tonal baja D (Sound Effect) (Efecto de sonido) No scale for tones. Sin escala para los sonidos. a ........Keyboard range ........Gama del teclado b ........Available range (using transpose or a message receive) ........
Appendix/Apéndice Fingered Chord Charts Cuadros de acordes digitados This table shows the left-hand fingerings (including inverted forms) for a number of often-used chords. Esta tabla muestra las digitaciones (incluyendo las formas invertidas) para varios de los acordes más a menudo usados. 5 432 : Números de los dedos de la mano izquierda A-5 653A-E-103A LK70S_es_appendix.p65 1 : Left hand finger numbers 5 04.8.
Appendix/Apéndice * Cannot be specified in FINGERED setting because of accompaniment keyboard limitations, but augmented and diminished (seventh) chords made up of the same component notes (with different base note) can be used instead. Chords with same component notes as B aug ........... D aug, F aug Chords with same component notes as B aug ............ E aug, G aug Chords with same component notes as A dim7 ......... C dim7, E dim7, F dim7 Chords with same component notes as B dim7 ......
POPS 00 CLUB POP 01 FUNKY POP 02 SOUL BALLAD 03 POP BALLAD 04 LITE POP 05 16 BEAT FUNK 06 8 BEAT POP 07 POP ROCK 08 DANCE POP 09 POP FUSION 10 FOLKIE POP ROCK 11 ROCK WALTZ 12 SLOW ROCK 13 SOFT ROCK 14 50’S ROCK 15 60’S ROCK 16 4 BEAT ROCK 17 ROCK 18 TWIST 19 NEW ORLNS R&R 20 R&B JAZZ/FUSION 21 BIG BAND 22 SWING 23 FOX TROT 24 JAZZ WALTZ 25 LATIN FUSION DANCE/FUNK 26 TECHNO 27 TRANCE 28 DISCO 29 FUNK 30 RAP EUROPEAN 31 POLKA 32 MARCH 33 WALTZ 34 SLOW WALTZ 35 TANGO LATIN/VARIOUS I 36 BOSSA NOVA 37 SAMBA 38
653A-E-106A LK70S_es_MIDI Chart.p65 2 04.8.18, 11:04 AM Key’s Ch’s After Touch Control Change Pitch Bender Note ON Note OFF Velocity 0, 32 1 6, 38 7 10 11 True voice O O O O*2 O O O O X X X X X X X O 9nH V = 1-127 X 9nH V = 0, 8nH V = XX 0-127 12-108*1 X X X X 9nH V = 100 X 9nH V = 0 36-96 ❊❊❊❊❊❊❊❊❊❊❊❊❊❊ Mode 3 X ❊❊❊❊❊❊❊❊❊❊❊❊❊❊ Mode 3 X ❊❊❊❊❊❊❊❊❊❊❊❊❊❊ Default Messages Altered Mode Note Number 1-16 1-16 1 1-16 Recognized Default Changed Transmitted Basic Channel Function ...
653A-E-107A LK70S_es_MIDI Chart.p65 3 04.8.
This recycle mark indicates that the packaging conforms to the environmental protection legislation in Germany. Esta marca de reciclaje indica que el empaquetado se ajusta a la legislación de protección ambiental en Alemania. CASIO COMPUTER CO.,LTD. 6-2, Hon-machi 1-chome Shibuya-ku, Tokyo 151-8543, Japan LK70S_es_Cover.p65 2 C 04.8.