
User Manual


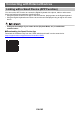
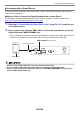
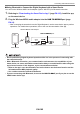


Table Of Contents
- Cover
- Contents
- General Guide
- Getting Ready to Play
- Operations Common to All Modes
- Playing on the Keyboard
- Controlling the Sound of a Performance
- Selecting a Musical Instrument Tone
- Playing with Touch Response
- Using a Pedal
- Sustaining Notes After Keyboard Keys Are Released
- Playing with Reverb
- Adding the Chorus Effect to a Tone
- Playing with a More Expanded Sound (Surround)
- Layering and Splitting Tones
- Changing the Volume Balance Between Keyboard Play and Rhythm Play (Balance)
- Changing the Pitch in Octave Units (Octave Shift)
- Changing the Pitch in Semitone Units (Transpose)
- Fine Tuning (Tuning)
- Changing the Keyboard Scale Tuning
- Using the Equalizer
- Saving and Recalling a Setup (MY SETUP)
- Playing a Built-in Song
- Singing with Karaoke
- Using a Lesson to Master Song Play
- Playing with a Rhythm Backing
- Rhythm
- Using the Rhythms
- Playing a Rhythm
- Using Recommended Rhythm Settings (One Touch Presets)
- Adjusting the Tempo by Tapping (Tap Tempo)
- Sounding Rhythm as You Use Tap Tempo
- Changing the Rhythm Pattern
- Inserting a Fill-in Phrase
- Fingering a Chord to Play a Rhythm Accompaniment
- Starting Rhythm Play when a Chord is Played (Synchro Start)
- Configuring Rhythm Play to Stop Automatically when Chord Play is Stopped (Synchro Stop)
- Changing the Rhythm Pattern and the Fill-in Operation Type
- Disabling Automatic Setting of the Tempo and Pattern when a Rhythm is Selected
- Increasing the Number of Rhythms (User Rhythms)
- Chord Lookup (Chord Book)
- Recording Your Keyboard Play
- Easy Keyboard Play Recording
- Deleting an Easy Recording
- Overdub Recording (Multi-track Recording)
- Copying a Tone Recording or Rhythm Recording as a Multi-track Recording
- Muting a Multi-track Recording Track
- Adjusting the Volume Level and Pan of Each Track of a Multi-track Recording (Mixing)
- Copying a Multi-track Recording
- Deleting One or More of the Multi-track Recordings in Memory
- Copying the Solo Track of a Multi-track Recording
- Deleting a Multi-track Recording Track
- Customizing the Home Screen (Home Customization)
- Configuring Settings
- Using a USB Flash Drive
- Connecting with External Devices
- Linking with a Smart Device (APP Function)
- Connecting to a Computer and Using MIDI
- Using a Cable to Connect with an Audio Device
- Sounding a Bluetooth Audio Capable Device (Bluetooth Audio Pairing)
- Deleting Bluetooth Audio Capable Device Pairing Registration
- Connecting with a Bluetooth MIDI Capable Device
- Turning Off Bluetooth
- Reference
- MIDI Implementation Chart

Connecting with External Devices
EN-169
■ Sounding Input From an External Device on This Digital Keyboard
Connection requires commercially available connecting cords, supplied by you.
The connecting cord should have a stereo mini plug on one end for connection to this Digital Keyboard
and a plug that matches the configuration of the output jack of external device on the other end.
When sounding input from an external device with this Digital Keyboard, use the external device
controls to adjust the volume level. In this case, you cannot adjust the volume level on this Digital
Keyboard.
• Turn off this Digital Keyboard before connecting. Before turning power on or off, turn down
the volume level of the Digital Keyboard and external devices.
• After connecting, turn on the external device and then this Digital Keyboard.
• If external device notes sounded by this Digital Keyboard are distorted, lower the external
device’s volume level.
• If the volume level of the external device notes sounds by this Digital Keyboard is lower than
the volume level of the notes you are playing on the keyboard, adjust the volume balance of
the Digital Keyboard. See “Changing the Volume Balance Between Keyboard Play and
Rhythm Play (Balance)” on page EN-52.
• Setting the volume level of the external device too high can cause Digital Keyboard power to
turn off in order to protect it against damage. If this happens, lower the volume of the external
device.
• The end of the connecting cord you connect to the Digital Keyboard must have a 3.5mm 3-
pole stereo mini plug. Use of other types of plugs is not supported.
■ AUDIO IN center cancel (Vocal Cut)
Enabling Vocal Cut cuts (mutes or minimizes) the vocal part in the sound being input with the AUDIO
IN jack or Bluetooth audio. Note that this function cancels the sound in the center position of the audio,
which may (depending on how the original audio was mixed) end up canceling something else other
than the vocal part. How vocal cut is performed depends on the sound being input.
For information about how to configure settings, see the “Setting Item List” (page EN-147).
• Built-in effects (reverb) of the Digital Keyboard are not applied to AUDIO IN jack input.
Stereo mini plug
Portable audio player, etc.
AUDIO IN jack (3.5mm stereo mini jack)