
User Manual

Module No.1510
@
@
GETTING ACQUAINTED
This section contains important basic information about using the watch. Be
sure to read this section before trying to use the watch for the first time.
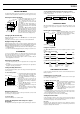
About this User’s Guide
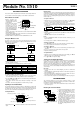
• Button operations are
indicated using the letters
and arrow marks shown in
the illustration.
• Each section of this manual
provides you with the
information you need to
perform operations in each
mode. Further details and
technical information can be
found in the “REFERENCE”
section.
• The term “the watch” in this manual refers to the CASIO PCX/PC-UNITE
Watch (Module 1510).
• The term “Watch Application” in this manual refers to the CASIO PCX/PC-
UNITE Watch Software Application.
• PCX/PC-UNITE is a trademark of CASIO COMPUTER CO., LTD.
Using the Menu Screens
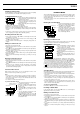
The modes of this watch are all accessed using the three menu screens.
While in the Timekeeping Mode, press M to cycle through the menu screens
in the sequence shown below.
• When you display a menu screen, the mode indicator of the mode that is
currently selected is flashing.
• The following is a list of all mode indicators and their meanings.
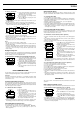
To enter a mode from a menu screen
1. In the Timekeeping Mode, press M until the menu screen that contains
the mode indicator of the mode you want to enter is on the display.
2. Use the H, J, K, and L buttons to move the flashing to the indicator of
the mode you want to enter.
3. Press E to enter the mode whose indicator is flashing on the menu
screen.
• To return to the Timekeeping Mode from another mode, press M.
A
M
L
I
E
@
(ADJUST)
(MENU)
(LIGHT)
(IR TRANSFER)
(HLEFT)
(RIGHTJ)
(KUP)
(ENTER)
(DOWNL)
Timekeeping Mode
▼
Menu Screen 1
@
Menu Screen 3
@
Menu Screen 2
▼
▲
▲
Mode
Telememo Mode
ToDo Mode
Schedule Mode
Owner Mode
World Time Mode
Indicator
TEL
TODO
SCH
OWNR
WT
Mode
Alarm Mode
Stopwatch Mode
Browser Mode
Option Mode
Indicator
ALM
STW
BROWSER
OPTION
Press M
Inputting Text and Other Data
The following describes general procedures for inputting text, symbols and
numbers. The operations described here can be used in any mode where you
can input data. See the other sections of this manual that describe the
various modes for information about displaying record input screens.
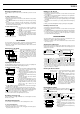
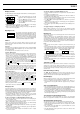
Text Input Buttons
• The flashing cursor ( ) shows the location where the next character will be
input.
Display Areas
The display has two areas for input and recall,
a text area
and
a
number area
.
As their names suggest, text area is for inputting and displaying text (Telememo
name field, Schedule description field, Browser text field etc.), while the
number area is for inputting and displaying numbers (time, date, telephone
number fields etc.).
To input a character
1. While the cursor is flashing in the text area of the display, use H and J to
move the cursor to the location where you want to input a character.
2. Use L to select the type of character you want to input.
• Each press of L cycles through the character types as shown below. The
currently selected character type is indicated on the display by the character
type indicator.
3. Use K and L to scroll through the available characters at the cursor
location.
4. When the character you want is shown, press J to move the cursor to the
next position.
• H and J buttons move the cursor left and right.
Notes
• See the “CHARACTER TABLE” for details about the characters you can
input on the watch.
• See “Display Text” for details on different character types.
To delete a character
1. Use H and J to move the cursor to the character you want to delete.
2. Press M to delete the character at the cursor position.
To insert a character
1. Use H and J to move the cursor to location where you want to insert a
character.
2. Press I to insert a space at the current cursor position.
3. Input the character you want.
To input numbers
1. While the cursor is flashing in the number area of the display, use H and
J to move the cursor to the digit you want to input.
2. Use K and L to change the setting.
Turning On the Display Backlight
Except when you are making settings or performing a data communication
operation, pressing the L button in any mode turns on the backlight for
about two seconds. The backlight uses an EL (electro-luminescent) panel
that causes the entire display to glow for easy reading in the dark.
If you need to keep the backlight on longer, keep the L button depressed.
Even if you do, however, the backlight automatically turns off after about one
or two minutes.
Important!
• You may not be able to see the backlight if you turn it on under direct
sunlight.
• The backlight turns off automatically if an alarm or other buzzer operation is
performed while it is on.
• The EL backlight vibrates slightly when it is turned on, which can cause a
noticeable sound. This does not indicate malfunction.
• The electro-luminescent panel loses illuminating power after very long use.
A
M
L
I
E
@
Text area
Shift
Space
Number area
Scrolls through characters
Enter
Cursor
Character type indicator
Delete
Move cursor
upper-case alpha
A
lower-case alpha
a
numbers
0
symbols
@
L
I
E
A
M
L
I
E
@
@
TELEMEMO MODE
The Telememo Mode lets you store names, telephone numbers, e-mail
addresses and other data for later recall when you need it. See “Data Fields”
for details on Telememo Mode data fields.
• Telememo, Schedule, To Do, Owner, and Browser data is all stored in the
same memory area.
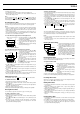
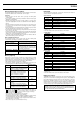
Entering the Telememo Mode
1. In the Timekeeping Mode, press the M
button once to display Menu Screen 1.
2.
TEL is flashing on the menu screen,
so press the E button to enter the
Telememo Mode.
• The display initially shows how many
records are store in the mode and the
percentage of memory that is unused.
Next, the display changes to show the
record you were viewing when you last
exited the Telememo Mode.
• Telememo field names are shown along
the bottom of the display. The name of
the currently displayed field has a frame
around it.
Name
Telephone number
Current field
1510-1