
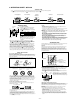
User Manual

- 3 -
To calibrate the temperature
1.Holding down while in the Thermometer Mode
and the current temperature digits flash.
2.Each press of increase the displayed
temperature by 0.1˚C, and pressing the
decrease it by 0.1˚C.
• You can calibrate the temperature within a range
of –9.9˚C to +9.9˚C.
• Press and at the same time to rest the
temperature calibration to the factory setting.
3.After calibrating the temperature, press to
return to the Thermometer Mode.
• If you do not operate any button for a few minutes
while a selection is flashing, the flashing stops
and the watch goes back to the Thermometer
Mode automatically.
Flashes
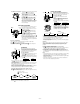
COUNTDOWN ALARM MODE
The countdown timer can be set within a range of
1 minute to 60 minutes. When the countdown
reaches zero, an alarm sounds for 10 seconds or
until you press any button.
To set the countdown time
1.Hold down while in the Countdown Alarm
Mode. The minutes digits flash on the display
because they are selected.
2.Press to increase the minutes digits or to
decrease them. Holding down either button
changes the setting at high speed.
3.After you set the countdown alarm time, press
to return to the Countdown Alarm Mode.
• If you do not operate any button for a few minutes
while a selection is flashing, the flashing stops
and the watch goes back to the Countdown Alarm
Mode automatically.
Mode
indicator
Current
time
Minutes
Seconds
To use the countdown time
1. Press while in the Countdown Alarm Mode to start the countdown timer.
2. Press again to stop the countdown timer.
• You can resume countdown timer operation by pressing .
3. Stop the timer and then press to reset the countdown time to its starting value.
ALARM MODE
When the Daily Alarm is turned on, the alarm
sounds for 20 seconds at the preset time each day.
Press any button to stop the alarm after it starts to
sound. When the Hourly Time Signal is turned on,
the watch beeps every hour on the hour.
To set the alarm time
1.Hold down while in the Alarm Mode. The hour
digits flash on the display because they are
selected. At this time the Daily Alarm is turned on
automatically.
2.Press to change the selection in the following
sequence.
Mode
indicator
Current
time
Minutes
Alarm on
indicator
Hourly time
signal on
indicator
Hour
Hour Minutes
3. Press to increase the selected digits or to decrease them. Holding down
either button changes the selection at high speed.
• The format (12-hour and 24-hour) of the alarm time matches the format you select
for normal timekeeping.
• When setting the alarm time using the 12-hour format, take care to set the time
correctly as morning (A) or afternoon (P).
4. After you set the alarm time, press to return to the Alarm Mode.
• If you do not operate any button for a few minutes while a selection is flashing, the
flashing stops and the watch goes back to the Alarm Mode automatically.
To switch the daily alarm and hourly time signal on and off
Press while in the Alarm Mode to change the status of the daily alarm and hourly
time signal in the following sequence.
To test the alarm
Hold down while in the Alarm Mode to sound the alarm.
Both ON Both OFF Daily Alarm
only
Hourly Time
Signal only
Alarm on indicator
Hourly time signal on indicator
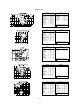
SUNRISE/SUNSET MODE
Be sure to set the current time and your current
location before trying to use Sunrise/Sunset
functions. The Sunrise/Sunset functions tell you the
time of sunrise and sunsets for specific dates.
To set the location date
• See the Time Zone Chart at the back of this
manual.
1.Holding down while in the Sunrise/Sunset
Mode causes the GMT differential data to start
flashing because it is selected.
2.Press to change the selection in the following
sequence.
Sunrise time
Sunset time
Mode
indicator
DateMonth
GMT differential Longitude/Latitude
3. While the GMT differential is selected (flashing),
press to increase it. Holding down changes
the current selection at high speed.
4. While the longitude/latitude is selected (flashing),
press to change the longitude or to change
the latitude. Holding down either button changes
the corresponding setting at high speed.
< Latitude >
Press
0˚E~180˚E 179˚W~1˚W
Press
< Longitude >
0˚N~65˚N 65˚S~1˚S
To display the sunrise and sunset times for a specific date
1. Use to enter the Sunrise/Sunset Mode.
• When you enter the Sunrise/Sunset Mode from other mode, the display shows the
sunrise/sunset data for today?s data (as set in the Timekeeping Mode).
2.Press to advance the date. Holding down returns to the current date.
3. When the date you want is displayed, you will have to wait for about 15 seconds
as the watch performs its internal calculations before displaying the sunrise/sunset
time for the date.
Notes
• If you think that the watch is not showing the correct information, check the settings
of the watch in the following order: year, GMT differential, longitude, latitude,
east/west, north/south.
• Sunrise and sunset times are for sea level locations. Actual times may differ sightly
depending on your elevation.
• Sunrise and sunset times are correct with a range of 5 minutes at latitudes less
than 50, and 10 minutes at latitudes greater than 50.
5. After you set the location data, press to return to the Sunrise/Sunset Mode.
• If you do not operate any button for a few minutes while a selection is flashing, the
flashing stops and the watch goes back to the Sunrise/Sunset Mode automatically.
• You can set a latitude within the range of 65˚ south to 65˚ north.
• For the Longitude, always set 0˚ as 0˚E, and 180˚ as 180˚E.
• Be sure to advance the GMT differential by one hour when summer time (daylight
saving time) is applicable.
Important
After you change a setting in the above procedure, the watch needs a bit of time to
calculate certain information. During this calculation, the patterns in the graphic
display move. Wait until these patterns stop before trying to perform the next
procedure.
C
C
C
D
D D
D
D D
D
D
D
D
D
D
D
D
D
B
B
B
B
B
B
A
A
A
A
A
A
A
A
A
SUNRISE SUNSET
LON.
GMT LAT.