
User Manual

1811-3
Recalling Telememo Data
There are two methods you can use to search for Telememo data:
scroll
search and index search
.
To use scroll search to recall data
1. In the Telememo Mode, press D to scroll forward through stored data
items or C to scroll in reverse.
• Holding down either button scrolls through the data at high speed.
2. When the data item you want is on the display, you can press B to search
through the other fields (numbers or e-mail address) that make up the
data item.
• Only the field that contain data appear on the display. Empty fields are
skipped.
• The name of the data item also appears in the text area while any field
beside E-MAIL is displayed.
• If the e-mail address is longer than six characters, it scrolls across the
display from right to left when you first display the E-MAIL field screen.
Pressing A stops the scrolling and displays the first six characters of the
e-mail address. Each subsequent press of A (while the scrolling is
stopped) displays the next six characters of the e-mail address.
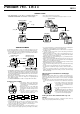
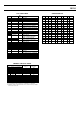
TEL
(Field 1 → 2)
E-MAIL
FAX
(Field 1 → 2)
CALL
(Field 1 → 2)
To use index search to recall data
1. In the Telememo Mode, hold down B until
the
SRCH (search) message appears on
the display.
2. Input the first character of the name field of
the data you want to recall.
• See the “Text Area” for details on how to
input characters in the text area.
• Performing the next step to start the search
operation without inputting a character here
causes the new data screen to appear.
3. Press B to jump to the first data item whose name data starts with the
character you input in step 2.
• If there is no data in memory that starts with the character you input in step
2, the message
NODATA appears for a few seconds, followed by the
SRCH screen in step 1. From there you can proceed with step 2 to
perform another search or press M to return to the Telememo Mode data
screen.
4. Use scroll search to recall other data items before and after the one you
found using index search.
• Press B to display other fields within the displayed data item.
Editing Telememo Data Items
1. In the Telememo Mode, scroll through the data items and display the one
you want to edit.
2. Hold down A until the flashing cursor appears in the text area of the
display.
L
A
B
M
CD
GMT
+12
-12
FAX CALL E-MAILTEL
A
• The contents of the data item’s name field appear with the flashing cursor
located at the first character.
3. Each press of B causes the cursor to jump to the first character of the
next field in the following sequence.
4. Use M to move the cursor to the character you want to change.
5. Use C and D to change the character.
• For details on inputting characters, see “About Text and Number Input”.
6. After making the changes you want, press A to store them and return to
the Telememo Mode data screen.
Deleting Telememo Data
Use the following procedure to delete a specific Telememo data item. This
procedure deletes all the data in the data item.
1. In the Telememo Mode, scroll through the data items and display the one
you want to delete.
2. Hold down A until the flashing cursor appears in the text area of the
display.
• The contents of the data item’s name field appear with the flashing cursor
located at the first character.
TEL
(Field 1 → 2)
E-MAIL
FAX
(Field 1 → 2)
CALL
(Field 1 → 2)
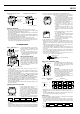
Name field
3. Hold down L about four seconds until the name data disappears from
the display.
• When you hold down L the message
{CLR (clear) first appears
flashing in the text area. Keep L pressed until the message stops
flashing.
• After the data is deleted the cursor is located in the text area ready for
more input.
4. Input data or press A to return to the Telememo Mode data screen.
WORLD TIME MODE
The World Time Mode shows the current
time in 29 time zones (27 cities) around the
world.
• For full information on city codes, see
the “CITY CODE TABLE” at the back of
this manual.
• See “TIMEKEEPING MODE” for details
about the GMT Differential Graph.
• The GMT differential is the time difference
of the time zone where the city code is
located from Greenwich Mean Time.
• The GMT differentials used by this watch
are based on Universal Time Coordinated
(UTC) data.
• The time zone that is displayed when
you leave the World Time Mode will still
be displayed when you enter the World
Time Mode again.
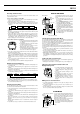
GMT
+12
-12
FAX CALL E-MAILTEL
P
L
A
B
M
CD
GMT
+12
-12
FAX CALL E-MAILTEL
P
Home Time differential
Home zone time
City code
Mode indicator
GMT
Differential
Graph
Time in indicated city
Timekeeping in the World Time Mode
The current time in all the World Time zones is calculated in accordance with
the Greenwich Mean Time (GMT) differential for each zone, based on the
current Home Time setting in the Timekeeping Mode.
You can also turn Daylight Saving Time (DST) on or off separately for each
time zone. Turning on daylight saving time automatically advances the
corresponding time setting by one hour.
A simple operation switches between the Home Time and the World Time, so
you can quickly and easily change times when travelling from one time zone
to another.
• The seconds count of the World Time is synchronized with the seconds
count in the Timekeeping Mode.
• The 12-hour/24-hour format of the World Time matches the format you
select in the Timekeeping Mode.
• With daylight saving time, clocks are set one hour later in order to better
take advantage of daylight hours during the summer, when days are
longer. Whether or not daylight saving time is used depends on the country
you are in.
Viewing the Time in Another Zone
While in the World Time Mode, press D to scroll forward through the city
codes (time zones) and C to scroll back.
• Holding down either button scrolls through the city codes at high speed.
Switching a Zone between Standard Time and
Daylight Saving Time
1. In the World Time Mode, display the time
zone (city code) whose standard time/
daylight saving time setting you want to
change.
• You can make separate settings for each
zone (city).
2. Hold down B for about one second to
toggle daylight saving time on and off.
• The DST indicator appears whenever
daylight saving time is turned on for the
zone (city) whose time is currently on the
display.
Making a Zone Your Home Zone
1. In the World Time Mode, display the zone (city code) that you want to
make your home zone.
2. To make the displayed zone (city) your home zone, hold down A for
about one second.
• The time displayed in the Timekeeping Mode changes in accordance with
the zone you select with the above procedure.
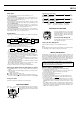
L
A
B
M
CD
GMT
+12
-12
FAX CALL E-MAILTEL
P
P
DST
DST indicator
ALARM MODE
You can set five independent alarms with hour,
minutes, month, and day. When the alarm is
turned on, the alarm sounds for 20 seconds at
the preset time. Press any button to stop the
alarm after it starts to sound.
When the Hourly Time Signal is turned on, the
watch beeps every hour on the hour.
• The alarms and Hourly Time Signal sound
in accordance with the Timekeeping Mode’s
Home Time.
L
A
B
M
CD
GMT
+12
-12
FAX CALL E-MAILTEL
P
P
Mode indicator – Alarm No.
Home zone time
Alarm on
indicator
Month – Day
Hour : Minutes