
User Manual

1811-4
Alarm Types
The types of alarm you get depends on the information you set.
• To set a Daily alarm
Set the hour and minutes for the alarm time. Set
x for the month and xx for
the day (see step 4 under “Setting Alarms”). This type of setting causes the
alarm to sound every day at the time you set.
• To set a Date alarm
Set the month, day, hour and minutes for the alarm time. This type of setting
causes the alarm to sound at the specific time, on the specific date you set.
• To set a 1-Month alarm
Set the month, hour and minutes for the alarm time. Set
xx for the day (see
step 4 under “Setting Alarms”). This type of setting causes the alarm to sound
every day at the time you set, only during the month you set.
• To set a Monthly alarm
Set the day, hour and minutes for the alarm time. Set
x for the month (see
step 4 under “Setting Alarms”). This type of setting causes the alarm to sound
every month at the time you set, on the date you set.
Setting Alarms
1. Press C or D while in the Alarm Mode to select Alarm 1 through Alarm
5.
2. After you select an alarm, hold down A until the hour digits start to flash
on the display. The hour digits flash because they are
selected
.
• At this time, the alarm is automatically turned on.
3. Press M to change the selection in the following sequence.
Hourly Time Signal
Alarm 1
Alarm 2 Alarm 3
Alarm 4
Alarm 5
Press CPress D
Hour
Minutes Month
Day
4. Press D to increase the selected digits and C to decrease them.
Holding down either button changes the selection at high speed.
• To set an alarm that does not include a month (daily alarm, monthly alarm),
set
x for the month. Press D or C until the x mark appears (between 12
and 1) while the month digits are flashing.
• To set an alarm that does not include day (daily alarm, 1-month alarm), set
xx for the day. Press D or C until the xx mark appears (between 31 and
1) while the day digits are flashing.
• The format (12-hour and 24-hour) of the alarm time matches the format
you select for normal timekeeping.
• When setting the alarm time using the 12-hour format, take care to set the
time correctly as morning (no indicator) or afternoon (P).
5. After you set the alarm, press A to return to the Alarm Mode.
Switching an Alarm and Hourly Time Signal on and off
1. In the Alarm Mode, press C or D to select an alarm or the Hourly Time
Signal.
2. When the alarm or Hourly Time Signal you want to is selected, press B to
turn it on and off.
Indicates alarm is ON.
Indicates Hourly Time Signal is ON.
• The alarm on indicator (
) and the Hourly Time Signal on indicator ( )
are shown on the display in all modes while these functions are turned on.
Testing the alarm
Hold down B while in the Alarm Mode to sound the alarm.
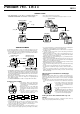
STOPWATCH MODE
The Stopwatch Mode lets you measure elapsed
time, split times, and two finishes. The range
of the stopwatch is 23 hours, 59 minutes, 59.99
seconds.
L
A
B
M
CD
GMT
+12
-12
FAX CALL E-MAILTEL
P
(a) Elapsed time measurement
(b) Split time measurement
(c) Split time and 1st-2nd place times
▼
▼
▼
▼
DDDDC
StopRe-start ClearStart Stop
▼
▼
▼
▼
DC C D C
Start Split Split release Stop Clear
▼
▼
▼
▼
CDDCC
Start Split release
Stop
Split
Clear
First runner
finishes.
Second runner finishes.
Record time of first runner.
Record time of
second runner.
Hours
Seconds
Home zone
time
Mode indicator
1/100 second
Minutes
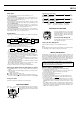
AUTO DISPLAY FUNCTION
The Auto Display function of this watch
continually changes the contents of the digital
display. Note that you cannot use any of the
watch’s other functions while the Auto Display
function is operating.
Turning the Auto Display On
Hold down M for about three seconds in any
mode until the watch beeps.
Turning the Auto Display Off
Hold down M for about three seconds until the watch beeps.
Note
The Auto Display function cannot be performed while you are making settings
(i.e. while digits or other settings are flashing on the display).
L
A
B
M
CD
GMT
+12
-12
FAX CALL E-MAILTEL
P
ABOUT THE BATTERY
Should battery power drop below a certain level, display characters will
appear dim, the backlight may fail to light, and the alarm may fail to sound.
Also, the message
BATT will appear and further operation will be impossible
when you try to input or recall data in the Telememo Mode. Should any or all
of this happen, have the battery replaced as soon as possible. Using the
watch while the battery is low can result in abnormal operation.
ALWAYS LEAVE BATTERY REPLACEMENT UP TO THE DEALER
WHERE YOU BOUGHT THE WATCH OR TO AN AUTHORIZED CASIO
DISTRIBUTOR. BE SURE TO SHOW THE FOLLOWING INFORMATION
TO THE PERSON REPLACING THE BATTERY.
Attention dealer or CASIO distributor
Be sure to use the following procedure when replacing the battery.
1. Open and remove the back cover.
• If
{CLOSE appears on the display when you open the back cover,
replace the back cover. Wait for a few minutes and try again.
2. Remove the battery holder.
3. Remove the old battery and load a new one.
4. Replace the battery holder.
5. Touch the AC contact and the battery (+) side with metallic tweezers.
• The AC (all clear) operation
DOES NOT
delete data stored in memory.
6. Close the back cover.
• The message {WAIT appears on the display about 20 seconds after
you perform the AC (all clear) operation in step 5 of the above procedure,
indicating that the watch is performing an internal self-check for data
errors.
• The
{WAIT indicator remains on the display up to 6 minutes while the
watch performs an internal check of data in memory. Though you can
change the time setting of the watch while the
{WAIT indicator is on the
display, other operations are disabled.