
User Manual


USER’S GUIDE 2419
1
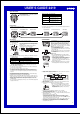
General Guide
• Click ● to change from mode to mode.
• In any mode, press L to illuminate the display.
• In all modes, the watch always shows the current Timekeeping Mode time in
the upper display area.
Timekeeping Mode e-DATA MEMORY Mode World Time Mode Stopwatch Mode Countdown Timer Mode Alarm Mode
Click ●.
Timekeeping
Use the Timekeeping Mode to set the current time and date.
To set the time and date
1. In the Timekeeping Mode, hold down A until the
second’s setting starts to flash, which indicates the
setting screen.
2. Click ● to move the flashing in the sequence
shown below to select other settings.
Minutes
Seconds
Hour
12/24-Hour
Format
Month YearDay
3. When the setting you want to change is flashing, use ▼ and ▲ to change it
as described below.
To change this setting
Seconds
12/24-Hour Format
Hour, Minutes, Year,
Month, Day
Perform this button operation
Rock ▼ to reset to
00
.
Rock ▼ to toggle between 12-hour (12H) and 24-hour (24H)
timekeeping.
Use ▼ (+) and ▲ (–) to change the setting.
• Rocking ▼ while the second’s count is in the range of 30 to 59 resets the
seconds to
00
and adds 1 to the minutes. In the range of 00 to 29, the
minutes count is unchanged.
4. Press A to exit the setting screen.
• The day of the week is automatically displayed in accordance with the date
(year, month, and day) settings.
• The year can be set in the range of 2000 to 2039.
Day of week
Month – Day
Hour : Minutes
PM indicator
Seconds
Year
• The watch’s built-in full automatic calendar automatically makes allowances
for different month lengths and leap years. Once you set the date, there
should be no reason to change it except after you have the watch’s battery
replaced.
To toggle between 12-hour and 24-hour timekeeping
In the Timekeeping Mode, press B to toggle between 24-hour timekeeping
(indicated by 24 on the display), or 12-hour timekeeping.
• With the 12-hour format, the P (PM) indicator appears to the left of the hour
digits for times in the range of noon to 11:59 p.m. and no indicator appears to
the left of the hour digits for times in the range of midnight to 11:59 a.m.
• With the 24-hour format, times are displayed in the range of 0:00 to 23:59,
with 24 indicator.
• The 12-hour/24-hour timekeeping format you select in the Timekeeping Mode
is applied in all modes.
e-DATA MEMORY
e-DATA MEMORY lets you store log in codes and ID
codes used to access a bank account (from a mobile
phone, etc.), a securities account, and other secure
accounts. You can store up to 10 records (data
items), each with its own name. Each record has six
fields, called “ID codes,” each of which can contain a
separate entry. You can also limit access to e-DATA
MEMORY contents with a password.
• You can input alphabetic characters and numbers
for an e-DATA MEMORY record.
• You can input up to eight characters for each record
name and ID code.
• All of the operations in this section are performed in
the e-DATA MEMORY Mode, which you can enter
by clicking ● .
Name
Record
ID 6ID 1 ID 2
Record numbe
r
To create a new e-DATA MEMORY record
1.In the e-DATA MEMORY Mode, use ▼ and ▲ to
scroll through record names until one that does not
contain any data is on the display.
• Default record names are DATA 1through DATA 10.
You can leave these record names as they are, or
you can input other names, if you want. It is a
good idea to use names that describe the type of
data stored in a record.
2.Hold down A until the flashing cursor (_) appears
on the display, which indicates the setting screen.
3. Use ▼ and ▲ to change the character at the cursor position. The character
changes in the sequence shown below.
Rock ▼.
Rock ▲.
(space)
to
(upper-case)
to
(lower-case)
to
(symbol)
to
(number)
• See the “Character List” at the back of this manual for information about
the characters you can input.
4. When the character you want is at the cursor position, click ● to move the
cursor to the right.
5. Repeat steps 3 and 4 until the record name is complete.
Record numbe
r
Cursor
6.After you are finished inputting the record name,
rock to change to the ID 1 code input screen.
• The ID code input screen shows a cursor and the
ID number (ID 1 through ID 6) of the currently
displayed ID code.
7. Repeat steps 3 and 4 until input of the ID 1 code is complete.
• If you do not want to input any more ID codes, skip step 8 after you
finished inputting the ID 1 code.
8. After inputting the ID 1 code, rock to change to the ID 2 code input screen,
and input the ID 2 code.
• Repeat steps 3 and 4 for the ID 2 code.
• After inputting an ID code, rock to advance to the next ID code input
screen. You can input up to six ID codes per record. Rocking after
inputting the sixth ID code returns to the record name input screen. Repeat
steps 3 and 4 to input data for each ID code.
• Rocking returns to the previous ID code. Rocking while the ID 1 code
input screen is on the display returns to the record name input screen.
9. Press A to store your data and return to the e-DATA MEMORY record
screen (without the cursor).
ID number
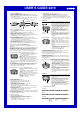
About This Manual
• Button operations are indicated using the letters
shown in the illustration.
• The following shows how control button operations
are described in this manual.
(Light)
Control Button
When you see this:
Click ●.
Rock ▲.
Rock ▼.
Rock .
Rock .
You should do this:
Press straight down on the control
button.
Place your finger on the control
button and slide upwards.
Place your finger on the control
button and slide downwards.
Place your finger on the control
button and slide to the left.
Place your finger on the control
button and slide to the right.