
User Manual

USER’S GUIDE 2539
1
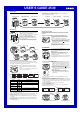
• In any mode, press L to illuminate the display.
• Each mode has its own icon. When you enter a mode, the corresponding icon
performs an animation sequence.
General Guide
• Press C to change from mode to mode.
Timekeeping Mode
World Time Mode
e-DATA MEMORY Mode Stopwatch ModeCountdown Timer ModeAlarm Mode
Press
.
Mode icons
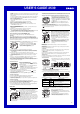
Timekeeping
Use the Timekeeping Mode to set and view the current
time and date.
• In the Timekeeping Mode, the graphic analog hands
indicate the same time as the digital time.
• There are two PM indicators (P), one for the digital time
and one for the graphic analog hands.
To select the Timekeeping Mode display format
Use D and B to cycle through the available screen
formats as shown below.
• The screens that include graphic analog hands also
have a graph that counts seconds (seconds graph).
Digital time
(Hour : Minutes)
Day of week
Day
PM
indicator
Hour hand
Minute
hand
Record number
(Page number)
Text
Remaining memory
Press . Press .
Seconds graph
Seconds
Read This Before You Set the Time and Date !
The times displayed in the Timekeeping Mode and World Time Mode are linked.
Because of this, make sure you select a city code for your Home City (the city where
you normally use the watch) before you set the time and date.
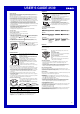
To set the time and date
1. In the Timekeeping Mode, hold down A until the
seconds start to flash, which indicates the setting
screen.
2. Press C to move the flashing in the sequence shown
below to select other settings.
Minutes
12/24-Hour
Format
Seconds City Code
Hour
YearDay
DST
Month
3. When the setting you want to change is flashing, use D and B to change it as
described below.
Setting
Seconds
DST
City code
Hour, Minutes
12/24-Hour Format
Year, Month, Day
Button Operations
Press D to reset to
00
.
Press D to toggle between Daylight Saving Time (OZ )
and Standard Time (OFF).
Use D (+) and B (–) to change the setting.
Press D to toggle between 12-hour (12H) and
24-hour (24H) timekeeping.
Use D (+) and B (–) to change the setting.
Screen
•
For full information on city codes, see the “City Code Table”.
• See “Daylight Saving Time (DST)” for details about DST setting.
4. Press A to exit the setting screen.
• With the 12-hour format, the P (PM) indicator appears on the display for times in the
range of noon to 11:59 p.m. and no indicator appears for times in the range of
midnight to 11:59 a.m.
• With the 24-hour format, times are displayed in the range of 0:00 to 23:59, without
any indicator.
• The 12-hour/24-hour timekeeping format you select in the Timekeeping Mode is
applied in all modes.
• The day of the week is automatically displayed in accordance with the date (year,
month, and day) settings.
Daylight Saving Time (DST)
Daylight Saving Time (summer time) advances the time setting by one hour from
Standard Time. Remember that not all countries or even local areas use Daylight
Saving Time.
To toggle the Timekeeping Mode time between DST and Standard Time
1. In the Timekeeping Mode, hold down A until the
seconds start to flash, which indicates the setting
screen.
2. Press C to display the DST setting screen.
3. Press D to toggle between Daylight Saving Time (OZ
displayed) and Standard Time (OFF displayed).
• Note that you cannot switch between Standard Time
and Daylight Saving Time while
is selected as
the Home City code.
4. Press A to exit the setting screen.
• The DST indicator appears on the display to indicate
that Daylight Saving Time is turned on.
e-DATA MEMORY
You can use the watch’s e-DATA MEMORY to store e-mail
addresses, Web page URLs, and other text data.
You can also use a password to limit access to e-DATA
MEMORY contents.
• You can input up to 63 characters for each e-DATA
MEMORY record. See “e-DATA MEMORY
Management” for information about the number of
records you can store.
• All of the operations in this section are performed in the
e-DATA MEMORY Mode, which you enter by pressing
C.
To create a new e-DATA MEMORY record
1. In the e-DATA MEMORY Mode, press D and B at the
same time to display the remaining memory screen.
• If
^%
is shown for remaining memory, it means that
memory is full. To store another record, you will first
have to delete some of the records stored in memory.
2. Hold down A until the flashing cursor (
) appears on
the display, which indicates the setting screen.
• The setting screen also shows the record number that
is automatically assigned to the new record.
3. Input the text you want.
• When inputting the text, use D (+) and B (–) to
cycle through characters at the current cursor
location, and C to move the cursor to the right. See
“Inputting Text”.
4. Press A to store your data and return to the e-DATA MEMORY record screen
(without the cursor).
• Pressing A causes the message
SET to appear for about one second as the data
is stored. After that, the e-DATA MEMORY record screen appears.
• The text can show only three characters at a time, so longer text scrolls continuously
from right to left. The last character is indicated by the symbol
s after it. Press A to
stop and restart scrolling.
• Records are stored in memory in the sequence they are created.
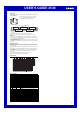
To recall e-DATA MEMORY records
In the e-DATA MEMORY Mode, use D (+) and B (–) to cycle through e-DATA
MEMORY records as shown below.
Press .
Press .
Remaining
memory
screen
Record 1
()
Record 2
()
Password
setting
screen
Remaining
memory graph
Alternates
(1 second)
Remaining Memory screen Password Setting screen