
User Manual


Operation Guide 3467
E-49
Dual Time
Dual Time lets you set the current time in another time zone in addition your current
location time.
● Getting Ready
Enter the Dual Time Mode.
Navigating Between Modes…E-12
Configuring Dual Time Settings
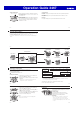
1. Hold down A for at least two seconds. Release the
button when the hour digits of the Dual Time in the
upper display start to flash.
2. Use D and E to change the hour setting.
Hour
E-48
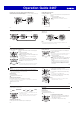
Using the Timer
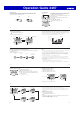
A typical operation is shown below.
D
(Measurement
operation starts.)
D D
End
(Time up)
Start Pause Resume
x The watch beeps for 10 seconds when the end of the
countdown is reached.
x To stop a countdown operation, first pause it and then
press E. This will reset the timer to its start time.
Stopping the Timer Beeper
Pressing any button while the timer beeper is sounding stops it.
E-47
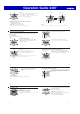
1. Hold down A for at least two seconds.
This causes the minutes digits of the current timer start
time to flash.
2. Use D and E to change the timer minutes setting.
3. Press C.
This causes the seconds digits to flash.
4. Use D and E to change the timer seconds setting.
5. Press A to exit the setting screen.
Note
x Setting a time of 0 minutes 00 seconds specifies a
countdown start time of 60 hours.
Minutes
Seconds
E-46
Timer
The timer counts down from a start time specified by you. The watch beeps for
10seconds when the end of the countdown is reached.
x The beeper is muted in the cases described below.
− When battery power is low.
● Getting Ready
Enter the Timer Mode.
Navigating Between Modes…E-12
Setting the Timer Start Time
The start time can be set in 1-second units up to 60 minutes.
x If a timer countdown operation is in progress, reset the timer to its current start
time before performing this operation.
Using the Timer…E-48
E-45
Deleting All Records
You can use the procedure below to clear all lap/split
records in watch memory.
Important!
x This operation cannot be performed while a stopwatch
elapsed time measurement operation is in progress.
1. Enter the Recall Mode.
Navigating Between Modes…E-12
2. Hold down D and E at the same time for at least five
seconds. Release the button when [CLR ALL] stops
flashing.
[CLR] flashes and then stops flashing to indicate that
the displayed lap/split record was deleted. Keeping the
buttons depressed will cause [ALL] to flash and then
stop flashing to indicate that all lap/split records have
been deleted.
E-44
Deleting a Particular Lap/Split Record
Use the procedure below to delete a selected lap/split
record.
1. Enter the Recall Mode.
Navigating Between Modes…E-12
2. Press A to display the number of the lap/split record
you want to delete.
x Each press of A advances to the next lap/split
record number.
3. Hold down D and E at the same time for at least
two seconds. Release the buttons when [CLR] stops
flashing.
This deletes the displayed lap/split record.
Note
x You cannot delete a lap/split record while a stopwatch
elapsed time measurement operation is in progress.
Record number
E-43
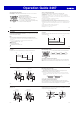
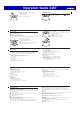
3. Use D and E to display the measurement value you want.
[LAP]: Lap time
[SPL]: Split time
D
E
Note
x A record of the measured data is created and assigned a number for each
measurement operation (from start to stop).
E-42
2. Press A to cycle through record numbers.
x Each time you press A, the next older record number appears.
A
A AA
E-41
Viewing Measured Time Data
Viewing Lap/Split Records
You can use the operation below to view split times and
lap times.
1. Enter the Recall Mode.
Navigating Between Modes…E-12
This causes the latest record number and date to
appear.
Record number
Measurement time
Measurement date
E-40
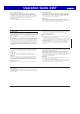
Displaying the Current Time During Stopwatch Measurement
Pressing A displays the current timekeeping time in the lower display. Pressing A
again returns to the normal stopwatch display.
Measurement
Current time
Measurement
A