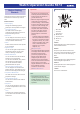
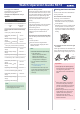
MA2202-EB © 2021 CASIO COMPUTER CO., LTD. Watch Operation Guide 5673 Contents Precautions Operating Precautions Alarm Temperature Measurement Configuring Alarm Settings Checking the Current Temperature Configuring the Hourly Time Signal Setting Calibrating Temperature Readings (Offset) Turning Off an Alarm or the Hourly Time Signal Specifying the Temperature Measurement Unit User Maintenance Battery Digital Compass Taking a Compass Reading Before Getting Started...
Watch Operation Guide 5673 Precautions ● ● Operating Precautions ● Water Resistance ● The information below applies to watches with WATER RESIST or WATER RESISTANT marked on the back cover.
Watch Operation Guide 5673 ● Temperature ● ● Never leave your watch on the dashboard of a car, near a heater, or in any other location that is subject to very high temperatures. Do not leave your watch where it will be exposed to very low temperatures. Temperature extremes can cause your watch to lose or gain time, to stop, or otherwise malfunction. Leaving your watch in an area hotter than +60 °C (140 °F) for long periods can lead to problems with its LCD.
Watch Operation Guide 5673 ● Bacteria and Odor Resistant Band ● The bacteria and odor resistant band protects against odor generated by the formation of bacteria from sweat, which ensures comfort and hygiene. In order to ensure maximum bacteria and odor resistance, keep the band clean. Use an absorbent soft cloth to thoroughly wipe the band clean of dirt, sweat, and moisture. A bacteria and odor resistant band suppresses the formation of organisms and bacteria.
Watch Operation Guide 5673 Before Getting Started... This section provides an overview of the watch and introduces convenient ways it can be used. Important! ● ● ● Watch Features ● Solar Charging Sunlight and artificial light generate electricity for watch operation as it charges. ● Time Signal Reception The watch receives a radio signal containing time information and uses it to keep its time setting accurate.
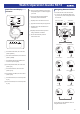
Watch Operation Guide 5673 Watch Face and Display Indicators hand points to [A] for a.m. times and [P] for p.m. times J The second hand indicates altitude/ ① barometric pressure differential. ⑤ ⑥ ② K Displayed when an alarm is turned on. ⑦ ⑧ ③ ④ Navigating Between Modes I During 12-hour timekeeping, the second Your watch has the modes shown below. ● To return to the Timekeeping Mode from any other mode, hold down (B) for at least two seconds.
Watch Operation Guide 5673 Mode Overview ● Timekeeping Mode In this mode, the digital display shows the current day of the week, month, and day. You can also use (D) to scroll display contents through the items below. ● Barometric pressure graph, month, day ● Hour, minute, second ● Digital Compass Mode ● Altitude Record Recall Mode Use this mode to take direction and bearing angle readings. l Digital Compass Use this mode to view altitude records.
Watch Operation Guide 5673 ● Alarm Mode The watch will beep when an alarm time is reached. l Alarm ① Using the Crown The watch’s crown is a screw-in (screw lock) type. To use the crown, you first need to rotate it towards you (leftwards) to loosen it. ② Crown Shifting the Hands Hand shift moves the hands out of the way for easy viewing of display information. 1. While holding down (L), press (B). This will shift the analog hands to allow easy viewing of display information.
Watch Operation Guide 5673 Charging This watch runs on power supplied from a rechargeable (secondary) battery that is charged by a solar panel. The solar panel is integrated into the face of the watch, and power is generated whenever the face is exposed to light. ● Checking the Charge Level Charge Level 4: Low A display indicator shows the watch’s charge level when you enter the Timekeeping Mode. Battery charge is lower than Level 3, and all functions are disabled. Also, all hands are stopped.
Watch Operation Guide 5673 ● Charging Time Guidelines ● Power Saving Function The table below shows guidelines for approximate charging times. Leaving the watch in a dark location for about one hour between the hours of 10 p.m. and 6 a.m. will cause the display to go blank, and the watch to enter Level 1 power saving. If the watch is left in this condition for six or seven days, the watch will enter Level 2 power saving.
Watch Operation Guide 5673 ● Specifying the Illumination Duration Note ● Auto Light is disabled when any one of the conditions below exists. ー Alarm, timer alert, or other beeper sounding ー Hand movement operation is in progress ー Watch in the Compass Mode ー While a time signal receive operation is in progress Time Adjustment You can select either 1.5 seconds or three seconds as the illumination duration. Your watch can receive time calibration signals and adjust its date and time setting. 1.
Watch Operation Guide 5673 Appropriate Signal Reception Location A time calibration signal can be received while the watch is near a window. ● ● Position the watch so its 12 o’clock side is facing the window. Keep metal objects away from the watch. ● Do not move the watch. ● Do not perform any operation on the watch. 12 o'clock Time Signal Reception Ranges ● Japan (JJY) Auto Time Calibration Signal Receive The Japan time signal radio stations are located on Mt. Otakadoya in Fukushima and Mt.
Watch Operation Guide 5673 Receive Level Indicator Note ● ● If you do not perform any operation for about three minutes while performing the Auto Receive on/off operation, the watch automatically returns to the Timekeeping Mode. While a receive operation is in progress, its current status is indicated on the display as shown below. Use the level indicator to find a location where signal reception is stable.
Watch Operation Guide 5673 Using Watch Operations to Adjust the Time Setting 5. Rotate the crown to select a summer time setting. Rotating the crown cycles through the setting items shown below. If, for some reason, you cannot use time signal reception to adjust the current time setting, you can adjust date, time, and Home City settings manually using watch button operations. ● ● ● Setting a Home City Use the procedure in this section to select a city to use as your Home City.
Watch Operation Guide 5673 ● Switching between 12-hour and 24- 5. Press (B). World Time hour Timekeeping This causes [HOUR] to flash on the display. 6. Rotate the crown to change the hour setting. You can specify either 12-hour format or 24hour format for the time display. 1. Enter the Timekeeping Mode. You can view the current time in 29 cities and UTC (Coordinated Universal Time) time. l Navigating Between Modes 7. Press (B). This causes the current year setting to flash on the display. 2.
Watch Operation Guide 5673 Specifying a World Time City Use the procedure in this section to select a World Time city. If you are in an area that observes summer time, you can also enable or disable summer time. ● 1. Enter the World Time Mode. l Navigating Between Modes ● 2. Pull out the crown. This causes [CITY] to flash on the display and the second hand to move to the current Home City.
Watch Operation Guide 5673 Configuring the Hourly Time Signal Setting 5. Press (B). This causes the hours digits to flash. Hours 1. Enter the Alarm Mode. 1. Enter the Alarm Mode. l Navigating Between Modes 2. Use (A) and (C) to scroll through alarm numbers ([AL1] to [AL5]) and the hourly time signal ([SIG]) screens until the one whose setting you want to change is displayed. l Navigating Between Modes 2. Press (A) or (C) to display the hourly time signal screen ([SIG]).
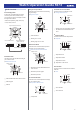
Watch Operation Guide 5673 Digital Compass Interpreting Bearing Readings ● Aligning a Map with Actual Surroundings (Setting a Map) Objective You can use the Digital Compass Mode to determine the direction of north, and to check your bearing to a destination. North Bearing angle 315° 0° Bearing angle to objective Bearing to objective Directions: N (North), E (East), W (West), S (South) Important! Check the information at the link below to find out how to ensure correct readings.
Watch Operation Guide 5673 3. While keeping the watch horizontal, press (C). This starts calibration of the first point, which causes [o WAIT] to appear on the display. When calibration is successful, indicators appear on the display in the following sequence: [OK] n [Turn 180°] n [p 2]. 4. Rotate the watch 180 degrees, taking care to be as exact as possible. Setting Up for True North Readings (Magnetic Declination Calibration) 4.
Watch Operation Guide 5673 Digital Compass Reading Precautions Altitude Measurement Location During Use Taking readings near sources of strong magnetism can cause reading error. Keep the watch away from the following types of items. Permanent magnets (magnetic accessories, etc.), metal objects, high-voltage wires, aerial wires, electrical household appliances (TVs, computers, cellphones, etc.
Watch Operation Guide 5673 Interpreting Altitude Graph Contents 1. Enter the Altimeter Mode. l Navigating Between Modes 2. Pull out the crown. This displays the current altitude and enters the Altitude Offset Mode. 50m* Current reading 6 readings ago Checking the Altitude Differential from a Reference Point After you set a reference altitude, the second hand of the watch will indicate the difference between your current altitude and the reference altitude.
Watch Operation Guide 5673 Note ● 4. While comparing the difference between the altitude you found on the map and the altitude differential indicated by the watch’s second hand, advance towards your destination. If you do not perform any operation for about two minutes after pulling out the crown, crown operations will automatically become disabled. If that happens, push the crown back in and then pull it out again.
Watch Operation Guide 5673 Note ● ● If you do not perform any operation for about two minutes after pulling out the crown, crown operations will automatically become disabled. If that happens, push the crown back in and then pull it out again. The watch will automatically return to the Timekeeping Mode if you do not perform any operation in the Altimeter Mode for about one hour while [0’05] is selected as the measurement interval or about 12 hours while [2’00] is selected.
Watch Operation Guide 5673 Altitude Reading Precautions Effects of Temperature When taking altitude readings, take the steps below to keep the watch at as stable a temperature as possible. Changes in temperature can affect altitude readings. ● ● Barometric Pressure Measurement You can use the Barometer Mode to take a reading of the barometric pressure at your current location, and to track reading changes and trends. Checking the Current Barometric Pressure 1. Enter the Barometer Mode.
Watch Operation Guide 5673 Checking Changes in Barometric Pressure Over Time The watch displays a graph of 20 hours of barometric pressure readings taken every two hours. The square (v) at the far right of the graph indicates the latest barometric pressure reading.
Watch Operation Guide 5673 1. Enter the Barometer Mode. l Navigating Between Modes 2. Hold down (D) for at least two seconds. If this turns on barometric pressure change indication, [INFO ON] will stop flashing and then the [BARO] indicator will appear on the display. Calibrating Barometric Pressure Readings (Offset) The watch’s pressure sensor is adjusted at the factory and normally does not require calibration. However, you can calibrate the displayed value if you notice major errors in readings.
Watch Operation Guide 5673 Temperature Measurement Note ● If you do not perform any operation for about two minutes after pulling out the crown, crown operations will automatically become disabled. If that happens, push the crown back in and then pull it out again. The watch can be used to take current air temperature readings. Checking the Current Temperature 1. Enter the Temperature Mode.
Watch Operation Guide 5673 Calibrating Temperature Readings (Offset) The watch’s temperature sensor is adjusted at the factory and normally does not require calibration. However, you can calibrate the displayed value if you notice major errors in readings. Important! ● ● Specifying the Temperature Measurement Unit You can select either Celsius (°C) or Fahrenheit (°F) as the temperature display unit.
Watch Operation Guide 5673 Viewing Altitude Records You can use the Altitude Record Recall Mode to view manually recorded and auto recorded data. l Recording Altitude Readings Viewing Recorded Data ● ● ● 1. Enter the Altitude Record Recall Mode. l Navigating Between Modes This displays a record of data recorded in the Altimeter Mode. 2.
Watch Operation Guide 5673 Deleting Data Stopwatch ● Deleting a Particular Record 1. Enter the Altitude Record Recall Mode. The Stopwatch Mode lets you measure elapsed time up to 24 hours in 1/100 of a second units. 2. Use the (A) and (C) buttons to scroll It can also measure split times. l Navigating Between Modes Measuring a Split Time 1. Enter the Stopwatch Mode. l Navigating Between Modes 2. Use the operations below to measure elapsed time.
Watch Operation Guide 5673 Using the Timer Timer The timer counts down from a start time specified by you. A beeper sounds when the end of the countdown is reached. ● The beeper will not sound if battery power is low. Hand Alignment Adjustment 1. Enter the Timer Mode. l Navigating Between Modes 2. Use the operations below to perform a timer operation.
Watch Operation Guide 5673 Note ● If you do not perform any operation for about two minutes after pulling out the crown, crown operations will automatically become disabled. If that happens, push the crown back in and then pull it out again. Important! ● After hand position adjustment is complete, check to make sure that the proper time is being indicated in the Timekeeping Mode by the hands and on the display. If the hands are misaligned, perform steps 2 through 4 again.
Watch Operation Guide 5673 Configuring Power Saving Function Settings Other Information Accuracy : This section provides non-operational information you also need to know. Refer to this information as required. 1. Enter the Timekeeping Mode. l Navigating Between Modes 2. Pull out the crown. City Table City code Second hand Home City 3. Press (B) six times. This displays [P.SAVE]. 4. Rotate the crown to turn the setting on or off.
Watch Operation Guide 5673 Barometer : Measurement range: 260 to 1,100 hPa (or 7.65 to 32.45 inHg) Display range: 260 to 1,100 hPa (or 7.65 to 32.45 inHg) Measurement unit: 1 hPa (or 0.05 inHg) Barometric pressure adjustment Barometric pressure graph Barometric pressure differential indicator Barometric pressure change indications Temperature : Measuring range: -10.0 °C to 60.0 °C (or 14.0 °F to 140.0 °F) Display range: -10.0 °C to 60.0 °C (or 14.0 °F to 140.0 °F) Measuring unit: 0.1 °C (or 0.
Watch Operation Guide 5673 Q2 The signal receive operation always fails. Is the watch in a location that is appropriate for signal reception? Check your surroundings and move the watch to a location where signal reception is better. l Appropriate Signal Reception Location Did you avoid touching the watch while the receive operation was in progress? Minimize movement of the watch and do not perform any watch operation while a receive operation is in progress.
Watch Operation Guide 5673 Barometric Pressure Measurement Alarm Q1 The alarm does not sound. Q1 Following a relative barometric Is the watch’s battery charged? pressure reading, the watch’s second hand points to 9 o’clock. Keep the watch exposed to light until it recharges sufficiently. l Charging The second hand will move to 9 o’clock if a reading is outside the allowable barometric pressure measurement range (260 hPa to 1,100 hPa (7.65 inHg to 32.45 inHg)).
Watch Operation Guide 5673 Charging Q1 The watch does not work even though it is exposed to light. The watch stops operating whenever the battery goes dead. Keep the watch exposed to light until it recharges sufficiently. l Checking the Charge Level Q2 [RECOVER] is flashing on the display. The watch is in the charge recovery mode. Wait until the recovery process is complete (about 15 minutes). The watch will recover more quickly if you place it in a brightly lit location.