
Webcam User Manual
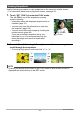
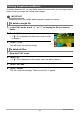
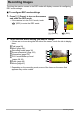
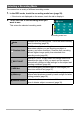
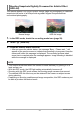
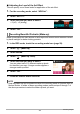
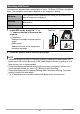
Table Of Contents
- Accessories
- Read this first!
- Contents
- General Guide
- Monitor Screen Contents
- Quick Start Basics
- What you can do with your CASIO camera
- Changing the Camera Style to Suit Shooting Conditions
- Using the Touch Panel
- First, charge the battery prior to use.
- Configuring Basic Settings the First Time You Turn On the Camera
- Preparing a Memory Card
- Turning Power On and Off
- To Shoot a Snapshot
- Viewing Snapshots
- Deleting Snapshots and Movies
- Snapshot Shooting Precautions
- Recording Images
- Using BEST SHOT
- Shooting Clearer Snapshots (Multi SR Zoom)
- Digitally Correcting for Overexposure and Underexposure (HDR)
- Shooting with High Speed Night Scene (High Speed Night Scene)
- Shooting with High Speed Anti Shake (High Speed Anti Shake)
- Shooting with Priority on Subject Faces (High Speed Best Selection)
- Shooting a Panorama Image (Slide Panorama)
- Advanced Recording Settings
- Using the REC Menu
- Using Touch Shutter (Touch Shutter)
- Using the Self-timer (Self-timer)
- Using the LED Light (LED)
- Changing the Image Size (Image Size)
- Movie Image Quality Settings (Movie Quality)
- Correcting Image Brightness (EV Shift)
- Adjusting White Balance (White Balance)
- Specifying ISO Sensitivity (ISO)
- Selecting a Focus Mode (Focus)
- Turning on Image Review (Review)
- Using the REC Menu
- Viewing Snapshots and Movies
- Other Playback Functions (PLAY)
- Printing
- Using the Camera with a Computer
- Other Settings (Set Up)
- Adjusting Monitor Screen Brightness (Screen)
- Turning off Eye-Fi Card Communication (Eye-Fi)
- Configuring Camera Sound Settings (Sounds)
- Time Stamping Snapshots (Timestamp)
- Configuring World Time Settings (World Time)
- Setting the Camera’s Clock (Adjust)
- Specifying the Date Style (Date Style)
- Specifying the Display Language (Language)
- Calibrating the Touch Panel (Calibrate TP)
- Selecting the HDMI Terminal Output Method (HDMI)
- Formatting Built-in Memory or a Memory Card (Format)
- Resetting the Camera to Factory Defaults (Reset)
- Configuring Monitor Screen Settings
- Appendix

40
Recording Images
Your camera is equipped with various types of zoom: HD Zoom, SR Zoom, and digital
zoom. The maximum zoom factor depends on the image size setting.
1. In the REC mode, touch the “+” or
“–” mark on the top of the zoom bar
to zoom.
2. Press the shutter button to shoot the image.
NOTE
• Telephoto images are prone to blurring caused by camera movement when you
press the shutter button. Because of this, stabilizing the camera by placing it on a
level surface, etc. is recommended.
• Zoom operations are disabled during high speed movie recording. Perform the
zoom operation before you touch “
b” (Movie) to start recording.
• Zoom operations are not supporting during Slide Panorama shooting. The zoom
setting is fixed at full wide angle.
•“Ù” is displayed on the monitor screen while digital zoom is being used.
Shooting with Zoom
HD Zoom
Allows greater zoom capabilities by cutting out a portion of the
original image and enlarging it.
SR Zoom
Applies super resolution technology to suppress image
deterioration.
Digital zoom Digitally processes the center of the image to enlarge it.
+ (Telephoto):
Enlarges the subject and narrows the
range.
– (Wide Angle):
Reduces the size of the subject and
broadens the range.
Zoom bar
+
–