
Webcam User Manual

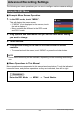
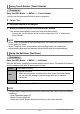
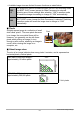
Table Of Contents
- Accessories
- Read this first!
- Contents
- General Guide
- Monitor Screen Contents
- Quick Start Basics
- What you can do with your CASIO camera
- Changing the Camera Style to Suit Shooting Conditions
- Using the Touch Panel
- First, charge the battery prior to use.
- Configuring Basic Settings the First Time You Turn On the Camera
- Preparing a Memory Card
- Turning Power On and Off
- To Shoot a Snapshot
- Viewing Snapshots
- Deleting Snapshots and Movies
- Snapshot Shooting Precautions
- Recording Images
- Using BEST SHOT
- Shooting Clearer Snapshots (Multi SR Zoom)
- Digitally Correcting for Overexposure and Underexposure (HDR)
- Shooting with High Speed Night Scene (High Speed Night Scene)
- Shooting with High Speed Anti Shake (High Speed Anti Shake)
- Shooting with Priority on Subject Faces (High Speed Best Selection)
- Shooting a Panorama Image (Slide Panorama)
- Advanced Recording Settings
- Using the REC Menu
- Using Touch Shutter (Touch Shutter)
- Using the Self-timer (Self-timer)
- Using the LED Light (LED)
- Changing the Image Size (Image Size)
- Movie Image Quality Settings (Movie Quality)
- Correcting Image Brightness (EV Shift)
- Adjusting White Balance (White Balance)
- Specifying ISO Sensitivity (ISO)
- Selecting a Focus Mode (Focus)
- Turning on Image Review (Review)
- Using the REC Menu
- Viewing Snapshots and Movies
- Other Playback Functions (PLAY)
- Printing
- Using the Camera with a Computer
- Other Settings (Set Up)
- Adjusting Monitor Screen Brightness (Screen)
- Turning off Eye-Fi Card Communication (Eye-Fi)
- Configuring Camera Sound Settings (Sounds)
- Time Stamping Snapshots (Timestamp)
- Configuring World Time Settings (World Time)
- Setting the Camera’s Clock (Adjust)
- Specifying the Date Style (Date Style)
- Specifying the Display Language (Language)
- Calibrating the Touch Panel (Calibrate TP)
- Selecting the HDMI Terminal Output Method (HDMI)
- Formatting Built-in Memory or a Memory Card (Format)
- Resetting the Camera to Factory Defaults (Reset)
- Configuring Monitor Screen Settings
- Appendix
57
Advanced Recording Settings
• Available image sizes are limited for some functions as noted below.
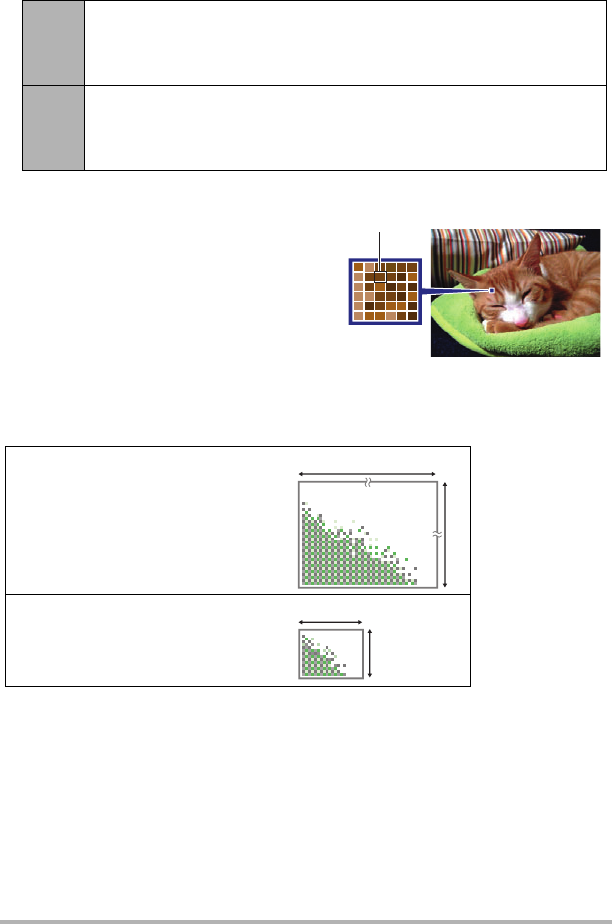
. Pixels
A digital camera image is a collection of small
dots called “pixels”. The more pixels there are
in an image, the more detail there will be.
However, you generally can do with fewer
pixels when printing an image (L size)
through a print service, attaching an image to
e-mail, when viewing the image on a
computer, etc.
. About image sizes
The size of an image indicates how many pixels it contains, and is expressed as
horizontal pixels
x
vertical pixels.
12M,
3:2
This image size cannot be selected while the HDR Art recording mode
or a BEST SHOT scene (except for Slide Panorama) is selected.
Selecting one of these settings after selecting “12M” in another mode
will cause the image size setting to change to “10M” automatically.
10M
This image size can be selected while the HDR Art recording mode or a
BEST SHOT scene (except for Slide Panorama) is selected. Switching
to another mode will cause the image size to change to “12M”
automatically.
12M (4000
x
3000) size image =
Approximately 12 million pixels
* Unit: pixels
VGA (640
x
480) size image =
Approximately 300,000 pixels
Pixel
4000*
3000*
640*
480*