E PROGRAM-LINK ™ FA-124 User’s Guide CASIO Worldwide Education Website http://edu.casio.com CASIO EDUCATIONAL FORUM http://edu.casio.
Note Display examples shown in this User’s Guide are intended for illustrative purposes only. The actual text and values that appear on display may differ from the examples shown in this User’s Guide.
Getting Started • You can use FA-124 to develop programs using the same commands as those available on an fx-9860G Series calculator. You can store your programs on your computer, and use the FA-124’s data communication functions to transfer them to your fx-9860G Series calculator when you need them.
Manual Conventions • The terms “FA-124” and “this software” as used in this manual refer to the FA-124 software. • The term “calculator” as used in this manual refers to your CASIO Graphic Scientific Calculator. • This manual explains only the procedures required to operate the FA-124 application software. It assumes that you are already familiar with the following computer operations.
CASIO Graphic Scientific Models This software is designed for use with the following CASIO Graphic Scientific models. • fx-9860G Series fx-9860G SD fx-9860G fx-9860G Slim fx-9860G AU • ALGEBRA FX Series ALGEBRA FX 2.0 • CFX-9850 Series CFX-9850G fx-9750G CFX-9850G PLUS CFX-9850Ga PLUS CFX-9850GB PLUS ALGEBRA FX 2.0 PLUS FX 1.0 FX 1.
System Requirements Operating Systems: Windows® 98 SE, Windows® Me, Windows® 2000, Windows® XP, Windows Vista™ * Operation on a computer running Windows® XP Professional x64 Edition is not supported. * For Windows Vista™, operation is supported for the 32-bit version only. The 64-bit version is not supported. Computer: Computer with one of the Windows® operating systems pre-installed (Excluding computers with an upgraded operating system and self-built computers.
Contents 1. Installing the Software ............................................................................ E-6 Installing ............................................................................................................................ E-6 Uninstalling ...................................................................................................................... E-11 2. Connecting the Calculator to Your Computer..................................... E-12 3.
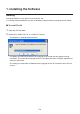
1. Installing the Software Installing Use the procedures in this section to install the FA-124. It is strongly recommended that you exit all Windows Programs before running the Install Wizard. k To install FA-124 1. Open the [FA-124] folder. 2. Double-click “CASIO FA-124” or “CASIO FA-124.exe”. • This displays a language selection menu. • The option you select here specifies the language of the screen text that appears during installation.
1. Installing the Software 3. Select a language and then click the [OK] button. 4. Click the [Next] button. • This displays the end user license agreement (EULA). • Selecting English, French, or German in step 3 above will cause the EULA to appear in the selected language. Selecting any other language will display the English EULA.
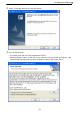
1. Installing the Software 5. Carefully read the EULA. 6. If you agree to be bound by the terms and conditions of the EULA, choose “I accept the terms...”, and then click [Next]. • If you do not want to agree, choose “I do not accept the terms...” and then click [Cancel] to exit the installation operation.
1. Installing the Software 7. Perform either of the two following steps to specify the installation drive and folder. • To use the default settings Simply click the [Next] button. • To specify a different folder Click the [Change…] button. Select the folder you want and then click [Next]. 8. Click the [Install] button to start the installation.
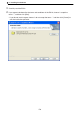
1. Installing the Software • If your computer is running Windows Vista™ a. The dialog box shown below will appear when installation starts. Click “Allow”. b. The dialog box shown below will appear if the USB driver is not installed on your computer. Click the [Install] button.
1. Installing the Software 9. When a message appears telling you that installation is complete, click the [Finish] button. • This finalizes installation of the software on your computer. Important! If the message shown below appears during installation, re-start you computer. Installation will re-start when your computer starts up again. Uninstalling Perform the following steps if you ever need to remove FA-124 from your computer. k To uninstall 1. Display the Windows Control Panel. 2.
2. Connecting the Calculator to Your Computer k To connect your fx-9860G SD/fx-9860G to a computer Important! • Be sure to install the FA-124 before you connect the fx-9860G SD/fx-9860G to your computer. Connecting before you install the FA-124 can result in improper operation. 1. Use the USB cable that comes with your fx-9860G SD/fx-9860G to connect to the computer. 2. Connect the USB cable to your fx-9860G SD/fx-9860G.
2. Connecting the Calculator to Your Computer u Windows® XP Users After installing the FA-124, perform the following steps to install the USB driver on your computer. 1. Connecting fx-9860G SD/fx-9860G to a computer running Windows ® XP causes the screen shown below to appear on your computer display. Select “No, not this time”. (Windows® XP SP2 only) 2. Select “Install the software automatically (Recommended)” and then click [Next].
2. Connecting the Calculator to Your Computer 3. Though a message appears to let you know that the software has not passed the “Windows Logo Test”, there is no need for concern. Simply click [Continue Anyway] and proceed with installation. 4. Click [Finish]. k To connect an ALGEBRA FX Series or fx-7400/CFX-9850 Series calculator to your computer Note • Be sure to use the SB-88 cable that comes with the FA-123 USB to connect an ALGEBRA FX Series or fx-7400/CFX-9850 Series calculator to a computer.
3. fx-9860G SD/fx-9860G – Computer Data Transfer 1. On your computer’s desktop, double-click “FA-124”. • This starts up FA-124. 2. Select [Tool] - [Model Type] - [fx-9860]. • This identifies the fx-9860G SD/fx-9860G as the connected graphic scientific calculator. 3. Select [Link] - [Communications]. • This displays the port selection dialog box. 4. Select “USB” and then click [OK]. • This specifies that the calculator is connected to the computer’s USB port. 5.
3. fx-9860G SD/fx-9860G – Computer Data Transfer Toolbar Buttons and Icons The following describes FA-124 toolbar buttons and icons. — Establishes a connection between your fx-9860G SD/fx-9860G and FA-124. — Disconnects your fx-9860G SD/fx-9860G from the FA-124. — Copies the currently selected folder(s) or file(s). — Pastes copied folder(s) or file(s). — Deletes the currently selected image(s), folder(s) or file(s). — Creates a new folder. — Displays variables stored in memory.
3. fx-9860G SD/fx-9860G – Computer Data Transfer — Icon for folders and files in the flash image. — Icon for data groups and files in the memory image. — Icon for a folder. — Icon for files or variables. — Data group icon.
3. fx-9860G SD/fx-9860G – Computer Data Transfer Menu Commands and Icons The following describes the shortcut menus that appear when you right-click with the mouse. k Right-clicking [User Name] (fx-9860) • Collapse/Expand — Collapses/expands data groups. • Copy — Copies the currently selected data group(s), folder(s) or file(s). • Paste — Pastes copied data group(s), folder(s) or file(s).
3. fx-9860G SD/fx-9860G – Computer Data Transfer k Right-clicking (fx-9860) • Collapse/Expand — Collapses/expands data groups. • Copy — Copies the currently selected data group(s), folder(s) or file(s). • Paste — Pastes copied data group(s), folder(s) or file(s). k Right-clicking • • • • • (Computer) Export to fx-9860 File — Exports the files in the selected folder to an external file. Import fx-9860 File — Imports an external file to an image. Copy — Copies the currently selected folder.
3. fx-9860G SD/fx-9860G – Computer Data Transfer k Right-clicking (fx-9860) • Copy — Copies the currently selected file. • Paste — Pastes copied file. k Right-clicking • • • • • (Computer) Export to fx-9860 File — Exports the selected file to an external file. Import fx-9860 File — Imports an external file to an image. Copy — Copies the currently selected file. Paste — Pastes copied file. Delete — Deletes the currently selected file.
3. fx-9860G SD/fx-9860G – Computer Data Transfer k Right-clicking Computer • Expand/Collapse — Expands/Collapses the currently selected flash or memory image. • Add New Image — Adds a new image. • Insert Existing Image — Inserts an existing image. k Right-clicking • • • • • • • • • or Expand/Collapse — Expands/Collapses the folder tree. Export to fx-9860 File — Exports the selected image to an external file. Import fx-9860 File — Imports an external file to an image.
3. fx-9860G SD/fx-9860G – Computer Data Transfer Transferring Files from the fx-9860G SD/fx-9860G to Your PC First set up your fx-9860G SD/fx-9860G for data communication, and then perform the transfer operation on your computer using FA-124. fx-9860G SD/fx-9860G Operation Use the following procedure to put your fx-9860G SD/fx-9860G into a standby state for data communication. k To set up your fx-9860G SD/fx-9860G for data communication 1. From the Main Menu, enter the LINK mode. 2.
3. fx-9860G SD/fx-9860G – Computer Data Transfer Using FA-124 The following procedures explain how to perform various data transfer and other operations using FA-124. k To establish a connection between your fx-9860G SD/fx-9860G and FA-124 1. After setting up your fx-9860G SD/fx-9860G for data communication (page E-12), start up the FA-124. • This displays the fx-9860 window on the left, and the computer window on the right. 2. Click the (Connect) button on the fx-9860 toolbar.
3. fx-9860G SD/fx-9860G – Computer Data Transfer 3. After the connection is established, the fx-9860 window will show data groups and data, while the computer window will show flash images and memory images. • On the computer window toolbar, click memory data. to display main memory data, or for storage • Double-clicking a data group on the fx-9860 window will display the data contained in the data group.
3. fx-9860G SD/fx-9860G – Computer Data Transfer • See the following for information about the various data transfer operations you can perform after establishing a connection. k To transfer a data group from the fx-9860G SD/fx-9860G to a computer 1. Start up FA-124 and establish a connection with your fx-9860G SD/fx-9860G. 2. On the fx-9860 window, select the data group you want to transfer. • To select multiple data groups, hold down the computer keyboard’s [Ctrl] key as you click each one.
3. fx-9860G SD/fx-9860G – Computer Data Transfer 3. Use your mouse to drag the selected data group to the computer window memory image to transfer it. 4. If you want to transfer other data groups, repeat steps 2 and 3. 5. After you are finished, terminate the connection between your fx-9860G SD/fx-9860G and computer. k To transfer folders from the fx-9860G SD/fx-9860G to a computer 1. Start up FA-124 and establish a connection with your fx-9860G SD/fx-9860G. 2.
3. fx-9860G SD/fx-9860G – Computer Data Transfer 4. Use your mouse to drag the selected data to the computer window memory image to transfer it. • This will create the data group associated with the data in the memory image and store the data inside the data group. 5. If you want to transfer more data, repeat steps 2 and 4. 6. After you are finished, terminate the connection between your fx-9860G SD/fx-9860G and computer. k To transfer a file from a computer to the fx-9860G SD/fx-9860G 1.
3. fx-9860G SD/fx-9860G – Computer Data Transfer 4. Select the file you want to transfer. • To select multiple files, hold down the computer keyboard’s [Ctrl] key as you click each one. 5. Use your mouse to drag the selected file to the fx-9860 window icon to transfer it. • You can also transfer a single data group by dragging it to the fx-9860 window.
3. fx-9860G SD/fx-9860G – Computer Data Transfer 6. If you want to transfer other files, repeat steps 3 and 5. 7. After you are finished, terminate the connection between your fx-9860G SD/fx-9860G and computer. k To create a new folder 1. On the fx-9860 window (storage memory only) or the computer window, click the tool bar button. 2. Click the (New Folder) button. 3. On the dialog box that appears, type in the name you want to assign to the new folder (“FOLDER” for this example) and then click [OK].
3. fx-9860G SD/fx-9860G – Computer Data Transfer k To delete a flash or memory image, folder, or file 1. On the computer window, select the flash image, memory image, folder, or file you want to delete. 2. On the computer window, click the toolbar (Delete) button. 3. On the confirmation dialog box that appears, click [OK] to delete or [Cancel] to cancel. k To terminate the connection between your fx-9860G SD/fx-9860G and FA-124 1.
3. fx-9860G SD/fx-9860G – Computer Data Transfer Batch Transferring Files You can use the data backup feature to transfer all fx-9860G SD/fx-9860G data to a computer for backup. You can later transfer the data back to the fx-9860G SD/fx-9860G when required. k fx-9860G SD/fx-9860G → Computer 1. Connect the fx-9860G SD/fx-9860G unit to your computer. 2. On the fx-9860 window, click fx-9860. 3. On the computer window, click the transfer destination image icon. 4.
3. fx-9860G SD/fx-9860G – Computer Data Transfer Adding a Flash Image or Memory Image Use the procedure below when you want to add a flash image or memory image to the computer window. The following procedure shows how to add a flash image. The procedure for adding a memory image is virtually identical. 1. On the computer window, click the toolbar button. 2. Right-click [Computer], and then select [Add New Image] from the shortcut menu that appears. 3.
3. fx-9860G SD/fx-9860G – Computer Data Transfer Exporting Flash Images and Memory Images A flash image or memory image can be saved to a file (fx-9860 data file), and then stored on a computer’s hard disk. 1. On the computer window, click the image you want to export. 2. Right-click with the mouse. 3. On the shortcut menu that appears, select [Export to fx-9860 File]. • Flash image: The dialog box shown below appears. Select the save destination directory, and then click [OK].
3. fx-9860G SD/fx-9860G – Computer Data Transfer • Memory image: The dialog box shown below appears. Type in the file name, and then click [Save]. Importing a Flash Image or Memory Image Use the FA-124 to import a flash image or memory image stored in a file on a computer’s hard disk. 1. Right-click with your mouse. 2. On the shortcut menu that appears, select [Insert Existing Image].
3. fx-9860G SD/fx-9860G – Computer Data Transfer 3. On the file dialog box that appears, select the image you want to import, and then click [Open]. • This imports the image to the computer window and displays in. Importing a File Use this procedure to import a file from a computer hard disk. Importing a file adds its data to the flash image or memory image. 1. On the computer window, select the destination flash image or memory image. 2. Right-click with your mouse.
3. fx-9860G SD/fx-9860G – Computer Data Transfer 3. On the shortcut menu that appears, select [Import fx-9860 File]. 4. On the file dialog box, select the file you want to import, and then click [Open]. • This will add the imported file data to the flash image or memory image.
4. Data Transfer between a Computer and ALGEBRA FX Series or fx-7400/CFX-9850 Series File Configuration FA-124 files are called “catalog files,” which can be one of three different types. Catalog Files Text files Back-up file Image files u Text files This type of file consists of two parts: a group and the multiple items stored under it. Except for graphic data, all items can be displayed on a computer screen, and programs can be edited on the computer.
4. Data Transfer between a Computer and ALGEBRA FX Series or fx-7400/CFX-9850 Series File Transfer The procedures described here can be used to upload calculator data to your computer, and to download programs and data from your computer to your calculator. Note • For details on how to operate your calculator during file transfers, see the section of the calculator’s User’s Guide titled “Data Communications.” k Types of transfers There are two ways to transfer items. • Transfer of a single data item.
4. Data Transfer between a Computer and ALGEBRA FX Series or fx-7400/CFX-9850 Series k Transferring files from your calculator to your computer 1. Select [Link] - [Receive] on the computer screen. 2. Select the calculator data you want and then send it. Example: Use the following procedure to send data from the ALGEBRA FX. Select [Transmit] in the LINK mode. Select [Select] and then select the data item you want to sent. Select [Trans] and then select [Yes].
4. Data Transfer between a Computer and ALGEBRA FX Series or fx-7400/CFX-9850 Series 4. Save the data as a file. Select [File] - [Save]. Specify a file name and click [OK] to save it as a catalog file. Note • Selecting [File] - [Save] displays a dialog box you can use to specify the file name, drive, and directory. You can also use the “Save type” box to specify the file format. • Double check the following items whenever data transfer is not performed correctly.
4. Data Transfer between a Computer and ALGEBRA FX Series or fx-7400/CFX-9850 Series 4. Select [Link] - [Transmit]. • Double check to make sure that both units are set up correctly for data transfer and then click [OK]. • Data transfer starts at this time, with its progress indicated by a dialog box on the computer screen. 5. If a received file has a name of a file already stored in calculator memory, a dialog box appears asking if you want to overwrite the existing file.
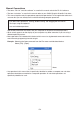
5. Data Editing Creating a New Catalog File (ALGEBRA FX, CFX-9850, fx-7400 Series only) 1. Select [File] - [New] - [Model Type], and then on the sending unit select [Model Type]. Sample screen 2. Input data to create a new program or copy (or move) data from another catalog window. • For details on creating a program, see “Creating a New Item (Program)”. • For details on copying or moving data, see “Deleting, Copying, and Moving Groups and Items”. 3. Select [File] - [Save As] to save the data.
5. Data Editing 2. Double-click on the item to launch the program editor. 3. Input the contents of the program. • See “8. Program Editor” for details on inputting program contents. 4. Select [File] - [Close] to quit the program editor. 5. Select [File] - [Save] to save the catalog file. Note • Program passwords are ignored by this software. • When a program with password is transferred from the calculator to the computer, the password is ignored. • You cannot edit a BASE program.
5. Data Editing Deleting, Copying, and Moving Groups and Items k To delete a group and item Select the group and item to be deleted and then select [Edit] - [Delete], or press the [Delete] key. k To copy a group and item to another catalog file 1. Select the group and item to be copied and then select [Edit] - [Copy]. 2. Open the destination catalog file and then select [Edit] - [Paste]. Note • You could also drag the group and item to the designation window.
6. Data Conversion • On the fx-9860G SD/fx-9860G, you can convert between List, File, Matrix, and Spreadsheet data and csv format data. • On an ALGEBRA FX, CFX-9850, fx-7400 Series calculator, you can convert between List, File, and Matrix data and csv format data. • You can also convert data between fx-9860 format and older model (ALGEBRA FX, CFX-9850, fx-7400 Series) format. k To convert calculator data to csv format 1. Select the data you want to convert. 2. On the File menu select [CSV].
6. Data Conversion k To convert csv data to calculator data 1. Select [File] - [CSV-Load from CSV]. 2. Select the csv data you want to convert. 3. Select the type of calculator data you want to convert to. • When converting to fx-9860G SD/fx-9860G Spreadsheet data, input up to eight characters for the file name. 4. Click [OK] to start data conversion. 5. One of the following happens when conversion is complete. fx-9860G SD/fx-9860G: The converted data is created.
6. Data Conversion k Converting data between fx-9860 format and ALGEBRA FX, CFX-9850, or fx-7400 Series format u Converting from fx-9860G SD/fx-9860G to ALGEBRA FX, CFX-9850/fx-7400 Series 1. On the computer window, select the image to be converted. 2. When converting to ALGEBRA FX Series: select [Tool] - [Convert] - [fx-9860 conversion]. When converting to CFX-9850/fx-7400 Series: select [Tool] - [Convert] - [fx-9860 9850 conversion]. ALGEBRA-FX CFX- • This will displays a file name input dialog box.
6. Data Conversion 4. When converting to ALGEBRA FX Series: select [Tool] - [Model Type] - [ALGEBRA FX series]. When converting to CFX-9850/fx-7400 Series: select [Tool] - [Model Type] - [fx-7400/CFX9850 series]. 5. Select [File] - [Open], and then open the converted catalog file. (See “Transferring files from your computer to your calculator” on page E-40.) u Converting from ALGEBRA FX, CFX-9850/fx-7400 Series to fx-9860G SD/fx-9860G 1. Open the catalog file you want to convert. 2.
6. Data Conversion 3. Type in the file name, and then click [OK]. • The converted image file (with extension “.g1r”) will be stored at My Documents\Casio\FA-124 on your computer’s hard disk. 4. Select [Tool] - [Model Type] - [fx-9860]. 5. Use the procedure under “Importing a Flash Image or Memory Image” (page E-34) to import the converted image. Note • For information about how data is converted, see “9. Data Transfer with an Old Model Calculator” (page E-54).
7. Screen Capture The screen image of the calculator can be captured as a bit pattern and transferred to your computer. Note • For details on how to operate your calculator for screen capture, see the section of the calculator’s User’s Guide titled “Data Communications.” Capturing a Screen to Your Computer u fx-9860G SD/fx-9860G 1. On the fx-9860G SD/fx-9860G, turn on manual image transfer. • In the LINK mode, press 6(CAPT)2(PC)J. 2. On the fx-9860G SD/fx-9860G, display the screen you want to transfer.
7. Screen Capture u CFX-9850/fx-7400 Series 1. Set up the calculator to send a screen shot to a computer. • On the calculator’s LINK mode, press 6(IMGE) and then turn on the Image Set Mode. In the case of a color calculator, you can select either MONO or COLR for the Image Set Mode. 2. On the calculator, display the screen you want to send to the computer. 3. On the FA-124 menu bar, select [Link] - [Screen Capture]. 4. On the calculator, press M to send the screen shot.
7. Screen Capture Displaying and Printing a Captured Screen Image k To display a captured screen image Select [File] - [Open] and open the image file to display the image. k To print a captured screen image 1. While the image is on the display, select [File] - [Print]. 2. Specify the printer, print options, number of copies, and enlargement factors, and then start the printing. • You can use the preview function to display an image of the printout on the screen.
8. Program Editor The program editor lets you edit the contents of programs. Launching the Program Editor Create a new program or select an existing program to launch the program editor. u Command Input You can input commands using any one of the three following methods. • Selecting a command from the PRGM menu • Inputting commands from the keyboard • Displaying the calculator window and using the mouse to click on its keys Note • To display the calculator window, select [View] - [Calculator].
9. Data Transfer with an Old Model Calculator Using this software to transfer data to the computer from an older model calculator automatically converts the data to the format used by fx-9860G SD/fx-9860G and then stores it on disk. • Old Model Caluculator fx-7700GB CFX-9800G fx-8700GB fx-7700GE fx-7700GH fx-9700GE fx-9700GH The following table shows how data is converted.
9. Data Transfer with an Old Model Calculator The following applies to data conversion between fx-9860G SD/fx-9860G data and older model calculator data. • Attempting to transfer the following type of data from the fx-9860G SD/fx-9860G to the CFX-9850 will cause an error (Transmit ERROR).
10. Installing an Add-in fx-9860G SD and fx-9860G support installation of the three types of add-ins described below. • Add-In Applications: You can install new applications as required. • Add-In Languages: You can install languages for on-screen messages. • Add-In Menus: You can install application menus in various languages. The procedure for installing an add-in the identical to the normal file import operation. Uninstall is also the same as deleting a normal file. k To install an add-in 1.
10. Installing an Add-in 5. Select the file you want to install, and then click [Open]. • This will cause the file to appear on the computer window. 6. Drag the file and drop it into the [User Name] icon on the fx-9860 window. • This will install the add-in on the fx-9860G SD/fx-9860G. k To uninstall an add-in • You can uninstall an add-in by using the fx-9860G SD/fx-9860G MEMORY mode to delete the its file.
11. Optimizing the Storage Memory or Flash Image Storage memory or the flash image can become fragmented after many store and load operations. Fragmentation can cause blocks of memory to become unavailable for data storage. Because of this, you should perform the storage memory or flash image optimization procedure periodically, which rearranges the data in the storage memory or flash image and makes memory usage more economical. k To optimize the flash image 1.
CASIO COMPUTER CO., LTD.