ES USER’S GUIDE GUÍA DEL USUARIO Please keep all information for future reference. Guarde toda información para tener como referencia futura. Safety Precautions Before trying to use the piano, be sure to read the separate “Safety Precautions”. Precauciones de seguridad Antes de intentar usar el piano, asegúrese de leer las “Precauciones de seguridad” separadas.
TO REDUCE THE RISK OF FIRE OR ELECTRIC SHOCK, REFER SERVICING TO QUALIFIED SERVICE PERSONNEL. IMPORTANT SAFETY INSTRUCTIONS 1. 2. 3. 4. 5. 6. 7. 8. 9. Read these instructions. Keep these instructions. Heed all warnings. Follow all instructions. Do not use this apparatus near water. Clean only with dry cloth. Do not block any ventilation openings. Install in accordance with the manufacturer’s instructions.
PX720_01_eTOC.fm 1 ページ 2007年8月10日 金曜日 午後2時23分 Contents Assembling the Stand .............................................................................................. E-24 Unpacking................................................................. E-24 To connect the cables ............................................... E-29 Assembling the Stand............................................... E-24 To install the music stand.......................................... E-29 General Guide ...........
PX720_e.
PX720_e.book 3 ページ 2007年6月6日 水曜日 午後3時6分 General Guide CAUTION • Make sure that the cover is fully open whenever you are playing on the keyboard. A partially open cover can suddenly close unexpectedly and pinch your fingers. NOTE • The names shown here are always indicated in bold when they appear within the text of this manual.
PX720_e.book 4 ページ 2007年6月6日 水曜日 午後3時6分 Power Outlet Your digital piano runs on standard household power. Be sure to turn off power whenever you are not using the digital piano. Using an AC Adaptor Use only the AC adaptor that is specified for use with this digital piano. Specified AC Adaptor: AD-12 Bottom AC adaptor AD-12 Household power AC adaptor terminal Note the following important precautions to avoid damage to the power cord. During Use • Never pull on the cord with excessive force.
PX720_e.book 5 ページ 2007年6月6日 水曜日 午後3時6分 Connections IMPORTANT! • Whenever connecting something to the digital piano, first use the VOLUME controller to set the volume to a low level. After connecting, you can adjust the volume to the level you want. Connecting Headphones Pin plug Audio amplifier AUX IN jack, etc. RIGHT (Red) LEFT (White) Stereo standard plug To digital piano’s PHONES jack Pin jack Pin plug (red) Guitar amplifier Keyboard amplifier, etc.
PX720_02_e.fm 6 ページ 2007年6月7日 木曜日 午後5時44分 Playing with Different Tones VOLUME TONE/SETTING SONG / POWER METRONOME GRAND PIANO Selecting and Playing a Tone This digital piano has 11 built-in tones. * You can select these tones using keyboard keys. The name of the tones assigned to each keyboard key is marked above the keys. For details about selecting these tones, see “Selecting a Tone Using the Keyboard Keys” on page E-7. 1. Press the POWER button to turn on the digital piano.
PX720_e.book 7 ページ 2007年6月6日 水曜日 午後3時6分 Playing with Different Tones Selecting a Tone Using the Keyboard Keys ʬʊʽ MODERN ɹʳʁʍɹ VARIATION CLASSIC ʚʴɲ˂ʁʱʽ GRAND PIANO ɺʳʽʓʞɬʘ ±1 ʝʠʳʟɳʽ VIBRAPHONE ²2 ʃʒʴʽɺʃ STRINGS ² 2 BASS (LOWER) ʣ˂ʃ ᴥͲᬩᴦ ELEC PIANO ɲʶɹʒʴʍɹʞɬʘ HARPSICHORD ʙ˂ʡʁɽ˂ʓ PIPE ORGAN ʛɮʡɴʵɶʽ TONE/SETTING button 1. ± 1 Tone Setting Keys While holding down the TONE/SETTING button, press the keyboard key that corresponds to the tone you want to select.
PX720_02_e.fm 8 ページ 2007年6月15日 金曜日 午後5時3分 Playing with Different Tones To adjust the brilliance of a tone 1. While holding down the TONE/SETTING button, use the BRILLIANCE keys to specify a brilliance value in the range of –3 to 3. Layering Two Tones Use the following procedure to layer two tones, so they sound at the same time. 1. While holding down the TONE/SETTING button, simultaneously press the keyboard keys that correspond to the two tones that you want to layer.
PX720_02_e.fm 9 ページ 2007年6月11日 月曜日 午前11時6分 Playing with Different Tones Using Effects Reverb . . . . Makes your notes resonate. Chorus . . . Adds more breadth to your notes. Using the Digital Piano’s Pedals Your digital piano comes equipped with three pedals: damper, soft, and sostenuto To configure reverb and chorus effect settings 1. While holding down the TONE/SETTING button, press the REVERB or CHORUS keyboard key.
PX720_02_e.fm 10 ページ 2007年6月11日 月曜日 午前11時6分 Playing with Different Tones Using the Metronome 1. Press the METRONOME button. • This starts the metronome. • The lamp above the SONG X/ button flash in time with the metronome beat. 2. To change the beat, hold down the TONE/ SETTING button as you press one of the METRONOME BEAT keys to select a beat setting. 4. Press the METRONOME button or SONG X/ button to turn off the metronome.
PX720_02_e.fm 11 ページ 2007年6月11日 月曜日 午前11時6分 Playing with Different Tones Changing the Octaves of the Keyboards Playing a Piano Duet You can use the Duet Mode to split the piano’s keyboard in the center so two people can play a duet. The left and right side keyboards have virtually the same range. The left pedal operates as the left side damper pedal, while the right pedal is the right side damper pedal.
PX720_e.book 12 ページ 2007年6月6日 水曜日 午後3時6分 Playing Back Built-in Songs TONE/SETTING SONG / LR IMPORTANT! • After you select a built-in song, it can take a number of seconds for the song data to be loaded. While the data is being loaded, the keyboard keys and button operations will be disabled. If you are playing something on the keyboard, the following operation will cause output to stop. Playing Back a Specific Music Library Song 1.
PX720_e.book 13 ページ 2007年6月6日 水曜日 午後3時6分 Playing Back Built-in Songs NOTE • Pressing the + and – keys at the same time will select song number 01. • You also can adjust the playback tempo and volume of the song. See “Configuring Settings with the Keyboard” on page E-18 for more information. Practicing with a Music Library Song You can turn off the left hand part or right hand part of a song and play along on the piano. NOTE • The Music Library includes a number of duets.
PX720_e.book 14 ページ 2007年6月6日 水曜日 午後3時6分 Recording and Play Back SONG / LR RECORDER METRONOME You can store the notes you play in digital piano memory for later playback. Tracks A track is a container of recorded data, and a song consists of two tracks: Track 1 and Track 2. You can record each track separately and then combine them so they play back together as a single song. Track 1 Record While playing back. . .
PX720_e.book 15 ページ 2007年6月6日 水曜日 午後3時6分 Recording and Play Back To record to a specific track of a song After recording to either of the tracks of a song, you can record to the other track while listening to playback what you recorded in the first track. 1. Press the RECORDER button twice so its lamp is flashing. 4. Start playing something on the keyboard. • Recording will start automatically. 5. To stop recording, press the SONG X/ button again.
PX720_e.book 16 ページ 2007年6月6日 水曜日 午後3時6分 Recording and Play Back To record to one track of a song while listening to the playback of the other track 1. Playing Back from Digital Piano Memory 1. Press the RECORDER button so its lamp is lit. Press the RECORDER button so its lamp is lit. NOTE 2. Press the LR button until the lamp of only the track to which you want to play back is lit. 3. Press the RECORDER button so its lamp is flashing. • This will cause the L lamp to flash. 4.
PX720_e.book 17 ページ 2007年6月6日 水曜日 午後3時6分 Recording and Play Back Deleting Recorded Data The following procedure deletes a specific track of a song. IMPORTANT! • The procedure below deletes all of the data of the selected track. Note that the delete operation cannot be undone. Check to make sure you really do not need the data in digital piano memory before you perform the following steps. 1. Press the RECORDER button so its lamp is lit. 2. Press the RECORDER button again so its lamp is flashing.
PX720_03_e.fm 18 ページ 2007年6月18日 月曜日 午後9時51分 Configuring Settings with the Keyboard TONE/SETTING In addition to selecting tones and Music Library tunes, you also can use the TONE/SETTING button in combination with the keyboard keys to configure effect, keyboard touch, and other settings. To configure settings with the keyboard 4. Release the TONE/SETTING button to complete the setting procedure. NOTE • You can configure the digital piano so no operation tone sounds in step 3.
PX720_03_e.fm 19 ページ 2007年6月12日 火曜日 午後7時26分 Configuring Settings with the Keyboard Keyboard Keys Used for Configuring Settings • The numbers 1 through br correspond to the same numbers in the “Parameter List” on page E-20.
PX720_03_e.fm 20 ページ 2007年8月10日 金曜日 午後2時24分 Configuring Settings with the Keyboard Parameter List ■ Tones Parameter 1 Tone selection Operation Type (page E-18) Settings See page E-6. A Default: GRAND PIANO (MODERN) Description Remarks Assigns a tone to the keyboard. (page E-6) 2 Brilliance –3 to 0 to 3 (BRILLIANCE) Default: 0 B Specifies the brilliance of notes. (page E-8) 3 Reverb (REVERB) Off (OFF), 1 to 4 Default: 2 A Specifies the reverb of notes.
PX720_e.book 21 ページ 2007年6月6日 水曜日 午後3時6分 Configuring Settings with the Keyboard ■ Keyboard Parameter Operation Type (page E-18) Settings Description Remarks bk Touch Response Off (OFF), 1 to 3 (TOUCH Default: 2 RESPONSE) A Specifies the relative touch of the keyboard keys. Setting a smaller value causes lighter touch to produce more powerful sound.
PX720_e.book 22 ページ 2007年6月6日 水曜日 午後3時6分 Configuring Settings with the Keyboard ■ MIDI and Other Settings Parameter Operation Type (page E-18) Settings Description Remarks bn Send Channel 01 to 16 Default: 01 B Specifies one of the MIDI channels (1 through 16) as the Send Channel, which is used for sending MIDI messages to an external device.
PX720_e.book 23 ページ 2007年6月6日 水曜日 午後3時6分 Configuring Settings with the Keyboard Connecting to the MIDI Terminal What is MIDI? MIDI is a standard for digital signals and connectors that allows musical instruments, computers, and other devices, regardless of manufacturer, to exchange data with each other. NOTE • For details about MIDI implementation, visit: http://world.casio.
PX720_03_e.fm 24 ページ 2007年8月10日 金曜日 午後2時24分 Assembling the Stand Unpacking Assembling the Stand PREPARATION • Before starting assembly, check to make sure that you have all the parts shown below. You can find the screws in a plastic bag inside of the polystyrene foam packing material. • This stand does not include any of the tools required for assembly. It is up to you to prepare a large Philips head (+) screwdriver for assembly.
PX720_03_e.fm 25 ページ 2007年8月10日 金曜日 午後2時24分 Assembling the Stand PREPARATION • Before starting assembly of the stand, divide the polystyrene foam packing material K into the sections as shown in the illustration below. After dividing up the material, you should end up with a total of six pieces named K-(a), K-(b), and K-(c), which you will use while assembling the stand. • If you do not have any packing material available for some reason, use a magazine or some other thick item. 2.
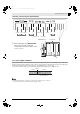
PX720_03_e.fm 26 ページ 2007年8月10日 金曜日 午後2時24分 Assembling the Stand 4. Perform the following steps to secure the side panel to the digital piano. 7. (4-1) Press downwards on side panel A to ensure that it is inserted as far as it will go into the bracket on the side of the digital piano. (4-2) Use the D screws to secure side panel A to the digital piano. With the speaker box C laying on its side as shown in the illustration, secure side panels A and B to the speaker box C.
PX720_03_e.fm 27 ページ 2007年8月10日 金曜日 午後2時24分 Assembling the Stand 10. Remove the screws that hold the corner brackets in place on the back corners (the corners away from the pianist) of the side panels. 12. Securely tighten the screws G that you temporarily tightened in step 9. • Cover the screw heads with the caps J. J G 11.
PX720_03_e.fm 28 ページ 2007年8月10日 金曜日 午後2時24分 Assembling the Stand To tighten the joint connector and screw (1) Rotate the screw counterclockwise about three turns to ensure that the screw is in the center of the joint connector. (2) Slowly rotate the screw clockwise and confirm that it tightens without resistance. If you feel any resistance, it means that the screw is not engaging properly with the joint connector. Rotate the screw counterclockwise again and try to get it to engage properly.
PX720_03_e.fm 29 ページ 2007年8月10日 金曜日 午後2時24分 Assembling the Stand 13. Tighten the screws you loosened in step 10 to secure the corner brackets to the side panels. IMPORTANT! • Press down on the edges of the pedal unit as you tighten the corner bracket screws. To connect the cables 1. Plug the speaker box C cable into the speaker connector on the bottom of the digital piano. 2.
PX720_03_e.fm 30 ページ 2007年6月12日 火曜日 午後7時14分 Reference Troubleshooting Problem No sound is produced when I press a keyboard key. The pitch of the digital piano is off. Cause Action See Page 1. The VOLUME controller is set to “MIN”. 2. Headphones are connected to the digital piano. 3. MIDI Local Control is turned off. 1. Rotate the VOLUME controller more towards “MAX”. 2. Unplug the headphones from the digital piano. 3. Turn on the Local Control setting. ) E-6 1.
PX720_03_e.
PX720_03_e.fm 32 ページ 2007年8月10日 金曜日 午後2時25分 Reference Operating Precautions Be sure to read and observe the following operating precautions. ■ Location Avoid the following locations for this product. • Areas exposed to direct sunlight and high humidity • Areas subjected to temperature extremes • Near a radio, TV, video deck, or tuner The above devices will not cause malfunction of the product, but the product can cause interference in the audio or video of a nearby device.
PX720_s.book 1 ページ 2007年6月18日 月曜日 午後12時16分 Appendix/Apéndice Tone List/Lista de tonos Song List/Lista de canciones Program Change/ Cambio de programa Bank Select MSB/ MSB de selección de banco Maximum Polyphony/ Polifonía máxima GRAND PIANO (MODERN) 0 48 64 GRAND PIANO (CLASSIC) 0 49 64 GRAND PIANO (VARIATION) 07 Prélude Op.28-7 0 50 128 08 Valse Op.64-1 “Petit Chien” Tone Name/ Nombre de tonos No./Nº Song Name/Nombre de canciones 01 Nocturne Op.9-2 02 Fantaisie-Impromptu Op.
MIDI Implementation Chart Model PX-720/PX-720C Function... Recognized Basic Channel Default Changed 1 - 16 1 - 16 1 - 16 1 - 16 Mode Default Messages Altered Mode 3 X Mode 3 X 21 - 108 0 - 127 0 - 127*1 O 9nH v = 1 - 127 X 8nH v = 64 O 9nH v = 1 - 127 X 9nH v = 0.
This recycle mark indicates that the packaging conforms to the environmental protection legislation in Germany. Esta marca de reciclaje indica que el empaquetado se ajusta a la legislación de protección ambiental en Alemania.