
User Manual

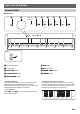
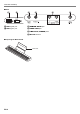
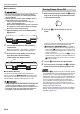

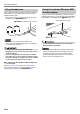
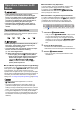
Table Of Contents
- Cover
- Contents
- Overview and Setup
- Operations Common to All Modes
- Digital Piano Operations
- Listening to Demo Play
- Selecting a Tone
- Changing Keyboard Response to Touch Pressure (Touch Response)
- Changing the Pitch in Semitone Steps (Transpose)
- Fine Tuning a Pitch (Tuning)
- Changing the Pitch in Octave Units (Octave Shift)
- Using the Sound Mode Effects (Hall Simulator and Surround)
- Using Chorus
- Using Brilliance
- Adjusting Acoustic Piano Sound Characteristics (Acoustic Simulator)
- Using the Metronome
- Specifying the Tempo
- Splitting the Keyboard for Duet Play
- Changing the Scale Tuning (Temperament) of the Keyboard
- Listening to Songs (Music Library)
- Using the MIDI Recorder to Record or Playback Performances
- Using the Audio Recorder to Record Performances
- Listening to Songs (MIDI Player)
- USB Flash Drive
- Supported USB Flash Drives
- USB Flash Drive and USB Type A Port Handling Precautions
- Connecting a USB Flash Drive to and Detaching It from the Digital Piano
- Formatting a USB Flash Drive
- USB Flash Drive Operations
- Using a Computer to Copy General Song Data to a USB Flash Drive
- Storing Standard Audio Data (WAV Files) to a USB Flash Drive
- Configuring Settings
- Linking with a Smart Device (APP Function)
- Troubleshooting
- Reference
- MIDI Implementation Chart

Overview and Setup
EN-6
■ Using Batteries
• Be sure to turn off power before loading batteries.
• It is up to you to prepare six commercially available
alkaline batteries.
• Note the precautions below while the Digital Piano is
turned upside down to load batteries.
− Take care to avoid injury due to pinching your
fingers under the Digital Piano.
− Do not allow the Digital Piano to tip over or otherwise
be subjected to strong impact. Impact can damage
the volume knob and keyboard keys.
1.
Open the battery cover on the bottom of the
Digital Piano.
2.
Load six AA-size batteries into the battery
compartment.
Make sure the positive + and negative - ends of the
batteries are facing as marked on the Digital Piano.
3.
Insert the tabs of the battery cover into the
holes along the side of the battery
compartment, and close the cover.
■ Low Battery Indicator
Low power is indicated when the lights of all the touch
buttons, except for the 3 FUNCTION, start to flash. When
this happens, try lowering the volume level. If this does not
stop the flashing, replace the batteries with new ones.
• Using the Digital Piano while batteries are very low can
cause it to turn off suddenly. This can cause data
stored in Digital Piano memory to be corrupted or lost.
• Low battery power can cause abnormal operation. If
this happens, replace batteries with new ones.
1.
Before turning on power, rotate the 2 volume
knob as far as it will go in the direction shown
in the illustration below.
2.
Press the 1P (Power) button to turn on
power.
Turning on power will cause the lights of the front panel
touch button to light in sequence from left to right
(3 FUNCTION to 8 GRAND PIANO). The Digital
Piano is ready to play when all touch button lights are lit.
• After pressing 1P (Power) to turn on power, do not
press any pedal until the Digital Piano is ready to play
(all touch buttons lit).
• Power may not turn on if you press the 1P (Power)
button too lightly. This does not indicate malfunction. If
this happens, apply more pressure when you press the
1P (Power) button.
3.
Use the 2 volume knob to adjust volume.
4.
To turn off power, hold down the 1P (Power)
button until all lit touch button lights turn off.
• Pressing the 1P (Power) button to turn off power actually
puts the Digital Piano into a standby state. Minute amounts
of current continue to flow within the Digital Piano in the
standby state. If you do not plan to use the Digital Piano for
a long time or if there is a lightning storm in your area, be
sure to unplug the AC adaptor from the power outlet.
• Turning off power normally causes the tone number and
other settings to return to their initial defaults. You can
enable Auto Resume (page EN-45), which will save most
settings when power is turned off.
• If Auto Resume is disabled, turning off power will initialize
settings, except for tuning (page EN-15) and touch button
luminosity (page EN-45).
Tabs
Turning Power On or Off