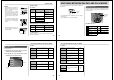
QUICK REFERENCE LCD Digital Camera Loading Batteries (page 31) QV-5500SX Be sure to load the four AA size batteries that come with the camera before using it. 1 2 Press the battery compartment lock on the bottom of the camera (1 ) to open the battery compartment cover (2). Load four batteries and close the battery compartment cover. Owner’s Manual If you need help with your camera, please call: 1(800)435-7732 • Be sure to use alkaline, lithium or Ni-MH batteries. Never use manganese batteries.
QUICK REFERENCE CONTENTS Deleting Images (page 79) 3 2 Press MENU. 4 Use [+] and [–] to select “Delete”, and then press the shutter button. Double check to make sure that you really want to delete the image you selected. 25 27 PLAYBACK 77 82 75 75 86 USING FOLDERS 75 76 IMAGE PROTECTION To Protect and Unprotect a Single Image ................... 77 To Protect and Unprotect Folders ............................... 78 To Protect and Unprotect All Images on the Memory Card ...................
FEATURES FEATURES Quick Shutter Hold down the shutter button to record high-resolution images at a rate of one image per 0.5 second. Quick View View high-resolution images on the built-in monitor screen at a rate of two frames per second. 2X or 4X zoom Movie and panorama images (pages 51, 53) Movie Play includes a buffer that lets you capture images of events that occurred before you pressed the shutter release. A built-in function lets you combine up to nine images into breathtaking panoramas.
PRECAUTIONS PRECAUTIONS Operating conditions Condensation About the camera’s backlight… • This camera is designed for use in temperatures ranging from 0°C to 40°C. • Do not use or keep the camera in the following areas.
GENERAL GUIDE UNPACKING IMPORTANT! The following illustrations show the names of each component, button and switch on the camera. Using the Soft Case • Be sure to keep the strap around your wrist whenever using the camera to protect against accidentally dropping it. • The supplied strap is intended for use with this camera only. Do not use for any other application. • Never swing the camera around by the strap.
SWITCHING BETWEEN THE REC AND PLAY MODES GENERAL GUIDE Lamps Operation lamp • The power/card access lamp is lit whenever power is turned on, regardless of whether the monitor screen is on or off. • The power/card access lamp flashes green while the memory card is being accessed. Never remove the memory card while the power/card access lamp is flashing. Record Mode Lamp Color Green Use the Function Switch to switch between the REC and PLAY Modes.
MONITOR SCREEN Pressing DISP causes various indicators to appear on the monitor screen. If the monitor screen is turned off, press DISP to turn on the monitor screen. To turn off the monitor screen, press the DISP button the required number of times. You can then use the viewfinder to compose images. Turning off the monitor screen conserves battery power.
MEMORY CARDS • Formatting is recommended for any memory card that you suspect contains corrupted image data (due to a DECODE ERROR, strange image colors, malformed images) or newly purchased memory cards. Memory Card Precautions Formatting a Memory Card You can format a memory card to delete all of the data stored on it. IMPORTANT! • Formatting a memory card deletes all images on the card, even if some or all of the images are protected.
POWER SUPPLY Auto Power Off (Battery Powered Operation Only) POWER SUPPLY Using AC Power Power automatically turns off whenever you do not perform any camera operation for a specific period. See page 35 for details about how you can specify the Auto Power Off time. • To restore power, simply slide the POWER Switch again. Use the optional AC adaptor (AD-C620) to power the camera from standard AC power.
RECORDING RECORDING SETTING THE CURRENT DATE AND TIME To select the date format Using the Shutter Button Example: May 12, 1999 You can select any one of the following formats for the above date: 99/5/12, 12/5/99, 5/12/99. The following describes the basic operation for recording images. 1. Press the shutter button about half way. 1. Slide the Function • The Auto Focus feature automatically focuses the image. 1. Slide the Function Switch to PLAY.
RECORDING RECORDING 2. While keeping the shut- Using Focus Lock Normally, Auto Focus automatically focuses on the object that is inside the Auto Focus Frame. Focus lock is a technique that lets you lock the focus on a subject and then move the camera so the Auto Focus Frame is pointed at another subject when you record. This keeps the original subject in focus, even though a different object is within the Auto Focus Frame.
RECORDING Resolution Settings The camera has four resolution modes: Super Fine ( ), Fine ( ), Normal ( ), Economy ( ). • To determine the number of images that can be stored on a memory card of a different capacity, multiply the capacities in the table by the appropriate value. • The actual number of images that can be stored in memory cannot be specified precisely because the amount of memory required for storage of each image differs according to image contents.
OTHER RECORDING FUNCTIONS OTHER RECORDING FUNCTIONS IMPORTANT! Using the Zoom Feature The zoom feature lets you move in closer on subjects that are located far from the camera. You can select either 2X or 4X zoom. In both cases, images are Economy “ ” resolution [VGA size (640 x 480 pixels)]. 1. Slide the Function Switch to REC. 2. Press ZOOM to display the current zoom setting in the lower right of the monitor screen.
OTHER RECORDING FUNCTIONS IMPORTANT! OTHER RECORDING FUNCTIONS 3. Compose the image and then record it. Panorama Recording • Flash is disabled during movie recording. • Movie images that are uploaded to a personal computer and then download back to the camera cannot be played back as a movie. Uploading a movie image to a computer ungroups it, so you will not be able to play it back when you download it back to the camera unless you re-group them using the procedure on page 67.
OTHER RECORDING FUNCTIONS Using the Self-timer You can use the self-timer for either of the two following recording operations. 10-second recording .... Records about 10 seconds after the shutter button is pressed. Use this method when you want to be included in the image that is recorded. OTHER RECORDING FUNCTIONS 3. Press · . You can use the timer to perform any one of the following operations. • Interval Recording Use this method to record a series of images at fixed time intervals.
OTHER RECORDING FUNCTIONS OTHER RECORDING FUNCTIONS 5. Make the setting. To make Record Menu settings Performing Manual White Balance 1. Slide the Function Switch to REC. • If you want to change other settings, repeat steps 4 and 5. 2. Press MENU. • After you make the Record Menu settings you want, select EXIT. 3.
PLAYBACK PLAYBACK The following describes the different techniques that you can use to playback recorded images. Basic Playback Operation The built-in monitor screen of the camera lets you play back recorded images without connecting an external monitor. 1. Slide the Function Switch to PLAY. PLAYBACK NOTES Playing Back a Movie • Sliding the Function Switch to PLAY immediately after recording an image displays the image you just recorded first.
PLAYBACK 4. Select “Tools” Regrouping Panorama Images “Group” PLAYBACK To ungroup panorama images “Panorama”. Transferring a panorama to a personal computer causes its images to become ungrouped. If you download the panorama back to the camera, you will be unable to play it back as a panorama unless you use the following procedure to regroup the images. 1. Perform steps 1 through 3 under “ To re-group panorama images” on page 69. 2. Select “Tools” “Group”. 3. Press the shutter button.
PLAYBACK 1. Slide the Function Switch to PLAY. 2. Press MENU. 3. Select “View” “Slide Show”. 4. To stop Slide Show, press any button besides MENU. • Pressing MENU while a Slide Show is in progress displays a screen that lets you change the interval within the range of 5 to 30 seconds. • Note that all buttons are disabled while an image change is in progress. Wait until an image is stopped on the monitor screen before performing a button operation, or hold down the button until the image stops.
IMAGE PROTECTION Use the following operations when you want to protect images against accidental deletion. A protected image cannot be deleted until it is unprotected. You can protect and unprotect a single specific image, all the image in a particular folder, or all images currently on the memory card. IMPORTANT! Formatting a memory card (page 29) deletes all images on the card, even if some or all of the images are protected.
CONNECTIONS DELETING IMAGES This camera is equipped with VIDEO OUT terminal for connection to a television or video deck, and a DIGITAL terminal for connection to a computer or other equipment. To Delete All Unprotected Images 1. Perform steps 1 through 3 under “To Delete a INPUT Single Image” on page 79. VIDEO OUT Terminal 2. Select “All”.
USING CompactFlash CARDS WITH YOUR COMPUTER USING CompactFlash CARDS WITH YOUR COMPUTER CONNECTING TO OTHER EQUIPMENT To Connect to a QV Color Printer Setting Up to Access CompactFlash Card Contents From Your Computer Connecting to a Personal Computer You can use a QV Color Printer to produce printouts of your image data.
USING CompactFlash CARDS WITH YOUR COMPUTER USING CompactFlash CARDS WITH YOUR COMPUTER 4. Specify the format. Card Browser Card Browser makes it possible to use a browser application to view images recorded with the QV-5500SX. • The HTML file generated by this camera is best viewed using Microsoft Internet Explorer 3.0 or later, or Netscape Navigator 2.0 or later. It cannot be viewed using QV-LINK. • QuickTime 3 is required to play back AVI movie files. 1. Slide the Function Switch to PLAY. 2.
TROUBLESHOOTING Power Supply 3. Wrong AC adaptor Sudden power failure 1. Auto Power Off 2. Low battery power 3. Use of manganese batteries. Battery life is too short Recording Probable Cause 1. Batteries not loaded correctly. 2. Dead batteries Use of the camera in cold temperatures. Action Symptom Probable Cause 1. Correctly load batteries (page 2). 2. Replace all four batteries with a set of new ones (page 2). 3. Use only recommended AC adaptor . Monitor screen image is out of focus. 1.
MESSAGES Perform the following procedure whenever a CF ERROR You must format the memory card starts to behave abnormally. CompactFlash card before using it with Important! The procedure described below deletes all imthis camera. ages stored in the memory card. Make sure all of FORMAT MENU your important images are backed up onto a computer hard disk or other storage medium before performing this procedure. To reformat a memory card 1.
MEMO MEMO CASIO COMPUTER CO.,LTD. 6-2, Hon-machi 1-chome Shibuya-ku, Tokyo 151-8543, Japan Printed on recycled paper.