Digital Camera QV-R40 User’s Guide Thank you for purchasing this CASIO Product. Before using it, be sure to read the precautions contained in this User’s Guide, and keep the User’s Guide in a safe place for future reference.
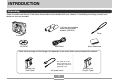
INTRODUCTION INTRODUCTION Unpacking Check to make sure that all of the items shown below are included with your camera. If something is missing, contact your dealer as soon as possible. 2 AA-size rechargeable nickel-metal hydride batteries (HR-3UA) Strap Camera CD-ROM USB Cable Basic Reference * The shape of the AC power cord plug varies according to country or geographic area.
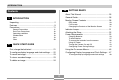
INTRODUCTION 25 Contents GETTING READY About This Manual ..................................................... 25 2 General Guide ............................................................ 26 INTRODUCTION Monitor Screen Contents ........................................... 28 Unpacking .................................................................... 2 REC mode PLAY mode Changing the Contents of the Monitor Screen Features ......................................................................
INTRODUCTION 51 Exposure Compensation (EV Shift) ........................... 70 BASIC IMAGE RECORDING Adjusting White Balance ............................................ 71 Recording an Image ................................................... 51 Recording Precautions About Auto Focus About the REC Mode Monitor Screen Adjusting White Balance Manually 53 54 54 72 Using the Best Shot Mode .........................................
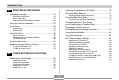
INTRODUCTION 92 PLAYBACK 104 Basic Playback Operation .......................................... 92 Folders ..................................................................... 104 Memory Folders and Files Zooming the Display Image ....................................... 93 104 Protecting Files ........................................................ 105 Resizing an Image .....................................................
INTRODUCTION 117 OTHER SETTINGS 129 Specifying the File Name Serial Number Generation Method ................................................... 117 USING A MEMORY CARD Using a Memory Card .............................................. 130 To insert a memory card into the camera To remove a memory card from the camera Formatting a Memory Card Memory Card Precautions Turning the Key Tone On and Off ............................. 118 Specifying an Image for the Startup Screen ............
INTRODUCTION 148 USING THE CAMERA WITH A COMPUTER 162 Using the Album Feature ......................................... 148 Creating an album Selecting an Album Layout Configuring Detailed Album Settings Viewing Album Files Saving an Album Menu Reference ....................................................... 162 148 149 150 152 155 Indicator Lamp Reference .......................................
INTRODUCTION • The USB driver (mass storage) uses Phoenix Technologies Ltd. software. Compatibility Software Copyright C 1997 Phoenix Technologies Ltd., All Rights Reserved. • Other company, product and service names used herein may also be trademarks or service marks of others. • Photo Loader and Photohands are the property of CASIO COMPUTER CO., LTD. Except as stipulated above, all copyrights and other related rights to these applications revert to CASIO COMPUTER CO., LTD.
INTRODUCTION • Coupling Shot and Pre-shot Coupling Shot lets you combine two subjects into a single image, while Pre-shot lets you add a subject to a previously recorded background image. This means you can create images that include you and your friend, even if you are the only two people around. You can use Coupling Shot and Pre-shot by selecting the applicable sample images in the Best Shot mode. Features • 4.0 million Effective Pixels A high-resolution megapixel CCD provides 4.
INTRODUCTION • PRINT Image Matching II Compatible Images include PRINT Image Matching II data (mode setting and other camera setup information). A printer that supports PRINT Image Matching II reads this data and adjusts the printed image accordingly, so your images come out just the way you intended when you recorded them. • Alarm A built-in alarm helps to keep you on time for important events, and even can be used in place of an alarm clock.
INTRODUCTION ■ Flash Precautions • Never use the flash unit in areas where flammable or explosive gas may be present. Such conditions create the risk of fire and explosion. • Never fire the flash in the direction of a person operating a motor vehicle. Doing so can interfere with the driver’s vision and creates the risk of accident. • Never fire the flash too close to the eyes of the subject. Doing so creates the risk of loss of eyesight.
INTRODUCTION ■ Connections ■ Water and Foreign Matter • Never plug any devices that are not specified for use with this camera into connectors. Connecting a nonspecified device creates the risk of fire and electric shock. • Water, other liquids, or foreign matter (especially metal) getting inside the camera creates the risk of fire and electric shock. Immediately perform the following steps whenever any of the above symptoms are present.
INTRODUCTION ■ Dropping and Rough Treatment ■ Locations To Be Avoided • Continued use of the camera after it is damaged by dropping or other rough treatment creates the risk of fire and electric shock. Immediately perform the following steps whenever any of the above symptoms are present. • Never leave the camera in any of the following types of locations. Doing so creates the risk of fire and electric shock.
INTRODUCTION ■ Batteries ■ Alkaline Batteries • Misuse of batteries can cause them to leak, which damages and corrodes the area around the batteries and creates the danger of fire and personal injury. Make sure you observe the following precautions when using batteries. — Never try to take batteries apart and never allow them to become shorted. — Do not expose batteries to heat or fire. — Never mix new batteries with old ones. — Never mix batteries of different types.
INTRODUCTION • If the batteries do not achieve full charge after the normal charging time has passed, stop charging. Continued charging creates the risk of overheating, fire, and explosion. • Battery fluid can damage your eyes. Should battery fluid get into your eyes accidentally, immediately rinse them with clean tap water and then consult a physician.
INTRODUCTION ■ Charger Unit ■ AC Adaptor (Option) • Never plug the charger unit into an outlet whose voltage rating is different from that marked on the charger unit. Doing so creates the risk of fire, malfunction, and electric shock. • Never plug in or unplug the charger unit while your hands are wet. Doing so creates the risk of electric shock. • Do not plug the charger unit into an outlet or extension cord that is shared by other devices.
INTRODUCTION • Never touch the AC adaptor while your hands are wet. Doing so creates the risk of electric shock. • Misuse of the optional AC adaptor creates the risk of fire and electric shock. Make sure you observe the following precautions when using the AC adaptor. — Never locate the power cord near a stove or other heating device. — When unplugging from the wall outlet, grasp the plug on the AC adaptor power cord. Never pull on the power cord. — Insert the plug into the wall outlet as far as it will go.
INTRODUCTION Data Error Precautions Operating conditions • Your digital camera is manufactured using precision digital components. Any of the following creates the risk of corruption of data in file memory. • This camera is designed for use in temperatures ranging from 0°C to 40°C (32°F to 104°F). • Do not use or keep the camera in the following areas.
INTRODUCTION Condensation Lens • When you bring the camera indoors on a cold day or otherwise expose it to a sudden change of temperature, there is the possibility that condensation can form on the exterior or on interior components. Condensation can cause malfunction of the camera, so you should avoid exposing it to conditions that might cause condensation.
INTRODUCTION Other • The camera may become slightly warm during use. This does not indicate malfunction. • If the exterior of the camera needs cleaning, wipe it with a soft, dry cloth.
QUICK START GUIDE QUICK START GUIDE First, charge the batteries! 1. Charge the rechargeable nickel-metal hydride 2. Load the batteries (page 37). batteries (HR-3UA) that come with the camera (page 33). • Note that you can also power the camera using commercially available AA-size alkaline batteries. Note, however, that the life of alkaline batteries is relatively short, and that alkaline batteries cannot be recharged.
QUICK START GUIDE To configure display language and clock settings 1, 10 1. Press the power button to turn on the camera. 2. Use [ ], [ ], [ ], and [ ] to select the language you want. 3. Press [SET] to register the language setting. 4. Use [ ], [ ], [ ], and [ ] to 2, 3, 4, 5, 6, 7, 8, 9 select the geographical area you want, and then press [SET]. 5. Use [ ] and [ ] to select the city you want, and then press [SET].
QUICK START GUIDE To record an image To view a recorded image (See page 51 for details.) Green operation lamp 1 3 (See page 92 for details.) 1 99 1600 1200 NORMAL IN 1 / 1000 F2.6 03/12 03 12/24 24 12:58 12 58 Focus frame 2 2 1. Press [ 1. Press [ ] (REC). 2. Point the camera at the subject, use the monitor screen or viewfinder to compose the image, and then press the shutter release button half way.
QUICK START GUIDE To delete an image (See page 102 for details.) 1 2, 3, 4, 5 1. Press [ ] (PLAY). 2. Press [ ] ( ). 3. Use [ ] and [ ] to display the image you want to delete. 4. Use [ ] and [ ] to select “Delete”. • To exit the image delete operation without deleting anything, select “Cancel”. 5. Press [SET] to delete the image.