GETTING READY GETTING READY ■ Button Operations This section contains information about things you need to know about and do before trying to use the camera. Button operations are indicated by the button name inside of brackets ([ ]). About This Manual ■ On-screen Text This section contains information about the conventions used in this manual. On-screen text is always enclosed by double quotation marks (“ ”).
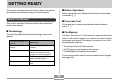
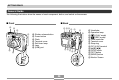
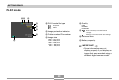
GETTING READY General Guide The following illustrations show the names of each component, button, and switch on the camera.
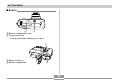
GETTING READY ■ Bottom K L K Battery compartment cover L Tripod screw hole * Use this hole when attaching to a tripod.
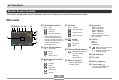
GETTING READY Monitor Screen Contents The monitor screen uses various indicators and icons to keep you informed of the camera’s status. REC mode 1 2 34 5 6 1 Flash Mode indicator 7 None Auto 4 Self-timer None Flash Off D 10s 8 Flash On 9 Red-eye reduction 0 A • If the camera detects that flash is required while auto flash is selected, the flash on indicator will appear when the shutter release button is pressed half way.
GETTING READY 1 1 Digital zoom indicator 2 3 4 2 Shutter speed value • An out of range aperture or shutter speed causes the corresponding monitor screen value to turn amber. 3 Aperture value 4 ISO sensitivity 5 5 Zoom indicator • Left side indicates optical zoom. • Right side indicates digital zoom.
GETTING READY PLAY mode 12 3 4 5 6 7 1 PLAY mode file type FINE NORMAL ECONOMY Movie 2 Image protection indicator 3 Folder number/File number 6 Built-in memory selected for data storage. Memory card selected for data storage.
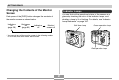
GETTING READY Changing the Contents of the Monitor Screen Indicator Lamps You can find out the operational status of the camera at a glance by checking the color of the indicator lamps, and whether a lamp is lit or flashing. For details, see “Indicator Lamp Reference” on page 164. Each press of the [DISP] button changes the contents of the monitor screen as shown below.
GETTING READY Attaching the Strap Power Requirements Attach the strap to the strap ring as shown in the illustration. Your camera features a two-way power supply that lets you use either AA-size batteries or household AC current. A set of AA-size rechargeable nickel-metal hydride batteries is supplied with the camera. The other items listed below are available separately.
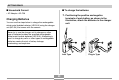
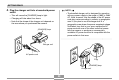
GETTING READY ■ Household Current ■ To charge the batteries • AC Adaptor: AD-C30 1. Positioning the positive and negative You can use the steps below to charge the rechargeable nickel-metal hydride batteries (HR-3UA) using the charger unit (BC-5H) that comes with the camera. Never try to use the charger unit to charge any other type of batteries besides the specified rechargeable nickel-metal hydride batteries (HR-3UA).
GETTING READY 2. Plug the charger unit into a household power NOTE outlet. • The bundled charger unit is designed for operation with any power supply in the range of 100V to 240V AC. Note, however, that the shape of the AC power cord plug varies according to country or geographic area.
GETTING READY NOTE IMPORTANT! • The charger unit is designed for operation on power ranging from 100V AC to 240V AC. Note, however, that the shape of the power plug varies according to country or geographic area. When traveling abroad, it is up to you to find out if the shape of the charger unit power plug is compatible with local power outlets and to purchase any required adapters.
GETTING READY • Charging the camera’s batteries may cause interference with TV and radio reception. If this happens, plug the charger into an outlet that is further away from the TV or radio. • Dirty charger contacts and/or battery terminals can make proper charging impossible. Be sure to wipe contacts and terminals occasionally with a dry cloth to keep them clean. • Charge the batteries in a location where the temperature is in the range of 10°C to 35°C (50°F to 95°F).
GETTING READY ■ Optional Batteries To load batteries Use of SANYO Electric Co., Ltd. Rechargeable nickelmetal hydride batteries (HR-3UA) is recommended for this camera. Proper operation cannot be guaranteed when other brands of rechargeable batteries are used. 1. Turn off the camera. 2. Slide the battery compartment cover on the bottom of the camera in the direction indicated by the arrow and then swing it open. IMPORTANT! • Never mix two batteries of different brands, ages, or charge levels.
GETTING READY ■ Low Battery Indicator IMPORTANT! • Use only the included rechargeable nickel-metal hydride batteries or the specified type of AA-size batteries. The following shows how the battery capacity indicator on the monitor screen changes as battery power is used. The indicator means that remaining battery power is low. Note that you will not be able to record images while the battery indicator is . Immediately replace or charge the batteries whenever either of these indicators appears.
GETTING READY ■ Battery Life Guidelines • The above approximate guidelines are based on the following battery types: The battery life guideline values given below indicate the approximate amount of time at a standard temperature of 23°C (73°F) until power automatically turns off due to battery failure. They do not guarantee that the batteries will provide the amount of service indicated. Low temperatures and continued use reduce battery life.
GETTING READY ■ Tips to Make the Batteries Last Longer ■ Alkaline Battery Life • If you do not need the flash while recording, select (flash off) for the flash mode (page 58). • Enable the Auto Power Off and the Sleep features (page 44) to protect against wasting battery power when you forget to turn off the camera.
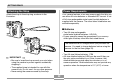
GETTING READY ■ Battery Handling Precautions Using AC Power Misuse of batteries can cause them to leak or explode, which damages and corrodes the area around the batteries and creates the danger of fire and personal injury. Make sure you observe the following precautions when using batteries. You need to purchase the optionally available AC adaptor (AD-C30) in order to be able to power the camera using AC power. 1. Connect the AC power cord to the AC adaptor.
GETTING READY ■ AC Adaptor Precautions 2. Open the camera’s terminal cover and connect the AC adaptor to the port marked [DC IN 3V]. • Be sure to turn off power before connecting or disconnecting the AC adaptor. • Always turn camera power off before disconnecting the AC adaptor, even if the camera has batteries installed. If you don’t, the camera will turn off automatically when you disconnect the AC adaptor.
GETTING READY IMPORTANT! Turning the Camera On and Off • If camera power is turned off by the Auto Power Off feature, press the power button, [ ] (REC) or [ ] (PLAY) to turn it back on again. • Pressing the power button or [ ] (REC) to turn on the camera also causes the lens to extend. Take care to any interference with the lens operation or allowing anything to strike the lens when it is extended. ■ To turn on the camera Press the power button, [ ] (REC) button, or [ ] (PLAY) button.
GETTING READY ● See page 45 for information about how to use menus. Configuring Power Saving Settings You can configure the settings described below to conserve battery power. To configure this feature: Sleep : Automatically turns off the monitor screen if no operation is performed for a specified amount of time in the REC mode. Performing any button operation causes the monitor screen to turn back on. Auto Power Off : Turns off power if you do not perform any operation for a specified amount of time.
GETTING READY 2. Press [MENU]. Using the On-screen Menus Tab Pressing [MENU] displays menus on the monitor screen that you can use to perform various operations. The menu that appears depends on whether you are in the REC mode or the PLAY mode. The following shows an example menu procedure in the REC mode. 1. Press the power button or the [ [MENU] [SET] ] (REC) button. [ ][ ][ ][ ] • If you want to enter the PLAY mode instead, press the [ ] (PLAY) button.
GETTING READY ● Menu Screen Operations 3. Press [ ] or [ ] to select the tab you want, When you want to do this: Do this: Move between tabs Press [ ] and [ ]. Move from the tab to the settings Press [ ]. Move from the settings to the tab Press [ ]. Move between the settings Press [ ] and [ ]. Display the options available for a setting Press [ ] or press [SET]. Select an option Press [ ] and [ ]. Register an option selection and exit the menu screen Press [SET].
GETTING READY 6. Perform one of the following operations to Configuring Display Language and Clock Settings apply the setting you configured. To do this: Perform this key operation: Apply the setting and exit the menu screen. Press [SET]. Apply the setting and return to feature selection in step 4. Press [ ]. Apply the setting and return to tab selection in step 3. 1. Press [ ]. 2. Use [ ] to move back up to tab selection.
GETTING READY IMPORTANT! To configure display language and clock settings • The camera’s clock settings are cleared whenever power is totally cut off. This can happen if the batteries go dead while the camera is not being supplied power by the AC adaptor. The clock setting screen will appear automatically the next time you turn on power after the settings are cleared. Set the date and time before using the camera.
GETTING READY 3. Use [ ], [ ], [ ], and 6. Use [ ] and [ ] to [ ] to select the geographical area where you live, and then press [SET]. change the date format setting, and then press [SET]. Example: October 23, 2003 4. Use [ ] and [ ] to select the name of the city where you live, and then press [SET]. To display the date like this: Select this format: 03/10/23 YY/MM/DD 23/10/03 DD/MM/YY 10/23/03 MM/DD/YY 7. Set the current date and the time. 5.
GETTING READY 8. Press [SET] to register the settings and exit the setting screen.
BASIC IMAGE RECORDING BASIC IMAGE RECORDING This section describes the basic procedure for recording an image. • This causes an image or a message to appear on the monitor screen. • This enters the REC mode for image recording. • If the camera is in the PLAY mode when it turns on, the message “There are no files” will appear if you do not have any images stored in memory yet. In addition, the icon will be visible at the top of the display. If this happens, press [ ] (REC) to enter the REC mode.
BASIC IMAGE RECORDING ● Operation Lamp and Focus Frame Operation 3. Press the shutter release button half way to focus the image. • When you press the shutter release button half way, the camera’s Auto Focus feature automatically focuses the image, and displays the shutter speed and aperture values. • You can tell whether the image is focused by observing the focus frame and the green operation lamp.
BASIC IMAGE RECORDING 4. After making sure that the Recording Precautions image is focused properly, press the shutter release button the rest of the way down to record. • The number of images that can be stored in memory depends on the resolution setting you are using (page 172). • Never open the battery compartment cover while the green operation lamp is flashing.
BASIC IMAGE RECORDING About Auto Focus About the REC Mode Monitor Screen • Auto Focus tends not to work well if the camera is moved during recording, or when recording the types of subjects listed below.
BASIC IMAGE RECORDING Using the Optical Viewfinder Using Zoom You can conserve battery power by turning off the camera’s monitor screen (page 31) and using the optical viewfinder to compose images. Your camera is equipped with two types of zoom: optical zoom and digital zoom. Optical Zoom The range of the optical zoom factor is shown below. Optical Zoom Factor Range: 1X to 3X (1X to 1.2X in the Macro Mode) Short distance to subject 1.
BASIC IMAGE RECORDING Digital Zoom Digital zoom is activated after you reach the maximum optical zoom factor (3X). It enlarges the part of the image at the center of the image screen. The range of the digital zoom factor is shown below. Zoom out Digital Zoom Factor Range: 3X to 9.6X (in combination with optical zoom) Zoom in 2. Compose the image, and then press the shutter release button. 1. In the REC mode, press [MENU]. NOTES 2. Use [ ] and [ ] to select the “REC” tab.
BASIC IMAGE RECORDING 5. Slide the zoom Digital zoom indicator IMPORTANT! controller towards (Telephoto)/ to change the zoom factor. • When zoom reaches maximum optical zoom, it stops momentarily. Keep the zoom controller pressed to the (Telephoto)/ side and zoom will switch over to digital zoom. • Digital zoom is disabled whenever the monitor screen is turned off (page 31). • Using digital zoom can cause degradation of the recorded image.
BASIC IMAGE RECORDING To do this: Using the Flash Have the flash fire automatically when required (Auto Flash) Perform the following steps to select the flash mode you want to use. Select this setting: None Turn off the flash (Flash Off) 1. In the REC mode, press [MENU]. Always fire the flash (Flash On) 2. Press [ ] ( ) to select the flash mode.
BASIC IMAGE RECORDING ■ About Red-eye Reduction Flash Unit Status Using the flash to record at night or in a dimly lit room can cause red spots inside the eyes of people who are in the image. This is caused when the light from the flash reflects off of the retina of the eye. When red-eye reduction is selected as the flash mode, the camera performs two preflash operations, one designed to cause the irises in the eyes of any people in the image to close, and one for the Auto Focus operation.
BASIC IMAGE RECORDING Changing the Flash Intensity Setting Flash Precautions Perform the following steps to change the flash intensity setting. Take care that your fingers do not block the flash when you hold the camera. Covering the flash with your finger can greatly reduce its effectiveness. 1. In the REC mode, press [MENU]. 2. Use [ ] and [ ] to select the “REC” tab. Flash 3.
BASIC IMAGE RECORDING • White balance is fixed while the flash is being used, so sunlight, fluorescent lighting, or other sources of illumination in the immediate area may affect the coloring of the recorded image. Using the Self-timer The self-timer lets you select either a 2-second or 10second delay of the shutter release after you press the shutter release button. A Triple Self-timer feature lets you perform three consecutive self-timer operations to record three images. 1.
BASIC IMAGE RECORDING To do this: 5. Record the image. Select this setting: Specify a 10-second self-timer 10 sec Specify a 2-second self-timer 2 sec Specify Triple Self-timer X3 Disable the self-timer Off Self-timer lamp • When you press the shutter release button, the self-timer lamp flashes and the shutter releases after the selftimer reaches the end of its countdown. • With the Triple Self-timer, the camera records a series of three images in the sequence described below.
BASIC IMAGE RECORDING NOTES Specifying Image Size and Quality • If you plan to make large prints of your images or otherwise use them in applications where highresolution is your top priority, select the “2304 x 1712” image size. • If you plan to send images as e-mail attachments or otherwise use them in applications where data economy is your top priority, select the “640 x 480” image size. You can specify the image size and image quality to suit the type of image you are recording.
BASIC IMAGE RECORDING NOTE To specify image quality • Use the “Fine” setting when image quality is your top priority and file size is secondary. Conversely, use the “Economy” setting when file size is your top priority and image quality is secondary. 1. In the REC mode, press [MENU]. 2. Use [ ] and [ ] to select the “REC” tab. 3. Use [ ] and [ ] to select “Quality”, and then IMPORTANT! press [ ]. • Actual file size depends on the type of image you record.