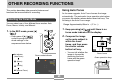
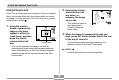
OTHER RECORDING FUNCTIONS OTHER RECORDING FUNCTIONS This section describes other powerful features and functions that are available for recording. Using Auto Focus As its name suggests, Auto Focus focuses the image automatically. The automatic focus operation starts when you press the shutter release button down half way. The following is the Auto Focus range. Selecting the Focus Mode You can select one of four different focus modes: Auto Focus, Macro, Infinity, and Manual. 1.
OTHER RECORDING FUNCTIONS When you see this: It means this: Green focus frame Green operation lamp The image is focused. Red focus frame Flashing green operation lamp The image is not in focus. 3. Select the Auto Focus area you want, and then press [SET]. 3. Press the shutter release button the rest of the way to record the image. ■ Specifying the Auto Focus Area You can use the following procedure to change the Auto Focus area used in the Auto Focus Mode and the Macro Mode.
OTHER RECORDING FUNCTIONS Using the Macro Mode Using the Infinity Mode The Macro mode lets you focus automatically on close up subjects. The automatic focus operation starts when you press the shutter release button down half way. The following is the focus range in the Macro mode. Use this mode when recording scenery and other faraway images. 1. Keep pressing [ ] ( Approximately 10cm to 70cm (3.9˝ to 27.6˝) 1. Keep pressing [ ] ( indicator shows indicator shows 2. Record the image.
OTHER RECORDING FUNCTIONS 2. While watching the Using Manual Focus image on the monitor screen, use [ ] and [ ] to focus. With the Manual Focus mode, you can adjust the focus of an image manually. The following shows focus ranges in the Macro mode for two optical zoom factors. Optical Zoom Factor Approximate Focus Range 1X 10cm (3.9˝) to infinity (∞) 3X 60cm (23.6˝) to infinity (∞) Manual focus position To do this: 1. Keep pressing [ ] ( ) until the focus mode indicator shows MF.
OTHER RECORDING FUNCTIONS 2. Keeping the shutter Using Focus Lock Focus lock is a technique you can use to focus on a subject that is not located within the focus frame when you record an image. You can use focus lock in the Auto Focus mode and the Macro mode ( ). release button half way down, recompose the image as you like. 1. Using the monitor • This locks the focus on the subject that is currently within the focus frame.
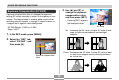
OTHER RECORDING FUNCTIONS 3. Use [ ] and [ ] to Exposure Compensation (EV Shift) change the exposure compensation value, and then press [SET]. Exposure compensation lets you change the exposure setting (EV value) manually to adjust for the lighting of your subject. This feature helps to achieve better results when recording a backlit subject, a strongly lit subject indoors, or a subject that is against a dark background. • Pressing [SET] registers the displayed value. EV value EV Shift Range: –2.
OTHER RECORDING FUNCTIONS • To cancel EV Shift, adjust the value until it becomes 0.0. Adjusting White Balance The wavelengths of the light produced by various light sources (sunlight, light bulb, etc.) can affect the color of a subject when it is recorded. White balance lets you make adjustments to compensate for different lighting types, so the colors of an image appear more natural. 4. Record the image.
OTHER RECORDING FUNCTIONS 3. Use [ ] and [ ] to select the setting you Adjusting White Balance Manually want, and then press [SET]. When shooting under these conditions: Normal conditions Under some light sources, automatic white balance under the “Auto” setting can take a long time to complete. Also, the auto white balance range (color temperature range) is limited. Manual white balance helps to ensure that colors are recorded correctly for a particular light source.
OTHER RECORDING FUNCTIONS 4. Point the camera at a white piece of paper or Using the Best Shot Mode similar object under the lighting conditions for which you want to set the white balance, and then press the shutter release button. Selecting one of the 21 Best Shot scenes automatically sets up the camera for recording a similar type of image. • This starts the white balance adjustment procedure. The message “Complete” appears on the monitor screen after white balance adjustment is complete.
OTHER RECORDING FUNCTIONS 1. In the REC mode, press [MENU]. IMPORTANT! • Sample scene number 4 is Coupling Shot scene (page 77). Sample scene number 5 is a Pre-shot scene (page 79). • Best Shot scenes were not recorded using this camera. They are provided as samples only. • Images recorded using a Best Shot scene may not produce the results you expected due to shooting conditions and other factors.
OTHER RECORDING FUNCTIONS 6. Use [ ] and [ ] to Creating Your Own Best Shot Setup display the image whose setup you want to register as a Best Shot scene. You can use the procedure below to save the setup of an image you recorded for later recall when you need it again. Recalling a setup you save automatically sets up the camera accordingly. 1. In the REC mode, press [MENU]. 7. Use [ ] and [ ] to 2. Select the “REC” tab, select “REC Mode”, and select “Save”, and then press [SET]. then press [ ]. 3.
OTHER RECORDING FUNCTIONS ■ To delete a Best Shot user setup IMPORTANT! • Setups that you register as Best Shot sample scenes are located after the built-in sample scenes. • When a Best Shot user setup is recalled, the monitor screen in step 4 of the procedure on page 74 displays the text “Recall User Scene”. • Note that formatting the built-in memory (page 128) deletes all Best Shot user setups. 1. In the REC mode, press [MENU]. 2. Select the “REC” tab, select “REC Mode”, and then press [ ]. 3.
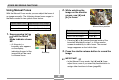
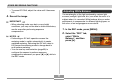
OTHER RECORDING FUNCTIONS Combining Shots of Two People into a Single Image (Coupling Shot) • Combined Images The Coupling Shot mode lets you record images of two people and combine them into a single image. This makes it possible for you to include yourself in group images, even when there is no one else around to record the image for you. Coupling Shot is available in the Best Shot mode (page 73).
OTHER RECORDING FUNCTIONS 5. Align the focus frame on the monitor screen with the subject you want on the left side of the image, and then press the shutter release button to record the image. 6. Next, align the focus frame with the subject you want in the right side of the image, taking care to align the actual background with the semi-transparent image of the background of the first image, which is shown on the monitor screen. When everything is aligned correctly, record the image.
OTHER RECORDING FUNCTIONS • Freeze the background on the monitor screen. Recording a Subject onto an Existing Background Image (Pre-shot) Pre-shot helps you get the background you want, even if you need to ask someone else to record the image for you. Basically, Pre-shot is a two-step process. 1. You compose the background you want and press the shutter release button, which causes a semi-transparent image of the background to remain on the monitor screen. 2.
OTHER RECORDING FUNCTIONS 1. In the REC mode, press [MENU]. 6. Next, align the focus frame with the subject, composing the subject with the semi-transparent background shown on the monitor screen. When everything is aligned correctly, record the image. 2. Select the “REC” tab, select “REC Mode”, and then press [ ]. 3. Use [ ] and [ ] to select “ (Best Shot)”, and then press [SET]. 4. Use [ ] and [ ] to select “Pre-shot”, and then press [SET]. 5. Freeze the background on the monitor screen.
OTHER RECORDING FUNCTIONS 3. Use [ ] and [ ] to Using the Movie Mode You can record movies up to 30 seconds long. (Movie), and select then press [SET]. • File Format: AVI AVI format conforms to the Motion JPEG format promoted by the Open DML Group. • “Remaining capacity” shows how many 30second movies can still be recorded to memory. Remaining capacity • Image Size: 320 x 240 pixels • Movie File Size: Approximately 150KB/second.
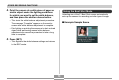
OTHER RECORDING FUNCTIONS • The remaining recording time value counts down on the monitor screen as you record. Using the Histogram You can use the [DISP] button to display a histogram on the monitor screen. The histogram lets you check exposure conditions as you record images (page 31). You can also display the histogram of a recorded image in the PLAY mode. 5. When movie recording is complete, the movie file is stored in file memory.
OTHER RECORDING FUNCTIONS • When the histogram is too far to the left, it means that there are too many dark pixels. This type of histogram results when the overall image is dark. A histogram that is too far to the left may result in “black out” of the dark areas of an image. IMPORTANT! • Note that the above histograms are shown for illustrative purposes only. You may not be able to achieve exactly the same shapes for particular subjects.
OTHER RECORDING FUNCTIONS Specifying ISO Sensitivity REC Mode Camera Settings Use the following procedure to select the ISO sensitivity setting that suits the type of image you are recording. The following are the settings you can make before recording an image using a REC mode. • • • • • • • • • • • ISO sensitivity Metering Color filtering Saturation Contrast Sharpness Grid on/off Image Review on/off L/R key setting Power on default settings Resetting the camera 1. In the REC mode, press [MENU]. 2.
OTHER RECORDING FUNCTIONS Center weighted (Center-weighted): Center-weighted metering measures light concentrating on the center of the focus area. Use this metering method when you want to exert some control over exposure, without leaving settings totally up to the camera. Selecting the Metering Mode Use the following procedure to specify multi-pattern metering, spot metering, or center-weighted metering as the metering mode. 1. In the REC mode, press [MENU].
OTHER RECORDING FUNCTIONS Using the Filter Function Specifying Color Saturation The camera’s filter function lets you alter the tint of an image when you record it. Use the following procedure to control the intensity of the image you are recording. 1. In the REC mode, press [MENU]. 1. In the REC mode, press [MENU]. 2. Select the “REC” tab, select “Filter”, and then 2. Select the “REC” tab, select “Saturation”, and press [ ]. then press [ ]. 3. Select the setting you want, and then press 3.
OTHER RECORDING FUNCTIONS Specifying Contrast Specifying Outline Sharpness Use this procedure to adjust the relative difference between the light areas and dark areas of the image you are recording. Use the following procedure to control the sharpness of image outlines. 1. In the REC mode, press [MENU]. 1. In the REC mode, press [MENU]. 2. Select the “REC” tab, select “Sharpness”, and 2. Select the “REC” tab, select “Contrast”, and then press [ ]. then press [ ]. 3.
OTHER RECORDING FUNCTIONS Turning the On-screen Grid On and Off Turning Image Review On and Off You can display gridlines on the monitor screen to help you compose images and ensure that the camera is straight when recording. Image review displays an image on the monitor screen as soon as you record it. Use the following procedure to turn image review on and off. 1. In the REC mode, press [MENU]. 2. Select the “REC” tab, select “Review”, and then press [ ]. 3.
OTHER RECORDING FUNCTIONS Assigning Functions to the [ ] and [ ] Keys A “key customization” feature lets you configure the [ ] and [ ] keys so they change camera settings whenever they are pressed in the REC mode. After you configure the [ ] and [ ] keys, you can change the setting assigned to them without going through the menu screen. 1. In the REC mode, press [MENU]. 2. Select the “REC” tab, select “L/R Key”, and then press [ ]. 3. Use [ ] and [ ] to select the setting you want, and then press [SET].
OTHER RECORDING FUNCTIONS Specifying Power On Default Settings Function On REC Mode The camera’s “mode memory” feature lets you specify the power on default settings individually for the REC mode, flash mode, focus mode, white balance mode, ISO sensitivity, AF Area, metering mode, flash intensity, digital zoom mode, and manual focus position.
OTHER RECORDING FUNCTIONS 1. In the REC mode, press [MENU]. Resetting the Camera 2. Select the “Memory” tab, select the item you Use the following procedure to reset all of the camera’s settings to their initial defaults as shown under “Menu Reference” on page 162. want to change, and then press [ ]. 3. Use [ ] and [ ] to select the setting you 1. In the REC mode or the PLAY mode, press want, and then press [SET]. [MENU].