
user manual
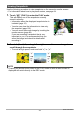

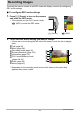

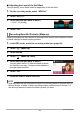
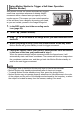
Table Of Contents
- Accessories
- Read this first!
- Contents
- General Guide
- Monitor Screen Contents
- Quick Start Basics
- What you can do with your CASIO camera
- Changing the Camera Style to Suit Shooting Conditions
- Using the Touch Panel
- First, charge the battery prior to use.
- Configuring Basic Settings the First Time You Turn On the Camera
- Preparing a Memory Card
- Turning Power On and Off
- To Shoot a Snapshot
- Viewing Snapshots
- Deleting Snapshots and Movies
- Snapshot Shooting Precautions
- Recording Images
- Using BEST SHOT
- Shooting Clearer Snapshots (Multi SR Zoom)
- Digitally Correcting for Overexposure and Underexposure (HDR)
- Shooting with High Speed Night Scene (High Speed Night Scene)
- Shooting with High Speed Anti Shake (High Speed Anti Shake)
- Shooting with Priority on Subject Faces (High Speed Best Selection)
- Shooting a Panorama Image (Slide Panorama)
- Advanced Recording Settings
- Using the REC Menu
- Using Touch Shutter (Touch Shutter)
- Using the Self-timer (Self-timer)
- Using the LED Light (LED)
- Changing the Image Size (Image Size)
- Movie Image Quality Settings (Movie Quality)
- Correcting Image Brightness (EV Shift)
- Adjusting White Balance (White Balance)
- Specifying ISO Sensitivity (ISO)
- Selecting a Focus Mode (Focus)
- Turning on Image Review (Review)
- Using the REC Menu
- Viewing Snapshots and Movies
- Other Playback Functions (PLAY)
- Printing
- Using the Camera with a Computer
- Other Settings (Set Up)
- Adjusting Monitor Screen Brightness (Screen)
- Turning off Eye-Fi Card Communication (Eye-Fi)
- Configuring Camera Sound Settings (Sounds)
- Time Stamping Snapshots (Timestamp)
- Configuring World Time Settings (World Time)
- Setting the Camera’s Clock (Adjust)
- Specifying the Date Style (Date Style)
- Specifying the Display Language (Language)
- Calibrating the Touch Panel (Calibrate TP)
- Selecting the HDMI Terminal Output Method (HDMI)
- Formatting Built-in Memory or a Memory Card (Format)
- Resetting the Camera to Factory Defaults (Reset)
- Configuring Monitor Screen Settings
- Appendix
35
Recording Images
Recording Images
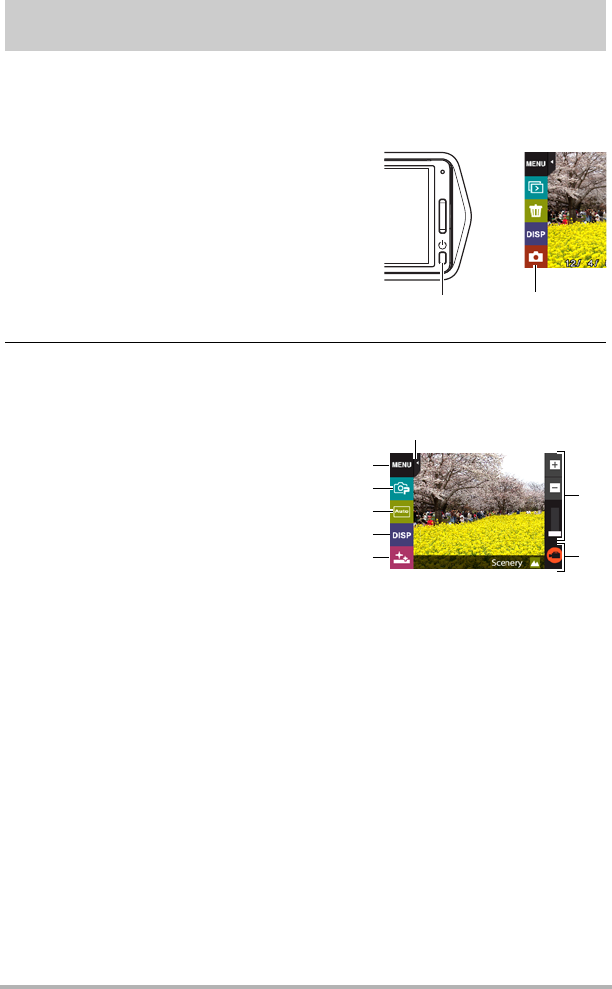
Touching the monitor screen in the REC mode will display a screen for configuring
REC mode settings.
. To configure REC mode settings
2. Touch the item whose setting you want to change.
• If there are no icons along the left side of the screen, touch the tab to display
them.
1. Press [p] (Power) to turn on the camera
and enter the REC mode.
• If the camera is in the PLAY mode, touch
“
r” (REC) to enter the REC mode.
1
Tab (page 28)
2
Menu (page 54)*
3
Recording mode (page 36)
4
Screen orientation (page 102)
5
Information (page 102)
6
PLAY mode/Make-up Level
(pages 28, 38)
7
Zoom (page 40)
8
Movie (page 43)
* Depending on the recording mode, some of the items on the menu that
appears may not be usable.
[p] (Power)
“r” (REC)
1
2
3
4
5
6
7
8