
user manual
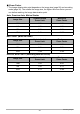
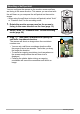
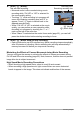

Table Of Contents
- Accessories
- Read this first!
- Contents
- General Guide
- Monitor Screen Contents
- Quick Start Basics
- What you can do with your CASIO camera
- Changing the Camera Style to Suit Shooting Conditions
- Using the Touch Panel
- First, charge the battery prior to use.
- Configuring Basic Settings the First Time You Turn On the Camera
- Preparing a Memory Card
- Turning Power On and Off
- To Shoot a Snapshot
- Viewing Snapshots
- Deleting Snapshots and Movies
- Snapshot Shooting Precautions
- Recording Images
- Using BEST SHOT
- Shooting Clearer Snapshots (Multi SR Zoom)
- Digitally Correcting for Overexposure and Underexposure (HDR)
- Shooting with High Speed Night Scene (High Speed Night Scene)
- Shooting with High Speed Anti Shake (High Speed Anti Shake)
- Shooting with Priority on Subject Faces (High Speed Best Selection)
- Shooting a Panorama Image (Slide Panorama)
- Advanced Recording Settings
- Using the REC Menu
- Using Touch Shutter (Touch Shutter)
- Using the Self-timer (Self-timer)
- Using the LED Light (LED)
- Changing the Image Size (Image Size)
- Movie Image Quality Settings (Movie Quality)
- Correcting Image Brightness (EV Shift)
- Adjusting White Balance (White Balance)
- Specifying ISO Sensitivity (ISO)
- Selecting a Focus Mode (Focus)
- Turning on Image Review (Review)
- Using the REC Menu
- Viewing Snapshots and Movies
- Other Playback Functions (PLAY)
- Printing
- Using the Camera with a Computer
- Other Settings (Set Up)
- Adjusting Monitor Screen Brightness (Screen)
- Turning off Eye-Fi Card Communication (Eye-Fi)
- Configuring Camera Sound Settings (Sounds)
- Time Stamping Snapshots (Timestamp)
- Configuring World Time Settings (World Time)
- Setting the Camera’s Clock (Adjust)
- Specifying the Date Style (Date Style)
- Specifying the Display Language (Language)
- Calibrating the Touch Panel (Calibrate TP)
- Selecting the HDMI Terminal Output Method (HDMI)
- Formatting Built-in Memory or a Memory Card (Format)
- Resetting the Camera to Factory Defaults (Reset)
- Configuring Monitor Screen Settings
- Appendix

47
Using BEST SHOT
Multi SR Zoom uses super-resolution technology and multiple Continuous Shutter
(CS) images for higher quality and clarity across the entire image. For information
about the zoom factor, see page 41.
• When shooting with Multi SR Zoom, the camera may require more time for image
data processing between shots.
1. In the REC mode, touch “b” (BEST SHOT).
2. Touch “Multi SR Zoom” scene.
3. Press the shutter button to shoot.
• After you press the shutter button, the message “Busy... Please wait...” will
appear on the monitor screen to indicate that recording is in progress. Keep the
camera still while this message is displayed. The recording process takes
some time to complete after the message appears. Image shooting is disabled
while the message is displayed.
NOTE
• Multi SR Zoom is effective when you want to capture delicate textures.
• With this BEST SHOT scene, the LED light setting automatically becomes off.
• Shooting with this BEST SHOT scene makes the shooting range narrower than
normal.
• The desired Multi SR Zoom effect may not be attained if the camera or subject
moves during shooting.
• Depending on shooting conditions and image composition, this BEST SHOT scene
may not be able to produce the desired result.
Shooting Clearer Snapshots (Multi SR Zoom)