DATA PROJECTOR XJ-A135/XJ-A145/XJ-A155/ XJ-A245/XJ-A255 E Data Projector USB Function Guide Be sure to read the precautions in the separate User’s Guide (Basic Operations). For details about setting up the Data Projector, see the User’s Guide (Basic Operations). Be sure to keep all user documentation handy for future reference. Microsoft, Windows, Windows Vista and PowerPoint are registered trademarks or trademarks of Microsoft Corporation in the United States and other countries.
Contents About this manual... ........................................................ 4 Terms and Conventions............................................................................................... 4 About the Data Projector’s USB Functions .................. 5 Connecting a USB Device to the Data Projector ......... 7 Installing the Software.................................................... 8 Minimum System Requirements..............................................................................
Performing a Presentation Using the YC-400/YC-430 Document Camera............................. 39 YC Camera Application Function and Operation Overview .................39 Connecting the Document Camera to the Data Projector......................................... 39 YC Camera Application Operations .....................................................42 YC Camera Application Projection Operations .........................................................
About this manual... This manual explains function and operations when any one of the following devices is connected to the USB port of the CASIO Data Projector. USB memory device CASIO Multi Projection Camera (YC-400/YC-430) CASIO Graphing Calculator (fx-9860G Series) Note Use of a memory device (page 5) requires separate purchase of commercially available USB memory or other memory.
About the Data Projector’s USB Functions The USB port that is built into the Data Projector lets you connect an external USB device and use it as an input source for image projection. USB Memory Device or Memory Card After you connect a memory device to the Data Projector’s USB port, you can playback (project) the following types of files. ECA files (special projector presentation files) The EZ-Converter FA software that comes with the Data Projector can be used to convert PowerPoint files to ECA (.
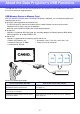
Document Camera (CASIO YC-400/YC-430) You can connect a CASIO Document Camera to the Data Projector’s USB port and project the images of documents placed on the document stage of the YC-400/YC-430. YC-400/YC-430 USB For more information, see “Performing a Presentation Using the YC-400/YC-430 Document Camera” on page 39.
Connecting a USB Device to the Data Projector What happens when you connect a USB device while the Data Projector is turned on depends on the current configuration of the Data Projector’s plug-and-play setting. Plug-and-play is enabled under the Data Projector’s initial default settings. For more details about the plug-and-play setting, see “Setup Menu Contents” in the User’s Guide.
Installing the Software The following USB expansion function software is included on the CD-ROM that comes with the projector. Software Name Description EZ-Converter FA Software for converting a PowerPoint file to an ECA file that can be played back on the projector. ArcSoft MediaConverter 3 for CASIO Projector Software for converting movie files. Multi Projection Camera Update Software Software for updating the firmware of the YC-400 Multi Projection Camera.
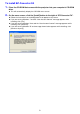
To install EZ-Converter FA 1. Place the CD-ROM that comes with the projector into your computer’s CD-ROM drive. This will automatically display the CD-ROM menu screen. 2. On the menu screen, click the [Install] button to the right of “EZ-Converter FA”. Follow the instructions on the dialog boxes that appear on the screen. If you are running Windows 7 and the “User Account Control” message appears while installing, click [Yes].
To install ArcSoft MediaConverter 3 for CASIO Projector 1. Place the CD-ROM that comes with the projector into your computer’s CD-ROM drive. This will automatically display the CD-ROM menu screen. 2. On the menu screen, click the [Install] button to the right of “ArcSoft MediaConverter 3 for CASIO Projector”. Follow the instructions on the dialog boxes that appear on the screen. If you are running Windows 7 and the “User Account Control” message appears while installing, click [Yes].
Installing Multi Projection Camera Update Software A YC-400 Multi Projection Camera can be connected to the Data Projector only if it is running firmware version 1.1 or higher. For information about how to check the firmware version of a camera, see the file named “YC-Update_Guide_English.pdf” in the “English” folder inside the “User’s Guide” folder on the CD-ROM that comes with the projector. To install Multi Projection Camera Update Software 1.
Projecting the Contents of Files on a Memory Device This section explains how to perform the following operations. How to use EZ-Converter FA computer software to convert PowerPoint files to files that can be played back with the Data Projector’s Viewer function. How to project the contents of files stored on a memory devices with the Data Projector’s Viewer function. Viewer is one of the Data Projector’s built-in applications.
Starting Up and Exiting EZ-Converter FA To start up EZ-Converter FA Perform either of the following operations to start up EZ-Converter FA on the computer. Double-click the icon on your Windows desktop. On your computer’s Windows Start menu, select [All Programs] - [CASIO] - [EZ-Converter FA]. Important! If your computer is running Windows Vista or Windows 7, starting up EZ-Converter FA will cause the “User Account Control” message to appear. When it does, click [Allow].
Converting a PowerPoint File to an ECA File Important! Before performing any of the operations here, you will need to have a file created using Microsoft Office PowerPoint 2003 or 2007 on hand. Conversion of a PowerPoint file to an ECA file requires playback of the original file from beginning to end. Note that the time required for conversion will roughly correspond to the time required for playback.
6. Select the PowerPoint file you want to convert from and then click the [Open] button. This will display a dialog box like the one shown below for specifying the ECA file settings. 7. Configure the settings as required on the dialog box. The following describes the meanings and settings of each of the items that appear on the dialog box. Dialog Box Item 8. Shows the name of the PowerPoint file selected in step 6. The setting of this item cannot be changed.
To specify the screen resolution of the ECA file 1. Right-click the left side of the EZ-Converter FA window. 2. On the menu that appears, click “Output Resolution”. 3. On the sub-menu that appears, select the resolution you want. The following shows the resolution settings that should be used for each Data Projector model. Model Resolution XJ-A135, XJ-A145, XJ-A155 1024 × 768 XJ-A245, XJ-A255 1280 × 800 Your computer may not support the 1280 × 800 option, depending on its display resolution.
5. Click the button to start playback. This will display a control panel at the top of the screen. Control panel During file playback, you can use the control panel buttons to perform the operations described below. To do this: Perform this operation: Go to the previous page Click the button. Go to the next page Click the button. Stop playback Click the button. Jump to a specific page 1. Click the button and then click “Slide Viewer” on the menu that appears. 2.
Using Viewer to Project the Contents of a File on a Memory Device Use the Data Projector’s Viewer application to project the contents of a file on a memory device. Viewer starts up automatically whenever you connect a memory device that is supported by the Data Projector into the Data Projector’s USB port. Connecting a Memory Device to the Data Projector The Data Projector’s USB port supports connection of a FAT/FAT32 format memory device supported by the USB interface.
To connect a memory card to the Data Projector 1. Connect a USB card reader that supports the memory card you are using to the Data Projector’s USB port. 2. Load the memory card into the USB card reader’s card slot. For details about how to load a memory card into the USB card reader, see the user documentation that comes with the reader. To connect a digital camera to the Data Projector 1. If necessary, configure the digital camera’s USB mass storage class setting. 2.
Starting Projection with Viewer If the Data Projector is turned on and you are performing the procedure under “Connecting a Memory Device to the Data Projector” (page 18) to connect USB memory to the Data Projector will cause the main Viewer window shown below to be projected. Menu Item Function Refer to: Presentation Enters the Presentation Mode for projection of ECA files.
Drive Menu Entering the Presentation Mode, Slide Mode, or Movie Mode while there are multiple memory devices connected to the Data Projector (multiple USB memory devices connected via a USB hub, multiple memory cards loaded in the memory card reader connected to the Data Projector, etc.) will cause a menu like the one shown below to appear on the projection screen. When this happens, use the cursor keys to move the highlighting to the drive you want to use and then press the [ENTER] key.
Projecting an ECA (Presentation) File Use the Viewer Presentation Mode to project ECA files. To project an ECA file 1. Connect the memory device where the ECA file you want to project is stored to the Data Projector. This will project the main Viewer window. If the main Viewer window does not appear, press the [INPUT] key and select “Viewer” as the input source. 2. Use the cursor keys to move the highlighting to “Presentation” and then press the [ENTER] key.
Operations during ECA File Projection The operations described below can be performed while an ECA file is playing. To do this: Go to the previous page Perform this operation: Press the [] key. Go to the next page Press the [] key. Pause ECA file playback 1. Press the [FUNC] key. 2. On the function menu that appears, use the cursor keys to move the highlighting to “Pause” and then press the [ENTER] key. Jump to a specific page 1. Press the [O] key to display a page menu. 2.
Page Menu Operations Pressing the [O] key while an ECA file is being played will project a page menu like the one shown below. The operations described below can be performed while the page menu is being projected. To do this: Re-start file playback from a particular page Perform this operation: Use the cursor keys to move the highlighting to the thumbnail of the page where you want to start playback of the presentation and then press the [ENTER] key. Scroll to the next screen Press the [Z] key.
Projecting an Image File Use the Viewer Slide Mode to project image files. You can also group image files and project them in a specific sequence as a slideshow. To project an image file 1. Connect the memory device where the image file you want to project is stored to the Data Projector. This will project the main Viewer window. If the main Viewer window does not appear, press the [INPUT] key and select “Viewer” as the input source. 2.
Projecting a Slideshow The Data Projector’s Slide Mode lets you group multiple image files and project them in sequence as a slideshow. You can select either manual playback or auto playback for slideshow image display. The initial default setting is manual playback. To prepare image files for slideshow play Note the following points when preparing your slideshow on your computer. All of the image files in the slideshow must be in the same folder.
6. Perform the operations described below as required. To do this: Perform this operation: Scroll back to the previous image Press the [] key. Scroll forward to the next image Press the [] key. Pause the slideshow (This option is available only when “Auto” is specified for the “Image Switching” setting on the setup menu.) 1. Press the [FUNC] key. 2. On the function menu that appears, use the cursor keys to move the highlighting to “Pause” and then press the [ENTER] key.
To project a movie file 1. Connect the memory device where the movie file you want to project is stored to the Data Projector. This will project the main Viewer window. If the main Viewer window does not appear, press the [INPUT] key and select “Viewer” as the input source. 2. Use the cursor keys to move the highlighting to “Movie” and then press the [ENTER] key. This will project a file menu like the one shown below.
Operations during Movie File Projection The operations described below can be performed while a movie file is playing or paused. To do this: Perform this operation: Pause and resume movie playback Press the [ENTER] key. A pause icon ( ) is displayed in the upper left corner of the projection screen while movie projection is paused. Re-play the file from the beginning 1. Press the [FUNC] key. 2.
3. Perform the operations described below as required. To do this: Press this key: Quit a fast forward or fast reverse operation and resume normal playback [ENTER] Toggle display of the playback time between show and hide [O] Stop playback and return to the file menu [ESC] File Menu Operations This section explains operations you can perform while the file list is displayed in the Presentation, Slide, or Movie Mode.
To toggle the file menu between the list view and icon view Press the [FUNC] key and then the [ENTER] key. Note You can specify either the list view or icon view as the default view. For more information, see “Configuring Viewer Settings” on page 33. To scroll the file menu Press the [Z] key to scroll forward, and the [f] key to scroll back. To open a folder Use the cursor keys to move the highlighting to the folder you want to open and then press the [ENTER] key.
To view file properties 1. Display the file menu list view. 2. Use the [] and [] keys to move the highlighting to the file whose properties you want to view. A thumbnail and the properties of the currently highlighted file will appear on the left side of the file menu. Thumbnail Properties The following explains the information that appears in file properties.
To return to the main Viewer window 1. Press the [FUNC] key. 2. On the function menu that appears, use the cursor keys to move the highlighting to “Back to Viewer Selection” and then press the [ENTER] key. Configuring Viewer Settings You can use the Viewer setup menu to configure the Viewer function settings described below. The initial default setting for each item is indicated by an asterisk (*).
To display the Viewer setup menu Perform either of the following operations. Operation 1 1. Project the main Viewer window. If you are playing a file in the Presentation, Slide, or Movie Mode, pause playback and return to the file menu. Next, press [FUNC], then [], then [ENTER]. 2. Use the cursor keys to move the highlighting to “Viewer Setup” and then press the [ENTER] key. Operation 2 1. While the Viewer is being projected, press the [MENU] key.
To configure Viewer settings 1. Display the Viewer setup menu. 2. Use the [] and [] keys to move the highlighting to the item whose setting you want to change. 3. Use the [] and [] keys to display the available settings. 4. After configuring all the settings you want, press the [ESC] key (or press the [FUNC] key and then the [ENTER] key). This will return to the main Viewer window. To return Viewer settings to their initial defaults 1. Display the Viewer setup menu. 2.
Viewer Troubleshooting Refer to the following whenever Viewer operations are not what you expect. Memory Devices Problem Cause and Required Action Viewer does not appear when I connect USB memory to the Data Projector’s USB port. The USB memory you are connecting may have a format that cannot be recognized by the Data Projector. Connect the USB memory to your computer to check if its file system is FAT or FAT32. If it isn’t, reformat the USB memory to FAT or FAT32.
File Display and Playback Problem Cause and Required Action ECA files converted from PowerPoint files using EZ-Converter FA do not appear in the file menu. Viewer may be in a mode other than the Presentation Mode. To enter the Presentation Mode, highlight “Presentation” on the main Viewer window (page 20) and then press the [ENTER] key. Image files do not appear in the file menu. Viewer may be in a mode other than the Slide Mode.
Viewer Error Messages Problem Cause and Required Action Folder does not contain any image files. There is no displayable folder, ECA file, image file, or movie file in the folder you are trying to access with Viewer. Use your computer to check the contents of the folder. For details about file formats supported for Data Projector playback, see “About the Data Projector’s USB Functions” (page 5). This ECA file cannot be played back. There may be an error in the ECA file itself.
Performing a Presentation Using the YC-400/YC-430 Document Camera This section explains how to connect the CASIO YC-400/YC-430 Multi Projection Camera (document camera) to the Data Projector in order to project the images of documents placed on the document stage of the document camera. The Data Projector’s built-in application named YC Camera is used to project document images. Important! A YC-400 document camera can be connected to the Data Projector only if it is running firmware version 1.1 or higher.
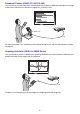
To connect the document camera to the Data Projector and project the image of a document 1. Turn on the Data Projector. Wait until the Data Projector’s POWER/STANDBY indicator is lit green. 2. Connect the document camera to the Data Projector using the USB cable that comes bundled with the document camera. YC-400/YC-430 Camera Camera stand USB cable Document stage 3. With nothing on the document stage, press the [P] (power) button on the camera stand.
4. Place the document whose image you want to project onto the document camera’s document stage. Be sure to place the document in the center of the stage, and do not let any part of the document extend off the edges of the stage. When placing a landscape orientation document onto the document stage, the top of the page should face towards the camera stand. Initially the monitor image will be projected, and so the image will appear a bit fuzzy.
YC Camera Application Operations This section explains the various types of projection operations you can perform with the YC Camera application and how to configure YC Camera application settings. Important! The procedures in this section assume that you have already connected the Document Camera to the Data Projector as explained under “Connecting the Document Camera to the Data Projector” (page 39), and that the Data Projector’s YC Camera application is running.
To adjust the document camera’s zoom setting 1. Press the [FUNC] key to display the YC Camera application function menu. 2. Use the [] key to move the highlighting to “Camera Zoom/Focus” and then press the [ENTER] key. This causes the YC Camera Zoom/Focus dialog box to appear in the projection area. The “Optical Zoom” item should be highlighted by default. 3. Use the [] and [] keys to adjust the document camera’s zoom setting. 4. After the zoom setting is the way you want, press the [ESC] key.
To adjust the camera position 1. Remove all documents and objects from the document stage. 2. Press the [FUNC] key to display the YC Camera application function menu. 3. Use the [] key to move the highlighting to “Adjust Camera Position” and then press the [ENTER] key. This displays the camera position adjustment dialog box. 4. Point the document camera downwards so the lens is pointed towards the document stage. Aim the camera as instructed by the text that appears in the projection area.
To perform white enhancement on the currently projected image Note White enhancement causes the background of the projected image to be white enhanced, which helps to make the text on a document easier to read. This operation will affect only the image that is currently being projected. The projection image produced the next time you release the shutter will be projected in accordance with the settings on the YC Camera Application Setup Menu (page 46).
Configuring YC Camera Application Setup Menu Settings You can use the YC Camera setup menu to configure various YC Camera application operation settings. To configure YC Camera application setup menu settings 1. Press the [MENU] key to display the setup menu. 2. Press the [] key to move the highlighting to “USB” and then press the [ENTER] key. 3. Press the [] key once to move the highlighting to “Setup” and then press the [ENTER] key. This will display the YC Camera application setup menu. 4.
To restore all settings on the YC Camera application setup menu to their initial factory defaults 1. Press the [MENU] key to display the setup menu. 2. Press the [] key to move the highlighting to “USB” and then press the [ENTER] key. 3. Press the [] key once to move the highlighting to “Setup” and then press the [ENTER] key. This will display the YC Camera application setup menu. 4. Press the [] key to move the highlighting to “Initialize YC Camera Setup” and then press the [ENTER] key.
YC Camera Application Setup Menu Contents This section provides detailed explanations of all of the items included on the YC Camera application setup menu. The initial default setting for each item is indicated by an asterisk (*). Setting Name Description Operation Mode Specifies whether recording of documents placed on the document stage of the document camera should be performed automatically or manually.
Setting Name Description Skew Correction Specifies whether or not skew correction should be performed automatically on the projected image. On*: Turns on automatic skew correction. Off: Turns off automatic skew correction. Project Document Monitor Image Specifies whether or not the camera’s monitor image should be projected when a document is removed from the document stage. On*: Displays the monitor image. Off: Does not display the monitor image.
Projecting the Screen Image of a Graphing Calculator You can connect a CASIO graphing calculator to the Data Projector using a USB cable and project the calculator’s screen image with the Data Projector. USB connection of the following CASIO graphing calculators is supported. fx-9860G Series To project the screen image of a graphing calculator 1. Set the graphing calculator up for data communication. Enter the LINK Mode, and configure the “Wakeup” and “Capture” settings as shown below.
MA0912-A