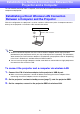
EN DATA PROJECTOR Network Function Guide Be sure to read the “Safety Precautions” and “Operating Precautions” in the “User’s Guide”, and make sure you use this product correctly. Keep this manual in a safe place for future reference. For information about the projector models covered by this manual and for the latest updates, visit the CASIO website below. https://world.casio.com/manual/projector/ The contents of this manual are subject to change without notice.
Contents Environment Setup Guide Establishing a Network Connection Between the Projector and a Computer.............................................. 6 Establishing a Direct Wireless LAN Connection Between a Computer and the Projector...................................................................6 To connect the projector and a computer via wireless LAN........................................ 6 To display the projector’s network standby screen ....................................................
Projector Setting Items.........................................................................23 Login Settings ............................................................................................................ 23 Network Settings ....................................................................................................... 24 System Settings......................................................................................................... 30 Update ...............................
Differences in Functions Provided by the Chrome OS Version of C-Connection .......................................................................................48 Advanced Operations ................................................... 49 Using the Moderator Function .............................................................49 To use a computer to control projection from multiple terminals .............................. 49 To use the remote controller to control projection from multiple terminals .....
Environment Setup Guide The contents of this Environment Setup Guide are intended mainly for network administrators. It contains information about preparing an environment that enables network projection by the projector. This Environment Setup Guide covers the topics below.
Establishing a Network Connection Between the Projector and a Computer To start network projection from a computer, there must be a network connection between the computer and projector. Establishing a Direct Wireless LAN Connection Between a Computer and the Projector With this configuration, the projector is used as a wireless LAN access point. A computer connects directly to the projector via a wireless LAN network connection.
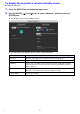
To display the projector’s network standby screen Projector Operation 1. Press the [INPUT] key to display the input menu. 2. Use the [INPUT], [], and [] keys to select “Network”, and then press the [ENTER] key. This displays the network standby screen. The information that appears on the screen is explained below.
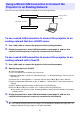
Using a Wired LAN Connection to Connect the Projector to an Existing Network You can use a LAN cable to connect the projector to an existing network. Existing network Router LAN connection Wired LAN connection Projector To use a wired LAN connection to connect the projector to an existing network that has a DHCP server 1. Use a LAN cable to connect the projector to the existing network. 2.
To display the projector’s wired LAN information screen Projector Operation 1. Press the [MENU] key to display the setup menu. 2. Select the following in sequence: “Network Settings” 3 “Wired LAN info”. Next, press the [ENTER] key. This displays the Wired LAN info screen. The information that appears on the screen is explained below.
Connecting the Projector to an Existing Wireless LAN Access Point Use the procedure in this section to connect the projector to an operating wireless LAN access point. Wireless LAN access point Existing network LAN connection Wireless LAN connection Projector To connect the projector to a wireless LAN access point 1. Perform steps 1 through 3 under “To connect the projector and a computer via wireless LAN” (page 6). Use the computer connected via wireless LAN to configure projector settings. 2.
Note Perform the operation below when connecting the projector to an existing network that is a fixed IP environment. (1) In the sidebar click “Network Settings” (the lower one). (2) Select the “LAN1 IP Settings (Auto if not checked)” check box. (3) Input the applicable information for the “IP Address”, “Subnet Mask”, “Default Gateway”, and “DNS Server” settings. 6. Click the [Save changes] button. In response to the restart dialog box that appears, click the [Reboot now] button.
To display the projector’s wireless LAN information screen Projector Operation 1. Press the [MENU] key to display the setup menu. 2. Select the following in sequence: “Network Settings” 3 “Wireless LAN Info”. Next, press the [ENTER] key. This displays the Wireless LAN Info screen. The information that appears on the screen is explained below.
Using the Projector as a NAT Router (Simultaneous Use of Wireless LAN and Wired LAN) The projector can be connected to an existing network via a wired LAN while it is simultaneously connected to one or more terminals (computers and/or smart devices) via a wireless LAN connection. In this configuration, the projector functions as a NAT router, which is capable of wireless LAN side and wired LAN side data communication.
To connect a computer to the projector via wireless LAN, and to connect the projector to an existing network at the same time 1. Perform steps 1 through 3 under “To connect the projector and a computer via wireless LAN” (page 6). 2. Use a LAN cable to connect the projector to the existing network.
Using the Remote Controller to Configure Projector Network Settings You can configure basic projector network settings with the projector’s remote controller by using the Setup Menu that appears on the projection screen. Note To configure more advanced network settings, use the projector’s Web Service page (page 18). The operations below can be performed using only the projector’s Setup Menu. For these, there are no corresponding setting items on the projector’s Web Service page.
This menu item: Does this: Network Settings 3 Applies changes to the projector that were made to the menu setting items included in Update Network Settings “Network Settings” 3 “Network Settings”. Network Settings 3 Initialize Network Settings Returns network settings to their factory defaults. To use the projector’s Setup Menu to configure network settings Projector Operation 1. Display the projector’s network standby screen (page 7). 2. Press the [MENU] key to display the setup menu. 3.
To use the projector’s Setup Menu to initialize network settings Note The procedure below can be used to initialize all items included in the “Network Settings” of the projector’s Setup Menu. Though it also initializes most of the items included in “Projector Setup” on the Web Service page (see “Projector Setting Items” on page 23), the current settings of the items below are maintained. Projector name, User List, Crestron Control, Firmware Update 1.
Using a Computer to Configure Projector Network Settings You can use the web browser of a computer to access the projector’s Web Service page in order to configure projector network settings and to perform various other operations. Web Service Page Top Menu Displaying the Web Service page first displays the top menu shown below. [Setup] button 18 Click to access the projector network detailed settings.
To display the Web Service page You can use either of the operations below to display the Web Service page. For this type of connection: Perform this operation: Computer and projector connected to a network*1 1. On the projector’s network standby screen, note the projector’s IP address. 2. Start up the computer’s browser, input the projector’s IP address into the address bar, and then press the computer’s [Enter] key. Connection with the projector from a computer using C-Connection*2 1.
Projector Setup This section explains how to configure detailed projector network settings. To log into the Projector Setup page 1. Use the computer to display the projector’s Web Service page (page 19). 2. On the Web Service page window title bar, click the [Setup] button. 3. Input the password (Initial Default: admin) into the “Password” box, and then click the [Login] button. “admin” will be input automatically as the user name in the “User Name” box. Do not change it.
To configure projector settings 1. Perform steps 1 through 3 under “To log into the Projector Setup page” (page 20). 2. Click a link to display the page whose settings you want to configure or the page whose information you want to view. 3. Click this: To go to this page: For more: Login Settings (sidebar) Login Settings page This page is for configuring settings related to the login code that is used when connecting a computer (or smart device) to the projector over a network.
To change the Web Service page password Important! When connecting the projector to a network, be sure to change the initial default passwords below to passwords you want to use. 1. Perform steps 1 through 3 under “To log into the Projector Setup page” (page 20). 2. In the sidebar, click the following links in sequence: “System Settings” 3 “Change Passwords”. This displays the Change Passwords page.
Projector Setting Items Login Settings Login Settings let you specify the login code for projector connection from C-Connection on a computer or MirrorOp Presenter on a smart device. You can also use it to display connection information on the projection screen. Use this item: To do this: Login Code Options Specify whether or not to require login code input when connecting to the projector from a terminal.* Disable (initial default): Login code input not required. Random: Login code input required.
Network Settings Network Settings include projector wireless LAN settings and IP settings. Wireless LAN Settings This page is for configuring detailed settings related to projector wireless LAN connection. Use this item: To do this: Enable Wireless LAN Switch the projector’s wireless LAN function between enabled and disabled. : Select this option when using the wireless LAN function (initial default). : Select this option when not using the wireless LAN function.
Use this item: To do this: Access Point Mode Bandwidth Select “20MHz” (initial default) or “40MHz” as the wireless LAN channel width. If you selected “B” or “G” for the “Mode” setting, “Bandwidth” will automatically be fixed as “20MHz”. Channel Select “Auto” (initial default) or a channel number from 1 to 11 for the wireless LAN channel. Security Configure wireless LAN communication encryption settings. NONE (initial default): Wireless LAN communication not encrypted.
Use this item: To do this: Client Mode Security Specify the type of encryption used by the external access point being connected with. NONE (initial default): Select this option when connecting with an external access point that does not use encryption. WEP WPA-PSK AES When connecting with an external access point that is WPA2-PSK AES encrypted, select its encryption type.
Network Settings This page is for specifying the projector name and IP address. This projector has two IP addresses, which are described in the table below. These IP addresses need to be specified in accordance with the type of network connection being used. LAN1 IP Address The projector IP address when connecting the projector to an existing network. It corresponds to the IP addresses described below.
Use this item: To do this: LAN1 IP Settings LAN1 IP Settings (Auto if not checked) Specify whether to use a manually specified fixed IP address or an IP address automatically obtained from an external DHCP server when connecting the projector to an existing network. : Fixed IP address : Automatically obtain IP address (initial default). If you are using a fixed IP address, you also need to manually input information for the settings from “IP Address” to “DNS Server” below.
Use this item: To do this: LAN2 IP Settings IP Address Input an IP address of the format below when using the projector as a wireless LAN access point. xxx.xxx.xxx.xxx (Initial Default: 192.168.100.10) DHCP Server Start Address DHCP Server End Address Specify the start and end of the range of IP addresses to be automatically assigned to a computer or smart device connecting to the projector via wireless LAN. Each address must be the format below. xxx.xxx.xxx.xxx (Initial Default: 192.168.100.11 to 192.
System Settings System Settings can be used to view projector system information, and to change login passwords and other settings (Moderator function user list screen display settings, Crestron control settings).
Other Settings This page lets you configure display settings for the Moderator function user list screen and Crestron control settings. Use this item: To do this: User List Show user list thumbnails. Specify whether to show or hide thumbnail images on the user list when using the Moderator function (page 49). : Show thumbnails (initial default). : Hide thumbnails, but show the terminal type. Regardless of what is selected for this setting, the user name is always shown in the user list.
Preparing for C-Connection C-Connection is software that is required to perform network projection of images from a computer. Visit the CASIO website at the URL below to download the software. https://world.casio.com/download/projector/ Important! Before installing C-Connection on the computer you plan to use, first be sure to visit the CASIO website and check the required operating environment, as well as required conditions for download and use of the software.
Network Connection Between a Single Projector and Multiple Computers A C-Connection installer file and One Click Connection file downloaded to a particular computer can be copied to and used by another computer. Distributing these files to other users simplifies the task of connecting multiple computers to the same projector. To use a copied file on other computers, perform the operation under “To project using a One Click Connection file” (page 36) on each of the computers.
To export Favorites data 1. Perform steps 1 and 2 under “To configure C-Connection settings” (page 47). 2. Display the Favorites tab and then click the [Export] button. 3. On the save file dialog box that appears, specify the file name and storage location, and then click the [Save] button. The file name extension is .xml. To import Favorites data Important! Performing the procedure below will replace the current Favorites with the imported data. 1.
Tutorial This section covers projection from a computer connected to the projector over a network, as well as more advanced projector operations performed over a network.
Network Projecting a Computer Screen Image (Using C-Connection) Use C-Connection to perform network projection of a computer screen image. To perform the operations in this section, you must first perform the operations below. C-Connection installed on the computer (page 32). Network connection between a computer and the projector (page 6). Important! Some functions are limited with the Chrome OS version of C-Connection.
Projecting by Selecting a Projector From a List You can select a projector for projection from a list that appears in the C-Connection window. There are two types of list, described below. Favorites List The Favorites List is a list of network projectors that you have specified as ones you often use. You can use the procedure under “To import Favorites data” (page 34) to import the contents of a previously-created Favorites file provided by your network administrator.
4. Move the mouse cursor to the line where the name of the projector you want to connect with is located, and then click the [CONNECT] button. If the “Login code” dialog box appears at this time, input the 4-digit login code shown on the projector’s network standby screen. After connection between C-Connection and the projector is established, a blue check mark ( ) will be shown to the left of the connected projector’s name on the projector list.
Using Manual Projector Search If a projector is not found when you perform the operation under “To project using auto projector search” (page 38), you can perform a search by projector name or IP address. With manual search, you can also connect to projectors that are outside of the subnet where the computer is located. To project by using a projector name or IP address to search for a projector 1.
Simultaneous Projection of Images from Multiple Computers on a Single Projector If you perform a network projection operation with two or more computers projecting on a single projector, projection will be performed using one of the layouts below, depending on how many computers are projecting (when the projection layout setting is “Auto Layout”.). 1 computer 2 computers* 3 computers 4 computers * With XGA model projectors, the two screens will be aligned vertically.
C-Connection Details This section explains operations that are supported by each C-Connection form, along with detailed information about C-Connection operations. C-Connection Windows and Buttons The different forms that C-Connection window can take are shown below. List panel (full) List panel (mini) Info panel Mini panel Normal startup of C-Connection displays the list panel (full).
List Panel (mini) Clicking this button: Does this: Switches to the list panel (full). Switches to the mini panel. List Panel Common Buttons Clicking this button: Does this: Displays a list showing found projectors and Favorite projectors. Displays a Favorites list of projectors (page 37). Re-executes the projector search operation. Searches for a projector based on the name on the currently displayed projector list. × Exits C-Connection.
Mini Panel Clicking this button: Does this: Switches to the info panel. Switches to the list panel (mini). Info Panel and Mini Panel Common Buttons Clicking this button: Does this: Toggles the projection layout between “Auto Layout” and “Full Screen”. For details, see “Simultaneous Projection of Images from Multiple Computers on a Single Projector” (page 40). Starts computer screen projection. Stops computer screen projection.
C-Connection Menu Bar (macOS) The operations described in the table below can be performed using the menu bar of the macOS version C-Connection. Menu This menu item: Does this: C-Connection About Displays C-Connection version information and copyright information. Preferences Displays the Preferences dialog box. For details, see “C-Connection Settings” on page 45. Quit Exits C-Connection. File Close Exits C-Connection. View Discover List Same operation as the (page 42). button.
C-Connection Settings You can configure C-Connection settings and tailor its operation to suit your needs. C-Connection Setting Items General Tab Use this item: To do this: User name Input the user name when using the Moderator function (page 49). The input name is shown on the projector’s user list screen and the computer’s Moderator page.
Advanced Tab Use this item: To do this: Mode Specify whether the computer’s main screen or extended screen should be projected. Duplicate: Main screen projection (initial default) Extend: Extended screen projection For more information, visit the CASIO website below. https://world.casio.com/download/projector/ One Click Connection Specify what operation the computer should perform after connection with a projector using a One Click Connection File (page 32).
Configuring Settings Settings can be configured even if there is no network connection between the computer and projector. To configure C-Connection settings 1. On the computer, start up C-Connection. 2. Display the Preferences dialog box. Windows: (1) Display the info panel or list panel (full). See “C-Connection Windows and Buttons” (page 41). (2) In the upper left corner of the C-Connection window, click select “Preferences”. .
Differences in Functions Provided by the Chrome OS Version of C-Connection The Chrome OS version of C-Connection does not have the functions listed below. One Click Connection (pages 32, 36) Favorites List* (page 37) * The Chrome OS version does not have a separate Favorites List screen. To view projectors you registered as Favorites, display the Auto Search Results List.
Advanced Operations This section explains the advanced operations below, which can be performed using a terminal (computer or smart device) that is connected to the projector over a network.
3. If required, select the “Allow control from this page only.” check box. While this check box is selected, projection start and projection layout settings can be configured on this page only. The only operations that can be performed on a terminal connected to the projector are stopping projection and terminating the connection. While this check box is not selected, all operations can be performed on a terminal connected to the projector. 4. Perform Moderator operations as required.
5. After you are finished, click the [Logout] button in the upper right corner of the window. This will return to the top menu. Note If the “Allow control from this page only.” check box is left selected, logging out from the Moderator page or using a web browser operation to close the Moderator page will re-enable projection operations from each terminal. The next time you log in to the Moderator page, the check box will be selected on the page.
4. Repeat steps 2 and 3 as required. Projection can be performed from as many as four terminals at the same time. 5. To exit the user list screen press the [ESC] key. This will start projection from all terminals for which (projecting) was selected. If the status of all terminals becomes (not projecting), the network standby screen will appear. Projector Remote Projector Remote lets you perform projector operations remotely from a computer. To perform projector operations from a computer 1.
Remotely Controlling a Computer from a Smart Device (PC Remote) The procedures in this section make it possible to use a smart device to remotely control a computer that is connected to the projector with C-Connection. Important! A smart device needs to have MirrorOp Receiver installed on it in order to perform remote operations. Download MirrorOp Receiver from the app store of your device: Google Play store for an AndroidTM device, iTunes App Store for an iOS device.
To exit PC Remote 1. On the smart device being used for remote control, exit MirrorOp Receiver. Execute any one of the operations below to exit PC Remote. – Turn off the projector. – On the computer, exit C-Connection. Template Pattern Customization With Template Pattern Customization, you can add, replace, and delete template images for projection. Important! Do not add template images that include personal information to this projector.
To add or delete a template image 1. Use the computer to display the projector’s Web Service page (page 19). 2. Input the password into the “Template Pattern Customization” box, and then click the [Login] button. The initial default password is: moderator. 3. Click the folder whose content you want to change or check. This displays the template editing page. The contents of the first folder (projector built-in templates) can be browsed only.
To rename a folder Important! When inputting a folder name with the procedure below, keep the name short enough to fit in the folder name box. Inputting a name that completely fills the input box or that does not fit in the input box can cause the end of the name to be cut off when displayed on the template selection screen. 1. Perform steps 1 and 2 of the procedure under “To add or delete a template image” (page 55). 2. Click the folder name box of the folder you want to rename. 3.
Network Administrator Appendix This section contains supplementary information that is mainly intended for network administrators.
Controlling the Projector from an External Network Device This projector supports the external devices and commands below. External Devices and Commands Refer to: All PJLink Class1 (Version 1.00) commands http://pjlink.jbmia.or.jp/english/ Crestron Electronics controller and software (RoomView® Express) commands https://www.crestron.com AMX Device Discovery http://www.amx.com For more information, visit the CASIO website below. https://world.casio.
Ports Used for TCP/UDP C-Connection and MirrorOP Presenter use the network ports shown in the table below for projection functions and PC Remote functions. As required, check to make sure that your network firewall or personal firewall of your environment is configured accordingly. Port Type TCP Port Port No. Network Projection 1234 PC Remote 389 3268 515 8080 18765 UDP Port 5353 54022 1900 18676 PJLink uses the network ports shown in the table below.
DLP is a registered trademark of Texas Instruments of the United States. Microsoft and Windows are registered trademarks or trademarks of Microsoft Corporation in the United States and other countries. HDMI, the HDMI Logo, and High-Definition Multimedia Interface are trademarks or registered trademarks of HDMI Licensing Administrator, Inc. macOS, iTunes are trademarks or registered trademarks of Apple Inc. in the United States and other countries.
MA1909-B