E DATA PROJECTOR XJ-S43W User’s Guide z Be sure to read the precautions in the separate User’s Guide (Basic Operation). For details about setting up the projector and lamp replacement, see the User’s Guide (Basic Operation). z Be sure to keep all user documentation handy for future reference.
• DLP is a registered trademark of Texas Instruments of the United States. • Microsoft, Windows, and Windows Vista are registered trademarks or trademarks of Microsoft Corporation in the United States and other countries. • HDMI, the HDMI Logo and High-Definition Multimedia Interface are trademarks or registered trademarks of HDMI Licensing LLC. • XGA is a registered trademark of IBM Corporation of the United States.
Contents About this manual... .......................................................................................... 5 Projector Overview ......................................................... 6 Projector Features and Main Functions ............................................................ 6 Projector Keys and Remote Controller Keys..................................................... 7 Operation During Projection .......................................... 8 Image Operations During Projection ..
Screen Settings Main Menu ....................................................................................... 27 Input Settings Main Menu .......................................................................................... 29 Option Settings 1 Main Menu..................................................................................... 30 Option Settings 2 Main Menu..................................................................................... 32 Operational Info Main Menu..................
About this manual... z This manual assumes that you are already familiar with the contents of the separate “User’s Guide (Basic Operation)”. z All of the operations in this manual are explained using the remote controller that comes with the projector. The following key operations can also be performed on the projector instead of the remote controller: [MENU], [ ], [ ], [ ], [ ], [ENTER], [ESC], [ ], [INPUT], [AUTO], [ZOOM +], [ZOOM –], [FOCUS ], [FOCUS ].
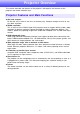
Projector Overview This section describes the features of the projector, and explains the functions of the projector and remote controller keys. Projector Features and Main Functions z Slim and compact: B5 file size and a mere 32 mm slim (at thinnest part). Compact enough to install or use just about anywhere. z WXGA resolution: This is the first of the CASIO Super Slim projector series to support WXGA (1280 × 800) resolution for optimal viewing of content formatted for today’s widescreen displays.
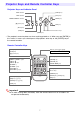
Projector Keys and Remote Controller Keys Projector Keys and Indicator Panel TEMP indicator [FOCUS] key LAMP indicator [Enter] key* POWER/STANDBY indicator [MENU] key [P] (Power) key [ESC] key [INPUT] key Cursor keys [AUTO] key [ZOOM] key * The projector’s enter key does not have anything printed on it. When you see [ENTER] in this manual, it means you should press the projector’s enter key or the [ENTER] key of the remote controller.
Operation During Projection This section explains the various types of operations you can perform while the projector is projecting an image. Image Operations During Projection You can perform the following operations while projecting an image.
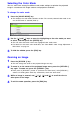
Selecting the Color Mode You can select from among five different color mode settings to optimize the projected image in accordance with image contents and projection conditions. To change the color mode 1 Press the [COLOR MODE] key. 2 Use the [ ] and [ ] keys to move the highlighting to the color mode you want to select, and then press the [ENTER] key. z This displays the color mode selection window. The currently selected color mode is the one whose button is selected (filled in).
Momentarily Cutting Off the Input Source Image 1 Press the [BLANK] key. 2 To resume projection of the image from the input source, press the [BLANK] key (or [ESC] key). z This temporarily cuts off the image from the input source and projects a black screen in its place. Note You can specify projection of a black screen or blue screen, or a logo. For details, see “Blank Screen” under “Screen Settings Main Menu” on page 28. Freezing an Image Pressing the [FREEZE] key freezes the projected image.
Displaying a Pointer in the Projected Image You can select from among different pointer styles, including various arrow styles, for display in the projected image. Pointers can be used during a presentation to indicate or highlight a specific part of the image. Note Depending on the pointer style you are using, the pointer may not display properly when you are using keystone correction. If this happens, use the [KEYSTONE +] and [KEYSTONE –] keys to change the keystone correction value to zero.
Changing the Aspect Ratio of the Projected Image Use the [ASPECT] key to change the aspect ratio of the projected image. When the input source is this: Each press of [ASPECT] cycles through these settings: VIDEO, component, or HDMI (DTV) Normal 16:9 Letter Box When the input source is either a component signal or an HDMI (DTV) signal with an aspect ratio of 16:9, the projection aspect ratio also will become 16:9 automatically. Pressing the [ASPECT] key will not change it.
Adjusting the Volume Level You can use the remote controller keys to adjust the volume level of the audio that is output from the projector’s speaker. To adjust the volume level 1 On the remote controller, press the [VOLUME] key. 2 3 Press the [ ] key to increase the volume, or the [ ] key to lower the volume. z This causes the [Volume] screen to appear on the projected image. After the setting is the way you want, press the [ESC] key. z This causes the [Volume] screen to disappear.
Using the [FUNC] Key Pressing the [FUNC] key displays the menu shown below. You can use this menu to perform the operations described below. z Adjust image brightness Highlight “Brightness” and then press the [ENTER] key. • This performs the same operation as pressing the [BRIGHT] key ( key) described on page 8. z Turn the Eco Mode on or off Highlight “Eco Mode” and then press the [ENTER] key. • This performs the same operation as pressing the [ECO] key ( key) described on page 13.
Configuring Advanced Projector Settings Your projector has a setup menu that you can use to configure advanced settings. Basic Setup Menu Operations Displaying the Setup Menu Pressing the [MENU] key displays the menu shown below in the center of the projection screen. Main menu The main menu includes nine main menu items. The currently selected main menu item is the one that is highlighted. Sub-menu The sub-menu shows each individual setting under each main menu item, and its current setting.
Basic Setup Menu Example The procedure below shows how to configure the following three settings: • Image Adjustment 1 Contrast • Image Adjustment 1 Color Mode • Option Settings 1 Eco Mode Note z Certain settings on the setup menu cannot be changed while there is no input signal to the projector. Because of this, you should configure setup menu settings after selecting an input source and starting projection. z This example covers basic steps only.
To configure the “Image Adjustment 1 Color Mode” setting 5 6 Press the [ ] key once to select “Color Mode”. 7 Use the [ ] and [ ] keys to select the color mode you want, and then press the [ENTER] key. 8 After selecting the color mode you want, press the [ESC] key. Press the [ENTER] key. z This displays the color mode menu. To configure the “Option Settings 1 Eco Mode” setting 9 Press the [ESC] key. 10 Press the [ ] key five times to select “Option Settings 1”. 11 Press the [ENTER] key.
Direct Power On You can configure the projector so it powers up automatically as soon as you plug it into a power source. With this “Direct Power On” feature, you do not even need to press the [P] (power) key. To enable Direct Power On, display the Setup Menu, and then change the “Direct Power On” setting to “On”. Important! z When you have Direct Power On enabled, do not leave the projector plugged into an electrical outlet while it is turned off.
Password Protecting the Projector The password feature lets you keep unauthorized individuals from using the projector. You can specify whether password input is required whenever you turn on the projector, and you can specify and change the password as required. Use the setup menu “Option Settings 1 Power On Password” setting to configure power on password settings.
Keep a written record of your password! You will not be able to use the projector if you forget its password. We strongly suggest that you keep a written or other type of record of the password so you can look it up when necessary. To change the password 1 2 3 Press the [MENU] key to display the setup menu. Use the [ ] key to select “Option Settings 1”, and then press the [ENTER] key. Use the [ ] key to select “Power On Password”, and then press the [ENTER] key.
To turn password protection on and off 1 Display the Power On Password setting screen by performing steps 1 through 5 of the procedure under “To change the password” on page 20. z At this time, make sure that “Power On Password” is selected on the Power On Password setting screen. 2 Use the [W] and [X] keys to select “On” or “Off”. z Changing the power on password setting from “Off” to “On” causes the confirmation dialog box shown below to appear.
Restoring Projector Settings to Their Initial Factory Defaults You can use the procedures in this section to restore all of the settings on a particular main menu or all of the settings on the setup menu to their initial factory defaults. To restore all settings on a particular main menu to their initial factory defaults 1 2 Press the [MENU] key to display the setup menu. Use the [ ] and [ ] keys to select the main menu whose settings you want to restore to their initial factory defaults.
To restore all settings on the setup menu to their initial factory defaults 1 2 Press the [MENU] key to display the setup menu. 3 Use the [ ] key to select “Restore All Defaults” sub-menu, and then press the [ENTER] key. Use the [ ] key to select “Restore All Defaults”, and then press the [ENTER] key. z This displays a confirmation message asking if you want to initialize all settings. 4 5 Use the [ ] key to select “Yes”.
Image Adjustment 1 Main Menu Setting Name Input Setting Unit Brightness RCVHD Source Specific Use this sub-menu to adjust the brightness of the projected image. A larger value produces a brighter image. Contrast RCVHD Source Specific Use this sub-menu to adjust the contrast of the projected image. A larger value produces a stronger contrast. Sharpness RCV Source Specific Use this sub-menu to adjust the sharpness of the outlines in the projected image.
Setting Name Input Setting Unit Description Noise Filter RCV Source Specific This setting is valid when VIDEO is selected as the input source. Normal*: Select this setting when projecting a movie. High: Select this setting when projecting still images. In particular, this setting should be used when projecting still images from a digital camera connected to the projector’s VIDEO terminal.
About the “Signal Specific” Setting Unit For the items that have “Signal Specific” in the “Setting Unit” column of the above table, the setting is saved for the specific type of signal (XGA/60Hz, SXGA/60Hz, etc.) that is being input when the setting is performed, and not for a specific input source. Volume Adjustment Main Menu Note The following menu operations are not supported if no audio is being input to the HDMI port during projection of an HDMI signal.
Screen Settings Main Menu Setting Name Input Setting Unit Description Keystone Correction RCVHDN Single Use this sub-menu to correct vertical keystoning of the projected image. Aspect Ratio RCVHD Source Specific Use this sub-menu to select an aspect ratio setting for the projected image. Normal*: Projects at the projector’s maximum possible size while maintaining the input signal aspect ratio.
Setting Name Input Setting Unit Ceiling Mount RCVHDN Single Use this sub-menu to configure the projector for use in an installation in which it is positioned upside down. On: Flips the projected image horizontally and vertically. Off*: Projects a normal image. Startup Screen RCVHDN Single Use this sub-menu to specify whether or not a startup screen should be projected whenever the projector is turned on. Logo: Select this option to project the projector’s built-in logo screen at startup.
Input Settings Main Menu Setting Name Input Setting Unit Description COMPUTER Terminal RCUVN Single Use this sub-menu to specify manually the type of signal being input from the projector’s COMPUTER terminal. Auto*: Automatically detects the signal being input from the COMPUTER terminal and configures the appropriate input protocol. RGB: Select this option when a computer is connected to the COMPUTER terminal.
Option Settings 1 Main Menu Setting Name Input Setting Unit Description Auto Keystone Correction RCVHDN Single Use this sub-menu to turn auto keystone correction on or off. On*: Select this option to turn on auto keystone correction. Off: Select this option to turn off auto keystone correction. Auto Adjust RCVHDN Single Use this sub-menu to select whether the projector should detect the RGB input signal type (resolution, frequency) and adjust the projection image accordingly (auto adjust).
Setting Name Input Setting Unit Description Language RCVHDN Single Use this sub-menu to specify the language to use for messages, setup menus, etc. English / French / German / Italian / Spanish / Swedish / Chinese (Simplified) / Chinese (Traditional) / Korean / Japanese Restore Menu Defaults RCVHDN Single This sub-menu returns all of the sub-menu items on the Option Settings 1 main menu to their initial default settings.
Option Settings 2 Main Menu Setting Name Input Setting Unit Description Zoom Memory RCVHDN Single Use this sub-menu to turn zoom memory on or off. Zoom memory lets you save the zoom setting when the projector is turned off, so it can be restored automatically the next time the projector is turned on. On*: Select this option when you want to restore the zoom setting that was in effect when the projector was last turned off, whenever it is turned on.
Operational Info Main Menu Setting Name Input Setting Unit Description Input Signal RCVHDN Source Specific This sub-menu item shows the currently selected input signal (RGB, Component, or VIDEO). “- - - -” is indicated here when there is no input signal. Signal Name RCVHD Source Specific This sub-menu item shows the signal name of the signal being input to the projector. For details about signal names, see “Signal Name” under “Supported Signals” on page 52.
Restore All Defaults Main Menu Setting Name Input Setting Unit Description Unit Operating Time RCVHDN Single This sub-menu item shows the cumulative operating time of this unit. This time cannot be initialized. Restore All Defaults RCVHDN Single This sub-menu returns all sub-menu items on all main menus to their initial default settings. This operation can be performed regardless of the currently selected input source and regardless of whether or not a signal is currently being input.
User Maintenance Cleaning the Projector Periodically clean the projector exterior, lens, intake vents, and exhaust vents on a regular basis. Important! z Always make sure that the projector has cooled sufficiently before cleaning it. If the projector is turned on, perform the following steps before cleaning it. 1 2 3 Turn off the projector. Check to make sure that the POWER/STANDBY indicator has changed to amber.
Cleaning Intake and Exhaust Vents Dust and dirt tend to collect around the intake vents located on the back and both sides of the projector. Because of this, you should use a vacuum cleaner to clean away accumulated dust and dirt periodically as shown below. Important! z Continued use of the projector after dust has accumulated around the intake vents can cause overheating of internal components and lead to malfunction.
Replacing the Lamp Caution z Continued use of a lamp that has passed its lamp life increases the risk of the lamp rupturing. Replace the lamp with a new one as soon as possible after the replacement message appears. z The light source lamp is a consumable item. The average life of a lamp is approximately 2000 hours. After 2000 hours, a message appears to alert you to the need of lamp replacement.
Replacing the Lamp z During normal use, the lamp and the area around it become extremely hot. Before replacing the lamp, turn off the projector and wait for the cool down operation (indicated when the POWER/STANDBY indicator is flashing amber) to finish. Next, disconnect the AC power cord from the projector, and wait for at least 60 minutes to allow it to cool down even further.
To replace the lamp Important! z When replacing the lamp, use the special screwdriver that comes with the replacement lamp. The projector does not come with a screwdriver. 1 Turn off the projector and unplug its AC power cord. 2 Wait for about 60 minutes to allow the projector’s current lamp to cool down completely. 3 Turn over the projector and place it on top of a desk or on some other stable surface. 4 Loosen the lamp cover screw, and then remove the lamp cover.
Caution z Take care to avoid touching the lamp (glass) and the mirrors inside the projector. Doing so can cause the lamp to rupture, shorten lamp life, and otherwise affect lamp performance. 8 9 Secure the lamp cartridge with the three screws. Return the lamp cover to its original position, and secure it with the screw. z After replacing the lamp, be sure to perform the procedure under “Resetting the Lamp Time” on page 40.
To reset the lamp time after exceeding the lamp life If you use the existing lamp until its life is exceeded, you will not be able to turn on the projector even after you replace the lamp with a new one. Perform the following procedure to initialize the lamp time in this case, which will make it possible to turn on the projector. 1 Use the bundled AC power cord to plug the projector into a power outlet. 2 While holding down the projector’s [ ] key, hold down the [AUTO] key for about five seconds.
Error Indicators and Warning Messages Warning messages and indicators let you know what the problem is when a projector error occurs. When an error occurs, wait until cool down is complete and the fan stops before unplugging the AC power cord. If you unplug the AC power cord while the fan is still operating, an error may occur when you plug the AC power cord back in. * For further information about items whose reference pages are marked with an asterisk, see “User’s Guide (Basic Operation)”.
Indicator/Error Message POWER : Amber flashing Red steady TEMP : Red steady LAMP : Red steady Message : There is a problem with the fan. The projector will turn off. POWER TEMP LAMP Message POWER TEMP LAMP Message POWER TEMP LAMP Message POWER TEMP LAMP Message POWER TEMP LAMP Message POWER TEMP LAMP Message : Amber flashing Red steady : Red steady :– : A system problem has occurred. The projector will turn off. : Green steady :– :– : A system problem has occurred. Normal projection is not possible.
Indicator/Error Message POWER : Amber flashing Red steady TEMP : Red flashing (0.5-second interval) LAMP : Red flashing (0.5-second interval) Message : – POWER TEMP LAMP Message POWER TEMP LAMP Message POWER TEMP LAMP Message POWER TEMP LAMP Message : Amber flashing Red steady : Red flashing (2-second interval) : Not lit or red flashing :– : Amber flashing Red steady : Amber flashing (1-second interval) :– :– : Green steady :– : Red flashing (1-second interval) : It is time to replace the lamp.
Appendix Connecting to a Component Video Output Device Some video devices are equipped with a component video output terminal. You can use an optionally available component video cable (YK-3) to connect the COMPUTER terminal of the projector to the component video output terminal of a video device. Important! z Always turn off the projector and the video device before connecting them.
Connecting the HDMI Output of a Video Device or Computer to the Projector The projector supports projection and output of HDMI video and audio output from a computer or video device. Important! z Turn off the projector and the computer or video device before connecting them.
Remote Controller Signal Range When performing an operation on the remote controller, point it at the remote control signal receiver on the back or front of the projector. The following illustration shows the range of the remote controller signal. ±30 degrees max. ±30 degrees max. 5 meters (16.4 feet) max. 5 meters (16.4 feet) max. Front Back 5 degrees to 30 degrees ±30 degrees max. 5 meters (16.4 feet) max. 5 meters (16.4 feet) max.
Replacing the Remote Controller Battery 1 Caution RISK OF EXPLOSION IF BATTERY IS REPLACED BY AN INCORRECT TYPE. DISPOSE OF USED BATTERIES ACCORDING TO THE INSTRUCTIONS. Caution Misuse of a battery can cause it to leak and stain the area around it, or to explode, creating the risk of fire and personal injury. Make sure that you always observe the following precautions. z Take care that the battery is oriented correctly when you load it.
Projection Distance and Screen Size h* The following table shows the relationship between the distance and projected image size. Projection Size Screen Size Diagonal (cm) Approximate Projection Distance Minimum Distance (m / feet) Maximum Distance (m / feet) h* (cm / inch) 40 102 1.0 / 3.28 1.9 / 6.23 9 / 3.54 60 152 1.4 / 4.59 2.8 / 9.19 14 / 5.51 80 203 1.9 / 6.23 3.8 / 12.47 18 / 7.09 100 254 2.4 / 7.87 4.8 / 15.75 23 / 9.06 150 381 3.6 / 11.81 7.2 / 23.62 34 / 13.
Aspect Ratio Setting and Projection Image The following shows how images are projected in accordance with the type of the input signal and the aspect ratio setting of the projector. Input source: RGB or HDMI (PC) Input Signal Normal Full True SVGA 800 × 600 XGA 1024 × 768 WXGA 1280 × 800 * SXGA 1280 × 1024 * The blue boundary indicates the projection area.
Input source: Video, component or HDMI (DTV) Input Signal Normal 16:9 Letter Box 4:3 Aspect Image * Squeezed Image * Letter Box Image * 16:9 Aspect Image * The blue boundary indicates the projection area.
Supported Signals RGB Signal Signal Name VESA Other Resolution Horizontal Frequency (kHz) Vertical Frequency (Hz) 640 × 480/60 640 × 480 31.5 60 640 × 480/72 640 × 480 37.9 73 640 × 480/75 640 × 480 37.5 75 640 × 480/85 640 × 480 43.3 85 800 × 600/56 800 × 600 35.2 56 800 × 600/60 800 × 600 37.9 60 800 × 600/72 800 × 600 48.1 72 800 × 600/75 800 × 600 46.9 75 800 × 600/85 800 × 600 53.7 85 1024 × 768/60 1024 × 768 48.4 60 1024 × 768/70 1024 × 768 56.
Component Signal Horizontal Frequency (kHz) Signal Name HDTV 1080p/50 SDTV Vertical Frequency (Hz) 62.5 50 1080p/60 67.5 60 720p/50 37.5 50 720p/60 45.0 60 1080i/50 31.3 50 1080i/60 33.7 60 576p50 31.3 50 576i50 16.6 50 480p60 31.5 60 480i60 15.7 60 Video Signal Signal Name Horizontal Frequency (kHz) Vertical Frequency (Hz) NTSC 15.7 NTSC4.43 15.7 60 60 PAL 15.6 50 PAL-M 15.7 60 PAL-N 15.6 50 PAL60 15.7 60 SECAM 15.
HDMI Signal Signal Name 640 × 480/60 Horizontal Frequency (kHz) Vertical Frequency (Hz) 31.469 59.94 800 × 600/60 37.879 60.317 1024 × 768/60 48.363 60.004 1280 × 768/60 47.776 59.87 1280 × 800/60 49.702 59.81 1280 × 960/60 60 60 1280 × 1024/60 63.981 60.02 1400 × 1050/60 65.317 59.978 1600 × 1200/60 75 60 SDTV (480p) 31.469 59.94 SDTV (576p) 31.25 50 HDTV (720p) (50) 37.5 50 HDTV (720p) (60) 45 60 HDTV (1080i) (50) 28.125 50 HDTV (1080i) (60) 33.
MA0907-A