
User Manual


Getting Ready
E-16
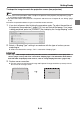
6. With both the Projector A and Projector B images being projected, repeat steps 3
and 5 as required to minimize the difference between the shape of the Projector A
and Projector B images.
Adjustment 2: Fine adjustment using the adjustment pattern
7. On the remote controller, press the [CORRECT] key.
8. On the “Image Shaping” menu that appears, select “Adjust Image Position” and
then press the [ENTER] key.
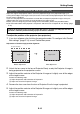
z This will project two adjustment patterns, a yellow one for Projector A and a light blue one for
Projector B.
z Adjust the focus of the patterns as required.
9. Observe the adjustment patterns as you adjust Projector A and then Projector B.
Try to achieve the characteristics described below as you make adjustments.
z Adjust the horizontal lines of the crosshairs in the center of the adjustment pattern so they are
horizontal (no left-right sloping).
z Adjust so the vertical lines of the crosshairs in the center of the adjustment pattern are in the
center of the screen.
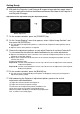
10.
On the remote controller, press the [BLANK] key.
z This will cause the Projector B adjustment pattern to disappear, leaving only the Projector A
adjustment pattern (yellow).
11.
While observing the Projector A adjustment pattern, perform the vertical
adjustments described below.
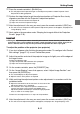
3
Before adjustment After adjustment
Perform the following steps.
Projector A : Use the same procedure as that in step 3 to fine tune the adjustment of the Projector
A adjustment pattern.
Projector B : Use the same procedure as that in step 5 to fine tune the adjustment of the Projector
B adjustment pattern.
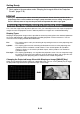
(1) Adjust the vertical inclination of Projector A.
(2) Adjust the size of the Projector A image.
The crosshairs of the adjustment pattern should be in the
center of the target screen and the outer border of the
adjustment pattern should be just outside of target projection
area, as shown in the nearby figure.