EN DATA PROJECTOR XJ-V1/XJ-V2 User’s Guide Be sure to read the “Safety Precautions” and “Operating Precautions” in the “Setup Guide” document, and make sure you use this product correctly. Keep this manual in a safe place for future reference. Visit the site below for the latest version of this manual and the “Setup Guide”. https://world.casio.
DLP is a registered trademark of Texas Instruments of the United States. HDMI, the HDMI Logo and High-Definition Multimedia Interface are trademarks or registered trademarks of HDMI Licensing, LLC. XGA is a registered trademark of IBM Corporation of the United States. Other company and product names may be registered product names or trademarks of their respective owners. The contents of this User’s Guide are subject to change without notice.
Contents Useful Features and Functions ...................................... 5 Getting Ready.................................................................. 6 Setting Up the Projector.........................................................................6 Setup Precautions ....................................................................................................... 6 Connecting Projector Cables .................................................................7 Remote Controller .............
Using the Setup Menu (MENU) ............................................................19 Basic Setup Menu Operations................................................................................... 19 Setup Menu Settings ................................................................................................. 19 Password Protection ............................................................................23 Using the Password Feature............................................................
Useful Features and Functions Mercury-free Hybrid Light Source A CASIO-original laser and LED hybrid light source delivers high luminance up to 2,700 lumens (XJ-V1)/3,000 lumens (XJ-V2). This projector does not use a mercury lamp, making it environmentally friendly. No-wait Projection A CASIO hybrid light source reaches maximum brightness immediately after power is turned on, compared with a wait of approximately one minute normally required with a mercury lamp.
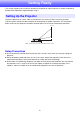
Getting Ready This section explains how to select a location for the projector, how to connect its cables, and how to perform other operations required before using it. Setting Up the Projector Locate the projector on a desk, table, or stand that is firm and level. Make sure that you allow sufficient space around the sides and back of the projector for proper ventilation. The illustrations below show how the projector should be oriented relative to the screen for optimum projection.
Connecting Projector Cables Connect the projector to a power outlet and to an input source device. Use an RGB cable to connect to the RGB output terminal of a computer or other input source. Use an HDMI cable* to connect to the HDMI output terminal of a computer, video equipment, or other input source. * Be sure to use a High Speed HDMI cable. Use the supplied power cord to plug the projector into a power outlet.
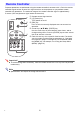
Remote Controller Projector operations are performed using the remote controller that comes with it. Point the remote controller signal emitter at one of the signal receivers on the projector as you perform remote controller key operations. The maximum range of the remote controller signal is approximately 5 meters (16.4 feet) (between signal emitter and receiver). 1 Remote control signal emitter [P] (Power) key 2 [ESC] key Turns power on or off.
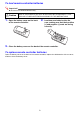
To load remote controller batteries Important! Be sure to use alkaline batteries only. *Caution RISK OF EXPLOSION IF BATTERY IS REPLACED BY AN INCORRECT TYPE. DISPOSE OF USED BATTERIES ACCORDING TO THE INSTRUCTIONS. 1. Open the battery cover on the back of the remote controller. 2. 3. Close the battery cover on the back of the remote controller. Load two new batteries into the case, making sure that their positive (+) and negative (–) ends are facing correctly.
Operating the Projector This section explains how to use the remote controller to perform projector operations. Selecting the Input Source (INPUT) To select the input source 1. Press the [INPUT] key. 2. On the “Input” dialog box that appears, use the [INPUT], [] and [] keys to select the input source you want and then press the [ENTER] key. If you do not press the [ENTER] key, the projector will automatically apply the currently selected input source after about two seconds.
Output Image Operations To use manual keystone correction (KEYSTONE) The projector has a keystone correction feature that prevents distortion of the projected image when projecting from an angle. You can use the [KEYSTONE +] and [KEYSTONE –] keys to adjust keystone correction manually. To zoom an image (D-ZOOM) 1. Press the [D-ZOOM +] key. This will enlarge the center of the projected image one step. 2. To zoom in on the center of the projected image more, press the [D-ZOOM +] key again.
To auto adjust an image (AUTO) Press the [AUTO] key. Pressing the [AUTO] key automatically adjusts the frequency and phase in accordance with the input signal, which can reduce flickering and other projected image problems. This operation is supported while the input source is Computer (RGB). To change the aspect ratio of the projected image (ASPECT) Press the [ASPECT] key to cycle through the aspect ratio settings for the projected image.
To adjust image brightness (FUNC) 1. Press the [FUNC] key. On the menu that appears, select “Brightness” and then press the [ENTER] key. 2. On the brightness adjustment screen that appears, use the [] and [] keys to adjust brightness. 3. To hide the window, press the [ESC] key. To change the color mode (FUNC) 1. Press the [FUNC] key. On the menu that appears, select “Color Mode” and then press the [ENTER] key. This displays the color mode selection window.
Adjusting the Volume Level (VOLUME) You can use the remote controller [VOLUME +] and [VOLUME –] keys to adjust the volume level of the audio that is output from the AUDIO OUT terminal. To adjust the volume level 1. Press the [VOLUME +] or [VOLUME –] key. This causes the “Volume” screen to appear on the projected image. 2. Press the [VOLUME +] key to increase the volume, or the [VOLUME –] key to lower the volume. 3. After the setting is the way you want, press the [ESC] key. To mute the audio 1.
Eco Mode (ECO) The following Eco Mode settings are available to specify whether priority should be given to low-power, low-noise operation or to projection brightness. On : Enables manual adjustment to balance the needs of low-power, quiet operation and projection brightness. Off: Give top priority to projection brightness. To select the Eco Mode 1. Press the [ECO] key. This causes “Eco Mode” window to appear on the projection screen. 2. Use the [] and [] keys to select the setting you want.
Using the Presentation Timer (TIMER) The presentation timer shows a countdown from a preset time value. You can use it to keep track of how much time has elapsed during your presentation, and to limit a presentation to a preset amount of time. You can configure the presentation timer so it is displayed in the projected image. To display the timer When the timer is not displayed on the projected image, press the [TIMER] key once.
To configure timer settings 1. Use the [TIMER] key to display the timer function menu. 2. Use the [] and [] keys to select the “Position”, “Continuous Display”, or “Start Time” setting and then change the settings as described in the table below. 3.
To pause the timer countdown 1. Use the [TIMER] key to display the timer function menu. 2. Select “Pause Timer” and then press the [ENTER] key. To resume a paused timer countdown 1. Use the [TIMER] key to display the timer function menu. 2. Select “Restart Timer” and then press the [ENTER] key. To reset the timer to its start time 1. Use the [TIMER] key to display the timer function menu. 2. Select “Reset Timer” and then press the [ENTER] key.
Using the Setup Menu (MENU) Pressing the [MENU] key displays the Setup Menu shown below on the projection screen. You can use this menu to adjust projected image brightness, contrast, and other settings, and to change projector settings. Menu Item (Sub-menu) Menu Items (Main Menu) Highlighting Guidance The guidance shows the key operations that can be performed for the currently selected (highlighted) menu item.
Use this menu item: To do this: Image Adjustment 1 3 Eco Off Mode When “Off” is selected for the “Option Settings 1 3 Eco Mode” setting, specify either “Bright” (brightness priority) or “Normal*” (hue priority) as the image quality setting. Image Adjustment 1 3 Restore Menu Defaults Return all of the items in the “Image Adjustment 1” main menu to their initial defaults for the currently projecting image source.
Use this menu item: To do this: Screen Settings 3 No Signal Screen Select one of the following as the projection image whenever there is no input signal being input to the projector: “Blue”* (blue screen), “Black” (black screen), “Logo” (projector built-in logo). Screen Settings 3 Blank Screen Select one of the following as the projection image whenever the [BLANK] key is pressed: “Blue”* (blue screen), “Black” (black screen), “Logo” (projector built-in logo).
Use this menu item: To do this: Option Settings 2 3 Timer Function Display the timer function menu. For details, see “Using the Presentation Timer (TIMER)” (page 16). Option Settings 2 3 Restore Menu Defaults Return all of the items in the “Option Settings 2” main menu to their initial defaults for the currently projecting image source. Operational Info (RCHD) Display the projector information below.
Password Protection The password feature lets you keep unauthorized individuals from using the projector. You can specify whether password input is required whenever you turn on the projector, and you can specify and change the password as required. Use the Setup Menu “Option Settings 1 3 Password” setting to configure password settings. Using the Password Feature Note the following precautions whenever you use the password feature. The password feature protects against unauthorized use of the projector.
To change the password 1. Press the [MENU] key to display the setup menu. 2. Use the [] key to select “Option Settings 1”, and then press the [ENTER] key. 3. Use the [] key to select “Password”, and then press the [ENTER] key. This will display a dialog box prompting you to enter the current password. 4. Enter the current password. The password of your projector is not really a “word” made up of letters, but rather a sequence of remote controller key inputs.
To change the power on password setting 1. Perform steps 1 through 5 under “To change the password” (page 24) and display the Power On Password setting screen. 2. After confirming that “Power On Password” is selected, use the [] and [] keys to select either the “On” or “Off” setting. Changing the setting from “Off” to “On” will cause the “Prompt for password when power is turned on?” dialog box to appear.
Cleaning the Projector Make it a habit to clean the projector at regular intervals as described in this section. Before cleaning the projector, be sure to unplug it from the power outlet and make sure it is cooled down completely. Cleaning the Projector Exterior Wipe the exterior of the projector with a soft cloth that has been moistened in a weak solution of water and a mild neutral detergent. Be sure to wring all excess moisture from the cloth before wiping.
Troubleshooting Indicators The POWER/STANDBY indicator and STATUS indicator change to show the current status of the projector as described in the tables below.
Error Indicators and Warning Messages Warning messages and indicators let you know what the problem is when a projector error occurs. When an error occurs, wait until the fan stops before unplugging the AC power cord. If you unplug the AC power cord while the fan is still operating, an error may occur when you plug the AC power cord back in. Press the [ESC] key to clear the warning message.
Indicator/Error Message POWER : Red steady STATUS : Red flashing (0.5-second interval) Message : – POWER : Red steady STATUS : Red flashing (2-second or 1-second interval) Message : – Description and Required Action The projector was turned off automatically because the light source unit turned off or did not turn on. After confirming that the POWER/STANDBY indicator is lit red (without flashing), unplug the power cord.
Projector Troubleshooting Check the following items whenever you experience any problem with the projector. Problem Cause and Recommended Action Power does not turn on. If the POWER/STANDBY indicator is not lit, the AC power cord is not connected correctly. Connect the AC power cord correctly. If the POWER/STANDBY indicator is lit red and the STATUS indicator is lit (or flashing) red or amber, it means some type of error has occurred. See “Error Indicators and Warning Messages” (page 28).
Problem Cause and Recommended Action The message “Please input the password.” appears and further operation is not possible. The “Option Settings 1 Password” setting on the setup menu is turned on, so the projector is password protected. Input the correct password, and then press the [ENTER] key. See page 23. The remote controller does not work. The remote controller batteries may be dead. Replace the batteries. The remote controller may be too far from the projector.
Appendix Connecting to a Component Video Output This section explains how to establish a component video connection between the projector and a video device. Component video output terminals come in 3-terminal sets: Y·Cb·Cr or Y·Pb·Pr. Be sure to match the colors of the plugs on a component video cable with the colors of the terminals (Green: Y; Blue: Cb/Pb; Red: Cr/Pr). Note that connection only to an analog component video output terminal is supported.
Updating Firmware The projector’s firmware (software in the projector flash ROM) can be updated from a computer connected to the projector’s SERVICE port (USB port for ROM updating) with a USB cable. To connect the projector’s SERVICE port with a computer’s USB port Use a commercially available USB cable to connect the projector’s SERVICE port to the computer’s USB port.
Hanging the Projector from a Ceiling The projector can be hung from a ceiling. When doing so, the projector should be turned upside down, and secured to the ceiling. For full details, contact the retailer where you purchased the projector. Important! When hanging the projector from a ceiling, make sure that it is at least one meter away from fire detectors, fire alarms, and other fire protection devices.
Projection Distance and Screen Size The projection distance values below are for reference when setting up the projector. a Lens h b Projection Size Screen Size (inch) Approximate Projection Distance h (cm / inch) Diagonal (cm) Minimum Distance (m / feet) Maximum Distance (m / feet) 30 76 0.83 / 2.72 0.93 / 3.04 10 / 3.9 40 102 1.15 / 3.77 1.28 / 4.20 13 / 5.3 60 152 1.79 / 5.87 1.99 / 6.52 20 / 7.9 77 196 2.33 / 7.66 2.59 / 8.50 26 / 10.2 80 203 2.43 / 7.97 2.70 / 8.
Aspect Ratio Setting and Projection Image The following shows how images are projected in accordance with the type of the input signal and the aspect ratio setting of the projector.
Input source: Component or HDMI (DTV) Input Signal Normal 16:9 4:3 Aspect Image Squeezed Image Letter Box Image 16:9 Aspect Image 37 16:10 4:3
Supported Signals Important! Even if a signal is listed in the table below, it does not guarantee that you will be able to display its images correctly. RGB Signal VESA Signal Name Resolution Horizontal Frequency (kHz) Vertical Frequency (Hz) 640 × 480/60 640 × 480 31.5 60 640 × 480/72 640 × 480 37.9 73 640 × 480/75 640 × 480 37.5 75 640 × 480/85 640 × 480 43.3 85 800 × 600/56 800 × 600 35.2 56 800 × 600/60 800 × 600 37.9 60 800 × 600/72 800 × 600 48.
Component Signal HDTV SDTV Signal Name Horizontal Frequency (kHz) Vertical Frequency (Hz) 1080p/50 56.3 50 1080p/60 67.5 60 720p/50 37.5 50 720p/60 45.0 60 1080i/50 28.1 50 1080i/60 33.7 60 576p/50 31.3 50 576i/50 15.6 50 480p/60 31.5 60 480i/60 15.7 60 HDMI Signal Signal Name Horizontal Frequency (kHz) Vertical Frequency (Hz) 640 × 480/60 31.5 60 800 × 600/60 37.9 60 1024 × 768/60 48.4 60 1280 × 768/60 47.8 60 1280 × 800/60 49.
Projector RS-232C Control When there is a serial connection between the projector and a computer, you can control the projector using RS-232C commands sent from the computer. To establish a serial connection between the projector and a computer Connect the projector and computer as shown in the illustration below.
Using Control Commands This section explains the commands that are used to control the projector from a computer. Command Send Format Configure your computer’s serial port with the following settings. Communication Protocol Data Rate 19200 bps Data Bit 8 bit Parity None Stop Bit 1 bit Flow Control None Send this command when you want information about the current setup of the data projector.
Command List Only the following functions are supported while the projector is turned off. Do not try to send any other command to the projector. Power on/off: Read Power on: Write Get light time: Read Input of a valid signal must be in progress in order to use a command to turn on blank screen or change the aspect ratio.
Command Name RW Keystone Correction +: Raises the current keystone correction setting by 1. KSP W 0 to 120 Keystone Correction –: Lowers the current keystone correction setting by 1. KSM W 0 to 120 Key: Operation executed when a key is pressed.
MA2008-C