E XW-P1 USER’S GUIDE Please keep all information for future reference. Safety Precautions Before trying to use the instrument, be sure to read the separate “Safety Precautions”.
NOTICE This equipment has been tested and found to comply with the limits for a Class B digital device, pursuant to Part 15 of the FCC Rules. These limits are designed to provide reasonable protection against harmful interference in a residential installation. This equipment generates, uses and can radiate radio frequency energy and, if not installed and used in accordance with the instructions, may cause harmful interference to radio communications.
Important! Please note the following important information before using this product. • Before using the optional AC Adaptor to power the unit, be sure to check the AC Adaptor for any damage first. Carefully check the power cord for breakage, cuts, exposed wire and other serious damage. Never let children use an AC adaptor that is seriously damaged. • Never attempt to recharge batteries. • Do not use rechargeable batteries. • Never mix old batteries with new ones.
Contents General Guide ............................. E-5 Controlling Sounds .................................. E-35 Using a Pedal ....................................................... E-35 Getting Ready to Play ................ E-8 Using the Wheels (Bender, Modulation) ............... E-35 Using the Assignable Knobs ................................. E-35 Connections ...............................................E-8 Using Sliders.........................................................
Contents Using the Step Sequencer ....... E-49 Other Useful Functions ............ E-67 How the Step Sequencer is organized.....E-49 Using the Mixer ....................................... E-67 Playing Back a Step Sequence................E-51 Instant Adjustment of Settings using the Sliders and Step Buttons ................................ E-67 Editing a Sequence -Simple Editing.........E-51 Mixer Settings ....................................................... E-68 To turn a step on or off .......
Contents Connecting to a Computer ...... E-79 Minimum Computer System Requirements...........................................E-79 Connecting the Synthesizer to Your Computer .....E-79 Saving and Loading Synthesizer Data to a Computer and Editing Synthesizer Data on a Computer.................................E-80 Reference .................................. E-81 Error Messages........................................E-81 Troubleshooting .......................................E-82 Specifications ...........
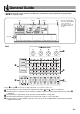
General Guide • In this manual, buttons, knobs, terminals, and other parts are referred to using a combination of group numbers ( , , etc.) and part names. 12 Back Left Center Right Tray • The tray is angled slightly. Take care so items placed on it do not slide off. • Do not place cups or any other liquid containers on the tray. Lower left Left 3 1 4 2 5 (Sliders) 1 through 5 are laid out to facilitate adjustment of a sound as you listen to it.
General Guide Center 6 9 7 bk 8 LCD Indicates name of function when button is held down. bm bn bo (Dial) bl 6 Use the [POWER] button to turn power on or off, and the [VOLUME] knob to adjust the volume level. ☞ Page E-9 7 Use the top three buttons to select the Synthesizer’s mode. Use the bottom three buttons to edit and save tone and other data, and to configure system-wide general settings.
General Guide Right bp bq br bp Use these buttons to select a tone number, performance number, etc. ☞ Page E-20 bq Use the six buttons on the right to move the cursor on the screen, and the minus (–) and plus (+) buttons to change a displayed value. Press the [MENU] button to display a menu of options for the operation you are currently performing. ☞ Page E-21 br Use these keys for one-touch alteration of the pitch of a sound.
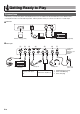
Getting Ready to Play Connections • Whenever you connect any device to the Synthesizer, be sure to read the user documentation that comes with the device. • This Synthesizer does not have built-in speakers. It will no produce unless you connect some device for sound output. bt Back left Memory card (page E-73) Computer (page E-79) Other electronic music instrument (page E-69) ck Back right (1) (2) (3) (4) (5) (6) (7) Configuration and type depends on your geographic location.
Getting Ready to Play To do this: Do this: (1) Use a pedal Connect an optionally available sustain pedal. For information about the type of effect applied when the pedal is depressed, see page E-65. (2) Input sound from another electronic musical instrument Use a commercially available connecting cord to connect the output terminal (monaural) of the other instrument to the Synthesizer.
Getting Ready to Play ■ Low Battery Indication 6 • If you press POWER only lightly, the display will light up momentarily but power will not turn on. This does not indicate malfunction. Press POWER firmly and completely to turn on power. • The AC adaptor will become warm to the touch after very long use. This is normal and does not indicate malfunction. • To prevent breaking of the wire, take care to avoid putting any type of load on the power cord.
Learning to Play by Playing (For Synthesizer Novices) This chapter gets you started with basic operations by actually using the Synthesizer, while avoiding getting too bogged down in theory and technical details. It is the perfect place to start for those who are using a synthesizer for the first time. ■ Three Synthesizer Modes Performance Mode Use this mode for playing and performing. It enables high-level performance with tone categories, a Step Sequencer, and more.
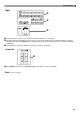
Learning to Play by Playing (For Synthesizer Novices) First, let’s see what a Solo Synthesizer tone sounds like. Press SOLO SYNTH so the button becomes lit. bl The tones of this Synthesizer are divided into 10-tone groups called “banks”. There are a total of 10 Solo Synthesizer tone banks numbered 0 through 9, with 10 tones in each bank for a total of 100 Solo Synthesizer tones. You can quickly select a bank and a tone number by rotating the dial.
Learning to Play by Playing (For Synthesizer Novices) Play some notes on the keyboard, and as you do move the sliders around. This will change the volume settings of the tones that make up the six layers. Adjust the volume levels until you get the balance you want. 5 Layer 1 through 6 individual volume Global volume bq left (U) and right (I) buttons to move the cursor Use the between input positions, and the tone number buttons to input characters.
Learning to Play by Playing (For Synthesizer Novices) At this point you have mastered the simplest steps required to edit and save tones. But you shouldn’t stop here. Your Synthesizer has a wealth of other tone editing features, functions, and tools. Take the time to learn about these and you will become capable of high-level tone editing. Find out more under “Selecting and Creating Tones” on page E-18. Phrase Sequencer To give you an idea about what a musical phrase is, let’s listen to a preset phrase.
Learning to Play by Playing (For Synthesizer Novices) Step Sequencer Let’s start out our explanation of the Step Sequencer by listening to some preset sequence data. Press 7 STEP SEQ to enter the Step Sequencer Mode. The Step Sequencer uses nine (8 through 16) of the 16 parts of the Synthesizer’s sound source, which provides plenty of support every for very complex rhythms. You can find out which parts are outputting sound at any time by checking the level meter on the Synthesizer’s display.
Learning to Play by Playing (For Synthesizer Novices) Using the Performance Function If you have read all of the information in this introductory part of the manual, you are finally ready to start using the Performance function. In the Tone Mode, you saw how you can select a single tone and play it on the keyboard. In the Performance Mode, you can perform with up to four tones simultaneously.
Learning to Play by Playing (For Synthesizer Novices) Example: To save the performance to User Bank 2, Performance 1 Edits saved indicator Playing a Built-in Demo Song Use the procedure below to play a built-in demo song that shows off the full versatility of the Synthesizer. Press 7 SETTING and 7 WRITE at the same time.
Selecting and Creating Tones 7 3 bm bn bo bp bq br 5 9 bl Overview The tones of this Synthesizer are made up of the 16 parts shown below, plus externally input parts. This chapter explains how to select, edit, and save tones using Zone Part 1* in the Tone Mode (page E-11). It also covers the Effect Function that can be used to enhance tones and controllers that can be used to make various changes in a tone as you play. Part Number Part name Features Zone Part1* This is the Synthesizer’s main part.
Selecting and Creating Tones Built-in sound source Zone Part 1 Zone 1 settings Zone Part 2 Zone 2 settings Zone Part 3 Zone 3 settings Zone Part 4 Zone 4 settings External device (MIDI Channel 1) (MIDI Channel 2) (MIDI Channel 3) (MIDI Channel 4) E-19
Selecting and Creating Tones To select a tone 1. Press 7 TONE. The button will light and the Synthesizer will enter the Tone Mode. 2. Use the bl SOLO SYNTH to VARIOUS buttons to select a tone category. 3. Press bp PRESET/USER to select preset tones or user tones. • Preset tones are selected while the button is unlit, while user tones are selected while the button is lit. 4. Press the bp NUM/BANK button so the button is flashing.
Selecting and Creating Tones To edit and save a tone as a user tone Enters a group. Exits a group. bo 1. Select the tone you want to edit. bq Selects item. • You can select a preset tone or an existing user tone for editing. 2. Press 7 EDIT. This will display the top screen of the tone editing list. Example: First page of the Solo Synthesizer tone editing list Changes setting. Scrolls pages. List title 4. After you finish with your edits, press 7 EDIT. This exits the tone editing list.
Selecting and Creating Tones Editable Solo Synthesizer Tone Parameters Solo Synthesizer tones are synthesized by combining tones of the six blocks, number (1) through (6), in the illustration below. Before actually getting into tone editing, you should spend a little time becoming familiar with the structure and the details of each block.
Selecting and Creating Tones Description (1) Synthesizer OSC1 Block “OSC” is an abbreviation of “oscillator”, which is where a sound is actually produced. These two synth OSC blocks creates sound using a sine wave, sawtooth wave, or other base waveform, just like an analog synthesizer. • Synth OSC: Generates the base sound and determines the pitch. • Filter: Cuts some of the frequencies to adjust timbre. • Amp: Adjusts volume.
Selecting and Creating Tones ■ Editable Parameters of Blocks (1) through (6) 5) and four knobs (3) can be used for quick and easy adjustment of some of the parameters in the list • The nine sliders ( below (page E-35). Preparation Perform the following steps from the screen in step 2 of the procedure under “To edit and save a tone as a user tone” on page E-21. 1. Select “OSC Block >Ent” and then press bq ENTER to enter the group. 2.
Selecting and Creating Tones Display Text Description Settings Pitch envelope. Group of editable envelope (Envelope Generator) parameters applied to the synth OSC, PCM OSC, and pitch shifter. • The figure below also applies to filter, amp, and other envelopes. With the pitch envelope, the pitch of the sound corresponds to the vertical (Level) axis.
Selecting and Creating Tones Display Text Description Settings TrigThresh (Block (5) only) (V) Trigger threshold. Specifies the external input level threshold value that determines whether or not an external input trigger (page E-25) is applied. 0 to 127 TrigRelease (Block (5) only) (V) Trigger release time. Adjusts the time following external input trigger (page E-25) operation that the next trigger operation is blocked. 0 to 127 P.ShiftMode (Block (5) only) Pitch shifter mode.
Selecting and Creating Tones Display Text PortaTime (V) Description Portamento Time. Specifies the time until the next note is reached by Portamento. Settings 0 to 127 ■ Block (7): Total Block Filter Editable Parameters Preparation On the screen that appears in step 2 under “To edit and save a tone as a user tone” (page E-21), select “Total Filter >Ent” and then press ENTER to enter the group. bq Editable Parameter List • Shaded cells indicate a group made up of multiple items.
Selecting and Creating Tones ■ Block (8): LFO1 and Block (9): LFO2 Editable Parameters Preparation Perform the following steps from the screen in step 2 of the procedure under “To edit and save a tone as a user tone” on page E-21. 1. Select “LFO >Ent” and then press bq ENTER to enter the group. 2. Use the 9 PART minus (–) and plus (+) buttons to select the block you want to edit.
Selecting and Creating Tones ■ Block (10): Controllers Editable Virtual Controller Parameters These controllers are virtual controllers for adjusting any editable parameters (destinations) with any input method (source). Preparation Perform the following steps from the screen in step 2 of the procedure under “To edit and save a tone as a user tone” on page E-21. 1. Select “VirtualCtrl >Ent” and then press bq ENTER to enter the group.
Selecting and Creating Tones Editable Hex Layer Tone Parameters Hex Layer tones have three types of editable parameters: parameters for each of the individual layers (Layer 1 through Layer 6), parameters that affect all six of the layers, and the same parameters that apply to the other tone categories. 5) and four knobs (3) can be used for quick and easy adjustment of some of the parameters in the list below (page E-35).
Selecting and Creating Tones ■ Editable Parameters for All Layers (Layer 1 through Layer 6) Preparation Display the screen in step 2 of the procedure under “To edit and save a tone as a user tone” on page E-21. Editable Parameter List • Shaded cells indicate a group made up of multiple items. Press Display Text bq ENTER to display the items that make up a group. Description Settings Detune. Causes the tuning of Layers 1 through 6 to be slightly different from each other.
Selecting and Creating Tones Editable Drawbar Organ Tone Parameters There are two types of parameters: drawbar organ tone specific editable parameters and the same parameters that apply to the other tone categories. • The nine sliders ( ), three buttons ( ), and four knobs ( ) can be used for quick and easy adjustment of some of the parameters in the list below (page E-35).
Selecting and Creating Tones Editable PCM Melody Tone (Non-drum PCM Tones) Parameters There are two types of parameters: PCM melody tone specific editable parameters and the same parameters that apply to the other tone categories. The drum sets in the Variance category of the PCM tones have different editable parameters. See “Editable Drum PCM Tone Parameters” for more information about them.
Selecting and Creating Tones Editable Drum PCM Tone Parameters The editable parameters described here are for the drum set tones in the Variance tone category. There are two types of parameters: PCM drum tone specific editable parameters and the same parameters that apply to the other tone categories. ■ Editable Drum Set PCM Tone Parameters Preparation Display the screen in step 2 of the procedure under “To edit and save a tone as a user tone” on page E-21.
Selecting and Creating Tones Controlling Sounds You can use a pedal, the bender, or other devices, to instantly change the pitch and volume of notes, the envelope, and other parameters as you perform. Using a Pedal A pedal operation can be used to sustain notes, arpeggios (page E-40), or phrases (page E-44), or to apply a soft effect. • For information about connecting a pedal, see page E-8.
Selecting and Creating Tones Using Sliders Using the Hold Button 5 You can used the nine sliders ( ) to adjust the volume balance between the multiple sounds (see below) that make up a tone, and to make simple adjustments in some DSP parameters.
Selecting and Creating Tones 2. To change the pitch in octave steps, use the br OCTAVE minus (–) and plus (+) buttons (without holding down TRANSPOSE). br • The setting range for this operation is three octaves upwards and downwards (–3 octaves to +3 octaves). br (1) Reverb Adds reverberation to make it sound like you are playing in a room or in a hall. (2) Chorus Combines multiple layers of the same note to create a sound with more depth.
Selecting and Creating Tones To configure effect settings 1. Hold down bm EFFECT until the effect list top screen shown below appears. bm 2. Next, refer to the list below as you perform operations with the bq controls to select items and change settings. ■ Effect Settings Display Description Settings Rev Type Reverb type. Reverb effect type. Type1, Type2 Rev Level Reverb level. Reverb effect level. 0 to 127 Rev Time Reverb time. Reverb sustain time. 0 to 127 Cho Level Chorus level.
Selecting and Creating Tones Saving an Edited DSP DSPs are divided among 53 DSP types according to effects. Preset Normal DSPs 0-0 and 0-1 are compressor type DSPs. There are two DSP types: a Normal DSP specific type and a Solo Synthesizer DSP specific type. When editing and saving a DSP, you must first specify its type and then edit it in accordance with its type. • For a list of DSP types, see “DSP Type List” on page E-87. 1. Select the tone to which you want to apply the DSP.
Sounding Arpeggio Phrases Automatically bm 7 bo bq 4 2 5 bk With the Arpeggio Function, you can play various arpeggios automatically by simply pressing keys on the keyboard. You can select from a number of different arpeggio options, including playing arpeggios from a chord, playing various phrases automatically, and more. • The Arpeggio Function has 100 arpeggio type presets. A type presets can be edited and saved as a user arpeggio type. There is memory for up to 100 user arpeggio types.
Sounding Arpeggio Phrases Automatically 5. Use the bo dial or the bq minus (–) and plus (+) Editing an Arpeggio There are two arpeggio types: step type and variation type. • With a step type arpeggio, you can edit its steps and its parameters. A step type arpeggio can contain up to 16 steps. You can change the following values for each step. TYPE : Specifies the relative position in the arpeggio pattern where each of the keyboard notes will play.
Sounding Arpeggio Phrases Automatically Menu Layer Description 1 Settings 2 Step Edit >Ent Specifies the relative position in the arpeggio pattern where the keyboard notes will play starting from the lowest note played (which is L1). • If the number of keys pressed is less than the number of configured type (L) settings (i.e.
Sounding Arpeggio Phrases Automatically Clearing Arpeggio Data Use the procedure below to clear preset step data or step data that was edited using Step Edit (page E-42) and create new step data from scratch. • Note that variation type data cannot be cleared. 1. Hold down bm ARPEGGIO until the type selection screen shown below appears on the display. 2. From among the preset or user arpeggio types select the arpeggio type you want to clear.
Recording and Playing Back Phrases 7 bn bp bq bk The Phrase Sequencer is a great way to record musical phrases that suddenly pop into your mind for later playback. • The Sequencer has 100 preset phrases. • You can record a new phrase or overdub onto an existing phrase to create a user phrase. There is memory for storage of up to 100 user phrases for later recall when you need them. • In addition to what you play on the keyboard, your pedal, wheel, and knob operations are also recorded as part of phrase.
Recording and Playing Back Phrases To change the tempo setting There are two different methods you can use to change the tempo setting: using the TEMPO buttons or tapping a beat with a button. • You can use this procedure to adjust the tempo not only for phrases, but also for other functions as well. ■ To change the tempo using the TEMPO buttons 1. Press the 8 TEMPO – (slower) or 8 TEMPO + (faster) button. • This displays the tempo screen shown below.
Recording and Playing Back Phrases Recording a New Phrase In addition to what you play on the keyboard, pedal, knob, and wheel operations are also recorded in phrases. • You can record up to approximately 1,600 notes for a single phrase. Also, recorded wheel and knob operations significantly reduce the remaining number of notes available for recording. 1. Press bn REC. bn This will cause the REC light to flash.
Recording and Playing Back Phrases 5. After you finish configuring settings, save them Phrase Data Settings When playing on keyboard to start phrase playback (page E-45), the phrase data will play back in the key it was originally recorded in (Original Key) if you press the key for the first note recorded in the phrase.
Recording and Playing Back Phrases ■ To pause overdubbing during looped playback bn In step 4 of the above procedure, press REC instead of PLAY/STOP. • This will cause REC to start flashing. • Though what has been recorded up to that point continues to play as a loop, further recording is not possible while overdubbing is paused. • Press REC again to resume overdubbing. bn bn To save a phrase Press 7 WRITE to display the screen for saving a phrase.
Using the Step Sequencer 7 1 2 bm bo bp bq 4 5 9 bk bl The Step Sequencer provides up to 16 steps. The Synthesizer’s sliders can be used to control step notes and velocity in real time. The Step Sequencer is not just a rhythm machine, it makes it possible for you to compose music as you play on the keyboard. You can edit each step of a preset sequence to create your own rhythm pattern and save the result as a user sequence. • The Step Sequencer has 100 preset sequences.
Using the Step Sequencer Sequence Parts Patterns 1 through 8 (page E-49) Part (page E-49) Note Part Control Part Sliders (page E-52) Beat Drum 1 Track Drum 2 Track Drum 3 Track Drum 4 Track Drum 5 Track Bass Track Solo 1 Track Solo 2 Track Chords Track Control 1 Track Control 2 Track Control 3 Track Control 4 Track A A A A A A A A A Master Slider (page E-53) B B B B B B B B B Mixer (page E-67) 8ch 9ch 10ch 11ch 12ch 13ch 14ch 15ch 16ch Track Step Data 1 2 3 4 5 6 7 8 9
Using the Step Sequencer Playing Back a Step Sequence A step sequence can be played back from the Performance, Tone, or Step Sequencer Mode. The step sequence can be changed by switching to a different pattern, selecting a different sequence bank and number, and by shifting the key (Key Shift). 3. If you want to change to a different sequence, enter the Step Sequencer Mode and change the sequence bank and/or number.
Using the Step Sequencer 2. Next, while holding down 1 STEP To turn a step on or off 4 ■ On (Sounding) 4 Press the 1 to 16 button of the number of the step you want to turn on. When a step is on, its 1 to 16 button is lit and NOTE is displayed next to its step number. SEQUENCER, press the 1 to 16 button that corresponds to the step number of the last note of the tied group. 4 Last step number ■ Off (Not sounding) 4 Press the 1 to 16 button of the number of the step you want to turn off.
Using the Step Sequencer ■ Selecting a Slider Function 2 Pressing FUNC A/B toggles the sliders between two functions. Example: Preset sequence FUNC A/B unlit: L (NOTE) FUNC A/B lit: M (VELOCITY) 2 2 3. Use the 9 PART minus (–) and plus (+) buttons to select the part whose slider assignments you want to change. 4. Press 2 FUNC A/B to select the set of sliders (A or B) whose assignments you want to change. 5.
Using the Step Sequencer 4. Press bq ENTER. This will display the master slider setting screen. Inputting Step Data by Playing on the Keyboard, etc. You can input note, velocity, and other step data by performing keyboard, pitch bend, and knob operations as you play. • When inputting a pitch bend or knob operation, you first need to use the control track to select the pitch bender or knob and then perform in input. 1. Press 7 EDIT. 5.
Using the Step Sequencer Changing the Timing of Pattern Switching 1. Perform steps 1 through 3 of the procedure under “Changing the Solo1 Channel” on page E-54. 2. Use the bq up (q) and down (w) to move the item selection cursor (0) to “Pattern Change Timing”. To sound a single part (solo mode) 1. Press 1 STEP SEQUENCER and then press 7 EDIT. • This step is not necessary if you already pressed EDIT and are already editing a step sequence. 7 2. Press bm MIXER. 3.
Using the Step Sequencer ■ Step Sequencer Parameters Level 1 Level 2 Level 3 Trk On/Off >Ent Setting Range and Screen Contents Description Track editing EDIT while in the Step Sequencer Mode will • Pressing display the same screen as Trk On/Off >Ent. 7 Pattern Pattern number 1 to 8 Part Part name. Drm1 to 5, Bass, Sol1 to 2, Chrd, Ctl1 to 4 Track 1 to 16 to toggle. Track on/off. Use 1 to 4 correspond respectively to Control Parts 1 • through 4.
Using the Step Sequencer Level 1 Level 2 Level 3 Track Param >Ent Beat Info Setting Range and Screen Contents Description Track parameter Max Step 1 to 16 Maximum step. Specifies the number of steps played back by a part. If the specified maximum number of steps is exceeded during playback, playback returns to the first step. Step Size Step size. Specifies the note length between steps. 2, 6, NoteLngth Note length. Note on note length specified as a percentage of the step size.
Using the Step Sequencer Level 1 Level 2 Level 3 Copy >Ent Description Setting Range and Screen Contents Data copy Track Copies data from another track. Copies step data and part parameter data. • Data being edited (TMP) can also be copied. • The following are parts that can be copied.
Using the Step Sequencer 4. Use the bq cursor (U, q, w, I) buttons to move the brackets % or the cursor to the item whose setting you want to change, and then use the minus (–) and plus (+) buttons to change the selected setting. bq bl • Use PATTERN to change the pattern number. • Use the PART minus (–) and plus (+) buttons to change the part name. • Use STEP minus (–) and plus (+) buttons to change the step number. • To return to the previous menu level, press EXIT.
Using the Step Sequencer 3. Use the bq cursor (U, q, w, I) buttons to ■ Note Shift: Shifts notes. bq Use the cursor (U, q, w, I) buttons to move the brackets [ ] to an item and then use the minus (–) and plus (+) buttons to change the item’s shift value setting. bq move the cursor to an item and then input the setting you want.
Using the Step Sequencer To play back a chain 1. Hold down bk CHAIN until the CHAIN screen appears. 2. Use the bo dial, bp buttons, or the bq minus (–) and plus (+) buttons to display the chain you want to play. To save a chain in SMF format to a memory card • Before performing the following procedure, insert a memory card into the Synthesizer. 1. Hold down bk CHAIN until the CHAIN screen appears. 2.
Using the Performance Mode 7 8 3 bq 2 9 2. Select a performance bank and number the Overview same procedures as those for selecting a tone. You can use the Performance Mode to perform with up to four tones assigned to the keyboard. In addition to tone assignments, you can also save effect, Step Sequencer, and other settings as a setup (called a “performance”) which can be recalled at any time, even while you are playing, to instantly change the sequencer’s setup. • There are 100 preset performances.
Using the Performance Mode To recall a performance 1. Press 7 PERFORM. The button will light and the Synthesizer will enter the Performance Mode. 2. Select a performance bank and number the same procedures as those for selecting a tone. This will recall the contents of the performance you selected. • Recalled performance contents are the same as those described in “Editable Performance Parameter List” in the next section of this manual.
Using the Performance Mode Editable Performance Parameter List Editable Parameter List Display Zone Parame >Ent Description Settings Zone parameters. This group includes parameters for each of the zones (Zone 1 through 4). • Use the PART minus (–), plus (+) buttons to select the zone you want to edit. • You also can enter the group using the following shortcut: Perform step 2 under “To register a performance” (page E-62) and then hold down EDIT. This will enter the group. 9 7 Zone Zone on/off.
Using the Performance Mode Display Description Settings Arp Enable Arpeggio on/off. Enables/disables arpeggio function (page E-40) for each zone. Off, On Phrase Enable Phrase on/off. Enables/disables the Phrase Sequencer (page E-44) for each zone. Off, On Controller >Ent Controller parameters. This is group of editable controller parameters. 3 Knob Target 1. Selects the parameter controlled by K1 knob operation.
Using the Performance Mode Display ArpKeyRgHi Description Settings Arpeggio key range high. Specifies the high keyboard range where the arpeggio function is enabled. This setting is used in combination with the Arpeggio Key Range Lo setting to configure C-1 to G9 the keyboard range where the arpeggio function is enabled. Arp Hold Arpeggio hold on/off. Enables/disables arpeggio hold (page E-40). Off, On Arp Synchro Arpeggio synchronization. Switches the arpeggio sync setting (page E-40).
Other Useful Functions bm 7 bo bq 4 2 5 9 bk 3. Use the bq cursor (U, q, w, I) buttons to Using the Mixer The mixer lets you make adjustments to the tone, volume level, and other settings* of the Synthesizer’s sound source parts (Parts 01 through 16, external input parts, page E-18), while viewing the balance between the parts on the display. * Settings that affect individual parts are called “part settings”, wile settings that affect all parts are called “master settings”. 1. Press bm MIXER.
Other Useful Functions 3. Move a slider to adjust the setting of the part assigned to it. • Use the bq cursor (U, q, w, I) buttons to select a setting item. 4. Use the 4 1 to 16 buttons to toggle parts 01 through 16 between on and off. • Each press of a button toggles it between lit (on) and unlit (off). • Holding a button down will turn that part on and turn all other parts off (solo mode). Press the same button again to exit the solo mode.
Other Useful Functions Setting Item Global Synthesizer Settings Display The following are Synthesizer settings that can be configured globally. • Tuning (Fine tuning of note pitch) • Local Control • Master Coarse Tune (Tuning of note pitch in semitone steps) • Initial Power On Mode • Display Contrast • Auto Power Off On/Off (page E-10) 1. Press 7 SETTING. Settings Tuning 415.5 to 465.9Hz M.Coarse Master coarse tune.
Other Useful Functions MIDI Settings Display “MIDI >Ent” and then press Off, On S.Seq NRPN Step Sequencer NRPN change. When this setting is turned on, a Synthesizer sequence (page E-51) can be selected by a MIDI NRPN message from an external device. Off, On Phrase NRPN Phrase NRPN change. When this setting is turned on, a Synthesizer phrase (page E-44) can be selected by a MIDI NRPN message from an external device. Off, On Arp NRPN Arpeggio NRPN change.
Other Useful Functions Deleting Data Saved on the Synthesizer Initializing Synthesizer Global Settings and Data Use the procedure below to delete user tones, user sequences, and other data that you created, and return memory to its initial factory default status. You can use the procedure below to initialize Synthesizer global settings and data, and return them to their initial factory defaults. 1. Referring to the table in step 2 of the procedure 1. Press 7 SETTING.
Other Useful Functions Playing a Demo Tune or a File from a Memory Card You can use the procedure below to play back the Synthesizer built in demo tunes, and to play back SMF (Standard MIDI File) music files or audio files stored on a memory card. 1. Press 7 SETTING and 7 WRITE at the same time. This will enter the Playback Mode. 3. Press bq ENTER. This displays the playback screen. • In the case of a demo tune, playback will start automatically.
Using a Memory Card bm 7 3 bo bq bk You can save Synthesizer user area data to a memory card and load data from a memory card to Synthesizer memory. You also can play music files (MIDI files) stored on a memory card on the Synthesizer. • Use a memory card that satisfies the conditions below. Format: SDHC or SD Capacity: 32GB or less Use of any memory cards other than those defined above is not supported. • SDHC Logo is a trademark of SD-3C, LLC.
Using a Memory Card Card and Card Slot Precautions • Be sure to observe the precautions provided in the documentation that comes with the memory card. • Memory cards have a write-protect switch. Use it when you want to protect the data on the card from accidental deletion. • Avoid using a memory card under the following conditions. Such conditions can corrupt data stored on the memory card. – Areas subjected to high temperature, high humidity, or corrosive gas.
Using a Memory Card Formatting a Memory Card • Format a memory card before using it for the first time. • Before formatting a memory card, make sure it does not have any valuable data stored on it. • The memory card format operation performed by this Synthesizer is a “quick format”. If you want to completely delete all of the data on the memory card, format it on your computer or some other device. 1. Insert the memory card you want to format into the Synthesizer’s card slot.
Using a Memory Card 5. Select the bank and memory location number, To save this type of data: Setting data Perform these steps: 7 bq 1. Press SETTING. 2. Use the up (q) and down (w) buttons to move the item selection cursor (0) to “CardUtility” and then press ENTER. 3. Use the up (q) and down (w) buttons to move the item selection cursor (0) to “SettingData” and then press ENTER. bq bq bq 3.
Using a Memory Card 4. Use the bq up (q) and down (w) buttons to move the item selection cursor (0) to “Save”. 3. Use the bq up (q) and down (w) buttons to move the item selection cursor (0) to “Card Load” (or “Load” if you want to load all data) and then press ENTER. bq • This causes a menu screen like the one shown below to appear on the display. The sample screen below shows the screen that appears when you perform this procedure from the Step Sequencer Mode.
Using a Memory Card To delete a file from a memory card To rename a file on a memory card 1. Insert the memory card into the card slot. 1. Insert the memory card into the card slot. 2. Press 7 SETTING. 2. Press 7 SETTING. 3. Use the bq up (q) and down (w) buttons to 3. Use the bq up (q) and down (w) buttons to move the item selection cursor (0) to “CardUtility” and then press ENTER. move the item selection cursor (0) to “CardUtility” and then press ENTER.
Connecting to a Computer You can connect the Synthesizer to a computer and exchange MIDI data between them. You can send play data from the Synthesizer to music software running on your computer, or you can send MIDI data from your computer to the Synthesizer for playback. Minimum Computer System Requirements 2. After starting up your computer, use a commercially available USB cable to connect it to the Synthesizer.
Connecting to a Computer Saving and Loading Synthesizer Data to a Computer and Editing Synthesizer Data on a Computer You can transfer user tones, phrases, and other data you saved with the Synthesizer to a computer for storage. Later, you can return the data back to the Synthesizer when you need it. You can also edit tone, performance and other Synthesizer data on a computer, where it is easier to work with. A special Data Editor application is required in order to perform operations such as these. 1.
Reference Error Messages Display Message Cause Required Action 1. The current memory card format is not compatible with this Synthesizer. 1. Format the memory card on the Synthesizer (page E-75). 2. The memory card capacity is greater than 32GB. 2. Use a memory card with a capacity of 32GB or less. 3. You are trying to use an SDXC card. 3. SDXC cards not supported. Use an SD or SDHC memory card. 4. There is something wrong with the memory card. 4. Use a different memory card.
Reference Display Message Cause Required Action File Name When renaming a file on a memory card, attempting to specify a file name that is already used. Use a different name. Invalid Tone You selected a Synthesizer tone, hexlayer tone, or drawbar organ tone for a part other than PART1 (ZONE1). Select Synthesizer, hexlayer, or drawbar organ tones only for PART1 (ZONE1). Battery Low Battery power is low. Replace the batteries or change to AC adaptor power (page E-9).
Reference Symptom Action In certain keyboard ranges, the volume and tone quality sound are slightly different from those in other keyboard ranges. This is due to system limitations. It does not indicate malfunction. With some tones, octaves do not change at the far ends of the keyboard. This is due to system limitations. It does not indicate malfunction. The pitch of the notes does not match other accompanying instruments or sounds strange when played along with other instruments.
Reference Specifications Model Keyboard Touch Response XW-P1 61 standard-size keys 2 types, Off Maximum Polyphony 64 notes (1 to 32 for some tones) Tones 620 preset, 310 user Solo Synthesizer Tones 100 preset, 100 user Hex Layer Tones 50 preset, 50 user Drawbar Organ Tones 50 preset, 50 user PCM Melody Tones 400 preset, 100 user PCM Drum Tones 20 preset, 10 user Effects Reverb System reverb Chorus System chorus DSP 100 preset, 100 user 53 types (46 normal, 7 Solo Synthesizer) Master E
Reference Inputs/Outputs USB port TYPE B MIDI IN/OUT terminal IN, OUT Sustain/Assignable jack Standard jack (sustain, sostenuto, soft, start/stop) Phones jack Stereo standard jack Line Out R, L/MONO jacks Standard jack × 2 Output Impedance: 2.3kΩ, Output Voltage: 1.
Reference Operating Precautions Be sure to read and observe the following operating precautions. ■ Location Avoid the following locations for this product. • Areas exposed to direct sunlight and high humidity • Areas subjected to temperature extremes • Near a radio, TV, video deck, or tuner The above devices will not cause malfunction of the product, but the product can cause interference in the audio or video of a nearby device.
Reference DSP Effect List DSP Type List ■ Normal DSP Types • Type numbers 01 through 14 are single type DSPs, while numbers 15 through 46 are dual type DSPs. A single type DSP is one with a single structure, while a dual type is a combination of two single type DSPs. • The name of a dual DSP is formed by its two constituent single DSP names, in the order that they are applied. For example, type 15 named “Wah-Compressor” connects in line to “Wah” and “Compressor”, in that sequence.
Reference DSP Parameter List ■ Normal DSP Single Type DSP Parameters • (Param A) and (Param B) are parameters assigned to the 8/16 and MASTER sliders when Hex Layer tones are selected. 5 01: Wah This is a “wah” effect that can automatically affect the frequency using an LFO. Parameters and Value Ranges: 1 :Resonance (0 to 127) (Param B) Adjusts the strength of resonance. 2 :Manual (0 to 127) (Param A) Adjusts the wah filter reference frequency. 3 :LFO Rate (0 to 127) Adjusts the LFO rate.
Reference 08: Flanger 11: Reflection Applies wildly pulsating and metallic reverberation to sounds. LFO waveform is selectable. Parameters and Value Ranges: 1 :LFO Rate (0 to 127) (Param A) Adjusts the LFO rate. 2 :LFO Depth (0 to 127) (Param B) Adjusts the LFO depth. 3 :LFO Waveform (sin, tri, random) Selects the LFO waveform. 4 :Feedback (0 to 127) Adjusts the strength of feedback. An effector that extracts early reflections from reverb. Applies acoustic presence to sounds.
Reference 14: Lo-Fi Applies various types of noise to the input signal to reproduce a retro Lo-Fi sound. Includes wow and flutter for rotational fluctuation like that in tapes and records, a Noise 1 generator that generates continual FM radio type, and a Noise 2 generator that generates record play types scratch noise. Parameters and Value Ranges: 1 :Wow and Flutter Rate (0 to 127) Adjusts the wow and flutter rate. 2 :Wow and Flutter Depth (0 to 127) Adjusts the wow and flutter depth.
Reference 04: Chorus Parameters and Ranges 1 :LFO Waveform (Range: sin, tri) 2 :LFO Rate (Range: 0 to 127) (Param A) 3 :LFO Depth (Range: 0 to 127) (Param B) Supported Input Characters 05: Delay Parameters and Ranges 1 :Delay Time (Range: 0 to 127) (Param A) 2 :Feedback (Range: 0 to 127) 3 :Damp (Range: 0 to 3) Adjusts damping of the high-range. 3 results in maximum damping.
Control Change 0 1 5 6, 38 7 10 11 16 - 19 64 65 Key’s Ch’s After Touch Pitch Bender Note ON Note OFF Velocity True voice O O O *2 O *2 O O X O *2 O *3 O *2 O X X O 9nH v = 1 - 127 X 9nH v = 0 0 - 127 Mode 3 X Default Messages Altered Mode Note Number 1 - 16 1 - 16 Default Changed Transmitted O O O *2 O *2 O O O O *2 O O *2 O X O O 9nH v = 1 - 127 X 9nH v = 0, 8nH v =** 0 - 127 0 - 127 *1 Mode 3 X 1 - 16 1 - 16 Recognized MIDI Implementation Chart Basic Channel Function Model:
:True # Mode 1 : OMNI ON, POLY Mode 3 : OMNI OFF, POLY Remarks Messages O O O O O X X X X X X O *2 O 0 - 127 O O O *2 O O O *2 O *2 Reverb send Chorus send NRPN LSB, MSB RPN LSB, MSB Sostenuto Soft pedal Mode 2 : OMNI ON, MONO Mode 4 : OMNI OFF, MONO O : Yes X : No *1: Depends on tone. *2: For details about NRPN, RPN, and system exclusive messages, see MIDI Implementation at http://world.casio.com/. *3: In accordance with pedal effect setting.
This recycle mark indicates that the packaging conforms to the environmental protection legislation in Germany.