CASIO 3D Converter (YA-D30) User’s Guide Be sure to keep all user documentation handy for future reference. z Microsoft, Windows, and Windows Vista are registered trademarks or trademarks of Microsoft Corporation in the United States and other countries. z Macintosh, Mac OS and QuickTime are registered trademarks of Apple Inc. of the United States. z ArcSoft and the ArcSoft logo are trademarks or registered trademarks of ArcSoft, Inc. in the United States and other countries.
Contents Introduction ..................................................................... 3 Installing CASIO 3D Converter ...............................................................3 Minimum system requirements.................................................................................... 3 To install CASIO 3D Converter .................................................................................... 4 About Help ................................................................................
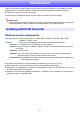
Introduction CASIO 3D Converter enables playback of 3D movies and 3D still images on your computer, and to project them on a 3D CASIO projector. CASIO 3D Converter supports the following functions. z Playback of 3D movies and 3D still images z Conversion of standard 2D images and still images to 3D movies and still images Important! Use of separately available 3D glasses (YA-G30) is required for three-dimensional viewing of 3D images played with CASIO 3D Converter and projected on a 3D CASIO projector.
To install CASIO 3D Converter 1. Place the CASIO 3D Converter CD-ROM into your computer’s CD-ROM drive. 2. On the menu that appears, click the [Install] button. z z z z Follow the instructions that appear on your computer screen. Windows 7: When the “User Account Control” message appears, click [Yes]. Windows Vista: When, the “User Account Control” message appears, click [Allow]. Windows XP: When the dialog box shown below appears, click [Continue Anyway].
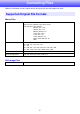
Converting Files CASIO 3D Converter can be used to convert 2D movie files and still-image files to 3D. Supported Original File Formats Movie Files File Format MP4, MOV, AVI, WMV Video Decoders: MPEG4, H264, Motion JPEG Audio Decoders: AAC, ADPCM MPEG4, AAC, .mp4 MPEG4, AAC, .mov MPEG4, ADPCM, .avi H.264, AAC, .mp4 H.264, AAC, .mov H.264, ADPCM, .mov Motion JPEG, ADPCM, .
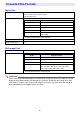
Converted File Formats Movie Files File Format AVI 3D (Side-by-side) Video Encoder: ArcSoft H.264 Encoder Audio Encoder: PCM Video Resolution Profile Video Resolution Small Size 320 × 240 Normal Quality 640 × 480 High Quality 1024 × 768 Wide Resolution 1280 × 720 User Settings 320 × 240, 640 × 480, 1024 × 768, 1280 × 720, 1920 × 1080 z The initial default profile is “Normal Quality”. Frame Rate 30, 24, 15 Audio Sampling Rate 44.
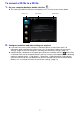
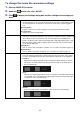
To convert a 2D file to a 3D file 1. On your computer desktop, double-click the . z This starts up CASIO 3D Converter and displays a window like the one shown below. Device icon 2. File list area Profile button Configure resolution and other settings as required. z If you want to use the current setup as-is, advance directly to step 3 from here.
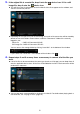
3. If the original file is a movie file, drop it onto the image file, drop it onto the device icon. device icon. If it is a still z This will cause the file information and a thumbnail of the file to appear on the window, and start the conversion process. z Depending on the type of file you are converting, the result of the conversion will be stored by default to one of the folders shown below, inside the “Documents” folder of the currently logged in user.
5. After you are finished, click the window. button in the upper right corner of the z This will exit CASIO 3D Converter. Note You also could perform either of the following operations in place of step 3 of the above procedure. 1 If the original file is a movie file, click “AVI 3D” under the device icon. If it is a still image file, click “JPG 3D” under the device icon. 2 Drop the file you want to convert into the file list area of the CASIO 3D Converter window.
To change the movie file conversion settings 1. Start up CASIO 3D Converter. 2. Under the 3. Click want. to display the Settings dialog box and then configure the settings you [General] tab Destination Path: Storage destination of the movie file produced by the conversion. Initial default: CASIO 3D Converter\AVI 3D\, located in the “Documents” folder of the currently logged in user. [Browse] button: Displays a “Browse For Folder” dialog box for specifying the destination folder.
4. After selecting the setting you want, click [OK]. This will close the preferences dialog box. Note The following table shows the relationship between original file video resolution and converted file video resolution when “Automatically choose the best resolution for my files.” is checked on the dialog box that appears when you select -[Options].
To create a new profile 1. Perform steps 1 through 3 under “To change the movie file conversion settings” (page 10) or “To change the still image file conversion settings” (page 11) to display the profile dialog box. 2. Depending on the type of profile you want to create, click the [Video] tab (for a movie) or the [Photo] tab (for a still image). 3. Click [New]. z This will display the settings for a new profile. New movie file conversion profile settings 4.
To delete a user profile 1. Perform steps 1 through 3 under “To change the movie file conversion settings” (page 10) or “To change the still image file conversion settings” (page 11) to display the profile dialog box. 2. Depending on the type of profile you want to delete, click the [Video] tab (for a movie) or the [Photo] tab (for a still image). 3. Click the “Profile” field and select the user profile you want to delete.
Playing 3D Files You can use CASIO 3D Converter to play back 3D files you converted with it, or to play back other 3D files. 3D File Formats Supported for Playback Movie Files AVI 3D 3D WMV 3D MP4 3D AVI (Side-by-side, Video: ArcSoft H.264; Audio: PCM) (Side-by-side) (Side-by-side, Video: H.
5. If the 3D file you want to play back is a movie file, drop it onto the icon. If it is a still image file, drop it onto the device icon. device z If you want to play back multiple files of the same type (movie or still image), you can drop them all onto the applicable device icon. z 3D files you drop onto the icon are added to the CASIO 3D Converter window file list. z If a 3D file is one you converted with CASIO 3D Converter, you can also drop it into the file list area instead of a device icon.
7. Click in the lower right corner of the Viewer window. z This changes the Viewer window to the full-screen view. The projected images from the connected computer will appear in 3D if you view them using 3D glasses (YA-G30). z To return from the full-screen view to the window view, double-click anywhere on the screen. Important! To view an image in 3D while wearing the 3D glasses, make sure that you select the full screen view of the viewer window.
MA1104-A