CASIO Interactive Whiteboard E YA-W72M/YA-W82M User’s Guide z Be sure to read the “Safety Precautions” and “Operating Precautions” in the “Read this first!” document that comes with the CASIO Interactive Whiteboard, and make sure you use this product correctly. z Keep this manual in a safe place for future reference. z Visit the site below for the latest version of this manual. http://world.casio.
Contents Introduction ..................................................................................................... 6 What is an Interactive Whiteboard?........................................................................... 6 About this manual....................................................................................................... 8 Chapter 1: Getting Ready ............................................................................... 9 Preparing the Digital Pen .................
Conducting a Slideshow in the PowerPoint Control Mode ................................. 34 To start a slideshow in the PowerPoint Control Mode ..................................................... 34 To end a slideshow in the PowerPoint Control Mode ...................................................... 35 Digital Pen Operations during a Slideshow (Power Point Control Mode) .......................... 35 Changing the Margin Settings ...........................................................................
Chapter 3: Using Dot Pattern Printer for CASIO ........................................ 70 Dot Pattern Printer for CASIO Overview.................................................................. 70 What you can do with Dot Pattern Printer for CASIO .......................................... 70 Registering Your Product (Serial Key Input) ........................................................ 71 To input the serial key.........................................................................................
z Anoto and the Anoto logotype are trademarks of Anoto Group AB (Sweden). z Microsoft, Windows, Windows Vista, and PowerPoint are trademarks of Microsoft Corporation in the United States and other countries. z “Bluetooth” is the trademark of Bluetooth SIG, Inc. z Intel is a trademark or registered trademark of Intel Corporation in the United States and other countries. z Other company and product names may be registered trademarks or trademarks of their respective owners.
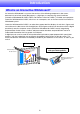
Introduction What is an Interactive Whiteboard? An Interactive Whiteboard is a system that consists of the following components: dot screen, documents that include special dot patterns*1, digital pen, a computer with special software (Interactive Whiteboard for CASIO, DSPD, Dot Pattern Printer for CASIO*2) installed, and a projector. Interactive Whiteboard for CASIO, which runs on a computer, acts as the front end of the Interactive Whiteboard system.
*1 Documents printed using Dot Pattern Printer for CASIO. If you use Dot Pattern Printer for CASIO to print paper versions of the same contents (such as PowerPoint files) as the slides to be projected on the dot screen during a presentation, you can control the presentation (page changes, writing on pages, etc.) using digital pen operations on the printed pages. A separate Anoto Qualified Printer or an Anoto Tested Printer is required to print documents with special dot patterns.
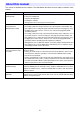
About this manual This manual is divided into five chapters. The table below describes the main topics covered in each chapter. Chapter Main Topics Chapter 1: Getting Ready Chapter 1 explains the three steps below, which you need to perform to get ready to use Interactive Whiteboard.
Chapter 1: Getting Ready This chapter explains what you need to do to get ready to use Interactive Whiteboard. General steps for getting ready are described below. (1) Preparing the digital pen (page 10) An Anoto digital pen is an input device for performing mouse operations on the computer whose screen image is being projected from a projector, and for writing or drawing on the dot screen or on documents printed on paper with special dot patterns.
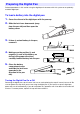
Preparing the Digital Pen Perform procedures in this section using the digital pen that comes with this system or an optionally available digital pen. To load a battery into the digital pen 1. Cover the nib end of the digital pen with the pen cap. 2. Slide the lock lever downwards (away from the pen nib) and then open the battery cover. 3. If there is a dead battery in the pen, remove it. 4.
Replacing the Pen Nib The digital pen comes with a stylus nib pre-installed. This means you do not need to replace the pen nib before using it for the first time. Replace the nib in the cases described below. z To install the ballpoint pen refill for writing onto paper documents printed on paper with special dot patterns z To replace a used up or damaged nib with a refill To replace the pen nib 1. Gently grasp the pen nib currently installed in the digital pen and carefully pull it out.
Establishing a Connection between the Digital Pen and Computer (Pairing) To establish a connection between the digital pen and your computer, you need to register the digital pen on your computer as a Bluetooth device. This operation is called “pairing”. General steps for pairing are described below. (1) Check your computer system environment. Check to make sure that your computer system environment satisfies the required conditions (“Minimum Computer System Requirements”, page 17).
To connect a Bluetooth adapter to your computer 1. Obtain a commercially available Bluetooth adapter and connect it to your computer. z The first time you connect a Bluetooth adapter to your computer, the Windows standard driver will be installed automatically. 2. Click the Bluetooth icon that appears in your computer’s task tray. z If the Bluetooth icon does not appear in the Windows XP task tray, perform the following operation on your computer: [Start] 3 [Control Panel] 3 [Bluetooth Devices].
To pair the digital pen with your computer 1. Click the Bluetooth icon in your computer’s task tray. z If the Bluetooth icon is not shown in the Windows XP task tray, perform the operation below on your computer. 1 [Start] 3 [Control Panel] 3 [Bluetooth Devices] 2 On the “Bluetooth Devices” dialog box that appears, click the “Options” tab, and then select the check box next to “Show the Bluetooth icon in the notification area”. 3 Click [OK] to close the dialog box. 2.
6. Windows XP: Select “Use the passkey found in the documentation” and then input single-byte characters for the passkey. Windows Vista, Windows 7, Windows 8: Select “Enter the pairing code for the device” and then input single-byte characters for the passkey. Windows XP Windows Vista, Windows 7 z The pass keys for digital pens are shown below. Digital pen included with the YA-W72M or YA-W82M: 0000 Optional CASIO DP-301 digital pen: 0000 7. Click [Next].
Digital Pen Operation Indicator The current operational status of the digital pen is indicated by an LED. z The digital pen LED is unlit when the cap is closed (pen is turned off) and immediately after you remove the cap (immediately after pen power is turned on). z The table below describes the meaning of each pen LED status while the cap is removed.
Installing the Software The software described in the table below must be installed on a computer paired with the digital pen in order to use Interactive Whiteboard. Software Name Description DSPD DSPD stands for “digital pen streaming product driver”. DSPD is driver software that makes it possible to send data picked up by a digital pen to Interactive Whiteboard for CASIO.
Minimum Computer System Precautions z Configuring a computer system that meets the minimum requirements described above does not necessarily guarantee that all hardware will operate normally. z A system that does not satisfy the above minimum requirements or running other applications at the same time as using the applications of this system can produce results that are different from those described in this manual. z Administrator rights are required to install software on your computer.
To start up the setup launcher 1. Exit all programs currently running on your computer. 2. Open the Interactive Whiteboard software “setup_en” folder and then double-click “CASIO_InteractiveWhiteboardsetup.exe”. z Interactive Whiteboard for CASIO Setup Launcher will start up and display the dialog box shown below. [Install Interactive Whiteboard for CASIO] becomes enabled after the DSPD is installed.
z Windows XP If the computer does not have .NET Framework 2.0 Service Pack 2 or higher installed, the following error message will appear on its display at this time: “The application failed to initialize properly”. If this happens, perform the procedure under “To install .NET Framework” (page 22) to start up the setup launcher. To install the DSPD 1. Perform the procedure under “To start up the setup launcher” (page 19). 2.
To install Dot Pattern Printer for CASIO 1. If the Interactive Whiteboard for CASIO Setup Launcher window is not currently displayed, perform the procedure under “To start up the setup launcher” (page 19). 2. On the Interactive Whiteboard for CASIO Setup Launcher window, click [Install Dot Pattern Printer for CASIO]. z Carefully read the contents of the end user license agreement that appears. 3. To agree to be bound by the terms of the license agreement and start installation, click [I agree].
To install .NET Framework Important! z Perform the procedure below only if the error message “The application failed to initialize properly” appears in step 2 of the procedure under “To start up the setup launcher” (page 19). 1. In the “dotnet” folder located inside the “setup_en” folder, double-click “dotnetfx20.exe”. Note z The next two steps are not required if you are running the Windows XP English version. 2. From the Microsoft Download Center, download the .NET Framework 2.
Setting Up the Dot Screen, Projector, and Computer This section explains how to connect a computer that has the required software installed to a projector, and how to project computer screen images onto the dot screen. Dot Screen Part Names Roll End cap End cap Anti-slack wire End bar Screen Setting Up the Dot Screen for Projection Important! z The dot screen that comes with CASIO Interactive Whiteboard is designed for magnetic adhesion to a metal wall, blackboard, or other appropriate surface.
3. Completely unroll the screen and affix the magnetic roll to the metal surface. z Check to make sure that the dot screen will not separate from the surface to which it is affixed when you release the roll. z Note that when the screen is cold it may not flatten out completely, which makes it very possible that it will become detached and fall from the surface you attaching it to. 4. Pull out the anti-slack wire of the top end cap and pass the safety hook wire through the loop. 5.
Projecting a Computer Screen Image onto the Dot Screen Note z Do not perform the procedure below until you have completed all of the steps under: “Preparing the Digital Pen” (page 10), “Installing the Software” (page 17), and “Setting Up the Dot Screen, Projector, and Computer” (page 23). z For detailed information about projector and computer operations, refer to the projector and computer user documentation. 1. Set up the projector in a location where it can project onto the dot screen. 2.
Chapter 2: Using Interactive Whiteboard for CASIO This chapter provides detailed explanations about how to use the features and functions of the Interactive Whiteboard when conducting presentations. Operations are mainly performed using Interactive Whiteboard for CASIO software running on a computer.
Registering Your Product (Serial Key Input) The first time you start up IWB for CASIO, a serial key confirmation dialog box will appear. This dialog box will keep on appearing with each startup until you input the serial key. The serial key is located in the Software License Certificate that comes with this system. The serial key confirmation dialog box will stop appearing once you input the serial key. To input the serial key 1.
To perform calibration 1. If IWB for CASIO is not running, double-click the Interactive Whiteboard for CASIO icon on your computer desktop to start it up. 2. Remove the cap from the digital pen. 3. Project the screen image from the computer onto the dot screen. z If there are multiple display devices (including projectors) connected to the computer, check if the projector is the computer’s primary display device or secondary (or other) display device.
8. With each tap, a calibration mark will appear in the lower left, upper right, and then lower right corners of the dot screen. Tap the center of each mark once with the digital pen. z Calibration is complete when you tap the fourth calibration mark. To re-perform calibration Perform the procedure under “To perform calibration”, starting from step 4. Even while calibration marks are displayed, you can restart calibration by going back to step 4 under “To perform calibration”.
Basic Operations This section explains how to start up and exit IWB for CASIO, how to use the main toolbox, and how to perform digital pen operations in the Mouse Control Mode. To start up Interactive Whiteboard for CASIO Use any one of the following operations. z Windows XP, Vista, 7: Click [Start] 3 [All Programs] 3 [CASIO] 3 [Interactive Whiteboard for CASIO] 3 [Interactive Whiteboard for CASIO]. z Windows 8: On the Start screen, click the [Interactive Whiteboard for CASIO] tile.
Using the Main Toolbox The table below explains the functions of each of the tools in the main toolbox. Main toolbox To do this: Do this: Enter the Mouse Control Mode (page 32)*1 Click . Enter the PowerPoint Control Mode (page 33)*1 Click . Enter the Presentation Mode (page 41)*1 Click . Enter the Capture & Draw Mode (page 51)*1 Click . Move the main toolbox Drag the blue bar at the top of the main toolbox. Switch the main toolbox orientation between vertical and horizontal Click .
To view version information In the computer’s task tray, click the Interactive Whiteboard for CASIO icon ( appears, click “About Interactive Whiteboard for CASIO”. ). On the menu that Mouse Control Mode Digital Pen Operations In the Mouse Control Mode, you can use the digital pen operations described below to perform mouse operations. To perform this mouse operation: Do this with the digital pen: Click Tap the dot screen once with the digital pen.
Using the PowerPoint Control Mode The PowerPoint Control Mode is for conducting slideshow presentations with PowerPoint files*1. The slideshow operations themselves are the same as those you perform when using PowerPoint. The IWB for CASIO PowerPoint Control Mode supports the operations described below. z Control of PowerPoint slideshow operations (page changes, writing on pages, etc.) using digital pen operations on image projected on the dot screen.
Conducting a Slideshow in the PowerPoint Control Mode This section explains how to open a PowerPoint file and perform operations to control the slideshow. To start a slideshow in the PowerPoint Control Mode 1. Start up IWB for CASIO. Next, in the main toolbox, click PowerPoint Control Mode. to enter the z This will display a PowerPoint Control Mode toolbox like the one shown below. PowerPoint file drop area 2.
To end a slideshow in the PowerPoint Control Mode Advance the slideshow to the final page or select “End Show” on the PowerPoint application menu. This will cause the PowerPoint window to be displayed as the top window. z To restart a slideshow with the same PowerPoint file, perform the required PowerPoint application operation to start the slideshow. If you do not want to restart the slideshow, exit the PowerPoint application.
z If there is a “PowerPoint Operations” operation palette printed on the document, use the operation palette to control the PowerPoint application. To do this: Tap this icon: Select the PowerPoint slideshow function Arrow tool (Ballpoint Pen) Select the PowerPoint slideshow function Pen tool (When using PowerPoint 2010, tapping the Ballpoint Pen or Felt Tip Pen icon will select Pen.
z Tapping or dragging on a printed document with special dot patterns is interpreted as described below, in accordance with the tool currently selected with the PowerPoint application. When you do this: It is interpreted as this: Tap the page of a printed document with special dot patterns when the Arrow ( ) is selected Clicking with the arrow on the corresponding page of the PowerPoint file in the PowerPoint application.
Changing the Margin Settings Clicking (Margin settings) on the PowerPoint Control Mode toolbox displays a dialog box that can be used to change the settings described below. These settings apply when using the digital pen on a printed document with special dot patterns. Margin settings icon z Display settings These settings can be used to specify the range of movement for the mouse cursor on the computer screen (the screen projected on the dot screen).
3. Use the “Bottom”, “Left”, and “Right” boxes to enter values the same as in step 2, above. z For example, entering 30 for “Left” and leaving all of the other values set to 0 will configure the cursor movement range shown below for printed documents with special dot patterns and on the computer screen. Document printed on paper with special dot patterns 4. Computer screen Click [Apply]. z This saves any changes you have made to the settings and closes the dialog box. To configure paper settings 1.
4. Click [Apply]. z This saves any changes you have made to the settings and closes the dialog box. z The settings you configured in step 3 above will be applied as the initial default settings on the “Paper settings” dialog box that appears when you perform the procedure under “To start a slideshow in the PowerPoint Control Mode” (page 34). To configure advanced paper settings 1. On the PowerPoint Control Mode toolbox, click 2. Click the “Paper settings (advanced)” tab. .
Using the Presentation Mode The Presentation Mode is for conducting presentations using special format (PPG) files generated from PowerPoint, Word, PDF, and other types of files. This mode supports the operations described below. z Slideshow operations (page changes, writing on pages, etc.) with the digital pen on the dot screen or on printed documents with special dot patterns z As with PowerPoint file slideshow presentations, the Pen tool or Marker Pen tool can be used for writing into the image.
Conducting a Slideshow in the Presentation Mode This section explains how to open a PPG file and perform operations to control the slideshow. To start a slideshow in the Presentation Mode 1. Start up IWB for CASIO. Next, in the main toolbox, click Presentation Mode. to enter the z This displays the Presentation Mode toolbox along with an “Open” dialog box. 2. Use the “Open” dialog box to select the PPG file for the slideshow and then click [Open].
To select full-screen view or window view for a slideshow In the Presentation Mode, you can select either full-screen view or window view for a slideshow. For more information, see “Changing Presentation Mode Configuration Settings” (page 47). Note that any time you change the view you will need to restart IWB for CASIO.
To do this: Click this icon: Display the Shapes menu Clicking an icon on the Shapes menu that appears will select a drawing tool for the shape represented by the icon. Display an “Open” dialog box for inserting an image file into the page Display the Line Type Setting menu Clicking an icon on the Line Type Setting menu that appears will change the line type assigned to the currently selected write/draw tool. This setting can be changed individually for each digital pen.
Printed Document with Special Dot Pattern Operations z You can use the digital pen to perform mouse click and drag operations on a printed document with special dot patterns. To perform this mouse operation: Do this with the digital pen: Click Tap the document once with the digital pen. Drag Hold the nib of the digital pen against the document as you drag it from one location to another.
Page Auto Change Feature of Printed Documents with Special Dot Patterns An operation performed with the digital pen on any page of a printed document with special dot patterns is interpreted as an operation on the corresponding PPG file page. A page auto change feature causes the slideshow to jump automatically to the PPG file page that corresponds to any printed document page that is tapped with the digital pen. You can disable page auto change, if you want.
Changing Presentation Mode Configuration Settings You can use the procedure in this section to change settings that affect the Presentation Mode operation as described below. z Specify higher speed or higher quality for pen input z Specify a full-screen view or window view for slideshows To configure Presentation Mode configuration settings 1. On the Presentation Mode toolbox, click . z This will display a “Configuration” dialog box like the one shown below.
Changing Presentation Mode Startup Default Settings You can use the procedure in this section to edit the contents of the startup default setup file, which specifies the initial Presentation Mode startup default settings of the items listed below.
To select this as the startup default Pen color: Change first line under [PEN] to this: Red* Color=red Blue Color=blue Black Color=black Yellow Color=yellow To select this as the startup default Pen line thickness: Change second line under [PEN] to this: Fine* Width=thin Normal Width=normal Thick Width=bold Extra thick Width=extrabold To select this as the startup default Marker Pen color: Change first line under [MARKER] to this: Red Color=red Blue Color=blue Black Color=black Y
5. After all of the edits are the way you want, save the file and close the Notepad window. Note z When you save the file in step 5 of the above procedure, the initial factory default setting will be automatically set for any item for which there is invalid text (a setting that is not included in the table above) to the right of the equals (=) sign. For example, if “Width=red” is specified for the Shapes line thickness setting, “thin” will automatically be applied as the startup default setting.
Using the Capture & Draw Mode The Capture & Draw Mode lets you capture the computer screen image (being projected onto the dot screen), and then write or draw on the captured image using the digital pen. Note that IWB for CASIO toolboxes and windows are not included in the captured image. Captured images containing drawn or written data can be stored as editable format (DST) files, or as non-editable image (png, jpg, or bmp) files.
Capturing and Drawing on the Currently Displayed Computer Screen Image Use the procedure below to capture an image of the computer screen being projected onto the dot screen and to draw on the captured image. To capture and draw on the currently displayed computer screen image 1. On the computer screen, display the diagram or document you want to capture and draw on. 2. On the main toolbox, click to enter the Capture & Draw Mode.
3. On the thumbnail window, click the capture button. z This will close the thumbnail window. At the same time, the computer screen you displayed in step 1 (excluding IWB for CASIO toolboxes and windows) will be captured and displayed. Image number Outer boundary of captured image display z A boundary is displayed around a captured image to differentiate it from the normal computer screen.
To capture and draw on another image 1. Click . . In the lower right corner of the thumbnail window that appears, click z This will close the captured image and display the computer’s desktop. z The IWB for CASIO main toolbox and Capture & Draw Mode toolbox also will remain on the display. 2. On the computer screen, display a chart, document, etc. z If you want an unobstructed view of the screen, you can hide the IWB for CASIO toolbox by clicking the minimize ( ) button on the main toolbox.
To display previously captured images 1. Click 2. Click the thumbnail of the captured image you want to re-display. to display the thumbnail window. z This will display the captured image whose thumbnail you clicked. To exit the Capture & Draw Mode In the lower right corner of the Capture & Draw Mode toolbox, click the close ( ) button. If there are any unsaved captured images on the thumbnail window, a confirmation dialog box will appear with the message “Save “Capture & Draw” data before exiting?”.
To open and edit a saved DST file 1. Use either of the operations below to open a DST file. – Use Windows Explorer to navigate to the storage location of the DST file and then double-click the file. – On the Capture & Draw Mode toolbox, click ( ). Use the “Open” dialog box that appears, select the DST file and then click [Open]. z This will display the first image (the image with the oldest capture date) in the DST file. 2. To display another image in the DST file, click to display the thumbnail window.
To do this: Click this icon: Undo up to 10 of the last draw operations Redo operations undone with Increase the zoom factor of the page view (150%, 200%, 300%) Decrease the zoom factor of a zoomed page view Select the Hand cursor tool (to drag a zoomed page) Display the thumbnail window The two operations below can be performed with the thumbnail window. z Capture an image of the computer screen by clicking the capture ( ) button. z Display a captured image by clicking its thumbnail.
Changing Capture & Draw Mode Startup Default Settings You can use the procedure in this section to edit the contents of the startup default setup file, which specifies initial Capture & Draw Mode startup default settings of the items listed below.
4. Edit the file contents in accordance with information in the table below. An asterisk (*) indicates the factory default setting.
5. After all of the edits are the way you want, save the file and close the Notepad window. Note z When you save the file in step 5 of the above procedure, the initial factory default setting will be automatically set for any item for which there is invalid text or numbers (a setting that is not included in the table above) to the right of the equals (=) sign.
Tool Operations in the Presentation Mode and Capture & Draw Mode The Presentation Mode toolbox and Capture & Draw Mode toolbox include some tools that are common to both modes, and some tools that are unique to each mode. Among the common tools, there are those whose operations are identical on both modes, and those whose operations are slightly different in each mode. This section explains the tools that are available in each of the modes and what operations they perform there.
5. On the page, perform a drag operation at the location where you want to draw the triangle. z While you drag, a dotted line rectangle, whose diagonal goes from the drag start position to the current mouse pointer position, will appear to indicate the size of the shape. When you release the mouse button (or remove the digital pen from the dot screen), an isosceles triangle will be drawn in the area that was defined by the rectangle. To draw a straight line or arrow on a page (Presentation Mode) 1.
To paste an image file into a page (Presentation Mode) 1. Click 2. On the “Open” dialog box that appears, select the image file you want to paste onto the page. . z Supported image file formats are png, jpg, and bmp. 3. Click [Open]. z This pastes the image in the center of the page. 4. To resize the image or move to a different location, click image, and then perform the resize or move operation.
To select multiple objects 1. Click 2. Drag so all of the objects you want to select are enclosed inside of the rectangular selection boundary that appears. . z While you drag, a dotted line rectangle, whose diagonal goes from the drag start position to the current mouse pointer position, will appear to indicate the size of the selection boundary.
To specify the color of an object 1. To specify the color before writing or drawing an object, select the tool you want to use. To change the color of an object that has already been written or drawn, select the object. 2. Click to display the Color Setting menu. (Color Setting menu) 3. On the Color Setting menu, click the icon for the color you want. z If you want to use a color that is not included on the Color Setting menu, click the down arrow (r) on the right end of the menu.
To rotate objects (Presentation Mode) Note z You can use the procedure below only to rotate a circle, triangle, or rectangle drawn with the shapes tool, or an image pasted from a file onto the page. 1. Perform the steps under “To select a single object” (page 63) or “To select multiple objects” (page 64) to select the object(s) you want to change. 2.
Delete Menu Operations You can use the Delete menu (which appears when you click on the tool box) to delete all of the objects on the currently displayed page or on all pages, or to delete the currently displayed page. The operations in this section are the same in both the Presentation Mode and the Capture & Draw Mode, except as specifically noted. To delete all objects on the displayed page 1. Click to display the Delete menu, and then click .
Save File Menu Operations You can use the Save File menu (which appears when you click on the toolbox) to save a file that is currently open in the Presentation Mode or Capture & Draw Mode as an IWB for CASIO proprietary format file (ppg or dst) or as a general-purpose format image file (png, jpg, or bmp). z A file saved as an IWB for CASIO proprietary format file (ppg or dst) can be opened and edited using IWB for CASIO.
To batch save all of the pages as individual image files 1. Click 2. Use the “Save As” dialog box that appears to specify a file name and a storage location, and then click [Save]. to display the Save File menu, and then click . z Nine-digit numbers that indicate the time of the file saves and three-digit page numbers will be appended automatically to the file names. The three-digit serial number will start from 001 for the first file, and be incremented for each additional file.
Chapter 3: Using Dot Pattern Printer for CASIO This chapter explains how to use Dot Pattern Printer for CASIO, which is a virtual printer driver that can print documents with special dot patterns and output PPG files for use in the Interactive Whiteboard for CASIO PowerPoint Control Mode and Presentation Mode. Dot Pattern Printer for CASIO Overview This section explains what you can do with Dot Pattern Printer for CASIO, and how to perform the required product registration procedure.
Registering Your Product (Serial Key Input) The first time you use Dot Pattern Printer for CASIO, a serial key confirmation dialog box will appear. This dialog box will keep on appearing with each use until you input the serial key. The serial key is located in the Software License Certificate that comes with this system. The serial key confirmation dialog box will stop appearing once you input the serial key. To input the serial key 1.
Printing Documents with Special Dot Patterns and Creating PPG Files The operations in this section are presented for each Interactive Whiteboard for CASIO mode (PowerPoint Control Mode and Presentation Mode). When referring to a procedure, make sure it is the right one for the Interactive Whiteboard for CASIO mode you are using. Dot Pattern Printer for CASIO Operating Precautions Note the following precautions whenever printing a document with special dot patterns or creating a PPG file.
3. On the print dialog box that appears, configure the print settings below. – For “Printer”, select “Dot Pattern Printer for CASIO”. If you are using PowerPoint 2003 or 2007, use the “Printer Name” box to select “Dot Pattern Printer for CASIO”. – Under “Settings” select “Print all slides”. If you are using PowerPoint 2003 or 2007, select “All” for “Print range”. z To specify the print range and number of copies, use the “Dot Pattern Printer for CASIO” dialog box in step 10 of this procedure. 4.
Printing Documents with Special Dot Patterns and Creating PPG Files (for the Presentation Mode) This section explains how to print documents with special dot patterns for use in the Interactive Whiteboard for CASIO Presentation Mode, and how to create PPG files. For information about using printed documents with special dot patterns and PPG files, see “Conducting a Slideshow in the Presentation Mode” (page 42).
11. Configure the settings below on the dialog box. Select the “Print” check box. Use “Printer name” to select the output printer.* Use “Operation palette” to select “Presentation Mode” or “Presentation Mode for Student”. Configure the “Print range” and “Copies” settings. Since we will be creating a PPG file, select the “Create” check box. Use “Resolution” to select one of the following settings: 72, 150, 200, 300, 600 dpi. * Be sure to use a qualified printer.
Configuring Advanced Settings on the Dot Pattern Printer for CASIO Dialog Box Clicking [Advanced Settings] on the Dot Pattern Printer for CASIO dialog box (page 73, 75) will display an “Advanced Settings” dialog box like the one shown below. This dialog box can be used to configure the settings described below. Setting Description Page size information Specifies whether or not original source file page size information should be sent to the printer.
Checking Your Dot Pattern Printer for CASIO Version To check the version of your Dot Pattern Printer for CASIO install, click the “Dot Pattern Printer for CASIO” tab on the “Dot Pattern Printer for CASIO Document Properties” dialog box that is displayed in step 4 under “To print a document with special dot patterns for use in the PowerPoint Control Mode” (page 72) and step 4 under “To print a documents with special dot patterns and generate a PPG file for Presentation Mode use” (page 74).
Chapter 4: Troubleshooting Check the information in this section whenever you experience any problems while using your Interactive Whiteboard. Digital Pen and Dot Screen Troubleshooting There is no response to digital pen operations on the dot screen or printed documents with special dot patterns with the digital pen. Probable Cause Required Action The digital pen battery is dead. Replace the battery. The digital pen is turned off.
Probable Cause The connection between the digital pen and computer has been broken. B Required Action Check the points below. z Is the Bluetooth icon ( ) displayed in your computer’s task tray? If not, click the arrow button on the left side of the task tray to display hidden icons. It the icon still does not appear, it probably means there is no Bluetooth adapter connected to the computer.
The operation I am trying to perform with the digital pen is different from the location I tap on the dot screen. Probable Cause Required Action The dot screen is dirty. You can erase characters and figures drawn with the provided marker or a commercially available marker with the provided melamine foam eraser or with a commercially available melamine type whiteboard eraser. If an eraser does not completely remove markings, wipe with a cloth moistened with water. Calibration settings are not correct.
Interactive Whiteboard for CASIO Troubleshooting Probable Causes and Required Actions I can’t draw or write with the digital pen on the dot screen or on a document with special dot patterns. Probable Cause Required Action The digital pen you are using is not supported. Use the digital pen included with this system or an optionally available CASIO DP-301 digital pen. The surface being projected to is not a dot screen.
When I tap a page in a printed document with special dot patterns with the digital pen, a different page is displayed. Probable Cause Required Action Settings were wrong when printing the document with special dot patterns. Selecting a range of pages for printing (instead of all pages) on the print dialog box of the application you are using for printing will result the pages of the printed document with special dot patterns not corresponding with the source file pages.
Dot Pattern Printer for CASIO Troubleshooting Probable Causes and Required Actions A landscape orientation source file is being output in portrait orientation, causing parts of the image to be cut off. Probable Cause Required Action The “Page size information” check box is not selected. On the “Dot Pattern Printer for CASIO” dialog box, click [Advanced Settings]. Next, under “Page size information”, select the “Use” check box. The orientation setting on the properties screen is not correct.
Chapter 5: Appendix DSPD Management Functions DSPD includes functions that send data received from the digital pen to the applicable digital pen application (Interactive Whiteboard for CASIO). Though you normally never need to do anything concerning DSPD, you can use the menu that appears when you right-click the DSPD icon ( ) on your computer’s task tray to perform the operations described below. Menu Item Function Application List Displays information about applications registered with DSPD.
4. The dot screen is ready for use after it is completely dry. To clean the back of the dot screen When cleaning the back of the dot screen, roll it on to the roller bit by bit and wipe the back. This makes it possible to clean the back of the screen without creating wrinkles. To avoid getting dust or other foreign matter on the surface of the dot screen, never allow it so come into direct contact with the floor.
Uninstalling and Re-installing the Software Uninstalling the Software Be sure to use the CASIO_InteractiveWhiteboardsetup.exe file, which is located inside the folder named “setup_en”, to uninstall the software. To uninstall Interactive Whiteboard for CASIO 1. Exit all programs currently running on your computer. 2. Open the Interactive Whiteboard software “setup_en” folder and then double-click “CASIO_InteractiveWhiteboardsetup.exe”.
3. Click [Uninstall DSPD]. z Depending on the operating system your computer is running, a message may appear instructing you to close the Interactive Whiteboard for CASIO Setup Launcher. If such a message appears, click [Ignore] and proceed with the uninstall operation. z After installation is complete, [Uninstall DSPD] will change to [Install DSPD]. Uninstalling DSPD will also cause [Install Interactive Whiteboard for CASIO] to become disabled. 4.
Specifications Digital Pen Specifications Model Name: DP-301 External Dimensions: 159.5 mm × 20.5 mm × 18.2 mm (6.3" × 0.8" × 0.7") (Cap closed) Weight: 40 g (1.4 oz) (Including battery and cap) 148 mm × Ø18.2 mm (5.8" × Ø0.7") (Cap removed) Power Supply: One AAA-size battery Operation Time: Approximately 6 hours (Continuous tapping of dot screen and/or printed document with special dot patterns) Standby Time: Approximately 150 hours (Cap removed) Data Communication: Bluetooth version 2.
MA1306-B