DATA PROJECTOR XJ-A135/XJ-A145/XJ-A155/ XJ-A245/XJ-A255 Data Projector Wireless Function Guide Be sure to read the precautions in the User’s Guide (Basic Operations) that comes with the Data Projector. Be sure to keep all user documentation handy for future reference. Microsoft, Windows, Windows Vista, and Aero are registered trademarks or trademarks of Microsoft Corporation in the United States and other countries.
Contents About This Manual... ....................................................... 5 Terms and Conventions .........................................................................5 What the Wireless Function Lets You Do... .................. 6 Projector Requirements ................................................. 7 Installing Wireless Connection 3 ................................... 8 Minimum System Requirements ............................................................
Configuring Security Settings for a Wireless LAN Connection .................................................................... 18 Security Setting Flow ...........................................................................18 Configuring Security Settings...............................................................19 To log in to the projector’s System Admin page ....................................................... 19 To log out of the projector’s System Admin page ...............................
Appendix ........................................................................ 38 Using the Token Wizard .......................................................................38 Installing Wireless Connection 3 on USB Memory .................................................... 38 To use a USB token to connect a computer to the projector via wireless LAN ........ 39 Installing and Removing the Wireless Adapter.....................................40 Wireless LAN Connection Troubleshooting ...............
About This Manual... This manual explains how to establish a wireless LAN connection between a CASIO XJ-A135, XJ-A145, XJ-A155, XJ-A245, or XJ-A255 Data Projector and a computer, and send computer screen contents to the projector for projection. Terms and Conventions In this manual, there are many procedures that require parallel operations on the Data Projector and your computer. The following are special terms and conventions used in this manual to differentiate between the Data Projector and computer.
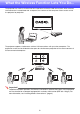
What the Wireless Function Lets You Do... The projector has a built-in function that lets it operate as a wireless LAN access point. After a wireless LAN connection is established with a computer, the contents of the computer screen can be sent to the projector for projection. The projector supports simultaneous wireless LAN connections with up to four computers. The projection screen can be divided into four parts for simultaneous projection of the screen contents of all four connected computers.
Projector Requirements The projector must meet the following conditions in order to use a wireless LAN connection to project computer screen contents. The wireless adapter that comes with the projector must be installed correctly on the projector. See “Installing and Removing the Wireless Adapter” (page 40) for details. The Wireless Connection 3 software that comes with the projector must be installed on a computer equipped with a wireless LAN function (IEEE 802.11b/g/n).
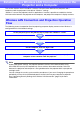
Installing Wireless Connection 3 Minimum System Requirements You need to install Wireless Connection 3 on your computer in order to send computer screen contents to the projector over a wireless connection for projection. Operating System : Microsoft® Windows® 7, Windows Vista® SP2, Windows® XP SP3 Computer : IBM PC/AT or compatible that satisfies the following conditions. Windows® 7, Windows Vista®, or Windows® XP pre-installed CPU: Pentium® M 1.
Installing Wireless Connection 3 1. Place the CD-ROM that comes with the projector into your computer’s CD-ROM drive. This will automatically display the CD-ROM menu screen. 2. On the menu screen, click the [Install] button to the right of “Wireless Connection 3”. Follow the instructions on the dialog boxes that appear on the screen. If you are running Windows 7 and the “User Account Control” message appears while installing, click [Yes].
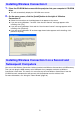
Establishing a Wireless LAN Connection between the Projector and a Computer This section explains how to establish a wireless LAN connection between the projector and a computer under the projectors initial default “Wireless” settings. “Wireless” is one of the projector’s built-in applications. It makes it possible to establish a wireless LAN connection between the projector and a computer, and project the computer’s display contents.
About the Projector’s Wireless Application Wireless is one of the projector’s built-in applications. It makes it possible to establish a wireless LAN connection between the projector and a computer, and project the computer’s display contents. To perform wireless projection Press the [INPUT] key and select “Wireless” as the input source. This will enable wireless projection. The Wireless standby screen will be projected if there is no wireless LAN connection between the projector and a computer.
Wireless Connection 3 Wireless Connection 3 is control software for a computer that connects to the projector via wireless LAN connection. To start up Wireless Connection 3 Perform either of the following operations to start up Wireless Connection 3 on the computer. Double-click the icon on your Windows desktop. On your computer’s Windows Start menu, select [All Programs] - [CASIO] - [Wireless Connection 3].
To display Wireless Connection 3 help On a Wireless Connection 3 window, click the function menu button and then click [Help] on the menu that appears. To display Wireless Connection 3 version information On a Wireless Connection 3 window, click the function menu button and then click [About] on the menu that appears. To close Wireless Connection 3 Perform either of the following operations. On a Wireless Connection 3 window, click the function menu button and then click [Exit] on the menu that appears.
To use a default SSID to connect a computer to the projector via wireless LAN 1. Turn on the projector and wait until the POWER/STANDBY indicator is lit green. 2. Press the [INPUT] key and select “Wireless” as the input source. This will project the Wireless standby screen. 3. Turn on your computer and start up Windows. 4. On the computer, start up Wireless Connection 3.
6. When everything is the way you want, click [OK]. This establishes a wireless LAN connection between the projector and computer, and causes the computer screen contents to be projected from the projector. The following shows the Wireless Connection 3 window that appears on the computer screen. This window is not shown on the image being projected by the projector. Now if you want to configure security settings, refer to “Configuring Security Settings for a Wireless LAN Connection” (page 18).
Wireless LAN Connection when Using Multiple Projectors at the Same Time When using two or more projectors in the same location (same meeting room, etc.), each one is identified by a unique SSID (service set identifier) that lets each computer keep track of which projector it is connected to. The initial default SSID for the projector is casiolpj_default1.
Wireless Connection when the Computer Finds Multiple Projectors If the computer finds more than one projector it can connect to in step 4 of the procedure under “To use a default SSID to connect a computer to the projector via wireless LAN” (page 14), a dialog box like the one shown below will appear on the computer screen. When this happens, check the SSID on the Wireless standby screen being projected by the projector you want to connect to and click the same SSID on the dialog box. Next, click [OK].
Configuring Security Settings for a Wireless LAN Connection Configuring security settings prevents unauthorized access to a computer or projector over the wireless LAN. Settings are configured with the projectors System Admin page, which can be accessed with a computer’s web browser. This section explains only the security settings of System Admin page. For details about other System Admin page operations, see “System Admin Page Operations and Settings” (page 32).
Configuring Security Settings This section explains the procedure for logging in to the projector’s System Admin page from a computer and configuring wireless LAN connection security settings. To log in to the projector’s System Admin page 1. Perform the procedure under “To use a default SSID to connect a computer to the projector via wireless LAN” (page 14) up to step 6 to establish a wireless LAN connection between the projector and computer. 2.
4. Click the [Login] button. This logs in to the System Admin page and displays the Status screen. Note For security reasons, be sure to change the password you use to log in to System Admin page from the default. For more information, see “To change the System Admin login password” (page 32). To log out of the projector’s System Admin page Click “Logout” in the upper right corner of the System Admin page. This returns to the top System Admin screen.
To configure security settings 1. Perform the procedure under “To log in to the projector’s System Admin page” (page 19) to log into System Admin. 2. Click “Setup” to display the System Admin page Setup screen. Changing only the three settings enclosed in the boxes above are required to configure security settings. Do not change the settings of any other items on the screen at this time.
5. Enter the passphrase (or WEP key). The passphrase or WEP key entered in the “Passphrase/WEP Key” text box depends on the security protocol you selected in step 4, as described below. Security WPA-PSK TKIP WPA-PSK AES WPA2-PSK TKIP WPA2-PSK AES Input Character String Enter the WPA-PSK or WPA2-PSK passphrase. Enter at least eight and up to 63 singlebyte characters, or a hexadecimal value up to 64 digits long.
Establishing a Wireless LAN Connection after Configuring Security Settings The procedures in this section start from the point that a single projector is projecting the Wireless standby screen following configuration of security settings. They also assume that the computer was restarted after settings were configured. To establish a wireless LAN connection between the projector and a computer after configuring security settings 1. On the computer, start up Wireless Connection 3.
Note When establishing simultaneous wireless LAN connections between a single projector and multiple computers, use the same procedure as above for the second and subsequent computers. For details about the operation required to project from each computer after it is connected, see “Wireless LAN Connection Operations” (page 25). When a computer finds multiple projectors that can be connected to, a Projector List dialog box appears after the “Connecting” message.
Wireless LAN Connection Operations This section explains operations you can performed after a wireless LAN connection is established between the projector and a computer. Most of these operations are performed using Wireless Connection 3.
Starting and Stopping Projection from a Computer Connected via Wireless LAN Connection Starting 1-screen Projection On the computer from which you want to start 1-screen projection, click the button on the Wireless Connection 3 window. The button will change to and 1-screen projection will start from the computer. Performing this operation while projection is being performed from another computer will cancel the current projection and switch to projection from the computer where the operation was performed.
To project the display contents of four computers simultaneously (4-screen projection) 1. Establish a wireless LAN connection between the projector and the first computer, and then click the button. This will cause the display contents of the first computer to appear in the upper left corner of the 4-screen projection. The button will change to to indicate the projection is in progress in the upper left corner of the screen. 2.
Displaying the User Name on the Projection Screen Pressing the projector’s remote controller’s [f] key displays the applicable computer user name on the projection screen. In the case of 4-screen projection, the name is displayed in the area where the computer screen image is being projected. The user name remains displayed for about five seconds after the key is pressed.
Terminating a Wireless LAN Connection Use Wireless Connection 3 to terminate a wireless LAN connection between the projector and a computer. Click the close button in the upper right corner of the Wireless Connection 3 window. Initializing Wireless Connection 3 Performing the following procedure returns the passphrase/WEP key that is currently recorded on the computer running Wireless Connection 3 to its initial default. To initialize Wireless Connection 3 1.
Configuring Wireless Settings You can use the projector’s setup menu to configure the Wireless function settings described below. Setting Name Description Change SSID Switches the projector’s SSID setting from one of the three default SSIDs to another. Initialize Wireless Setup Returns all Wireless settings to their initial factory defaults. Note More advanced projector wireless LAN connection settings (connection setup, security settings, etc.
To initialize the Wireless setup 1. While the Wireless screen is being projected, press the [MENU] key. 2. Use the [] key to move the highlighting to “Wireless” and then press the [ENTER] key. 3. Use the [] key to move the highlighting to “Initialize Wireless Setup” and then press the [ENTER] key. This will cause a “Initialize the Wireless setup?” confirmation dialog box to appear. 4. Press the [] key to move the highlighting to “Yes” and then press the [ENTER] key.
System Admin Page Operations and Settings While the projector is connected to a computer via wireless LAN, you can use the computer’s web browser to access the projector’s System Admin page. The System Admin page can be used to configure the projector’s wireless LAN connection settings from your computer. System Admin Page Operations Important! To perform the operations presented here, you must be logged in to the projector’s System Admin page from your computer.
3. Enter the new password twice into the “New Password” and the “Reinput Password” input boxes. You can enter up to eight characters as the password. Note that you will need the password you enter here the next time you log in to the System Admin page. Make sure you do not forget the password string you enter. If you keep a written record of the password, take care to ensure that it does not become lost or fall into the wrong hands.
To configure projector network settings and wireless LAN connection settings 1. Establish a wireless LAN connection between the projector and computer, and log in to the projector’s System Admin screen from the projector. 2. Click “Setup” to display the System Admin page Setup screen. 3. Change a setting by entering a value or selecting an option. For information about configuring wireless LAN security settings (SSID, security, passphrase/ WEP key), see “To configure security settings” (page 21).
Initializing All System Admin Page Settings This operation returns all of the settings on the System Admin page to their initial factory defaults. For information about default settings, see “System Admin Page Settings” (page 36). Note The user name and passphrase/WEP key information recorded on the computer by Wireless Connection 3 are not initialized by this procedure. To initialize all System Admin page settings 1.
System Admin Page Settings System Admin > Setup Settings Setting Name IP Setup DHCP Setup Wireless Setup Description IP Address Specifies the projector IP address. Initial Default: 192.168.100.10 Subnet Mask Specifies a subnet mask value, which specifies the IP address range of the subnet to which the projector belongs. Initial Default: 255.255.255.
System Admin > Change Password Setting Name New Password Reinput password Description For input of the new password when logging in to the System Admin page.
Appendix Using the Token Wizard You can use the Wireless Connection 3 token wizard to copy Wireless Connection 3 to USB memory. After you do that, you can run Wireless Connection 3 on a computer that does not have the program installed simply by plugging the USB memory (called a “USB Token”) into the computer’s USB port. Using USB tokens is recommended when connecting to the projector from multiple computers.
1. On a Wireless Connection 3 window, click the function menu button and then click [Token Wizard] on the menu that appears. This displays the token wizard. 2. Click [Next>]. This displays a USB drive selection screen. If there is no USB memory connected to the computer, the message “USB memory could not be detected.” will appear. If this happens, connect the USB memory and wait until its USB memory drive name appears in the “USB Drive” box. 3.
Installing and Removing the Wireless Adapter The projectors come with wireless adapters YW-3 (either built-in or supplied separately). You can install and remove the wireless adapter as required. *Caution Keep the wireless adapter that comes with the projector out of the reach of small children. Accidental swallowing of the product can interfere with proper breathing and create a life-threatening situation. Important! Keep the wireless adapter in a safe place when it is not installed on the projector.
To remove the wireless adapter from the projector 1. Turn off the projector and unplug its power cord from the power outlet. 2. Loosen the two screws that secure the wireless adapter cover, and then pull the top of the cover towards you to remove it. Special YW-3 port Wireless adapter YW-3 1 3. Remove the wireless adapter. Grasp the wireless adapter and move the adapter left as you pull it out. 4. Replace the cover and secure it with the two screws.
Wireless LAN Connection Troubleshooting Check the following points whenever you are having problems with a wireless LAN connection. Wireless LAN Connection between the Projector and a Computer Problem Cause and Required Action [Reconnect] remains on the Wireless Connection 3 window and the computer won’t connect to the projector. If any other wireless LAN utility besides Wireless Connection 3 is running on the computer, close it.
Simultaneous Wireless LAN Connections with Multiple Projectors Problem Wireless Connection 3 is running on my computer, but the Projector List dialog box won’t display. Cause and Required Action Make sure all of the projectors are turned on. A projector can be recognized by a computer even if “Wireless” is not selected as the projector’s input source. Refer to: – Make sure that all of the projectors have wireless adapters installed (page 40).
System Admin Page Problem Cause and Required Action The System Admin page does not appear when I try to access it from Wireless Connection 3. The browser you are using may be configured to use a proxy server. Since a proxy server configuration can make it impossible to access the System Admin page, you should change your browser configuration. For information about proxy server settings, see the help and other user documentation for your browser.
Error Messages Wireless Connection 3 Error Messages Error Message Cause and Required Action Could not connect to projector. Connection has been terminated. The wrong login code was entered when establishing a wireless LAN connection with a projector configured with default settings. Clicking the [OK] button on the error message will return to the login code input dialog box, so enter the correct login code. If you do not know the login code, check the projector’s Wireless standby screen (page 11).
MA0912-A