
Installation Instructions


www.menards.com/castnaturalstone
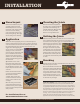
INSTALLATION INSTALLATION
DIRECT TO
MASONRY
INSTALLATION
See installation videos at
www.castnaturalstone.com
Surface
Preparation
3
Stone Layout
Before stone installation, lay out
a quantity near the work area.
Blend multiple boxes to ensure a
proper mix of size, shape, texture
and color of stones allowing
you to arrange the stones in the
most pleasing design. Then apply
stones, mixing colors randomly.
Application
“Butter” the stone by applying an even, 1/2 inch thick layer of
mortar to the back of the stone. Be sure to cover the entire back
of the stone with mortar. Press the stone rmly into place so that
the mortar behind the stone squeezes out on all sides. Use a
wiggle action while applying the
stone to insure a good bond. When
applying to clean, concrete and
masonry surfaces, dampen the wall
prior to installation. This will aid
adhesion to the existing surface.
Adhesion can also be improved by
adding a liquid bonding agent to
the mortar mix.
Tip: Install the corner stones
rst starting at the bottom and
working up. Install the balance of
the wall from the top down. This
helps to keep the stone face clean
of mortar.
Remove mortar from stone face,
as necessary, during installation.
Allow mortar to become
“crumbly”, then remove with
a trowel or brush. Do not allow
mortar on stone surface to dry
overnight.
When necessary, stones can be
cut and shaped with a masonry
hammer, masonry saw or nippers.
Position cut edges away from view
when possible.
Grouting the Joints
After the stone has been applied to
the surface, use a grout back to ll the
joints with mortar. Grout bags are
available at Menards. While grouting,
be sure to cover any noticeable
broken or cut edges with mortar.
Striking the Joints
When the mortar joints become rm, use a wood or metal strike
tool to push the mortar into any cavities or voids creating a seal
around each stone. Any holes, gaps, or voids must be lled in
with mortar to prevent water or pests
from occupying the space. Use a tuck
pointer or similar object to clean
the edges of each stone to prevent
cracking of the grout. Use pressure to
force the mortar into the joints. This
will thoroughly seal the joint edges.
Be careful not to work the joints too
soon. This will cause the mortar joints
to smear.
Brushing
Brush the mortar joints with a small whisk broom to smooth and
clean away any loose mortar.
Do not wash o with clear water. This
will result in a milky residue. Brush o
any mortar spots from the face of the
stone veneer. If desired, use a mild
vinegar and water solution to remove
any remaining mortar spots. Loose
mortar and mortar spots should not
be allowed to dry overnight.
4
6
7
5
*NOTE ABOUT SEALERS: Sealing exterior stone with any type of sealer
type is not recommended. Sealers can trap moisture within the stone,
causing stone damage. However, if you choose to use a sealer, it must be
a high quality “breathable” masonry sealer. Be extremely careful to follow
the manufacturer’s recommended application instructions. Test several
unused pieces before general application - some sealers may alter the
appearance of the masonry. Do not apply in heavier than recommended
coverage – more is not better. Any non-breathable sealer is likely to
damage the stone and voids the warranty. Failing to precisely follow
application instructions for any breathable sealer also voids the warranty.
The Menards all purpose poly tub
makes mixing & clean up easy
®